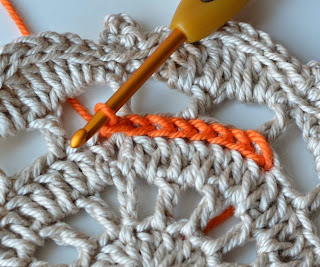
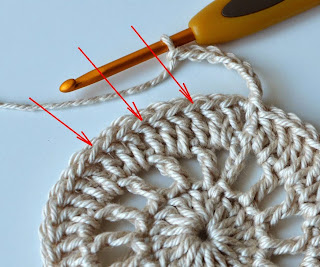
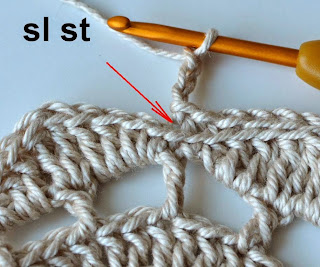
To work surface slip stitches, insert your hook from front to back between two stitches (usually between their posts – vertical parts) on the round where you want to make a decoration, yo, draw up a loop. Then again insert hook from front to back in a spot where you want to make the next slip stitch (usually it is next stitch of the round), yo, draw yarn up. Now you have two loops on hook. Pull second loop through the first one. Repeat for every stitch till the end of the round. Don’t pull the stitches too tight, otherwise it will warp your work!
When you come to the beginning of the round – cut the thread leaving 5 cm (2 inches) tail. Now you should make a needle join so that your joining section is invisible and imitates the “normal” chain slip stitch. I use a hook instead of a needle as it saves lots of time!
To make a “needle join”, insert the hook under both loops of the first slip stitch of the decorative round, yo, pull yarn under the loops. Then insert the hook from back to front (through the crocheted piece) inside the last slip stitch of the round, yo, and pull a yarn tail to the wrong side. Fasten both yarn tails with a knot and weave them in. Please, also check how you can use a needle join technique to invisibly join rounds in crochet and weave yarn tails "as you go".
Copyright LillaBjornCrochet 2015. All rights reserved. This pattern is for unlimited personal use only. Do not reproduce or sell the pattern. The pattern may not be copied in any way (print or digitally), in part or in full. Items may be sold that are made from this pattern as long as the designer is credited. Shop owners, if you wish to make a kit with yarn using this pattern, please request permission and copyright details from me before offering any kits for sale. Please, read Copyright page for more information.
Free coaster pattern
And now its time to share a present which I promised to give you in my previous post telling about the cotton line of Circulo yarns from Brazil. I designed a simple cotton coaster and here is its free pattern. It is very easy and I believe those of you who just begin their adventure in the exciting and wonderful world of crochet – will easily handle it!What you will need
To make this coaster you will need a little bit of yarn. I prefer pure cotton yarns to crochet coasters and potholders as they don’t “melt” and are suitable for holding cups and glasses with very hot drinks. Additionally, cotton has a very high absorber quality and is perfect for such kitchen accessories.
I used Sport yarn Duna from Circulo to make my coasters. I chose natural color and decorated it with bright orange. But you can of course use any weight of yarn. Along with a chosen hook it will influence the size of your finished coaster. I used 3.25 mm (D) crochet hook and my coaster is approx. 12.5 cm (5 inches) large across. And it perfectly suits my cups.
The gauge is not very important for this pattern, but your coaster should stay flat!
Abbreviations
American Standard Abbreviations are used in this pattern.
rnd - round
st(s) - stitch(es)
sl st - slip stitch
ch - chain
sc - single crochet
hdc - half double crochet
dc - double crochet
tr - treble crochet
sp(s) - space(s)
** - *crochet following directions* as many times as indicated
Instructions
Rnd 1. Make a magic ring, ch3 (which will count as a 1st dc of the round) and 15 dc inside a ring. Finish with a sl st in a ch3-space in the beginning of the round. (= 16 dc)
Rnd 2. *1 dc, ch2* 16 times. The first dc of this round will be ch3 (so you will make ch5 in the beginning of the rnd). Finish the round with a sl st in 3rd ch in the beginning of the round. (= 16 dc + 16 ch2-sps)
Rnd 3. *1 dc in dc of the previous rnd, 2 dc in next ch2-sp* 16 times. The first dc of this round will be ch3. Finish the round with a sl st in 3rd ch in the beginning of the round. (= 48 dc)
Rnd 4. *1 dc, ch4* 16 times. Dc’s of this round should be made directly above dc’s of rnd 2. The first dc of this round will be ch3 (so you will make ch7 in the beginning of the rnd). Finish the round with a sl st in 3rd ch in the beginning of the round. (= 16 dc + 16 ch4-sps)
Rnd 5. *1 sl st in dc of rnd 4, (1 sc, 1 hdc, 2 dc) in next ch4-sp, 2 tr in next dc, (2 dc, 1 hdc, 1 sc) in next ch4-sp* 8 times. The first sl st of this rnd will be ch1. Finish the round with a sl st in the 1st sl st of the rnd. (= six “petals”)
Rnd 6. Work this rnd in back loops only. *10 sl sts around the petal, (1 sl st, ch3, 1 sl st) in next sl st of rnd 5* 8 times. (= 80 sl sts + 8 “dots” made of ch3-sps) To add an accent you can choose another color for this rnd.
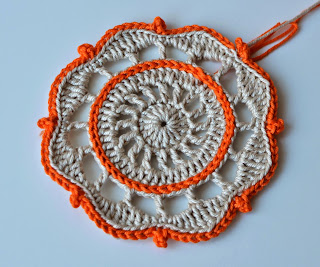
Congratulations! Your cotton coaster is finished now. Decorate it with surface crochet as described above. You can take the yarns of different colors to make decoration on each coaster from your set. Rainbow colors maybe?
I hope you enjoyed this pattern!
Remember to subscribe to a weekly newsletter not to miss a single pattern and tutorial. And you can also follow me on Facebook, Pinterest and Instagram.


Thank you! Beautiful job!
ReplyDelete