Showing posts with label yarn. Show all posts
Showing posts with label yarn. Show all posts
“Hi there! My name is Lisa. And I’m a new baby in Tatsiana’s modest amigurumi family. I have an elder sister and her name is also Lisa. We are friendly and very curious. We like to dance, to play all day long, and travel! Travelling is our passion. We would love to come to your country and make new friends!”
 Mandala crochet art is something I love to do most of all. But sometimes it’s nice to have a break and to switch to something else. Home décor is my main specialization, but you may have noticed that there are also several toys patterns available in my Etsy and Ravelry shops. They are: Magnus Bear, Rikki the Bear, Dancing Owl, Dolly the Sheep and Sunny the Bunny.

Since long ago I have wanted to create a Mouse pattern to add to my collection. So when I was contacted by Crochet Now magazine last year, I thought that might be a good challenge to take. Lisa the Mouse was designed especially for a magazine and now it’s also available as a stand-alone pattern in my Ravelry shop HERE.
Add this pattern to your Ravelry Queue!

Lisa the Mouse was born during vacations in the Netherlands, and maybe this fact explains her passion for travelling. We spent long hours in a café on a beach, enjoying the music of waves, calm and warm wind and fresh cold drinks. I knew I wanted to create a girl Mouse, in a dress, with big ears. And surprisingly Lisa turned out exactly as I was imagining her.

A colorful stitch pattern was requested by a magazine and I chose Spike crochet stitch for her dress. Small groups of spike stitches and changing yarn on every 3rd row gave her dress a nice “wavy” effect and a little bit of texture. When I look at Lisa’s dress I come back to calm and sunny afternoon on the beach.
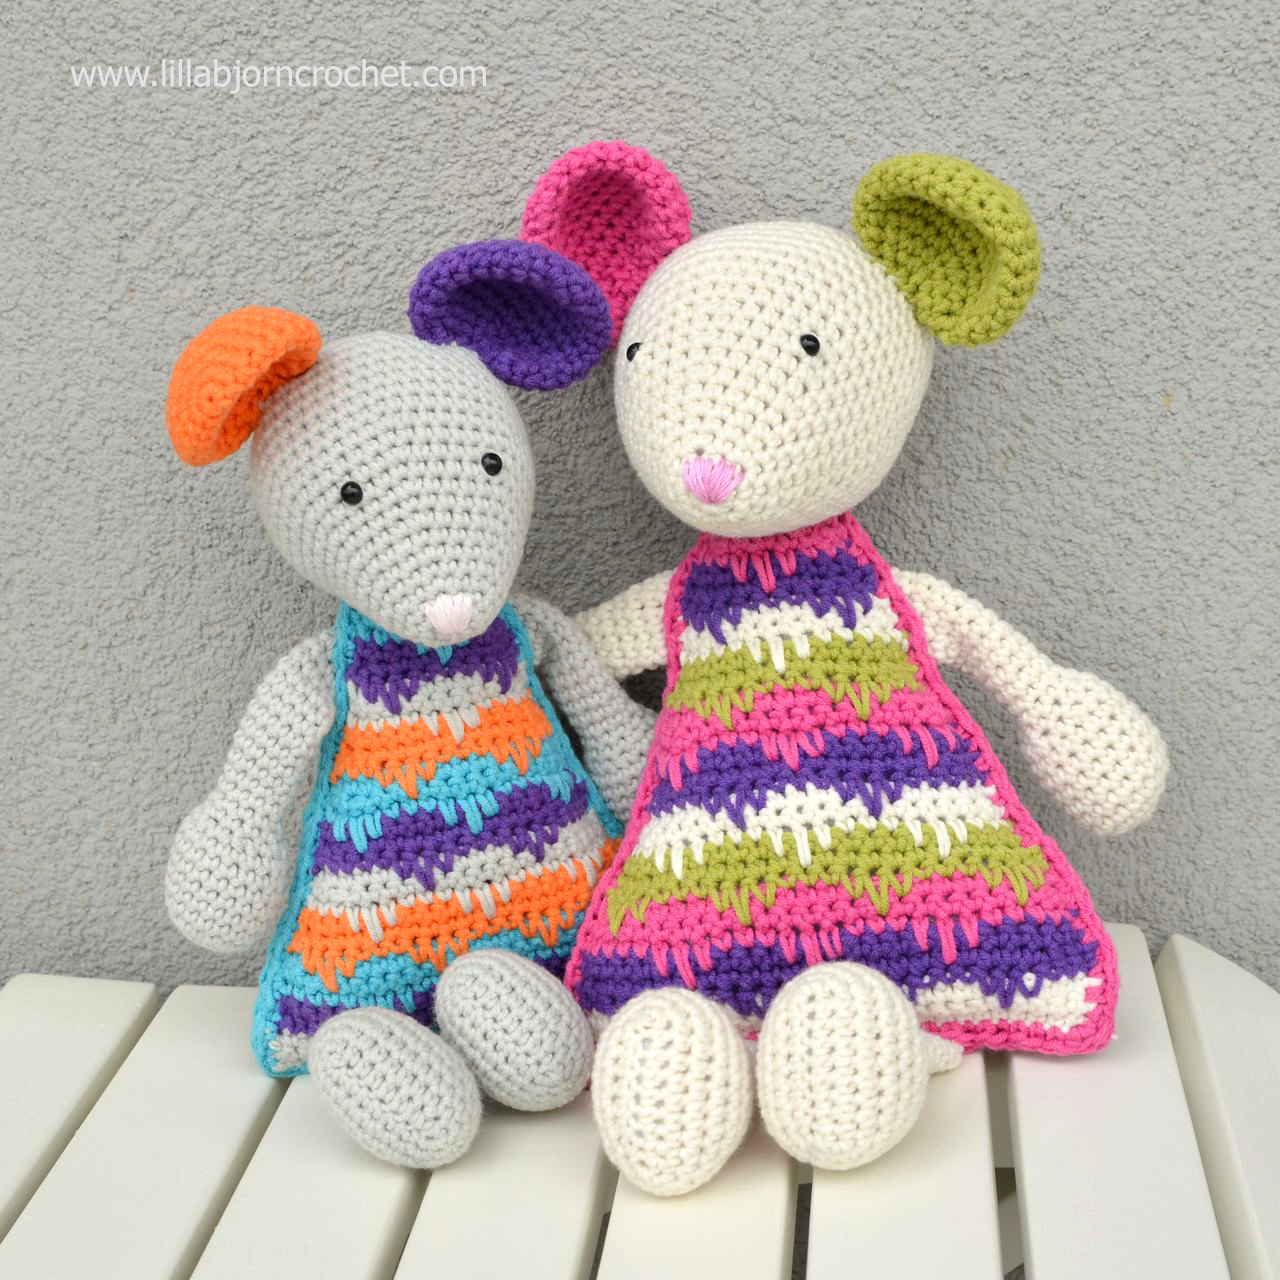
Soft Fun yarn by Scheepjes* was used for both toys, and I am pretty satisfied how it work for my new amigurumi pattern. It’s not so soft, I would say it has a certain stiffness. And when stuffed the toy keeps its shape very well.
You can take either 3.75mm or 4mm (G) crochet hook (I prefer Amour Clover hooks*), or any other size which allows you to obtain desired gauge. Gauge itself is not critical for this pattern, but I would recommend crocheting tightly so that stuffing is not seen through the stitches.

I used 5mm plastic safety eyes*, but if you intend to give a toy to a small baby, please note, that safety eyes can be dangerous, as they may fall out. Please, embroider the eyes instead.
As the majority of amigurumi crochet patterns Lisa the Mouse is aimed to Intermediate crocheters. But in practice Advanced beginners can also handle it without problems. No tricky stitches are used in the pattern. You will find full written instructions and a photo-tutorial in the end of the pattern showing how to make each detail and how to put the toy together.

Looking forward to see more Lisa’s!! If you would like to share pictures on social media, please, use the tag #LisaTheMouse so that I could find them and admire. I will be also happy to see your pictures in my Ravelry group HERE.
*****************************************************************
Facts about Lisa the Mouse pattern:
* DISCLOSURE: This blog contains affiliate links (marked with *). By using them you support my blog. Thank you!


Since long ago I have wanted to create a Mouse pattern to add to my collection. So when I was contacted by Crochet Now magazine last year, I thought that might be a good challenge to take. Lisa the Mouse was designed especially for a magazine and now it’s also available as a stand-alone pattern in my Ravelry shop HERE.
Add this pattern to your Ravelry Queue!

Lisa the Mouse was born during vacations in the Netherlands, and maybe this fact explains her passion for travelling. We spent long hours in a café on a beach, enjoying the music of waves, calm and warm wind and fresh cold drinks. I knew I wanted to create a girl Mouse, in a dress, with big ears. And surprisingly Lisa turned out exactly as I was imagining her.

A colorful stitch pattern was requested by a magazine and I chose Spike crochet stitch for her dress. Small groups of spike stitches and changing yarn on every 3rd row gave her dress a nice “wavy” effect and a little bit of texture. When I look at Lisa’s dress I come back to calm and sunny afternoon on the beach.

Soft Fun yarn by Scheepjes* was used for both toys, and I am pretty satisfied how it work for my new amigurumi pattern. It’s not so soft, I would say it has a certain stiffness. And when stuffed the toy keeps its shape very well.
You can take either 3.75mm or 4mm (G) crochet hook (I prefer Amour Clover hooks*), or any other size which allows you to obtain desired gauge. Gauge itself is not critical for this pattern, but I would recommend crocheting tightly so that stuffing is not seen through the stitches.

I used 5mm plastic safety eyes*, but if you intend to give a toy to a small baby, please note, that safety eyes can be dangerous, as they may fall out. Please, embroider the eyes instead.
As the majority of amigurumi crochet patterns Lisa the Mouse is aimed to Intermediate crocheters. But in practice Advanced beginners can also handle it without problems. No tricky stitches are used in the pattern. You will find full written instructions and a photo-tutorial in the end of the pattern showing how to make each detail and how to put the toy together.

Looking forward to see more Lisa’s!! If you would like to share pictures on social media, please, use the tag #LisaTheMouse so that I could find them and admire. I will be also happy to see your pictures in my Ravelry group HERE.
*****************************************************************
Facts about Lisa the Mouse pattern:
- Level: Intermediate (or Advanced Beginner)
- Materials: DK yarn in 4 colours (Soft Fun by Scheepjes), 3.75mm or 4mm (G) Amour Clover crochet hook*, 5mm safety eyes*, stitch markers, scissors, tapestry needle to weave in ends and assemble toy.
- Size: The size of the finished toy depends on the yarn and hook you use. My Lisa the Mouse is approx. 30 cm (12 inches) tall.
- Language: English
- Instructions: US crochet terms and abbreviations (including complete stitch guide), written instructions, step-by-step pictures showing how to make each detail and put the toy together.
- Lisa the Mouse pattern is available in my Ravelry store HERE.
- Add this pattern to your Ravelry Queue
* DISCLOSURE: This blog contains affiliate links (marked with *). By using them you support my blog. Thank you!
I missed autumn this year. My favourite season. And I can’t believe it… Every autumn we used to walk with my dog through the woods, smelling wet air and looking at the colorful happiness around. And this year everything was too fast. I was too busy with designing and preparations for a move to a new apartment. And when I could finally breathe again – autumn was gone… But I got a lucky chance to see its last traces in Holland where I met with my blogger friends – a creative team collaborating with Scheepjes company.

Last weekend felt like a fairy tale. Holland is getting prepared for Christmas and looks festive with all cute and stylish decorations and evening lights everywhere. We were driving in the dark from Almere to up North together with Nerissa, Dedri and Sarah. We were looking at cute small houses in the suburbs of Groningen. And the scenery was filled up with magic.
And next morning I saw my autumn. With small drops of water on grass quivering in the morning sun, with brown and wet leaves covered by fog, with fresh and moist air I missed so much. I was home…

What are Scheepjes Bloggers Days about? They are all about yarn and crochet. I usually spend all my days at home. I don’t go to public places very often as I am pretty happy with my small crochet world. I don’t normally crochet in public. And I was amazed to see the reaction of people when I started to crochet at Schiphol airport (where I had 3 hours to wait for Sarah’s and Dedri’s flight). People looked very interested. Some of them commented: “oh, that’s pretty” or “oh, you are so fast”. But many of them were smiling. Just looking and smiling! And I felt like crochet makes people happy. And maybe a world stuffed with technologies and mobile phones, and internet – a little bit better.
And I thought – we, crafters, should bring our crafts to public more often. And I am not talking about craft fairs or yarn shows… Maybe we should even think or a world’s flash mob - just pick exact time and go crochet to streets, cafes, everywhere. It would be nice to see people smiling. Let’s the whole world stop for 15 minutes, step away from internet, and just smile. We crocheted a lot during Scheepjes Bloggers days, or we were talking about crochet and yarns. And it felt very natural and comfortable.
Scheepjes Bloggers Days are about meeting friends, hugs and laughter; they are about learning, sharing creativity, inspiration, experience, ideas. This time Scheepjes invited Kate from A Playful Day to give a photography workshop. I am trying to grow my photography skills but very often it feels like my pictures are not telling the story themselves. It was so nice to meet Kate and hear lots of useful advice. And I have finally found a common language with my phone. I could even make a few shots with it. What do you think? :) (Many thanks to Dedri from Look At What I Made for capturing my creative process and struggles!)
Here are my Celtic Mandala chair pads...

…And detail of my Autumn Winds Cowl.

Scheepjes Bloggers Days are about playing with colors...
...and birth of new projects.
For me personally Scheepjes Bloggers Days are about dreams coming true. I have met Susan from Felted Button for real! Three years ago when I was not even thinking about designing, I found her Etsy shop and was staring for hours at colors and textures. I wished I could be able to come up with something like this myself one day… And after three years I meet her, and talk to her!
Scheepjes Bloggers Days are about finding way back to yourself. After several months of instant stress and fear not to be in time, I have finally breathed out. Two days of “my own autumn” in Holland helped me to discover peace and creativity again… I’ve got LOTS of ideas! And I feel strong again to bring them to life…
Subscribe to a newsletter not to miss a single post. You can also follow me on Facebook, Pinterest and Instagram.

Last weekend felt like a fairy tale. Holland is getting prepared for Christmas and looks festive with all cute and stylish decorations and evening lights everywhere. We were driving in the dark from Almere to up North together with Nerissa, Dedri and Sarah. We were looking at cute small houses in the suburbs of Groningen. And the scenery was filled up with magic.
And next morning I saw my autumn. With small drops of water on grass quivering in the morning sun, with brown and wet leaves covered by fog, with fresh and moist air I missed so much. I was home…

What are Scheepjes Bloggers Days about? They are all about yarn and crochet. I usually spend all my days at home. I don’t go to public places very often as I am pretty happy with my small crochet world. I don’t normally crochet in public. And I was amazed to see the reaction of people when I started to crochet at Schiphol airport (where I had 3 hours to wait for Sarah’s and Dedri’s flight). People looked very interested. Some of them commented: “oh, that’s pretty” or “oh, you are so fast”. But many of them were smiling. Just looking and smiling! And I felt like crochet makes people happy. And maybe a world stuffed with technologies and mobile phones, and internet – a little bit better.
And I thought – we, crafters, should bring our crafts to public more often. And I am not talking about craft fairs or yarn shows… Maybe we should even think or a world’s flash mob - just pick exact time and go crochet to streets, cafes, everywhere. It would be nice to see people smiling. Let’s the whole world stop for 15 minutes, step away from internet, and just smile. We crocheted a lot during Scheepjes Bloggers days, or we were talking about crochet and yarns. And it felt very natural and comfortable.
 |
| credit: Simy Somer |
 |
| credit: Look At What I Made |
Here are my Celtic Mandala chair pads...

…And detail of my Autumn Winds Cowl.

Scheepjes Bloggers Days are about playing with colors...
 |
| Jellina and Atty |
...and birth of new projects.
 |
| Sarah and Nerissa |
For me personally Scheepjes Bloggers Days are about dreams coming true. I have met Susan from Felted Button for real! Three years ago when I was not even thinking about designing, I found her Etsy shop and was staring for hours at colors and textures. I wished I could be able to come up with something like this myself one day… And after three years I meet her, and talk to her!
 |
| Susan |
Scheepjes Bloggers Days are about finding way back to yourself. After several months of instant stress and fear not to be in time, I have finally breathed out. Two days of “my own autumn” in Holland helped me to discover peace and creativity again… I’ve got LOTS of ideas! And I feel strong again to bring them to life…
 |
| On the way back to Almere |
Subscribe to a newsletter not to miss a single post. You can also follow me on Facebook, Pinterest and Instagram.
To tell I am excited is to tell nothing today. Yesterday I got a mail from the Netherlands which I was patiently waiting for a month already. And when I finally got it and opened it, I jumped up to the ceiling, and then screamed loudly, and then made a happy dance. The first issue of “Yarn” book-a-zine was here. And I could finally touch it. And smell it. And read it.

While writing reviews I usually try to get rid of emotions and to be as objective as possible. But today, I am afraid, there is no way for me to be objective, as my dream came true and my designs were published for the first time! And in such a beautiful edition.
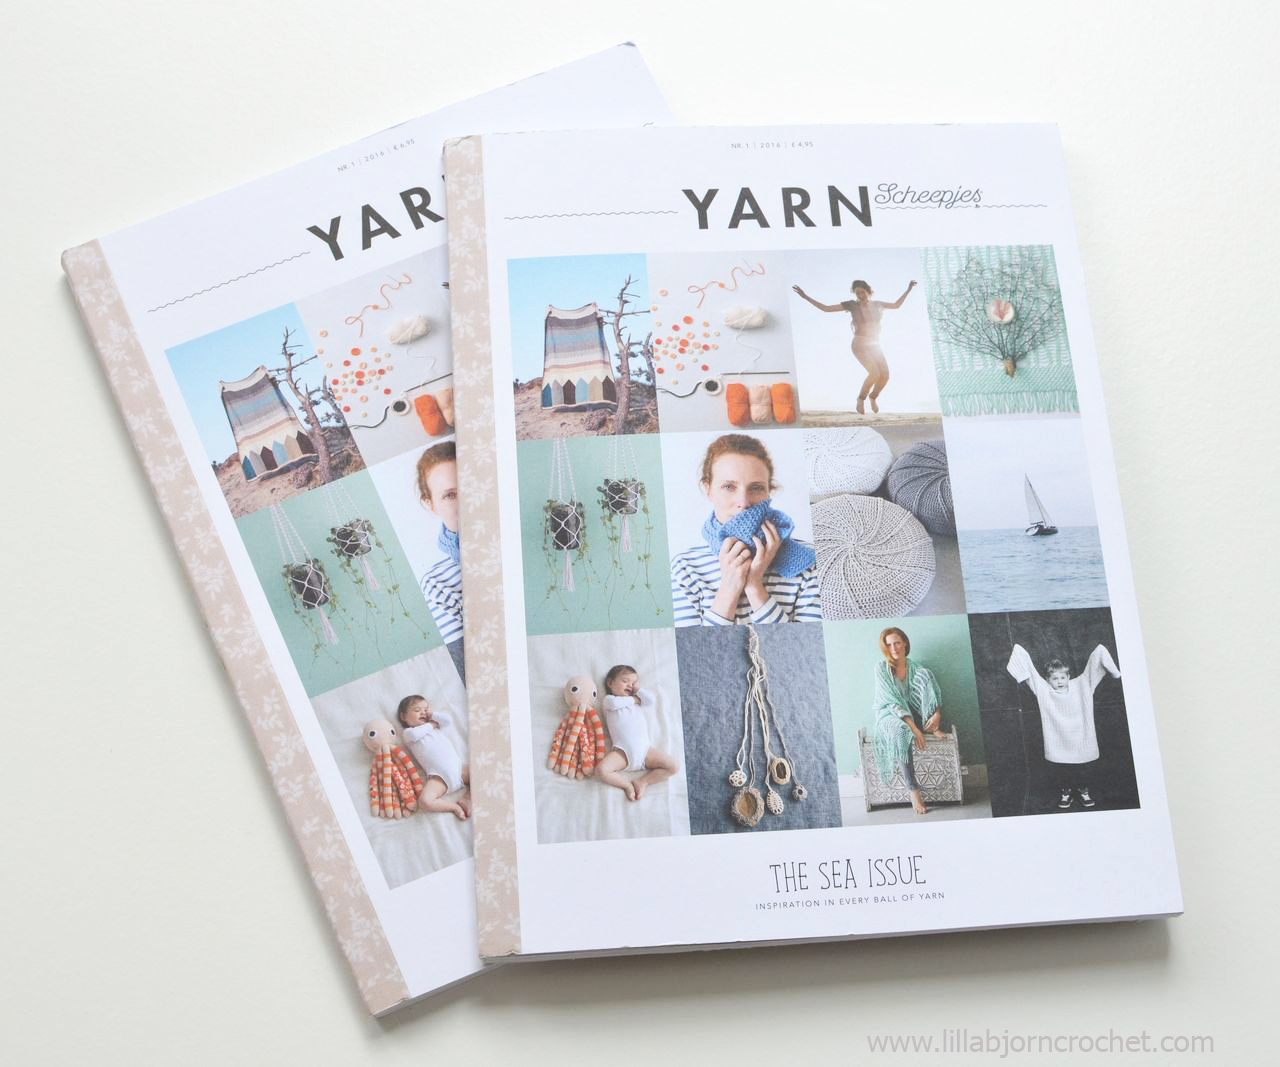
“Yarn” book-a-zine is published by Scheepjes and all designs use their yarns. The first issue was inspired by the sea (and it is actually called “The Sea Issue”) with everything related to this topic. So if you are as much in love with the sea as I am, this book-a-zine is right for you.
There are 13 crochet, knitting and even macramé patterns collected together, along with interesting articles about how to choose cotton yarn, Scheepjes story and inspiring insights into designer’s work and creative process.
Honestly, I enjoyed every single page, and not because two of my designs are featured (and my knitted top is on both front and back covers, yay!!). But I enjoyed the whole concept and quality of this edition. Every detail was taken into consideration, the photography is amazing and the whole issue is “tied” with one and the same color scheme.

Here are a few interesting facts about “Yarn”:

Two my designs are featured in the first issue – an airy and light Striped Top made with Rhythm Alpaca and Mohair yarns. It is a variation of my first ever knitted Blue Feather Sweater. By the way there is a ready kit with all yarns and beads available for purchase at Paradise Fibers* (US). And Stepping Stones (made with Mini Noodle* T-shirt yarn) which are actually the covers for ready poufs. For example they perfectly suit ALSEDA poufs from IKEA.

And I have my own favourites. For example this summer sweater with open back desinged by Annelies Baes from Vicarno! I definitely need it in my own life (and I still hope we will find an opportunity to go to the sea this summer...).

I don’t really know what else I can say about this wonderful publication. You better grab your own copy and read it yourself :) Book-a-zine “Yarn” is available for purchase HERE on Wool Warehouse* (international shipping), HERE at Paradise Fibers* (US) and in local Scheepjes shops. Enjoy!!
You can subscribe to weekly newsletter not to miss a single post. You can also follow me on Facebook, Pinterest and Instagram.
*This blog post contains affiliate links. Thanks for your support!

While writing reviews I usually try to get rid of emotions and to be as objective as possible. But today, I am afraid, there is no way for me to be objective, as my dream came true and my designs were published for the first time! And in such a beautiful edition.

“Yarn” book-a-zine is published by Scheepjes and all designs use their yarns. The first issue was inspired by the sea (and it is actually called “The Sea Issue”) with everything related to this topic. So if you are as much in love with the sea as I am, this book-a-zine is right for you.
There are 13 crochet, knitting and even macramé patterns collected together, along with interesting articles about how to choose cotton yarn, Scheepjes story and inspiring insights into designer’s work and creative process.
Honestly, I enjoyed every single page, and not because two of my designs are featured (and my knitted top is on both front and back covers, yay!!). But I enjoyed the whole concept and quality of this edition. Every detail was taken into consideration, the photography is amazing and the whole issue is “tied” with one and the same color scheme.

Here are a few interesting facts about “Yarn”:
- “Yarn” has the size of a computer tablet and perfectly fits the handbag. And in fact it looks and feels more like a book (with 74 pages), than a magazine. Though at the magazine’s price – €6.95/ £4.95.
- Both copies in English and Dutch are available.
- It is published on a thick matte paper. The pages are not glued, but stitched and it allows the book-a-zine to lay almost flat.
- There are several blank pages for you to make notes or even use them as inspiration boards.
- At the back you will find a very practical flap with all the abbreviations used in the patterns. So every time you knit or crochet something, you have all abbreviations in one place. And there are also punched holes for your yarn samples.

Two my designs are featured in the first issue – an airy and light Striped Top made with Rhythm Alpaca and Mohair yarns. It is a variation of my first ever knitted Blue Feather Sweater. By the way there is a ready kit with all yarns and beads available for purchase at Paradise Fibers* (US). And Stepping Stones (made with Mini Noodle* T-shirt yarn) which are actually the covers for ready poufs. For example they perfectly suit ALSEDA poufs from IKEA.

And I have my own favourites. For example this summer sweater with open back desinged by Annelies Baes from Vicarno! I definitely need it in my own life (and I still hope we will find an opportunity to go to the sea this summer...).

I don’t really know what else I can say about this wonderful publication. You better grab your own copy and read it yourself :) Book-a-zine “Yarn” is available for purchase HERE on Wool Warehouse* (international shipping), HERE at Paradise Fibers* (US) and in local Scheepjes shops. Enjoy!!
You can subscribe to weekly newsletter not to miss a single post. You can also follow me on Facebook, Pinterest and Instagram.
*This blog post contains affiliate links. Thanks for your support!
Stone Washed* is probably the most famous yarn produced by Scheepjes. Well, I can be mistaken of course but the first association that comes to my head when I hear brand name Scheepjes is exactly Stone Washed. First time I saw and touched it last summer. Being on a holiday trip to Belgium and walking through Gent I came across a local yarn shop with lots of Scheepjes yarns. Did I like Stone Washed from the first glance? Yes I did! And a few months later I got a lucky chance to try it.
 I was shipped several skeins of Stone Washed yarn for my new project (a free pattern will be soon published here) and since I’ve created a column with reviews on my blog, I decided to share my own opinion about this yarn as well.
 My first impression about Stone Washed is that it is very warm. Warm and soft. It is cotton blend (70% cotton, 30% acrylic) and thus ideal choice if you suffer from allergy (animal hair) or if you are vegan. This Sport weight yarn comes in balls of 50g/1.76 ounces with 130m/142 yards each. For me these yardages are ideal to calculate more or less exact amount of yarn needed for each project. Needles and crochet hook 3-3.5 mm (D, E) are recommended by the producer, but it is also possible to go for 4 mm (G) hook to obtain more open effect.
 Scheepjes made a great job with construction of this yarn. And its look exactly reflects the name of the line: the shades look very rich but at the same “washed out”. This yarn consists of several thin threads of white color twisted together with a little bit of colorful fluffiness. And this fluffiness is the reason why the projects made with Stone Washed yarn are very difficult to rip. So, please, keep it in mind and better make several gauge swatches before you start to create a large project.
 As was mentioned above, Stone Washed is a soft yarn. But it is stiff and strong at the same time. I cannot imagine this yarn can be torn! And this is actually a big magic. Because being very strong and stiff in a way, this yarn is crocheted and knitted in a very soft and pleasant to touch fabric.
 Each shade is named after the natural stone (Blue Apatite, Canada Jade, Moon Stone, Smokey Quartz, Amazonite…) and there are 23 shades available at the moment. I would personally prefer many more shades to choose from, so hopefully Scheepjes will think about development of this precious yarn line in the future.
 The colors are not very contrasting and form mostly a very calm pastel palette with several bright accents. At first I was a bit afraid to choose this yarn for my project in overlay crochet technique, and in fact it took me a while before I came up with a nice color combination. But it worked out. So I am safe to say that Stone Washed can work equally well for monochrome designs and also for the projects with multiple color changes.
 As many other Scheepjes yarns, each skein of Stone Washed has a small magic label “Easy Start” marking the yarn tail hidden inside the ball.
 And here is a good news for those of you who love to wear handmade garments but are not very fond of hand washing them separately. Stone Washed yarn is machine washable at 40 degrees (though I would probably still wash them by hand and in cool water).
If you like to work with cotton blend you should definitely give this yarn a try. Stone Washed yarn is available in your local Scheepjes stores as well as via larger online retailers, such as Wool Warehouse* and Black Sheep Wools* (both in UK but with international shipping), Caro’s Atelier* (NL and Europe), Knotty House* (Canada) and Loveknitting* (US).
Don't forget to subscribe to Weekly Newsletter not to miss a single post. And you can also follow me on Facebook, Pinterest and Instagram.
*This blog post contains affiliate links. Thanks for your support!


If you like to work with cotton blend you should definitely give this yarn a try. Stone Washed yarn is available in your local Scheepjes stores as well as via larger online retailers, such as Wool Warehouse* and Black Sheep Wools* (both in UK but with international shipping), Caro’s Atelier* (NL and Europe), Knotty House* (Canada) and Loveknitting* (US).
Don't forget to subscribe to Weekly Newsletter not to miss a single post. And you can also follow me on Facebook, Pinterest and Instagram.
*This blog post contains affiliate links. Thanks for your support!
My craft life has filled up with different experiments recently. It all started two years ago when I suddenly came across overlay and tapestry crochet. I started to experiment with different stitches, colors and shapes. And I’ve also started to work with different fibres. Alpaca and mohair* are among them. Well, of course I did crochet with alpaca before (not so many times as this yarn is not the cheapest) and I even tried mohair once. But my projects were very rare.

As you probably know, I am a member of Scheepjes bloggers group and sometimes I get samples of newly released yarn for my crochet projects. There was a new luxury Rhythm line launched in November - consisting of alpaca and mohair in identical colors. And as a proud member of the group I also got a box full of fluffy, silky yarn - to have a look and to test.
My first impression was – wow! I LOVE it! It you are fan of mohair and alpaca, you will understand me. I felt like I want to dive into the box and stay there forever. This yarn is so soft and silky, and it is not scratchy at all.

Brief Information about Alpaca Rhythm and Mohair Rhythm:
- Both Alpaca Rhythm and Mohair Rhythm come in balls 25g / 200m. They are classified as Laceweight and have an Easy Start center pull-tab.
- Fiber Content: Alpaca Rhythm (80% Alpaca, 20% Extra Fine Wool), Mohair Rhythm (70% Mohair, 30% Microfiber)
- Recommended needle/hook size: 2-2.5mm. But this is not a limitation, of course. You can choose bigger size of needles and hook to obtain an open, transparent effect. You can also use both yarns one- or double stranded (or even combine alpaca and mohair together) for a more dense fabric. The possibilities are endless.
- Both yarns can be used for knitting and crochet. Finished projects should be wet blocked by pinning to size and spraying with room temperature water and allowed to dry completely and naturally before unpinning.
- Care Instructions: Hand wash at 30*C and dry flat; lightly iron with a cool iron.
- Alpaca Rhythm and Mohair Rhythm are both available in 20 identical rich and vivid colours (so far). And each colour is named after a different dance form. :)
- Both Alpaca Rhythm and Mohair Rhythm are available for purchase at Scheepjes (NL), Deramores* and WoolWarehouse*(international shipping), or at Paradise Fibers* (US).

And here are my own experience with both Alpaca Rhythm and Mohair Rhythm.
When I first saw it, I became very strong in my wish to create something beautiful. I got one ball of each color and made this selection for a future project.

I searched internet for inspiration and decided to make a crocheted shawl with granny squares. What I would recommend is to always make a gauge swatch before you start working on a project. Both Alpaca and Mohair can be worked with different sizes of needles as hooks, as was mentioned above. And everything depends on the effect you would like to get. It took me some time to adjust the gauge, I changed several hooks… and suddenly thought I really want a knitted project instead of a crocheted. So I ripped everything (and ripping mohair – is a pain, so please, keep it in mind) and started over again.
So far I will not tell you what I am busy with, let’s keep a bit of mystery ;-) but I can show you a small sneak peek. I wanted to get a structured fabric with alternation of dense and transparent, “airy” parts. So I worked with 2 strands of alpaca and then 1 strand of mohair. The effect is great! I like it.

Though both yarns are coming in small balls, the yardage is very good. So a couple of balls should be enough for a big project. My fabric weights almost nothing, it is light like a feather. It is so wonderfully fluffy and it already feels like it will be very warm!
Who knows, maybe I should join the fan club of mohair and alpaca lovers?..

***
Being a journalist in my past life, I felt that I need to make a small research to find all the facts about mohair and alpaca and to understand this fibre better.
Did you know that the history of mohair and angora goats is an ancient one? It is said that they are one of the most ancient fiber sources known to man. Unbelievable: Biblical references to goat hair date to approximately 3,500 years.
Alpaca is a specialty fiber which is “stronger than mohair, finer than cashmere, smoother than silk, softer than cotton, warmer than goose down, and better-breathing than thermal knits. Along with that, alpacas themselves possess some pretty remarkable personality traits”. There are some interesting facts about alpaca that you probably didn’t know and would like to check.

Mohair is firm and resistant to dust and moisture. Being so thin it is very warm at the same time and holds the shape very well. Mohair is a silky fiber and (compared to wool) it does not have the proliferation microscopic scales and is therefore much less scratchy irritant. In fact mohair very closely approximates human hair on the surface, being very smooth. Both durable and resilient, mohair is known for its high luster and sheen. And thanks to that it got the nickname the “Diamond Fiber”.
Today mohair and alpaca are widely used for clothing, blankets, scarves and fiber crafts.
***
I will show you more sneak peeks of my new project in next posts, so, please, stay tuned not to miss anything!
UPDATE: My Blue Feather sweater is finished and you can find a tutorial HERE.
Don't forget to subscribe to Weekly Newsletter not to miss a single post. And you can also follow me on Facebook, Pinterest and Instagram.
*affiliate link
As you probably know I have been busy with creating photo-frames of wooden embroidery hoops recently. Last week 3 free patterns were released (you can find them HERE) and yesterday I finally finished the frames and wrote down a tutorial on how to attach pictures to the embroidery hoops. I hope you will like it!

Copyright LillaBjornCrochet 2014-2015. All rights reserved. This tutorial is for unlimited personal use only. Do not reproduce or sell it. The tutorial may not be copied in any way (print or digitally), in part or in full. Please, read Copyright page for more information.
I saw many wonderful crochet borders around embroidery hoops in the internet and was very strong in my wish to design something myself. At the very beginning I was thinking about photo frames, but when the designs were finished I thought they can be very cute hanging wall decorations themselves. And if made around smaller rings - they can become wonderful bracelets as well! But as far as I promised photo frames to you, I decided to fulfill this idea, too.
I had no experience with crochet around embroidery hoops before and I had no idea how I can attach pictures to them. So I asked my followers on Facebook for the tips, and got several wonderful ideas! Thank you very much for help!! Here are three of them:
- “Use mat board and long tacks to secure it to the hoop. That way you can take it apart later. I would get a piece of acetate to use as the "glass" to keep dust off the photo”. (Cathy Bullington)
- “You could print the picture on fabric and put it in the way you usually do embroidery. It would also allow you to add other embellishments like beads or sequins to the picture itself”. (Teresa Meckley)
- “Cut out a circle of felt slightly larger than the opening, mount your picture on the felt and then sew the felt onto the back of these beauties”. (Deborah O'Keefe Bryant)
I like all three ideas very much but in my opinion the last one is just genius! I decided to try it but instead of sewing felt onto the frame, I just used a second part of the hoop to fasten the felt.
So here is what I did.
First you will need to cut your picture to fit the opening of the frame (see pictures below). I suggest that you train with a piece of hard paper first to make a template of an ideal size to fit your frame. Place the ring with crochet border on the paper and draw a circle with pencil along the opening. Cut the circle 3-5 mm larger than the opening of the frame. Later you will try to insert it into your finished frame and maybe you will need to cut a little bit more to make a circle smaller. Once you are satisfied with the size and your circle fits the frame perfectly, you can use this template to cut your pictures.

To make a frame (see pictures below) place a piece of felt over the wrong side of the hoop with crochet border (you can use any fabric instead of felt, but disadvantage is that you will need to secure the cut edge in some way), put second ring of the hoop with fastener over it, press it a bit so that both rings fit well and tight the fastener. Now you can cut the felt around the hoop. And… your frame is ready! Isn’t it simple??

Now simply insert your cut picture into the frame, that’s it!

When I was working on this tutorial I suddenly thought about embroidery! Well, I am using embroidery hoops to make the borders, so why not to make an embroidery to frame it with this hoop? :) I used to make lots of cross stitch embroideries before. But I am not a professional embroider so, please, don’t judge my work too strictly. You may be shocked by the look of the wrong side of my embroidery… Well, what I can say in my defense. I can weave in ends in crochet but I am very- very bad in this when it comes to embroidery. :)

I made a small and simple embroidery of a Christmas tree on a linen canvas of natural color (to match the border which was crocheted with Linen Soft* yarn by Scheepjes) and attached it to the hoop in the same way as I attached the felt to a photo-frame. The only difference is that after cutting canvas I removed it from the hoop and worked with blanket stitches along the edge to secure it. It is probably not visible well in the picture but blanket stitches are there, I just used embroidery thread of matching color for that. And when I was done, I put embroidery back to the hoop.

That’s it!

Don't forget to subscribe to Weekly Newsletter not to miss a single post. And you can also follow me on Facebook, Pinterest and Instagram.
Subscribe to:
Posts (Atom)


