Showing posts with label soft fun. Show all posts
Showing posts with label soft fun. Show all posts
When I started to design four years ago I could not even imagine how many new friends I will have very soon. I feel so lucky and happy at the same time. Almost all my new friends are virtual. And one of them is Hilde Tindlund (aka RoadRash), a lovely lady from Norway who is helping me a lot with pattern testing. Hilde has designed a cute and very handy crochet hook organizer. And she kindly gave me permission to publish it on my blog. And I am proud and happy to share it with you today. It can make a lovely last minute gift for Christmas, don’t you agree?

*Purchase an ad-free and ready-to-print PDF of this pattern (including complete Stitch Guide with pictures, Important Notes, material list, complete written instructions and photo tutorials) HERE on Ravelry - in English and Norwegian. Hilde has another lovely Christmas pattern in her Ravelry shop, at a very reasonable price. So make sure to check it out as well as her website RoadRash with lots of beautiful crochet mandala bags!!
Width: 19cm / 7.5in
Height: 24cm / 9.5in
The width of the crochet hook cover can easily be adjusted by adding more or less stitches in 3-stitch increments.
ss slip stitch
sc single crochet
hdc half double crochet
st/sts stitch/stitches
rnd round
yo yarn over
lp/lps loop/loops
* ... * repeat between * and *as many times as indicated
sc2tog single crochet 2 together (insert hook in indicated st, yo, draw up a lp, insert hook in next indicated st, yo, draw up a lp, pull through 3 lps on hook)
BLO back loop only
FLO front loop only
3rdLP third loop
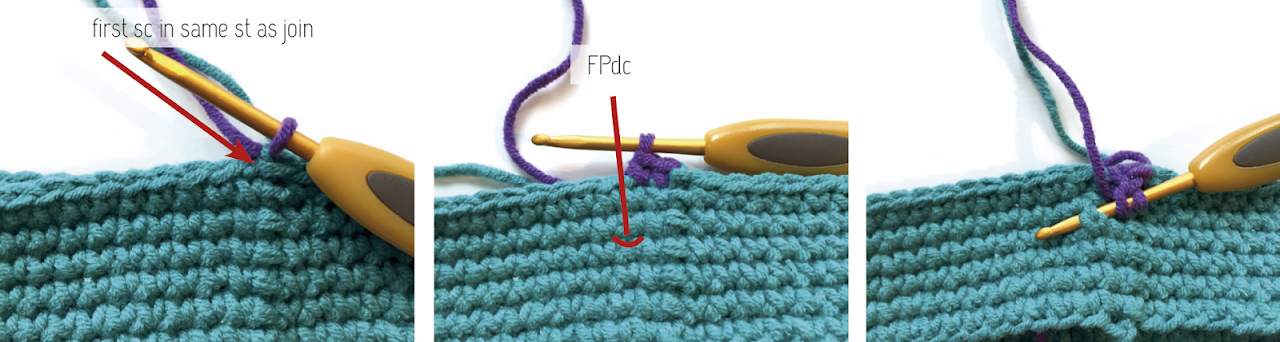
FPdc front post double crochet (yo, insert hook from front to back to front around the post of indicated stitch, yo,draw up a lp, *yo, pull through 2 lps* twice see pictures for rnd 7)

********************************************************************************
Color key: MC- 2604 • A - 2515 • B - 2519 • C - 2516
*COPYRIGHT* Hilde Tindlund (www.RoadRash.no). 2017. All rights reserved! This pattern is for personal use only. It cannot be sold, shared, republished (on-line and off-line), redistributed and translated without permission, or edited in any way - in part or a whole.
NB! Crochet through both loops unless other is stated in the pattern
Ch84 with MC. Join with ss in first ch. Make sure not to twist the ch row!
Rnd 1: ch1, 1sc in each st (first sc in same st as ch1 - see first pic for rnd 7), join with ss in first sc (see two last pics for rnd 7) (84 sc)
Rnd 2-6: as rnd 1
Rnd 7: Change to color A in first ch1. NB! There are always 2 sts skipped on rnd 4 between 2 FPdc.
Ch1 (doesn’t count as sc), *2sc (first sc in same st as ch1), 1FPdc around st of rnd 4 directly below, skip 1 st on rnd 6* repeat around, join with ss in first sc after ch1 (28 FPdc + 56 sc)

Rnd 8: Continue with color A. As rnd 1
Rnd 9: Change to MC in first ch1. As rnd 1
Rnd 10: As rnd 1
Rnd 11: Change to color A in first ch1.
Ch4, *1FPdc around st of rnd 8 directly above next FPdc of rnd 7, ch3* repeat around, 1FPdc around st of Rnd 8 directly above last FPdc of Rnd 7, join with ss in ch4-sp (28 FPdc + 28 ch3-sp)

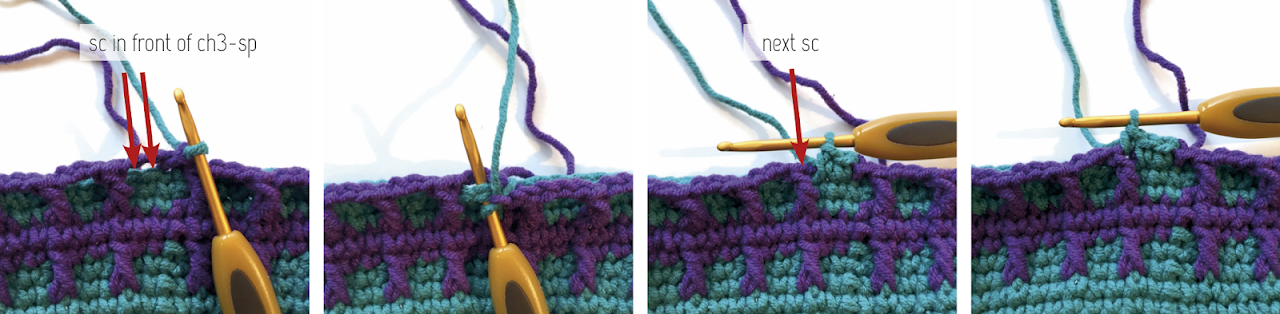
Rnd 12: Change to MC. Cut color A. NB! Some sc on this rnd are attached in rnd 10 and some in rnd 11. All sc attached in rnd 10 are made in front of ch3-sp.
Ch1 (doesn’t count as sc), *1sc in next 2 sts of rnd 10 visible under ch3-sp,1sc in next FPdc of rnd 11* repeat around, join with ss in first sc after ch1 (84 sc)
Rnd 13-14: as rnd 1
Row 16: ch1, 42 sc in BLO (first sc in same st as ch1), turn (42 sc)
Row 17-20: as row 15


Rnd 22-26: as rnd 1
Rnd 27-32: as rnds 7-12 - replace color A with color B
Rnd 33-34: as rnd 1
Row 36: as row 16
Row 37-44: as row 15 - don’t fasten off
Rnd 46-50: as rnd 1
Rnd 51-56: as rnds 7-12 - replace color A with color C
Rnd 57-58: as rnd 1- don’t fasten off
Row 60-61: as row 15
Row 62: ch1, 1 sc (in same st as ch1), sc2tog, 36sc, sc2tog, 1 sc, turn (40 sts)
Row 63: ch1, 1 sc (in same st as ch1), sc2tog, 34sc, sc2tog, 1 sc, turn (38 sts)
Row 64: ch1, 1 sc (in same st as ch1), sc2tog, 32sc, sc2tog, 1 sc, turn (36 sts)
Row 65: ch1, 1 sc (in same st as ch1), sc2tog, 30sc sc2tog, 1 sc,
change to color C in last sc. Cut MC. (34 sts)
Row 66: ch1, 5 sc (first sc in same st as ch1), 2 hdc, ch3, skip 1 st, 2 hdc, 14 sc, 2 hdc, ch3,
2 hdc, 5 sc, turn (24 sc + 4 hdc + 2 ch3-sp)
Row 67: ss to first ch3-sp, 5 sc in ch3-sp, ss to next ch3-sp, 5 sc in ch3-sp,
ss to the end of the row. Fasten off.

Row 1: Keep the bottom of the cover against you and attach the yarn in the first available loop, from bottom to top.
Ch1, 42 sc (first sc in same st as ch1), turn


Row 2: Ch1, 42 sc (first sc in same st as ch1), turn
Row 3-8: as row 62-67, but replace color C with color A/B.
Make ss through one lp in each chain st, turn, ch1, make ss down the other side of the chain sts.


• Weave in all tails.
• Attach buttons.

***********************************************************
I hope you will enjoy the pattern and I have started to make one organizer for myself!
Subscribe to a newsletter not to miss a single post. You can also follow me on Facebook, Pinterest and Instagram.

*Purchase an ad-free and ready-to-print PDF of this pattern (including complete Stitch Guide with pictures, Important Notes, material list, complete written instructions and photo tutorials) HERE on Ravelry - in English and Norwegian. Hilde has another lovely Christmas pattern in her Ravelry shop, at a very reasonable price. So make sure to check it out as well as her website RoadRash with lots of beautiful crochet mandala bags!!
You will need
- Scheepjes Soft Fun (DK yarn: 60% Cotton/40% Acrylic, 50g (1.76 ounces)/140m (153 yards) in shades: 2604 (2 skeins), 2515 (1 skein or ca 10 g scrap), 2519 (1 skein or ca 10 g scrap), 2516 (1 skein or ca 10 g scrap), or any colors of your choice!
- Clover Soft Touch crochet hook 3 mm (D)*
- Six (6) buttons (18mm/0.7in)
Gauge
22 sc x 10 rows/rnds = 10 x 10 cm / 4 x 4 inMeasurments
Width: 19cm / 7.5in
Height: 24cm / 9.5in
The width of the crochet hook cover can easily be adjusted by adding more or less stitches in 3-stitch increments.
Abbreviations and Stitch Guide (US terms)
ch chain stitch
ss slip stitch
sc single crochet
hdc half double crochet
st/sts stitch/stitches
rnd round
yo yarn over
lp/lps loop/loops
* ... * repeat between * and *as many times as indicated
sc2tog single crochet 2 together (insert hook in indicated st, yo, draw up a lp, insert hook in next indicated st, yo, draw up a lp, pull through 3 lps on hook)
BLO back loop only
FLO front loop only
3rdLP third loop
FPdc front post double crochet (yo, insert hook from front to back to front around the post of indicated stitch, yo,draw up a lp, *yo, pull through 2 lps* twice see pictures for rnd 7)

********************************************************************************
Color key: MC- 2604 • A - 2515 • B - 2519 • C - 2516
*COPYRIGHT* Hilde Tindlund (www.RoadRash.no). 2017. All rights reserved! This pattern is for personal use only. It cannot be sold, shared, republished (on-line and off-line), redistributed and translated without permission, or edited in any way - in part or a whole.
*Purchase an ad-free and ready-to-print PDF of this pattern (including complete Stitch Guide with pictures, all Important Notes, material list, complete written instructions and photo tutorials) HERE on Ravelry - in English and Norwegian.
INSTRUCTIONS
NB! Crochet through both loops unless other is stated in the pattern
First pocket
NB! Leave 100 cm yarn tail. You need it for crochet together the bottom of the pocket.Ch84 with MC. Join with ss in first ch. Make sure not to twist the ch row!
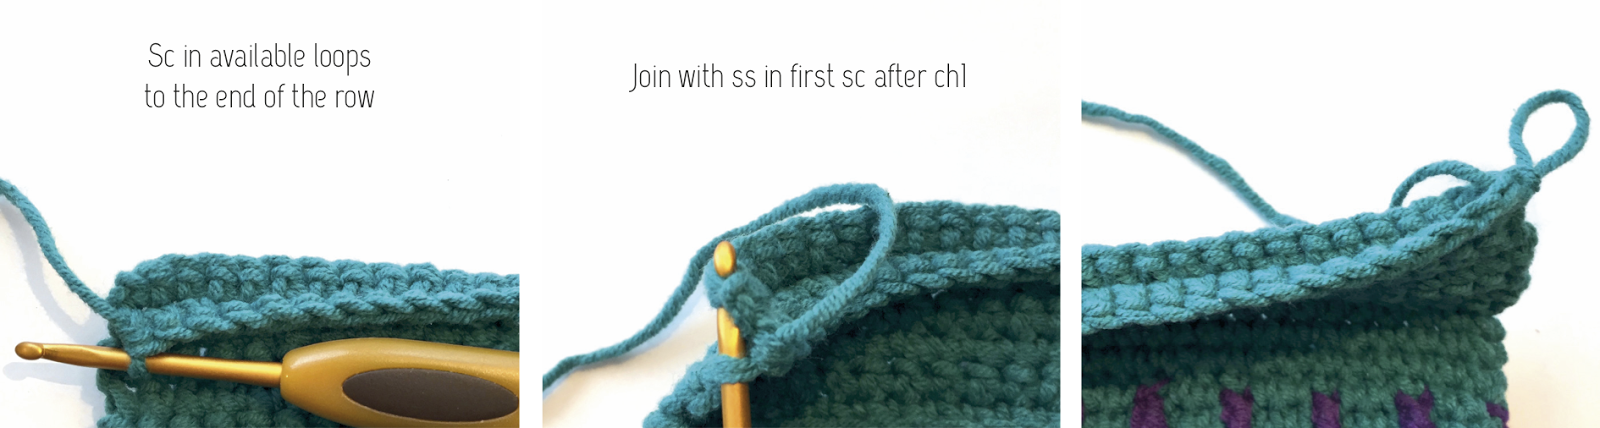
Rnd 1: ch1, 1sc in each st (first sc in same st as ch1 - see first pic for rnd 7), join with ss in first sc (see two last pics for rnd 7) (84 sc)
Rnd 2-6: as rnd 1
Rnd 7: Change to color A in first ch1. NB! There are always 2 sts skipped on rnd 4 between 2 FPdc.
Ch1 (doesn’t count as sc), *2sc (first sc in same st as ch1), 1FPdc around st of rnd 4 directly below, skip 1 st on rnd 6* repeat around, join with ss in first sc after ch1 (28 FPdc + 56 sc)


Rnd 8: Continue with color A. As rnd 1
Rnd 9: Change to MC in first ch1. As rnd 1
Rnd 10: As rnd 1
Rnd 11: Change to color A in first ch1.
Ch4, *1FPdc around st of rnd 8 directly above next FPdc of rnd 7, ch3* repeat around, 1FPdc around st of Rnd 8 directly above last FPdc of Rnd 7, join with ss in ch4-sp (28 FPdc + 28 ch3-sp)

Rnd 12: Change to MC. Cut color A. NB! Some sc on this rnd are attached in rnd 10 and some in rnd 11. All sc attached in rnd 10 are made in front of ch3-sp.
Ch1 (doesn’t count as sc), *1sc in next 2 sts of rnd 10 visible under ch3-sp,1sc in next FPdc of rnd 11* repeat around, join with ss in first sc after ch1 (84 sc)

Rnd 13-14: as rnd 1
Space between first and second pocket
Row 15: ch1, 42sc (first sc in same st as ch1), turn (42 sc)Row 16: ch1, 42 sc in BLO (first sc in same st as ch1), turn (42 sc)
Row 17-20: as row 15
Second pocket
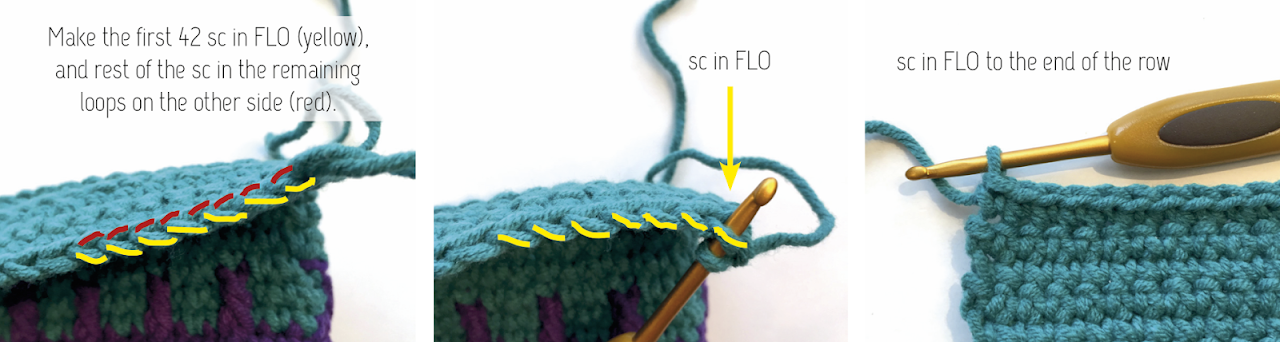
Rnd 21: ch1, 42sc in FLO (first sc in same st as ch1), turn with yarn in front of work, 42 sc in the available loops on the other side, join with ss in first sc (84 sc)

Rnd 22-26: as rnd 1
Rnd 27-32: as rnds 7-12 - replace color A with color B
Rnd 33-34: as rnd 1
Space between second and third pocket
Row 35: as row 15Row 36: as row 16
Row 37-44: as row 15 - don’t fasten off
Third pocket
Rnd 45: as rnd 21Rnd 46-50: as rnd 1
Rnd 51-56: as rnds 7-12 - replace color A with color C
Rnd 57-58: as rnd 1- don’t fasten off
Flap for third pocket
Row 59: ss in next st, ch1, 42sc in 3rdLP (first sc in same st as ch1), turn (42 sc)Row 60-61: as row 15
Row 62: ch1, 1 sc (in same st as ch1), sc2tog, 36sc, sc2tog, 1 sc, turn (40 sts)
Row 63: ch1, 1 sc (in same st as ch1), sc2tog, 34sc, sc2tog, 1 sc, turn (38 sts)
Row 64: ch1, 1 sc (in same st as ch1), sc2tog, 32sc, sc2tog, 1 sc, turn (36 sts)
Row 65: ch1, 1 sc (in same st as ch1), sc2tog, 30sc sc2tog, 1 sc,
change to color C in last sc. Cut MC. (34 sts)
Row 66: ch1, 5 sc (first sc in same st as ch1), 2 hdc, ch3, skip 1 st, 2 hdc, 14 sc, 2 hdc, ch3,
2 hdc, 5 sc, turn (24 sc + 4 hdc + 2 ch3-sp)
Row 67: ss to first ch3-sp, 5 sc in ch3-sp, ss to next ch3-sp, 5 sc in ch3-sp,
ss to the end of the row. Fasten off.

Flaps for first and second pocket
Attach the first row in the available loops right above the pockets (row 16 and row 36).Row 1: Keep the bottom of the cover against you and attach the yarn in the first available loop, from bottom to top.
Ch1, 42 sc (first sc in same st as ch1), turn


Row 2: Ch1, 42 sc (first sc in same st as ch1), turn
Row 3-8: as row 62-67, but replace color C with color A/B.
Ties
Ch80, ss around a st in center of the row where the second pocket flap was attached, ch80.Make ss through one lp in each chain st, turn, ch1, make ss down the other side of the chain sts.


Finishing
• Close the bottom of the first pocket with ss through both layers using the 100 cm yarn tail.• Weave in all tails.
• Attach buttons.

***********************************************************
I hope you will enjoy the pattern and I have started to make one organizer for myself!
Subscribe to a newsletter not to miss a single post. You can also follow me on Facebook, Pinterest and Instagram.
Don’t you think time is cruel? I seriously think so… It’s running (flying?) so fast that I can hardly keep up. Last year we celebrated Christmas with my friends. It was snowing and the weather and atmosphere was magic. And I am still warming these memories in my heart. But what? Christmas is coming again? Really? I am absolutely NOT ready! :) I haven’t even released any Christmas themed pattern so far. And I think I need to fix this. Today.
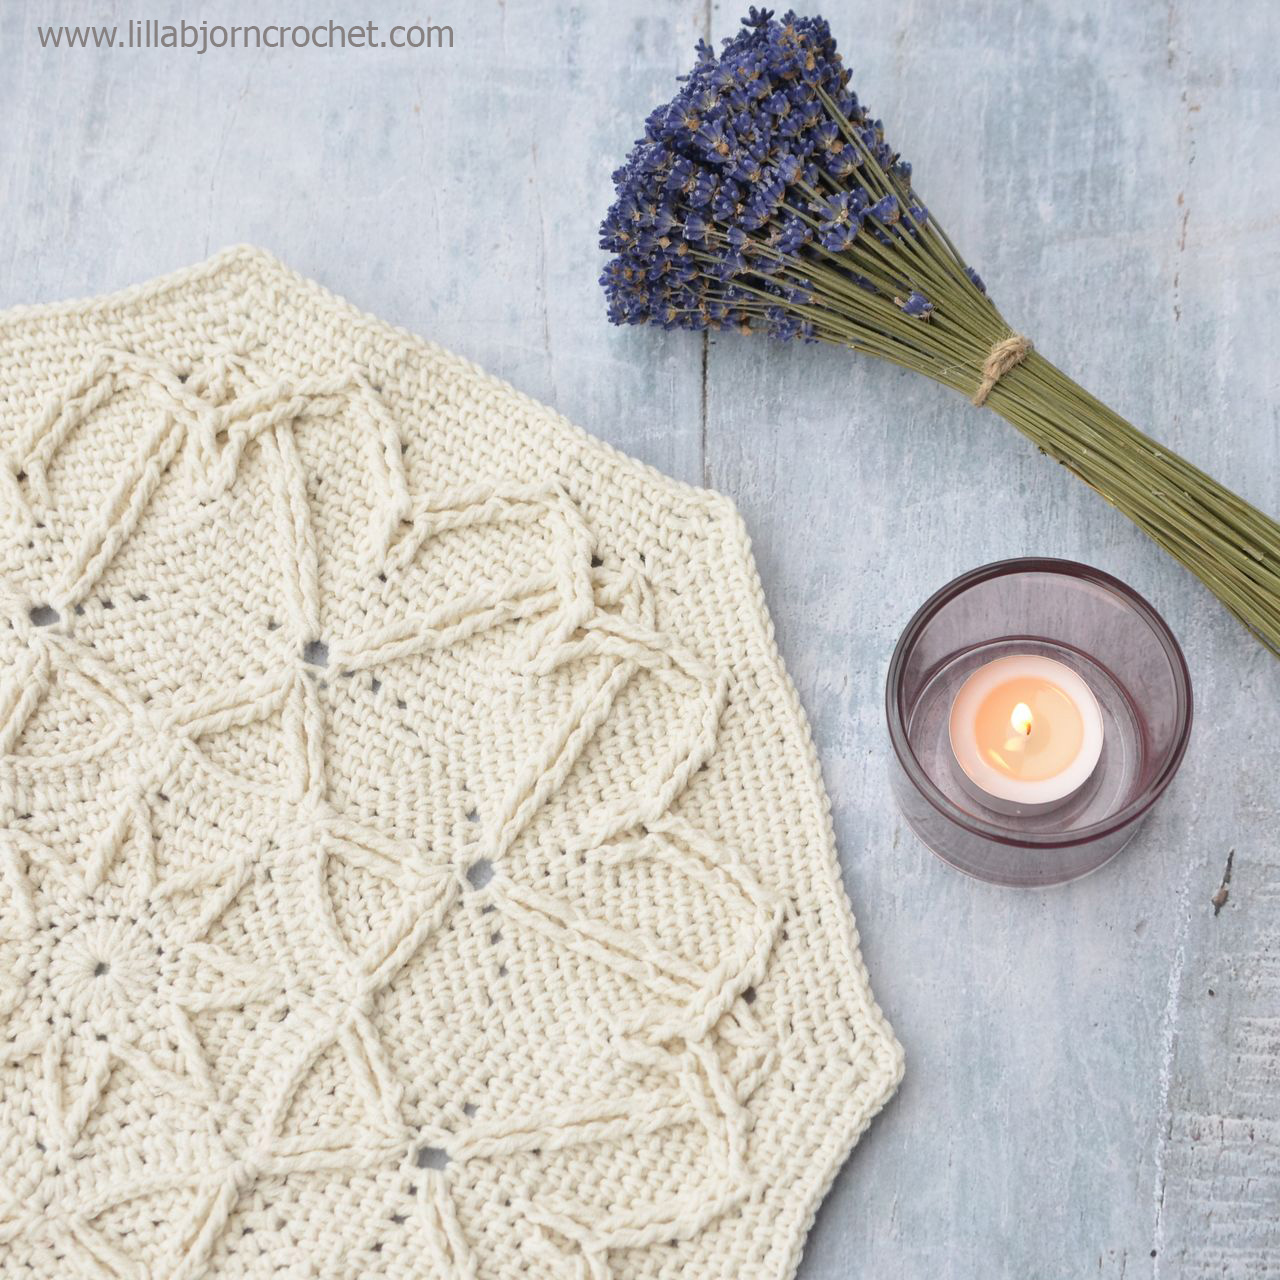
Spirits of Life CAL is taking all my time and thoughts at the moment. But that’s not the reason not to design anything else, what do you think? Today I would like to show you a Wintery Octagon Mandala (yay, I have designed a new mandala!). This design was hiding in my desk for several months already. And I think now is the right time to bring it to the world.

Add this pattern to your Ravelry Queue
The pattern is available on Etsy and Ravelry with 30% discount through Monday, November 13th. The pattern is discounted already and no coupon code needed. Next week it will be listed at a regular price.
As you can see, it’s not a traditional circle mandala but an octagon. I wanted it to look festive and wintery, and tried to imitate a snowflake pattern. Octagon shape is great for blankets, and it’s easy to square up.

I made several samples in different color palettes, but some patterns are just born to be monochrome, with just two shades. And this is an example of Wintery Octagon Mandala. A good thing is that there are no yarn tails to weave, as both yarns are carried on the wrong side from one row to the next. By switching placement of two yarns you can get a different visual effect.
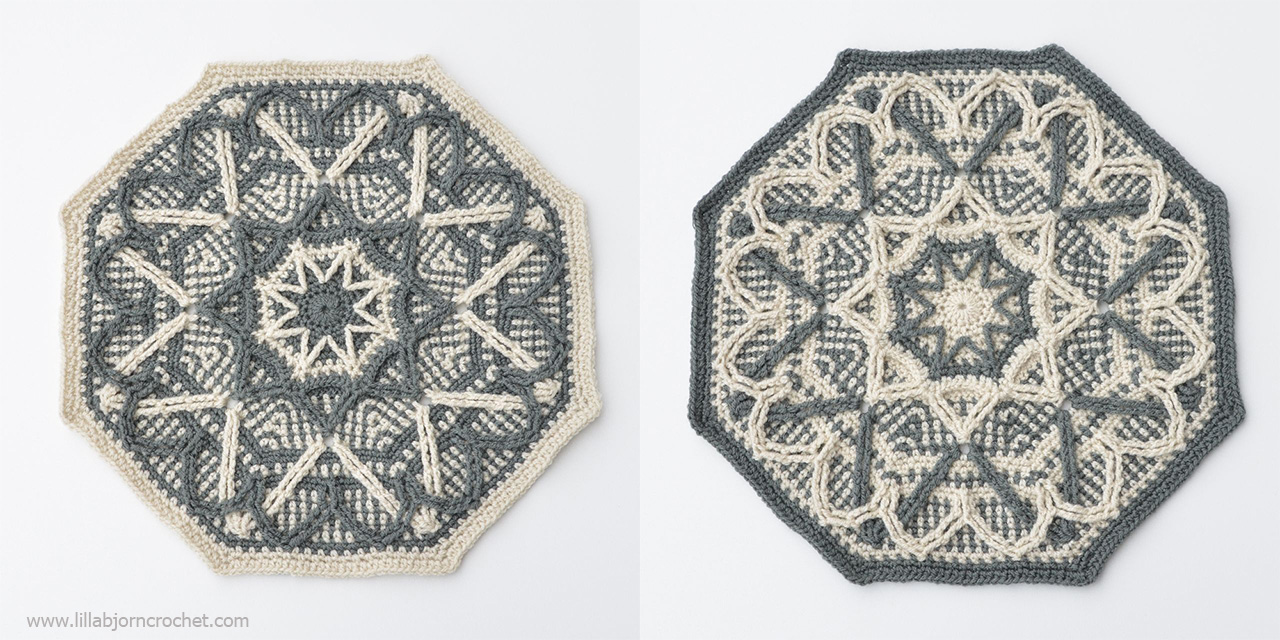
…Or you can make it in just one shade. I chose off-white. With hope that it will be snowing soon.

I chose a linen stitch background (and I am officially in love with Linen stitch now) – same as for A Different Granny Square pattern. It helped to make crochet fabric very soft and draping. And at the same time added an “embroidery effect” to the background which gives a nice contrast to overlay stitches. I am very biased and I LOVE this pattern. And I am in love with each and every mandala created by my wonderful and helping testers.
Wintery Octagon Mandala can be used in many different ways.
1. You can make just one mandala and use it as a doily/trivet or sew it onto ready fabric pillowcase.
2. Mandala’s center will become a wonderful potholder. You can even make two and sew them together for additional thickness and reverse look. The sample in the picture was made with three shades of Soft Fun yarn by Scheepjes*.

3. You can add four corners to a mandala and it will become a square. A nice afghan block, or front decoration for your new pillow, maybe?

4. If you complete only 8 first rounds, you will get a small star decoration. Great as Christmas hanging ornament, or bunting. Or even a festive table runner if you join small motifs together. I made mine with cotton yarn Catona*.
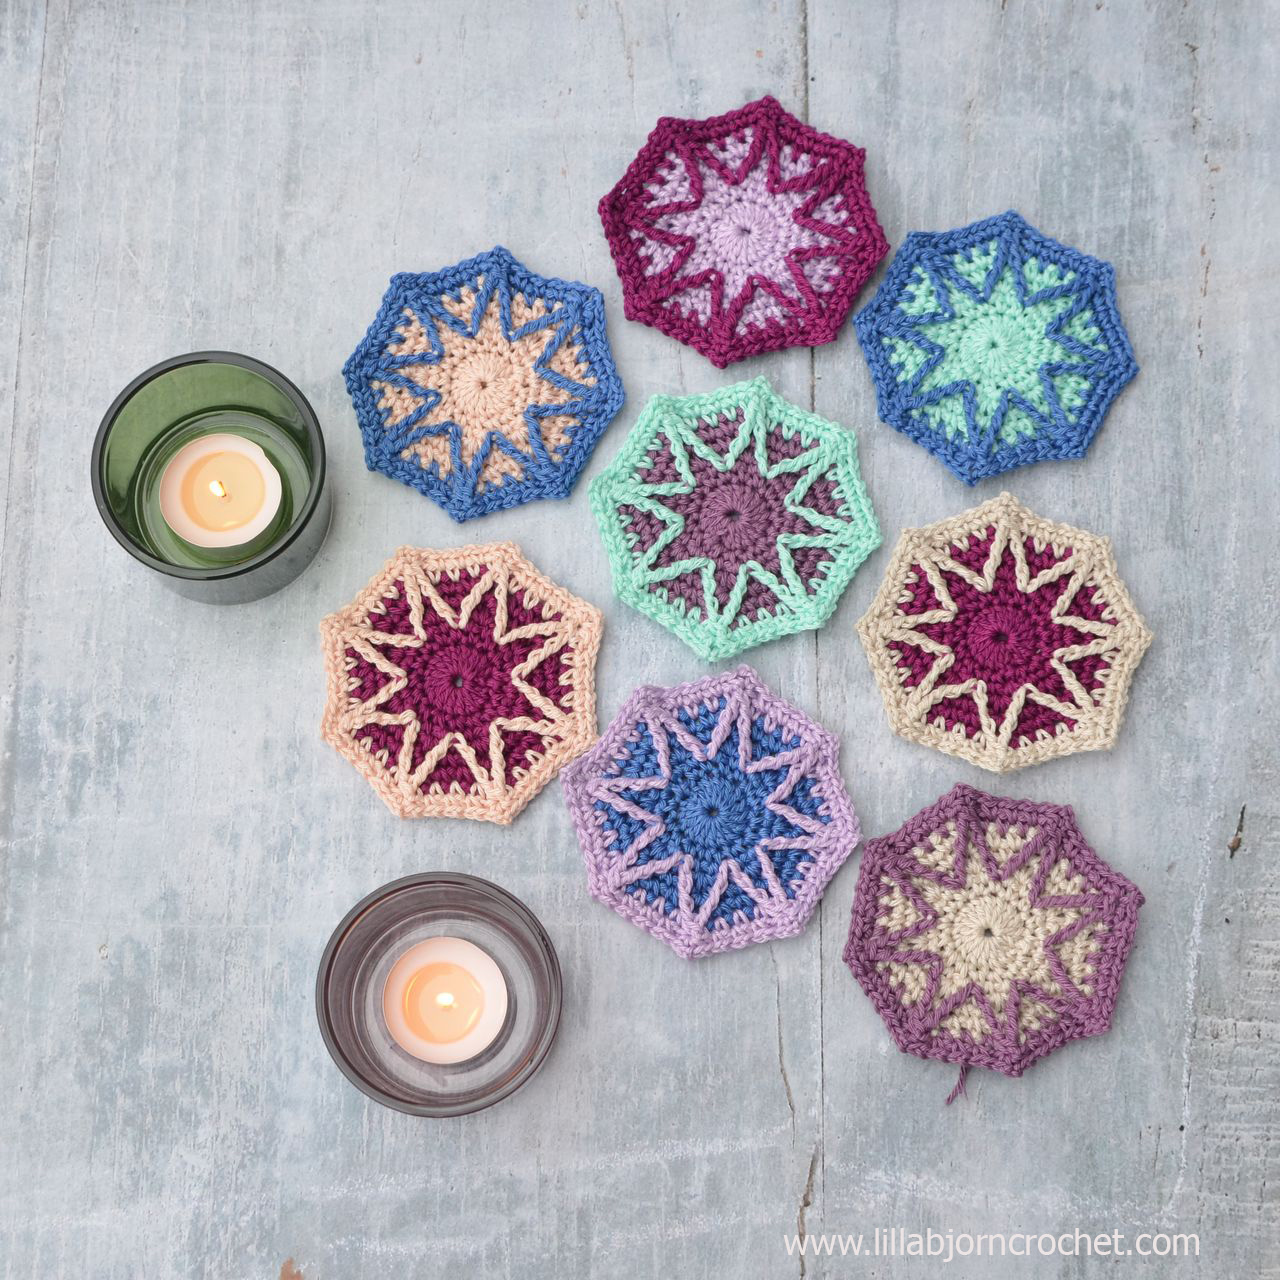
5. And of course, Wintery Octagon Mandala can be used for large, textured blankets!! I have created a mini blanket with Colour Crafter yarn* by Scheepjes to show you how several octagons look together when joined. You may notice that octagons have a reverse colorway. It was also made on purpose to show you how different colors can play within the same pattern.

*************************************************
Subscribe to a newsletter not to miss a single post. You can also follow me on Facebook, Pinterest and Instagram.

Spirits of Life CAL is taking all my time and thoughts at the moment. But that’s not the reason not to design anything else, what do you think? Today I would like to show you a Wintery Octagon Mandala (yay, I have designed a new mandala!). This design was hiding in my desk for several months already. And I think now is the right time to bring it to the world.

Add this pattern to your Ravelry Queue
The pattern is available on Etsy and Ravelry with 30% discount through Monday, November 13th. The pattern is discounted already and no coupon code needed. Next week it will be listed at a regular price.
As you can see, it’s not a traditional circle mandala but an octagon. I wanted it to look festive and wintery, and tried to imitate a snowflake pattern. Octagon shape is great for blankets, and it’s easy to square up.

I made several samples in different color palettes, but some patterns are just born to be monochrome, with just two shades. And this is an example of Wintery Octagon Mandala. A good thing is that there are no yarn tails to weave, as both yarns are carried on the wrong side from one row to the next. By switching placement of two yarns you can get a different visual effect.

…Or you can make it in just one shade. I chose off-white. With hope that it will be snowing soon.

I chose a linen stitch background (and I am officially in love with Linen stitch now) – same as for A Different Granny Square pattern. It helped to make crochet fabric very soft and draping. And at the same time added an “embroidery effect” to the background which gives a nice contrast to overlay stitches. I am very biased and I LOVE this pattern. And I am in love with each and every mandala created by my wonderful and helping testers.
What Wintery Octagon Mandala can be used for?
Wintery Octagon Mandala can be used in many different ways.
1. You can make just one mandala and use it as a doily/trivet or sew it onto ready fabric pillowcase.
2. Mandala’s center will become a wonderful potholder. You can even make two and sew them together for additional thickness and reverse look. The sample in the picture was made with three shades of Soft Fun yarn by Scheepjes*.

3. You can add four corners to a mandala and it will become a square. A nice afghan block, or front decoration for your new pillow, maybe?

4. If you complete only 8 first rounds, you will get a small star decoration. Great as Christmas hanging ornament, or bunting. Or even a festive table runner if you join small motifs together. I made mine with cotton yarn Catona*.

5. And of course, Wintery Octagon Mandala can be used for large, textured blankets!! I have created a mini blanket with Colour Crafter yarn* by Scheepjes to show you how several octagons look together when joined. You may notice that octagons have a reverse colorway. It was also made on purpose to show you how different colors can play within the same pattern.

What does the pattern include:
- Instructions for an octagon (with 2 shades)
- Instructions for joining motifs (if you would like to make a blanket): square, side triangle, corner triangle.
- Instructions on how to assembly the blanket and make the border.


*************************************************
Brief facts about Wintery Octagon Mandala Pattern:
- Level: Intermediate (front post stitches)
- Just two shades are used for this mandala, so no need to weave in tails.
- Octagon Mandala can be used in a variety of ways: as a doily/trivet, pillow, potholder, hanging ornament, blanket.
- The pattern is available on Etsy and Ravelry with 30% discount through Monday, November 13th. The pattern is discounted already and no coupon code needed. Next week it will be listed at a regular price.
Subscribe to a newsletter not to miss a single post. You can also follow me on Facebook, Pinterest and Instagram.
Corner-to-corner crochet technique (C2C) is great in many ways. It is very logic and easy, aimed to beginners. Being really easy it has endless possibilities for creation of unique and very intricate crochet fabrics. You can easily follow the chart and, more than that, you can create the charts by yourself!
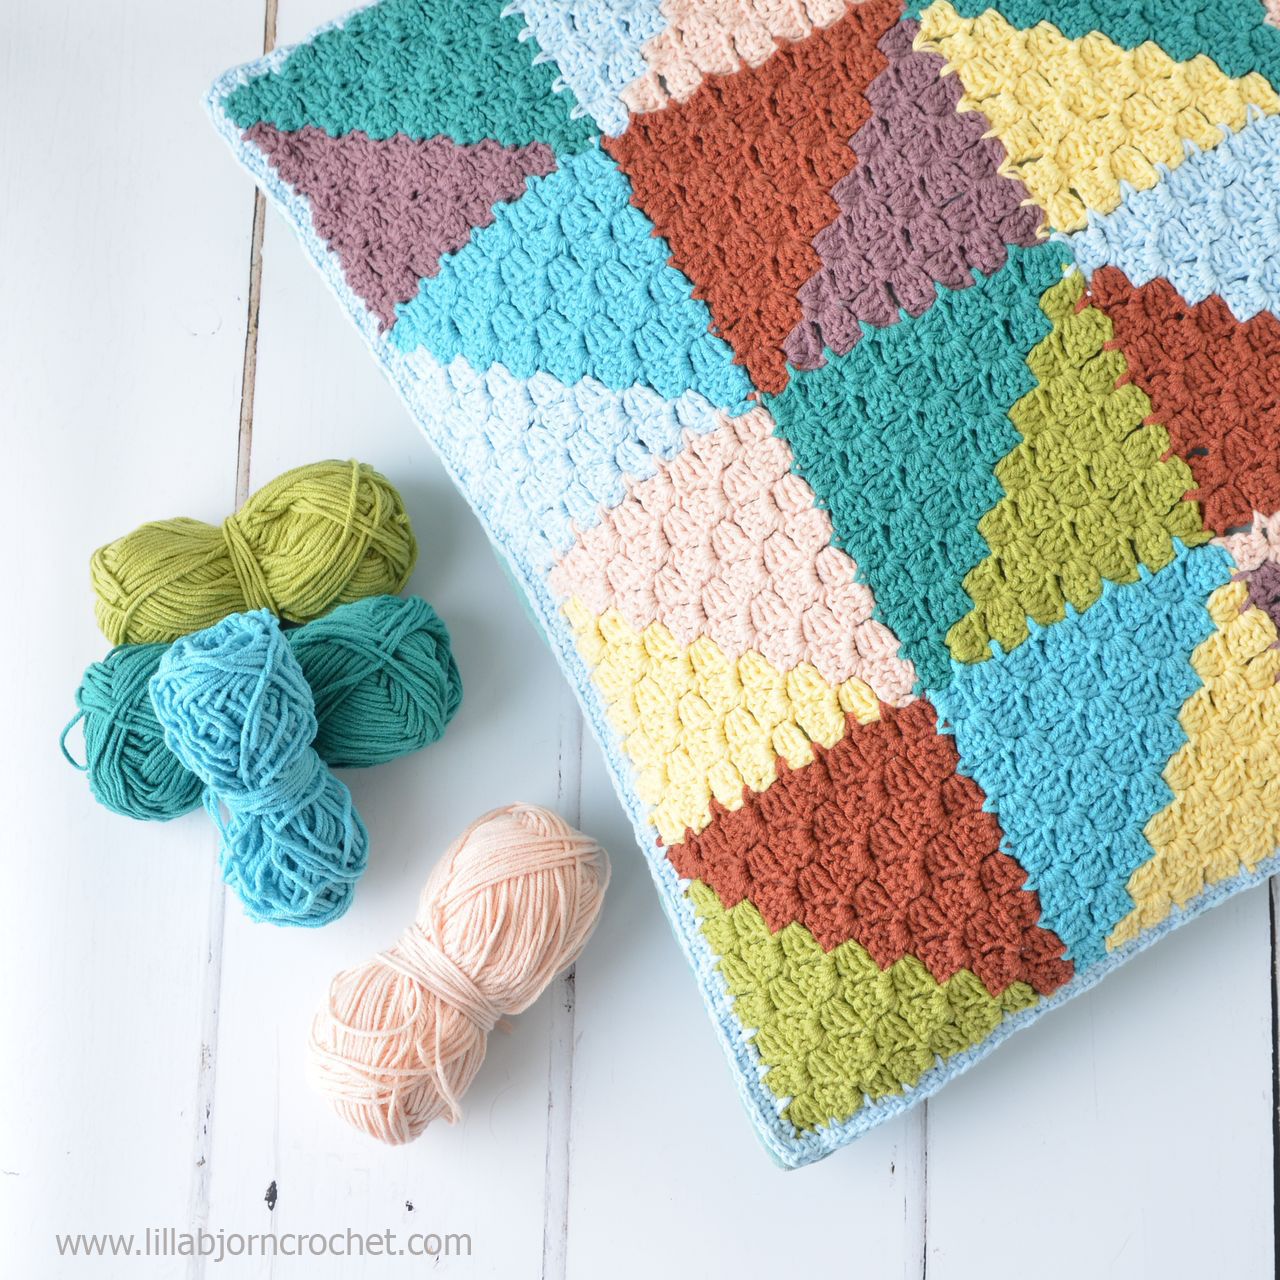
I have learned C2C about a year ago and totally fell in love with it. I used this technique for two parts of Spirits of Life CAL (next week the first part in C2C crochet will be released). I needed to join C2C panel with the body of the wrap, and I thought that join-as-you-go method is the best for this.
I made a small research and found a few tutorials on how to actually join-as-you-go in C2C. But many of them are describing how to join the squares. I thought what if I try to create a pattern with triangles and try to apply the same method. And it worked well. So I decided to make a video-tutorial and share it with you. Well, I am not saying it’s the first and only tutorial out there! It’s just mine, and with a certain pattern in mind.

Add this pattern to your Ravelry Queue
What does “join-as-you-go” mean? It means you don’t need to crochet around each element and then join them all into finished fabric. Instead, each new element is seamlessly added to the previous one. Very handy and saves lots of time!

I created a crochet decoration for a fabric pillow cover. And used leftovers of Soft Fun yarn* by Scheepjes in 8 shades (see color key below, with the chart). I was trying to think of the best way to explain how I did everything. And here are some important things I’ve come up with.
1. If you want to create a crocheted fabric with triangles, you should think of them as if they were squares. My pillow cover is built in rows with squares, and each of them consists of 2 triangles. So every square is started with one triangle and then when desired size is reached, the yarn is changed and the square is finished with second triangle, as you normally do in C2C.

2. Triangles “inside” each square are not the same size. For my pillow pattern I made them with 7 and 8 rows. But of course you can make them bigger (or smaller). And of course you can make your piece with any number of triangles (= in any size)!
3. It is important to understand how first several triangles are joined together in each row, and the rest of the row is just a repeat of what has been made already.
4. When you join new triangles, it is important to watch the direction of the stitches: they should not be placed in the same direction (see picture below).

Ideally wrong and right sides of closely situated blocks should also alternate. But sometimes it is not possible, and to be honest I don’t think is it absolutely necessary. In the end it doesn’t have any impact on the final look of the project. At least it’s not visible in my pillow.
Please, note that this tutorial is not aimed to teach C2C crochet. If you have never tried it before, please, check information about C2C technique HERE and HERE (tutorials by One Dog Woof and It’s All In A Nutshell)
I’ve created the chart to show you layout of my colors. Please, read it in “rows of squares”, from bottom to top and from right to left. The order of triangles in every row is marked with numbers. The starting point of each triangle is marked with arrows. After Rows 1 and 2 are completed, the rest of the pattern is repeating of Row 2. When entire piece is finished, work the border around it.

Colour key in Soft Fun yarn* (given for Row 1):
Triangle 1 – shade 2624,
Triangle 2 – shade 2604,
Triangle 3 – shade 2613,
Triangle 4 – shade 2466,
Triangle 5 – shade 2531,
Triangle 6 – shade 2423,
Triangle 7 – shade 2611,
Triangle 8 – shade 2431.
Instead of explaining with words how I joined triangle together, I created a video tutorial for you. Hope it will be clear and helpful!

Subscribe to a newsletter not to miss a single post. You can also follow me on Facebook, Pinterest and Instagram.

I have learned C2C about a year ago and totally fell in love with it. I used this technique for two parts of Spirits of Life CAL (next week the first part in C2C crochet will be released). I needed to join C2C panel with the body of the wrap, and I thought that join-as-you-go method is the best for this.
I made a small research and found a few tutorials on how to actually join-as-you-go in C2C. But many of them are describing how to join the squares. I thought what if I try to create a pattern with triangles and try to apply the same method. And it worked well. So I decided to make a video-tutorial and share it with you. Well, I am not saying it’s the first and only tutorial out there! It’s just mine, and with a certain pattern in mind.

Add this pattern to your Ravelry Queue
What does “join-as-you-go” mean? It means you don’t need to crochet around each element and then join them all into finished fabric. Instead, each new element is seamlessly added to the previous one. Very handy and saves lots of time!

Important to Know
I created a crochet decoration for a fabric pillow cover. And used leftovers of Soft Fun yarn* by Scheepjes in 8 shades (see color key below, with the chart). I was trying to think of the best way to explain how I did everything. And here are some important things I’ve come up with.
1. If you want to create a crocheted fabric with triangles, you should think of them as if they were squares. My pillow cover is built in rows with squares, and each of them consists of 2 triangles. So every square is started with one triangle and then when desired size is reached, the yarn is changed and the square is finished with second triangle, as you normally do in C2C.
2. Triangles “inside” each square are not the same size. For my pillow pattern I made them with 7 and 8 rows. But of course you can make them bigger (or smaller). And of course you can make your piece with any number of triangles (= in any size)!
3. It is important to understand how first several triangles are joined together in each row, and the rest of the row is just a repeat of what has been made already.
4. When you join new triangles, it is important to watch the direction of the stitches: they should not be placed in the same direction (see picture below).

Ideally wrong and right sides of closely situated blocks should also alternate. But sometimes it is not possible, and to be honest I don’t think is it absolutely necessary. In the end it doesn’t have any impact on the final look of the project. At least it’s not visible in my pillow.
How to Read the Chart
Please, note that this tutorial is not aimed to teach C2C crochet. If you have never tried it before, please, check information about C2C technique HERE and HERE (tutorials by One Dog Woof and It’s All In A Nutshell)
I’ve created the chart to show you layout of my colors. Please, read it in “rows of squares”, from bottom to top and from right to left. The order of triangles in every row is marked with numbers. The starting point of each triangle is marked with arrows. After Rows 1 and 2 are completed, the rest of the pattern is repeating of Row 2. When entire piece is finished, work the border around it.

Colour key in Soft Fun yarn* (given for Row 1):
Triangle 1 – shade 2624,
Triangle 2 – shade 2604,
Triangle 3 – shade 2613,
Triangle 4 – shade 2466,
Triangle 5 – shade 2531,
Triangle 6 – shade 2423,
Triangle 7 – shade 2611,
Triangle 8 – shade 2431.
Instead of explaining with words how I joined triangle together, I created a video tutorial for you. Hope it will be clear and helpful!

Subscribe to a newsletter not to miss a single post. You can also follow me on Facebook, Pinterest and Instagram.
C2C (corner-to-corner) crochet technique is something new to me. I have seen lots of amazing afghans created by other people but my own acquaintance with C2C happened not so long ago. First time I tried it while making Last Dance on the Beach blanket (Scheepjes CAL 2016). My friend Carmen introduced a simple C2C square and I had lots of fun making it. And when I first made it myself C2C crochet technique didn’t seem so difficult and complicated anymore.


Apparently there is not so much information about join as-you-go method for C2C crochet. I was lucky to find nice video-tutorials but they explain how to join the squares. I thought it would be nice to also try it with triangles maybe? Colorful triangles always look great in “patchwork” patterns. And I thought of creating a pillow cover using leftovers of Soft Fun yarn by Scheepjes and C2C.

What I am doing is definitely not an invention of something new. And most likely there are some tutorials about the same thing already. But I thought I would create my own – not just to show the joining method, but to show method for exact pattern.
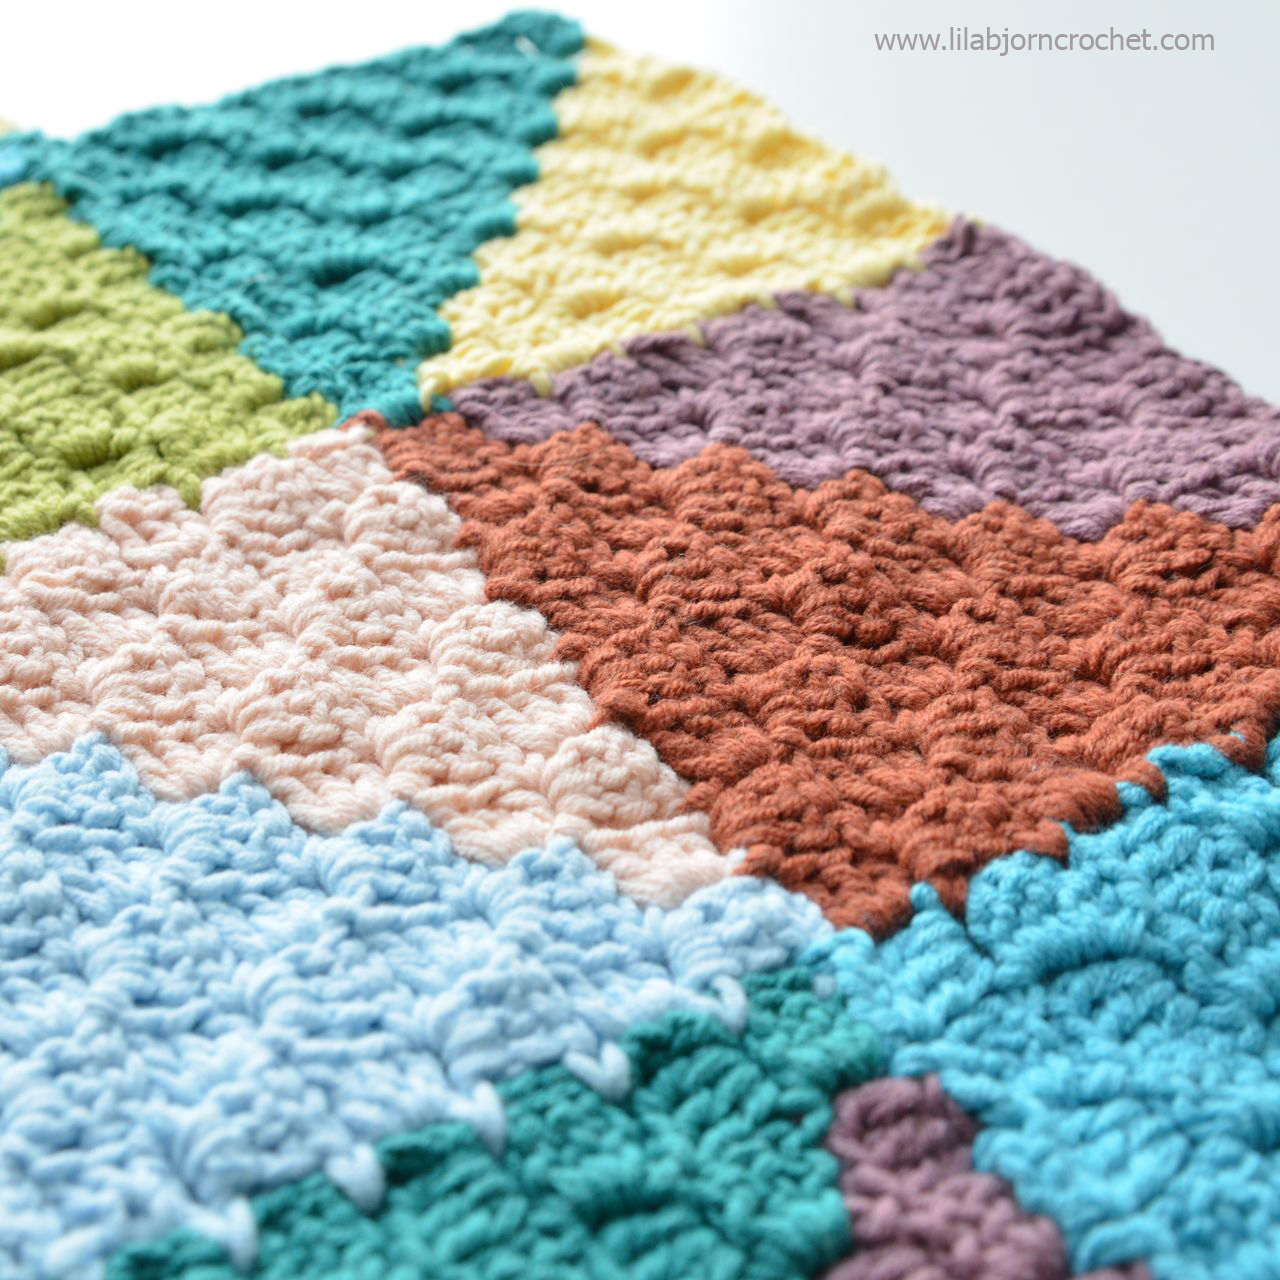
I have remade my sample a few times already trying to understand the best way of joining triangles. And I think I am almost there. I can’t wait to finish the pillow and show it to you. And I will also complete a video-tutorial to guide you through every step I made.
Subscribe to a newsletter not to miss a single post. You can also follow me on Facebook, Pinterest and Instagram.

Suddenly I felt confident enough and used it for several parts of Spirits of Life CAL which started this week (see Part 1 HERE). I wanted to recreate zig-zag pattern and C2C appeared to be the best and easiest “tool” for that. I’ve learned how to change the colors, and I also had to use a join as-you-go method which I have never tried before. If you follow Spirits of Life CAL you will be doing C2C parts in several weeks already.

Apparently there is not so much information about join as-you-go method for C2C crochet. I was lucky to find nice video-tutorials but they explain how to join the squares. I thought it would be nice to also try it with triangles maybe? Colorful triangles always look great in “patchwork” patterns. And I thought of creating a pillow cover using leftovers of Soft Fun yarn by Scheepjes and C2C.

What I am doing is definitely not an invention of something new. And most likely there are some tutorials about the same thing already. But I thought I would create my own – not just to show the joining method, but to show method for exact pattern.

I have remade my sample a few times already trying to understand the best way of joining triangles. And I think I am almost there. I can’t wait to finish the pillow and show it to you. And I will also complete a video-tutorial to guide you through every step I made.
Subscribe to a newsletter not to miss a single post. You can also follow me on Facebook, Pinterest and Instagram.
For me crochet design is about colors, stitches and shapes. And shape is probably the first thing I decide about, then choice of the colors comes, and then a perfect combination of stitches is looked for. There are quite a few shapes used in crochet design (and with freeform crochet you can basically create any shape at all): circles, triangles, rectangles, hexagons, octagons… But in my opinion square shape is the most basic and widely used. What do we try first when we want to learn crochet? A granny square, of course! It teaches us how to crochet flat and in round, how to join rounds and how to make increases in the corners. Granny squares use basic crochet stitches, but crochet squares can be more than that!

When I started to design crochet three years ago I looked into round shapes and overlay technique. I have created several mandala’s (Dandelion, Joana’s, Spanish, Sunny, Labyrinth) which can be either enlarged into bigger circles or squared up with Dandelion Border. I’ve always thought about mandala’s as round pillows, chair pads, pillow decorations, maybe. But I was amazed by the amount of blankets people have created using overlay crochet mandalas. Look at Sophie Loves Lilla Bjorn Winter Blanket (by Emma Aldous), or Celtic Mandala Blanket (by Laura, aka @Taemombo on Ravelry), for example.

Generally pieces created in overlay crochet are quite stiff, because background is worked with single crochet stitches and long, complex stitches are added above. Unless very soft and draping yarn is used, entire blankets in overlay crochet might feel too stiff and heavy. And I was wondering how it is possible to solve this “problem”.

And I came up with an idea of square pattern which uses overlay crochet with a very draping background, and lacy parts. And this is how A Different Granny Square pattern was born. It is already available for purchase via Ravelry (HERE) and Etsy (HERE) and is offered with 30% discount through Monday, October 2, 2017 (no coupon code needed). After that date the pattern will be listed at a regular price.

A Different Granny Square consists of three parts: floral center, lacy border and overlay zig-zag border. They give you lots of possibilities to play with sizes. I believe this square is PERFECT for blankets, and I wish I have time in the future to complete one for myself. You can either crochet and join entire squares (each approx. 37cm (14.5in) large when made with DK yarn and 4mm crochet hook). Or another option is to leave out the border and only use central floral motifs which are very draping as well.

You can of course use A Different Granny Square in a variety of other ways: as decorations for pillows and chair pads (with crochet fabric stitched onto the ready foam), as trivets, and other. I have hand stitched one of the squares onto ready fabric throw from IKEA to make a pillow for my friend.
I've made squares in different color palettes and also with one colour only (off white). And all of them play differently. Lori Baran who helped me with test, made her square in solid grey, and it looks amazing!

If you are interested, I used Soft Fun yarn* (DK weight) by Scheepjes and 4mm (G) Amour Clover hook* (my favourite brand and type). For one square you will need approx. 88g of yarn which is almost 2 skeins if only one shade is used. And here are shades for grey and emerald square (you will find all information about “Fall” version of this square in the pattern): Yarn A - 2515, Yarn B - 2532, Yarn C - 2531, Yarn D - 3535, Yarn E - 2466.

The pattern is intermediate. Full version contains lots of detailed pictures so you have no chance to be lost. It doesn’t take long to finish, and finished project can make a wonderful (Christmas?..) gift.
Find A Different Granny Square pattern on Ravelry and Etsy with 30% discount through Monday, October 2 (no coupon code needed).
Subscribe to a newsletter not to miss a single post. You can also follow me on Facebook, Pinterest and Instagram.
* DISCLOSURE: This blog contains affiliate links (marked with *). I may be compensated with a tiny amount from each purchase made via these links, and it will not cost you a penny. By using affiliate links you support my blog. Thank you!

When I started to design crochet three years ago I looked into round shapes and overlay technique. I have created several mandala’s (Dandelion, Joana’s, Spanish, Sunny, Labyrinth) which can be either enlarged into bigger circles or squared up with Dandelion Border. I’ve always thought about mandala’s as round pillows, chair pads, pillow decorations, maybe. But I was amazed by the amount of blankets people have created using overlay crochet mandalas. Look at Sophie Loves Lilla Bjorn Winter Blanket (by Emma Aldous), or Celtic Mandala Blanket (by Laura, aka @Taemombo on Ravelry), for example.

Generally pieces created in overlay crochet are quite stiff, because background is worked with single crochet stitches and long, complex stitches are added above. Unless very soft and draping yarn is used, entire blankets in overlay crochet might feel too stiff and heavy. And I was wondering how it is possible to solve this “problem”.

And I came up with an idea of square pattern which uses overlay crochet with a very draping background, and lacy parts. And this is how A Different Granny Square pattern was born. It is already available for purchase via Ravelry (HERE) and Etsy (HERE) and is offered with 30% discount through Monday, October 2, 2017 (no coupon code needed). After that date the pattern will be listed at a regular price.

A Different Granny Square consists of three parts: floral center, lacy border and overlay zig-zag border. They give you lots of possibilities to play with sizes. I believe this square is PERFECT for blankets, and I wish I have time in the future to complete one for myself. You can either crochet and join entire squares (each approx. 37cm (14.5in) large when made with DK yarn and 4mm crochet hook). Or another option is to leave out the border and only use central floral motifs which are very draping as well.

You can of course use A Different Granny Square in a variety of other ways: as decorations for pillows and chair pads (with crochet fabric stitched onto the ready foam), as trivets, and other. I have hand stitched one of the squares onto ready fabric throw from IKEA to make a pillow for my friend.
I've made squares in different color palettes and also with one colour only (off white). And all of them play differently. Lori Baran who helped me with test, made her square in solid grey, and it looks amazing!

If you are interested, I used Soft Fun yarn* (DK weight) by Scheepjes and 4mm (G) Amour Clover hook*
(my favourite brand and type). For one square you will need approx. 88g of yarn which is almost 2 skeins if only one shade is used. And here are shades for grey and emerald square (you will find all information about “Fall” version of this square in the pattern): Yarn A - 2515, Yarn B - 2532, Yarn C - 2531, Yarn D - 3535, Yarn E - 2466.
The pattern is intermediate. Full version contains lots of detailed pictures so you have no chance to be lost. It doesn’t take long to finish, and finished project can make a wonderful (Christmas?..) gift.
Find A Different Granny Square pattern on Ravelry and Etsy with 30% discount through Monday, October 2 (no coupon code needed).
Subscribe to a newsletter not to miss a single post. You can also follow me on Facebook, Pinterest and Instagram.
* DISCLOSURE: This blog contains affiliate links (marked with *). I may be compensated with a tiny amount from each purchase made via these links, and it will not cost you a penny. By using affiliate links you support my blog. Thank you!
“Hi there! My name is Lisa. And I’m a new baby in Tatsiana’s modest amigurumi family. I have an elder sister and her name is also Lisa. We are friendly and very curious. We like to dance, to play all day long, and travel! Travelling is our passion. We would love to come to your country and make new friends!”
 Mandala crochet art is something I love to do most of all. But sometimes it’s nice to have a break and to switch to something else. Home décor is my main specialization, but you may have noticed that there are also several toys patterns available in my Etsy and Ravelry shops. They are: Magnus Bear, Rikki the Bear, Dancing Owl, Dolly the Sheep and Sunny the Bunny.

Since long ago I have wanted to create a Mouse pattern to add to my collection. So when I was contacted by Crochet Now magazine last year, I thought that might be a good challenge to take. Lisa the Mouse was designed especially for a magazine and now it’s also available as a stand-alone pattern in my Ravelry shop HERE.
Add this pattern to your Ravelry Queue!

Lisa the Mouse was born during vacations in the Netherlands, and maybe this fact explains her passion for travelling. We spent long hours in a café on a beach, enjoying the music of waves, calm and warm wind and fresh cold drinks. I knew I wanted to create a girl Mouse, in a dress, with big ears. And surprisingly Lisa turned out exactly as I was imagining her.

A colorful stitch pattern was requested by a magazine and I chose Spike crochet stitch for her dress. Small groups of spike stitches and changing yarn on every 3rd row gave her dress a nice “wavy” effect and a little bit of texture. When I look at Lisa’s dress I come back to calm and sunny afternoon on the beach.
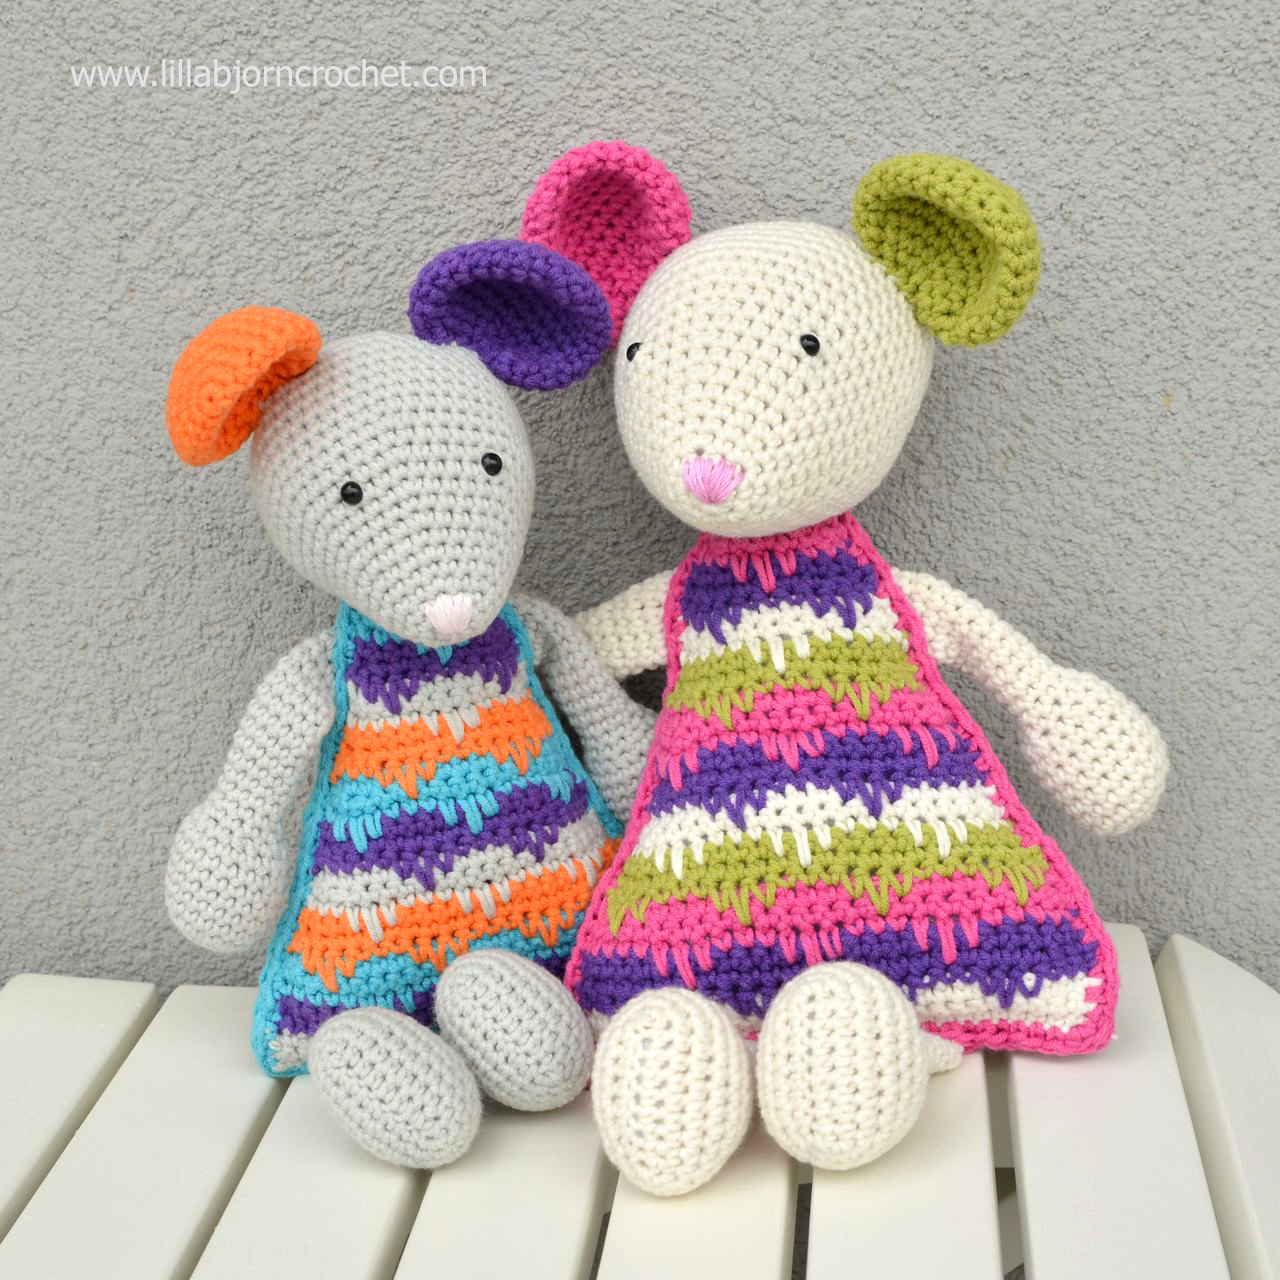
Soft Fun yarn by Scheepjes* was used for both toys, and I am pretty satisfied how it work for my new amigurumi pattern. It’s not so soft, I would say it has a certain stiffness. And when stuffed the toy keeps its shape very well.
You can take either 3.75mm or 4mm (G) crochet hook (I prefer Amour Clover hooks*), or any other size which allows you to obtain desired gauge. Gauge itself is not critical for this pattern, but I would recommend crocheting tightly so that stuffing is not seen through the stitches.

I used 5mm plastic safety eyes*, but if you intend to give a toy to a small baby, please note, that safety eyes can be dangerous, as they may fall out. Please, embroider the eyes instead.
As the majority of amigurumi crochet patterns Lisa the Mouse is aimed to Intermediate crocheters. But in practice Advanced beginners can also handle it without problems. No tricky stitches are used in the pattern. You will find full written instructions and a photo-tutorial in the end of the pattern showing how to make each detail and how to put the toy together.

Looking forward to see more Lisa’s!! If you would like to share pictures on social media, please, use the tag #LisaTheMouse so that I could find them and admire. I will be also happy to see your pictures in my Ravelry group HERE.
*****************************************************************
Facts about Lisa the Mouse pattern:
* DISCLOSURE: This blog contains affiliate links (marked with *). By using them you support my blog. Thank you!


Since long ago I have wanted to create a Mouse pattern to add to my collection. So when I was contacted by Crochet Now magazine last year, I thought that might be a good challenge to take. Lisa the Mouse was designed especially for a magazine and now it’s also available as a stand-alone pattern in my Ravelry shop HERE.
Add this pattern to your Ravelry Queue!

Lisa the Mouse was born during vacations in the Netherlands, and maybe this fact explains her passion for travelling. We spent long hours in a café on a beach, enjoying the music of waves, calm and warm wind and fresh cold drinks. I knew I wanted to create a girl Mouse, in a dress, with big ears. And surprisingly Lisa turned out exactly as I was imagining her.

A colorful stitch pattern was requested by a magazine and I chose Spike crochet stitch for her dress. Small groups of spike stitches and changing yarn on every 3rd row gave her dress a nice “wavy” effect and a little bit of texture. When I look at Lisa’s dress I come back to calm and sunny afternoon on the beach.

Soft Fun yarn by Scheepjes* was used for both toys, and I am pretty satisfied how it work for my new amigurumi pattern. It’s not so soft, I would say it has a certain stiffness. And when stuffed the toy keeps its shape very well.
You can take either 3.75mm or 4mm (G) crochet hook (I prefer Amour Clover hooks*), or any other size which allows you to obtain desired gauge. Gauge itself is not critical for this pattern, but I would recommend crocheting tightly so that stuffing is not seen through the stitches.

I used 5mm plastic safety eyes*, but if you intend to give a toy to a small baby, please note, that safety eyes can be dangerous, as they may fall out. Please, embroider the eyes instead.
As the majority of amigurumi crochet patterns Lisa the Mouse is aimed to Intermediate crocheters. But in practice Advanced beginners can also handle it without problems. No tricky stitches are used in the pattern. You will find full written instructions and a photo-tutorial in the end of the pattern showing how to make each detail and how to put the toy together.

Looking forward to see more Lisa’s!! If you would like to share pictures on social media, please, use the tag #LisaTheMouse so that I could find them and admire. I will be also happy to see your pictures in my Ravelry group HERE.
*****************************************************************
Facts about Lisa the Mouse pattern:
- Level: Intermediate (or Advanced Beginner)
- Materials: DK yarn in 4 colours (Soft Fun by Scheepjes), 3.75mm or 4mm (G) Amour Clover crochet hook*, 5mm safety eyes*, stitch markers, scissors, tapestry needle to weave in ends and assemble toy.
- Size: The size of the finished toy depends on the yarn and hook you use. My Lisa the Mouse is approx. 30 cm (12 inches) tall.
- Language: English
- Instructions: US crochet terms and abbreviations (including complete stitch guide), written instructions, step-by-step pictures showing how to make each detail and put the toy together.
- Lisa the Mouse pattern is available in my Ravelry store HERE.
- Add this pattern to your Ravelry Queue
* DISCLOSURE: This blog contains affiliate links (marked with *). By using them you support my blog. Thank you!
Subscribe to:
Posts (Atom)


