
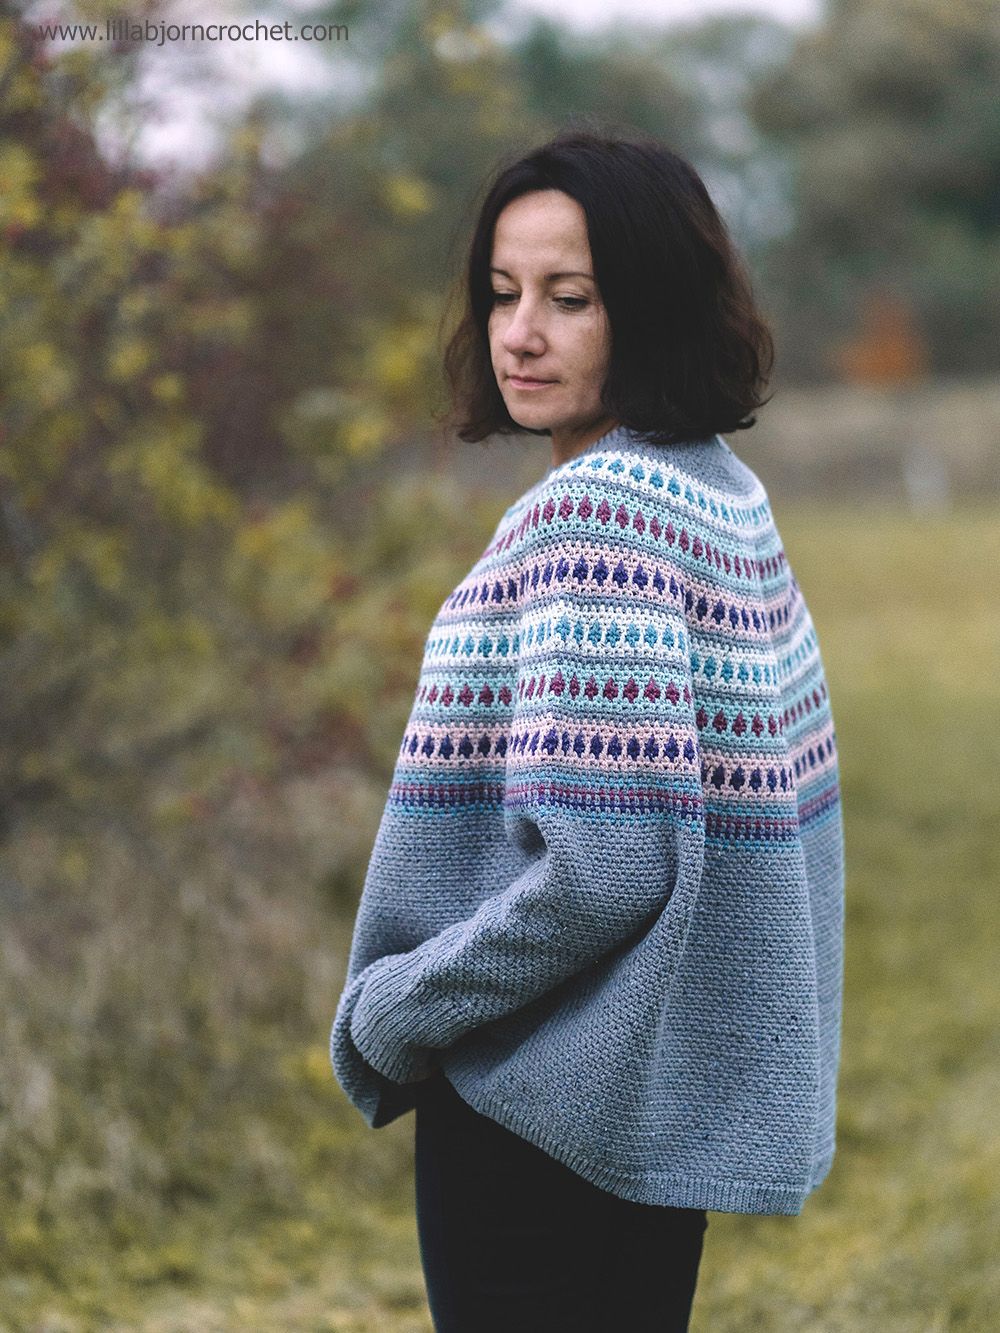
Following the series of satisfying crochet, I would like to introduce a new delicate pattern. Please, welcome a Morning Mist Wrap! The pattern is easy to follow, and instructions for both the wrap’s body and the border are quick to memorize. You can adjust the width and length as you need. And create a blanket instead, for example.

Copyright. An original LillaBjörnCrochet Design (Tatsiana Kupryianchyk). Copyright 2014-2023. All rights reserved. This pattern is for personal use only. It cannot be sold, redistributed or edited in any way. Translations and video tutorials are not allowed. You can sell your finished products, but you cannot use my pictures to promote them. Please, always note me as a designer of this pattern. Thank you!
***
Find a ready-to-print copy of Morning Mist Wrap pattern without ads on Ravelry HERE and Etsy HERE.
***
Materials:
Scheepjes Organicon (100% Organic Soft Cotton; 50g/170m)
Color 265 Morning Mist x 13 balls
You can find Organicon yarn in your
local Scheepjes shop, and via online retailers:
Caro's Atelier* (NL & Europe),
Taemombo
(US & Canada)
2.20mm crochet hook or any size to achieve the gauge
Scissors, yarn needle

Gauge: 24 sts and 12 rows to measure 10 x 10cm/4 x 4in (counting every ch3-sp as 2 sts), blocked
Measurements: approx. 58 x 200cm/22¾ x 78 ¾in, blocked
Pattern for gauge: Make a relaxed cord with 29 foundation sc. Work Rows 1-5 from the Wrap’s body, then repeat rows 2-5 two more times. Block the swatch and measure in the middle carefully for width and height, counting every ch3-sp as 2 sts.

Abbreviations (US terms)
beg beginning
blo back loop(s) only
ch chain stitch
dc double crochet
prev previous
RS right side
ss slip stitch
st(s) stitch(es)
sp(s) space(s)
yo yarn over the hook
WS wrong side

Stitch guide
BPdc (back post double crochet): yo, insert hook from back to front to back around the post of indicated stitch, yo, draw up a loop, [yo, pull through 2 loops] twice.
FPdc (front post double crochet): yo, insert hook from front to back to front around the post of indicated stitch, yo, draw up a loop, [yo, pull through 2 loops] twice.
FPdc2tog (front post double crochet 2 together): *yo, insert hook from front to back to front around the post of next st, yo, draw up a loop, yo, pull through 2 loops; rep from * once more, yo, pull through all 3 loops on hook.
FPdc3tog (front post double crochet 3 together): *yo, insert hook from front to back to front around the post of next st, yo, draw up a loop, yo, pull through 2 loops; rep from * twice more, yo, pull through all 4 loops on hook.
Pattern repeats:
[…] repeat instructions inside […] as many times as indicated in the pattern.
*…; rep instruction after * as many times as indicated in the pattern.

INSTRUCTIONS
Find a ready-to-print copy of Morning Mist pattern without ads on Ravelry HERE and Etsy HERE.
Video tutorial:
WRAP’S BODY
Stitch count is multiple of 8 sts + 5 sts
To begin, work a relaxed cored with 141 foundation sc.
Row 1 (WS): Ch4 (counts as first dc and ch2-sp – here and throughout), skip 1 st, 1dc in next st, [ch3, skip 2 sts, 3dc, ch3, skip 2 sts, 1dc] rep to last 2 sts, ch2, skip 1 st, 1dc in last st, turn.
Pattern repeat
Row 2 (RS): Ch4, skip first sp, 2dc in next dc, [ch3, skip sp, 1FPdc3tog around next 3 dc, ch3, skip sp, 3dc in next dc] rep to last sp working 2dc instead of last 3dc, ch2, 1dc in first ch of beg ch4 from prev row, turn.
Row 3 (WS): Ch4, skip sp, 1BPdc around each of next 2 dc, [ch3, skip sp, 1dc in next FPdc3tog, ch3, skip sp, 1BPdc round each of next 3 dc] rep to last sp working 2BPdc instead of last 3BPdc, ch2, 1dc in first ch of beg ch4 from prev row, turn.
Row 4: Ch4, skip sp, 1FPdc2tog around next 2 BPdc, [ch3, skip sp, 3dc in next dc, ch3, skip sp, 1FPdc3tog around next 3 BPdc] rep to last sp working FPdc2tog instead of last FPdc3tog, ch2, 1dc in first ch of beg ch4 from prev row, turn.
Row 5: Ch4, skip sp, 1dc in next FPdc2tog, [ch3, skip sp, 1BPdc around each of next 3 dc, ch3, skip sp, 1dc in next FPdc3tog] rep to last sp working last dc in last FPdc2tog, ch2, 1dc in first ch of beg ch4 from prev row, turn.
End of pattern repeat
Rep Rows 2-5 until the wrap has the desired length (I made 63 repeats). Then proceed to Border.

BORDER
Round 1 (RS): Ch1 (does not count as a st here and throughout), *(1sc, ch2, 1sc) in first st, cont along the top of the wrap working 2sc in every ch3-sp and 1sc in every st, when you reach next corner work (1sc, ch2, 1sc) in last st, turn a quarter and cont along the long side working 2sc in each sp until you come to the bottom of the wrap, turn a quarter and cont along the bottom, (1sc, ch2, 1sc) in first st of the bottom, 1sc in each st of the bottom to last st, (1sc, ch2, 1sc) in last st, turn a quarter and cont along the long side working 2sc in each sp until you come to the top of the wrap, join with ss to beg sc, 1ss to next ch2-sp, turn.
Round 2 (WS): Ch1, *1ss blo in each st to next corner ch2-sp, (1sc, ch2, 1sc) in corner ch2-sp; rep from * around, ss to beg st in blo, turn. On the next rounds, you will work vertically towards the sides of the scarf, creating a slim textured border.
Row 3 (RS): Ss to corner ch2-sp, ch5, 1ss in second ch from hook, 2sc, 1ss, 1ss blo in each of next 2 sts of the wrap’s side, turn.
Row 4 (WS): Ch1, 4ss blo, turn.
Row 5 (RS): Ch1, 1ss blo, 2sc blo, 1ss blo, skip the bump on the edge of prev row, 1ss blo in each of next 2 sts of the wrap’s side, turn.
Row 6 (WS): Ch1, 4ss blo, turn.
*Rep Rows 5-6 until you come to the next corner. On the last repeat of Row 5 you should cover one or both chains of the corner ch2-sp, then turn a quarter and cont along the next side repeating Rows 5-6; rep from * around the remaining three sides, covering the first two ch of Row 3 on the last repeat of Row 5. Fasten off.

FINISHING
Weave in ends, block wrap to measurements.
***
Find a ready-to-print copy of the pattern without ads, you can find it on Ravelry HERE and Etsy HERE.
Hope you enjoy!
p.s. When the picture of the Morning Mist Wrap was revealed on social media,
one of the followers on Facebook mentioned that it looked familiar to the
Shadowplay Shawl
created by Sascha Blase. Great minds think alike! Looking like sisters,
the wraps have major texture and constructive differences. If you prefer a
border as-you-go, please definitely check the Sascha's pattern!


You can purchase ready-to-print and ads free pdf with the complete pattern
on
Ravelry HERE
and
Etsy HERE.
Special Abbreviations
mdc mosaic double crochet: work dc as normal but work it in sk st of same color 3 rows below, working st in front of intervening 2 rows of chs in contrast color; all mdc are worked on RS of work.

INSTRUCTIONS
Mosaic Panel
Change to 2.5mm hook or cont with 3mm hook making sure Mosaic Panel does not ripple.
Row 1 (RS) With Yarn B, ch1 (does not count as st throughout), 2sc in first st, 6sc, ch1, sk 1 st, 1sc, *ch1, sk 1 st, 9sc, ch1, sk 1 st, 1sc**; rep from * to ** to last 6 sts before cnr, ch1, sk 1 st, 5sc, (1sc, ch2, 1sc) in cnr ch-2 sp, 5sc, ch1, sk 1 st, 1sc, rep from * to ** to last 8 sts, ch1, sk 1 st, 6sc, 2sc in last st, turn. [269 sts per side counting every ch-1 sp as a st]
Row 2 (WS) Ch1, 2sc in first st, 7sc, ch1, sk sp, 1sc, *ch1, sk sp, 9sc, ch1, sk sp, 1sc**; rep from * to ** to last sp and 6 sts before cnr, ch1, sk sp, 6sc, (1sc, ch2, 1sc) in cnr ch-2 sp, 6sc, ch1, sk sp, 1sc, rep from * to ** to last sp and 8 sts, ch1, sk sp, 7sc, 2sc in last st (changing back to Yarn A in last yo), turn. [2 sts increased on each side from here onwards]
Row 3 With Yarn A, ch1, 2sc in first st, 3sc, *ch1, sk 1 st, 4sc, 1mdc, 1sc, 1mdc, 4sc**; rep from * to ** to last 3 sts before cnr, ch1, sk 1 st, 2sc, (1sc, ch2, 1sc) in cnr ch-2 sp, 2sc, rep from * to ** to last 5 sts, ch1, sk 1 st, 3sc, 2sc in last st.
Row 4 Ch1, 2sc in first st, 4sc, *ch1, sk sp, 11sc**; rep from * to ** to last sp and 3 sts before cnr, ch1, sk sp, 3sc, (1sc, ch2, 1sc) in cnr ch-2 sp, 3sc, rep from * to ** to last sp and 5 sts, ch1, sk sp, 4sc, 2sc in last st (cc to Yarn B).
Cont changing to Yarn A and B after every other row. When Whirl cake has been used up, join Whirlette of the same color for Yarn A.
Row 5 With Yarn B, ch1, 2sc in first st, ch2, sk 2 sts, 3sc, 1mdc, 3sc, *ch2, sk 2 sts, 1sc, ch2, sk 2 sts, 3sc, 1mdc, 3sc**; rep from * to ** to last st before cnr, ch1, sk 1 st, (1sc, ch2, 1sc) in cnr ch-2 sp, ch1, sk 1 st, 3sc, 1mdc, 3sc, rep from * to ** to last 3 sts, ch2, sk 2 sts, 2sc in last st.
Row 6 Ch1, 2sc in first st, 1sc, ch2, sk sp, 7sc, *ch2, sk sp, 1sc, ch2, sk sp, 7sc**; rep from * to ** to last sp and st before cnr, ch1, sk sp, 1sc, (1sc, ch2, 1sc) in cnr ch-2 sp, 1sc, ch1, sk sp, 7sc, rep from * to ** to last sp and 2 sts, ch2, sk sp, 1sc, 2sc in last st (cc to Yarn A).
Row 7 With Yarn A, ch1, 2sc in first st, 1sc, ch1, sk 1 st, 2mdc, 3sc, ch1, sk 1 st, 3sc, *2mdc, ch1, sk 1 st, 2mdc, 3sc, ch1, sk 1 st, 3sc**; rep from * to ** to last sp and 2 sts before cnr, 1mdc, 1sc, ch1, sk 1 st, (1sc, ch2, 1sc) in cnr ch-2 sp, ch1, sk 1 st, 1sc, 1mdc, 3sc, ch1, sk 1 st, 3sc, rep from * to ** to last sp and 3 sts, 2mdc, ch1, sk 1 st, 1sc, 2sc in last st.

Row 8 Ch1, 2sc in first st, 2sc, *ch1, sk sp, 5sc**; rep from * to ** to last sp and st before cnr, ch1, sk sp, 1sc, (1sc, ch2, 1sc) in cnr ch-2 sp, 1sc, rep from * to ** to last sp and 3 sts, ch1, sk sp, 2sc, 2sc in last st (cc to Yarn B).
Row 9 With Yarn B, ch1, 2sc in first st, ch2, sk 2 sts, 1sc, 1mdc, 1sc, *ch2, sk 2 sts, 2sc, 1mdc, 2sc, ch2, sk 2 sts, 1sc, 1mdc, 1sc**; rep from * to ** to last st before cnr, ch1, sk 1 st, (1sc, ch2, 1sc) in cnr ch-2 sp, ch1, sk 1 st, 1sc, 1mdc, 1sc, rep from * to ** to last 3 sts, ch2, sk 2 sts, 2sc in last st.
Row 10 Ch1, 2sc in first st, 1sc, ch2, sk sp, 3sc, *ch2, sk sp, 5sc, ch2, sk sp, 3sc**; rep from * to ** to last sp and st before cnr, ch1, sk sp, 1sc, (1sc, ch2, 1sc) in cnr ch-2 sp, 1sc, ch1, sk sp, 3sc, rep from * to ** to last sp and 2 sts, ch2, sk sp, 1sc, 2sc in last st (cc to Yarn A).
Row 11 With Yarn A, ch1, 2sc in first st, 2sc, 2mdc, 1sc, *ch1, sk 1 st, 1sc, 2mdc, 2sc, ch1, sk 1 st, 2sc, 2mdc, 1sc**; rep from * to ** to last sp and 4 sts before cnr, ch1, sk 1 st, 1sc, 1mdc, 2sc, (1sc, ch2, 1sc) in cnr ch-2 sp, 2sc, 1mdc, 1sc, rep from * to ** to last sp and 5 sts, ch1, sk 1 st, 1sc, 2mdc, 2sc, 2sc in last st.
Row 12 Ch1, 2sc in first st, 6sc, *ch1, sk sp, 5sc**; rep from * to ** to cnr, (1sc, ch2, 1sc) in cnr ch-2 sp, 5sc, rep from * to ** to last 2 sts, 1sc, 2sc in last st (cc to Yarn B).
Row 13 With Yarn B, ch1, 2sc in first st, ch1, sk 1 st, 1sc, ch1, sk 1 st, 4sc, 1mdc, 4sc, *ch1, sk 1 st, 1mdc, ch1, sk 1 st, 4sc, 1mdc, 4sc**; rep from * to ** to last 2 sts before cnr, ch2, sk 2 sts, (1sc, ch2, 1sc) in cnr ch-2 sp, ch2, sk 2 sts, 4sc, 1mdc, 4sc, rep from * to ** to last 4 sts, ch1, sk 1 st, 1sc, ch1, sk 1 st, 2sc in last st.
Row 14 Ch1, 2sc in first st, 1sc, *ch1, sk sp, 1sc, ch1, sk sp, 9sc**; rep from * to ** to last sp and st before cnr, ch2, sk sp, 1sc, (1sc, ch2, 1sc) in cnr ch-2 sp, 1sc, ch2, sk sp, 9sc, rep from * to ** to last 2 sps and 3 sts, (ch1, sk sp, 1sc) twice, 2sc in last st (cc to Yarn A).
Row 15 With Yarn A, ch1, 2sc in first st, 2sc, *1mdc, 1sc, 1mdc, 4sc, ch1, sk 1 st, 4sc**; rep from * to ** to last sp and 2 sts before cnr, 2mdc, 2sc, (1sc, ch1, 1sc) in cnr ch-2 sp, 2sc, 2mdc, ***4sc, ch1, sk 1 st, 4sc, 1mdc, 1sc, 1mdc****; rep from *** to **** to last 3 sts, 2sc, 2sc in last st.
Row 16 Ch1, 2sc in first st, 10sc, *ch1, sk sp, 11sc**; rep from * to ** to cnr omitting last 2 sc, (1sc, ch2, 1sc) in cnr ch-2 sp, 9sc, rep from * to ** to end, work one more sc in last st (cc to Yarn B).
Row 17 With Yarn B, ch1, 2sc in first st, 3sc, ch2, sk 2 sts, 1sc, *ch2, sk 2 sts, 3sc, 1mdc, 3sc, ch2, sk 2 sts, 1sc**; rep from * to ** to last 4 sts before cnr, ch4, sk 4 sts, (1sc, ch2, 1sc) in cnr ch-2 sp, ch4, sk 4 sts, 1sc, rep from * to ** to last 6 sts, ch2, sk 2 sts, 3sc, 2sc in last st.
Row 18 Ch1, 2sc in first st, 4sc, ch2, sk sp, 1sc, *ch2, sk sp, 7sc, ch2, sk sp, 1sc**; rep from * to ** to last sp and st before cnr, ch4, sk sp, 1sc, (1sc, ch2, 1sc) in cnr ch-2 sp, 1sc, ch4, sk sp, 1sc, rep from * to ** to last sp and 5 sts, ch2, sk sp, 4sc, 2sc in last st (cc to Yarn A).
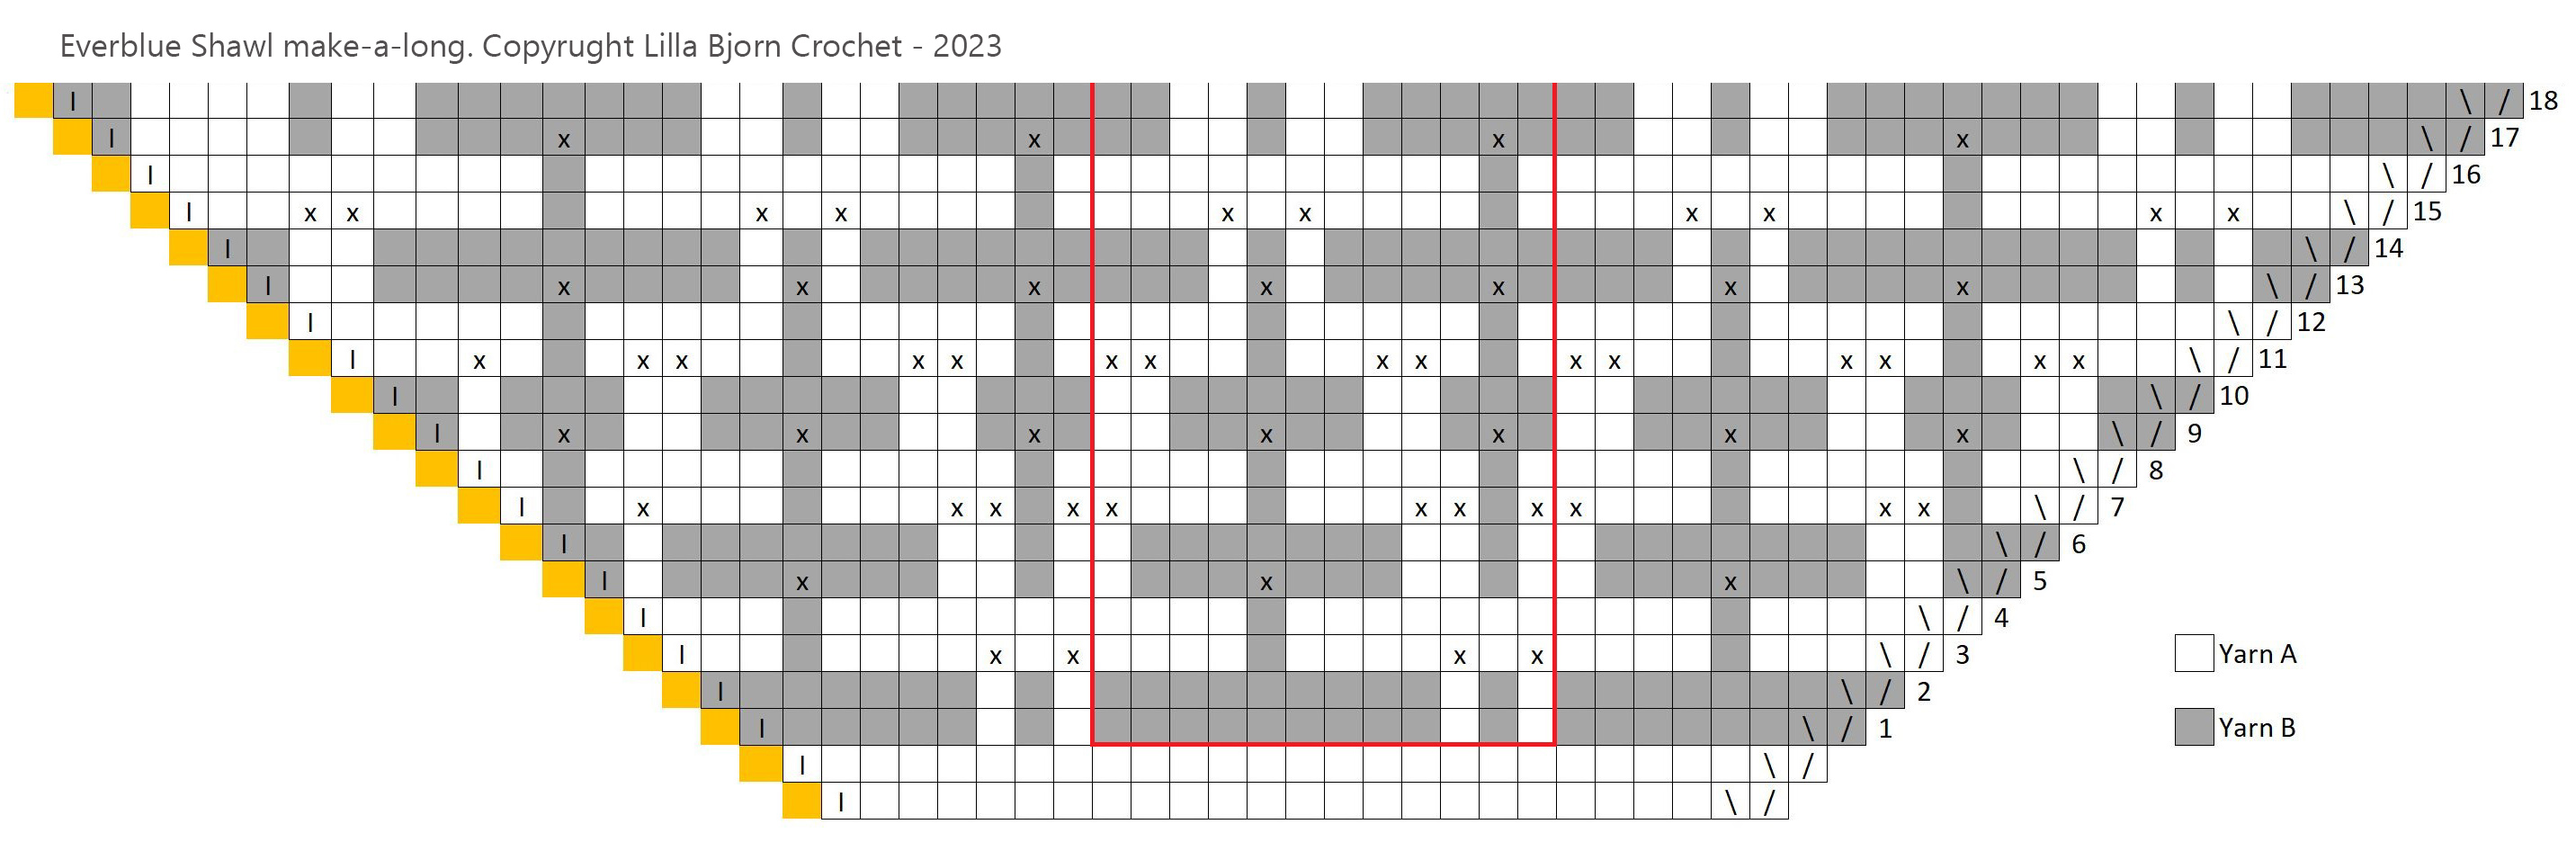
How to read Mosaic Panel Chart
The chart is read bottom to top. Each row represents 1 row on one side of Shawl.
Yellow squares indicate cnr ch2-sps. Follow chart until cnr. Work (1sc, ch2, 1sc) in ch-2 sp (those sc are marked with I), then cont in opposite direction to mirror same mosaic st patt for second side.
Each square shows 1 st or 1 sk st. The first square of each row shows color used for that row. 2sc marked with \ / at beg and end of each row indicate increases: 2sc worked in first/last st of prev row.
When squares of different color appear in row, they should be sk and instead you work same number of chs as number of sk sts. For 1 sk st, ch1; for 2 sk sts, ch2, etc.
On RS rows, with contrasting color, work mdc in these sk sts from 3 rows below in front of chs of prev rounds. Mdc are marked with X. On WS only sc and chs are made. Sc are made in sts of prev row, and chs are made in same place on both rows.
|
|
Click the chart to open it in full size |
Next week we will finish the Everblue Shawl. See you on Wednesday!
You can purchase ready-to-print and ads free pdf with the complete pattern
on
Ravelry HERE
and
Etsy HERE.
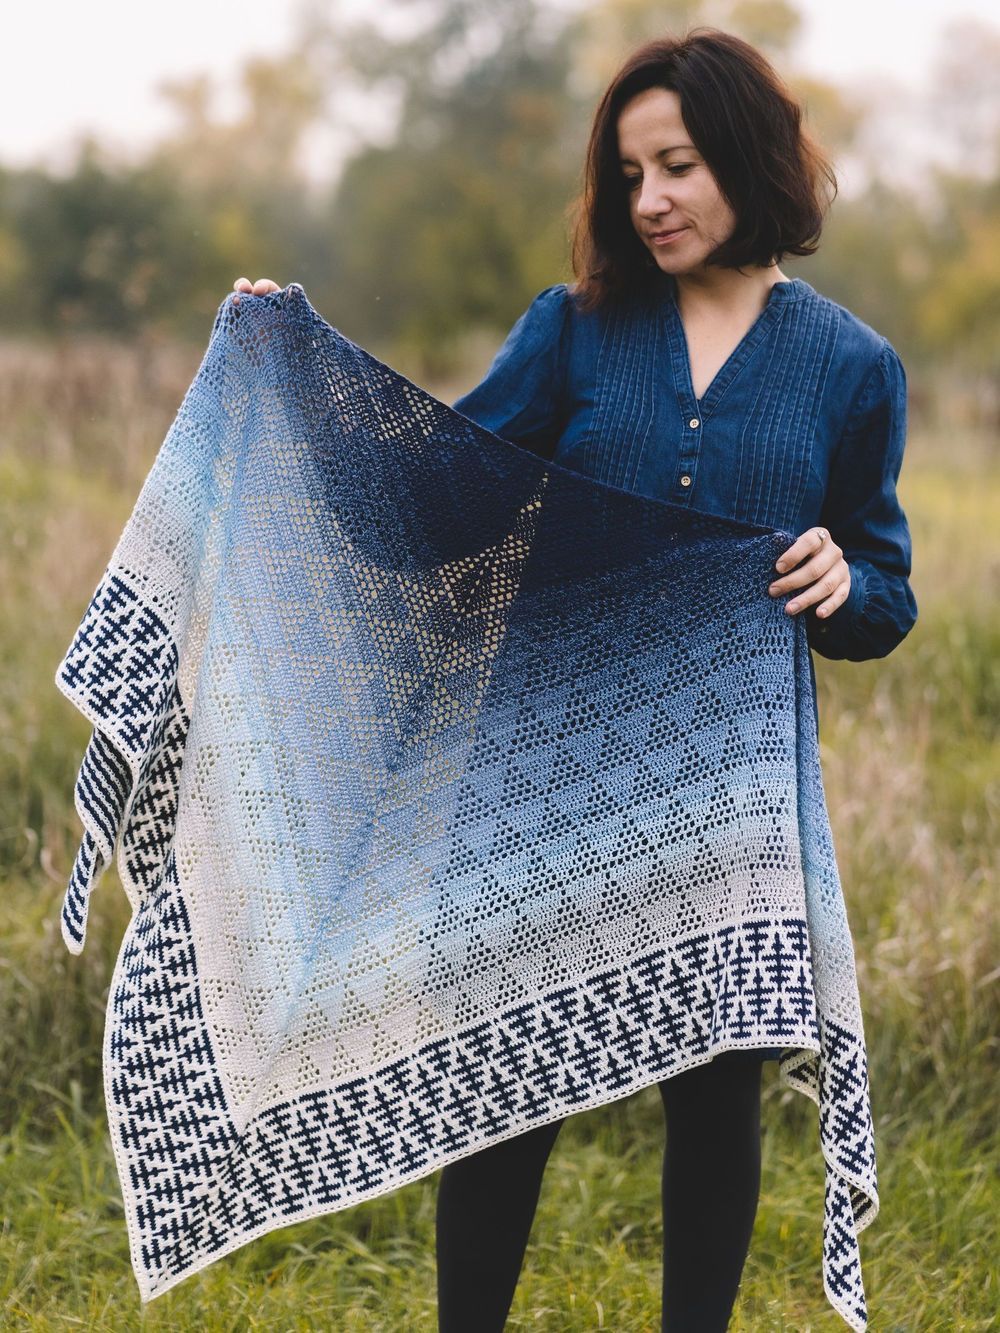
The shawl season has started! At least in our part of the world. The days are getting warmer but still not warm enough to hide winter clothes. And honestly – you can wear a nice shawl anytime of the year! Today, I am happy to announce that a new make-a-long will start next week here on my blog. We will be making an Everblue Shawl!
|
||
|
Photo credit: evakobz; Sample maker: Loele van den Bergh |
|
|
Some of you have probably recognized this design. It was released exclusively as a part of a Limited Edition mystery kit by Scheepjes back in 2021. You even might be a lucky owner of the kit with a limited color of Scheepjes Whirl. Those kits were a huge success! But if you were not lucky enough to put your hands on one of those, you can now make the shawl with a stand-alone pattern, and any colors of your choice.
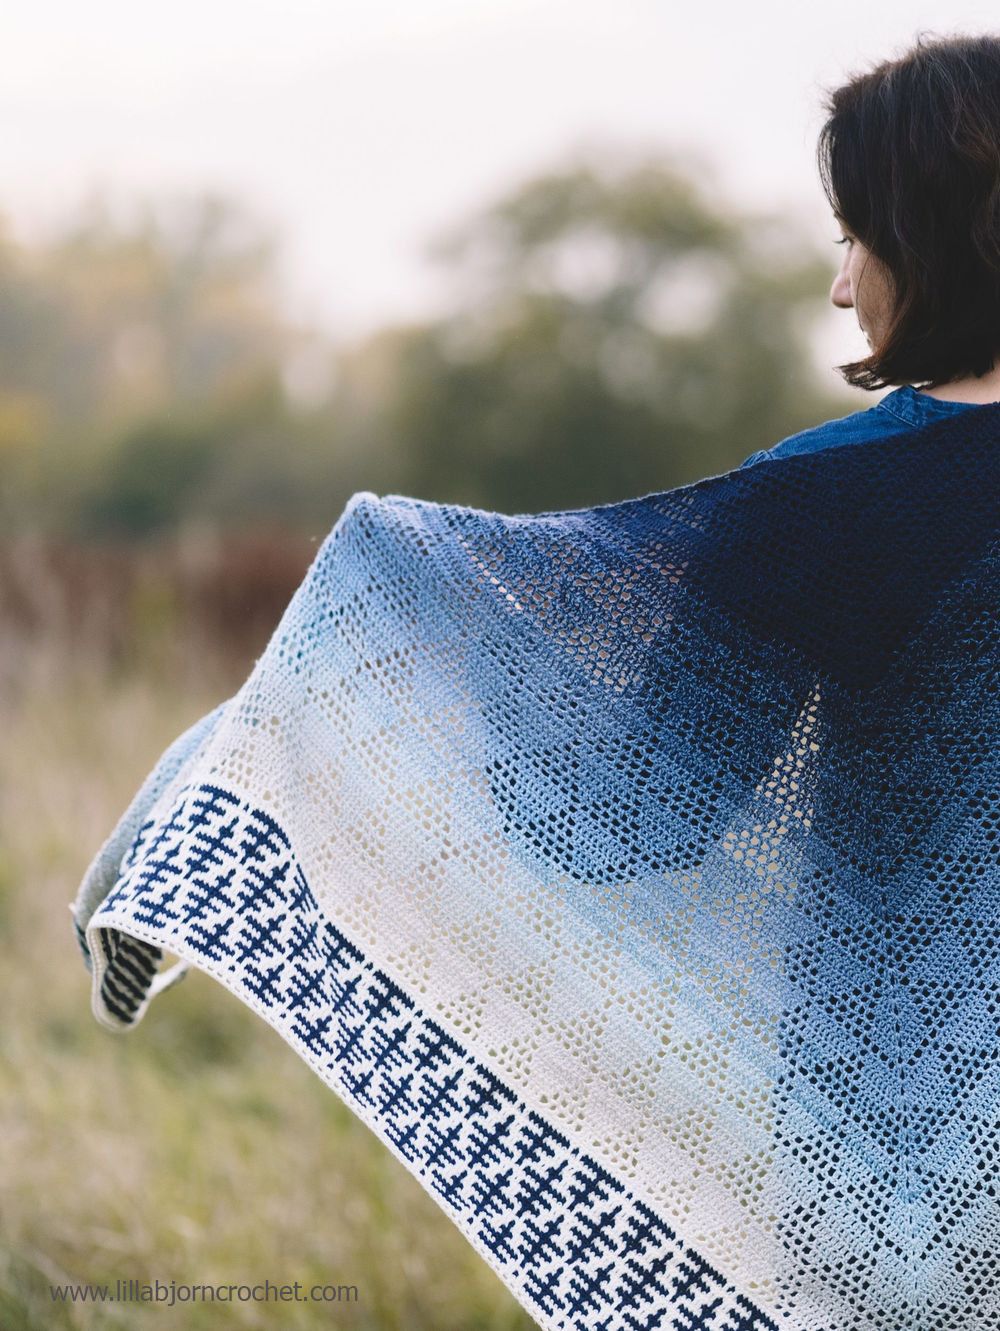
The idea of the mystery Scheepjes kit was to create a project to occupy busy crafter’s hands at a Crimbo Limbo time between Christmas day and New Year’s Day. I happily accepted this commission, as it ideally fell in line with my own aesthetics and design taste.
The main color (which is not available any more, but you have lots of other gradient shades of Whirl yarn to choose from) was a rich and soft green ombre, which we combined with a dark chocolate color to create an image of an evergreen tree with the pine cones. I was aiming to bring the similar cone pattern to the shawl’s body as well, and created an infinity lace fabric with mesh triangles.

And the good news is that this pattern design is easily adjustable into a square if you wish to create a blanket instead of a shawl.
After a very popular Scheepjes make-a-long with this shawl, I decided to bring the memories back and release it as a stand-along pattern. It will be a free one released as a make-a-long starting next Wednesday, March 29th, 2023. And then every Wednesday, a new portion of the instructions will be added here to my blog.
However, if you are not patient to wait and prefer to keep your pattern library as easy-to-print ads-free pdfs, you can purchase a complete pattern for the Everblue Shawl on Ravelry HERE and Etsy HERE. The files come with both UK and US crochet terms and include materials list, full written instructions and two charts – for the shawl’s body and mosaic panel.

The official support for this make-a-long will be handled in my Facebook group HERE. You can share your progress pictures there and ask questions. If you are not a member yet, make sure to join the fun and do not forget to answer a simple question upon a sign-up. Without this answer, your request will be denied.
If you want to get ready ahead of time, you will need fingering yarn and 2.5mm and 3mm crochet hooks. Scheepjes Whirl yarn is the best option for this pattern. Choose one Whirl cake and then two Whirlettes cakes. The best result will be if you choose a Whirlette which ideally matches one of the Whirl’s tails (either inside or outside), and then another contrast Whirlette for the mosaic patterning.
If you are curious about this exact sample (kindly made for me by wonderful
Loele van der Bergh), the colors are: Whirl 755 Blueberry Bambam (one cake),
Whirlette 860 Ice (one cake) and Whirlette 868 Bilberry (one cake).

You can find both yarns in your nearest Scheepjes local store, or order via online retailers: Wool Warehouse* (UK, international shipping), Caro’s Atelier* (NL, Europe), Taemombo* (US, Canada).
See you next Wednesday!
***
EDIT (timline):
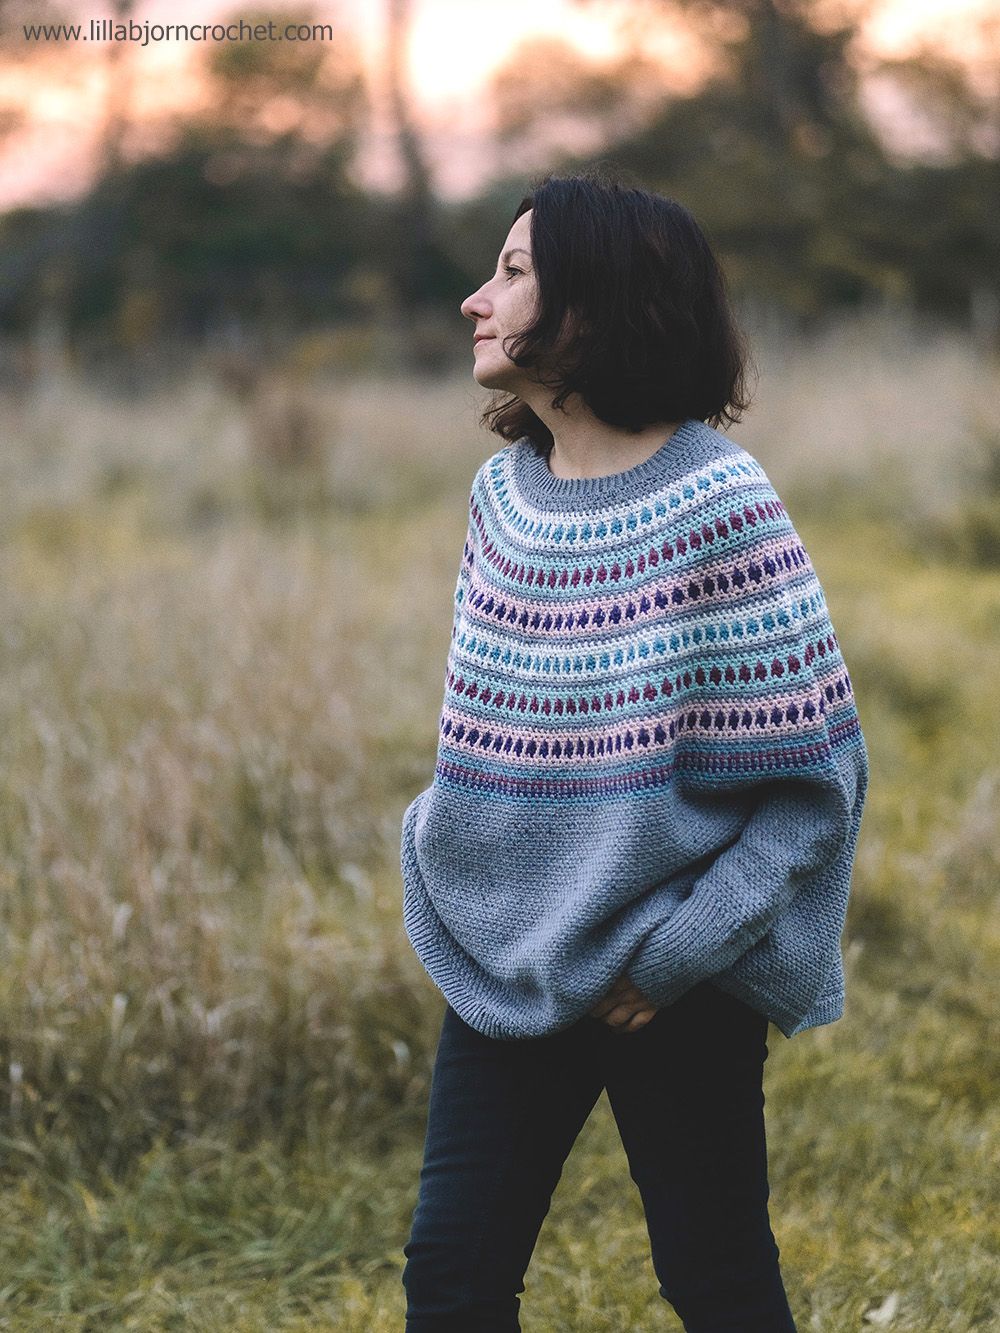
The swoncho (a mixed shape between the sweater and poncho) has been on my designing list for a couple of years now. And today I am excited to say that I have finally brought this idea to life. Let me introduce – a Polar Swoncho. A comfy and snaggy garment for everyday wear. The pattern is free on my blog below, but if you prefer an ads-free version in one printable pdf file, you can find it HERE on Ravelry and HERE on Etsy.

Materials:
Scheepjes Terrazzo (70% Recycled Mulesing Free Wool x 30% Recycled Viscose; 50g/175m)
You can find Terrazzo via your local Scheepjes shops, and via online retailers: Wool Warehouse* (UK, international shipping), Caro's Atelier* (NL and Europe), Taemombo (US and Canada).
Here is the list of the colors and yarn amounts for some colors. As you can
see, only 1/2 skein was used for some colors, so you can play around and use
less colors for your swoncho. Or go creative and use leftovers from your
stash.
Yarn A: 741 Cenere (747 Tortora) x8 balls / 13 balls
Yarn B: 745 Pergamena (740 Piuma) x1 ball /1 ball
Yarn C: 735 Fontana (749 Caffe Nero) x1 ball (21g) / 1 ball (25g)
Yarn D: 736 Bolle (746 Sabbia) x1 ball / 2 balls (52g)
Yarn E: 720 Sangria (710 Pera) x1 ball (25g) / 1 ball (27g)
Yarn F: 712 Sassolino (756 Guscio d'Uovo) x1 ball / 2 balls (57g)
Yarn G: 730 Melanzana (748 Cioccolato) x1 ball (30g) / 1 ball (33g)
3mm, 3.5mm and 4mm crochet hook (or the size to obtain correct gauge)

Sizes: 1 (2)
Size 1 will fit XXS-L
Size 2 will fit XL-3X
Lower body circumference: 172 (205) cm/68¼ (93¼) in
Sleeve circumference at elbow: 28 (42.5) cm/11 (16 ¾) in
Gauge for beginning of the yoke: 24 sts x 22 rows to measure 10 x 10cm/ 4 x 4in, blocked (every sc and every ch1 and will count as 1 st)
Gauge for lower body: 22 sts x 22 rows to measure 10 x 10cm/ 4 x 4in, blocked (every sc and every ch1 and will count as 1 st)
Abbreviations (US terms)
beg begin(ning)
blo back loop(s) only
BOR beginning of the round
ch chain stitch
cont continue
corr corresponding
dc double crochet
dc3tog double crochet 3 together
prev previous
RS right side
sc single crochet
ss slip stitch
st(s) stitch(es)
sp(s) space(s)
yo yarn over the hook
pm place marker
prev previous
WS wrong side
Pattern repeats:
[…] repeat instruction inside […] as many times as indicated in the pattern.
*…; rep instruction after * as many times as indicated in the pattern.
Pattern notes:
The Polar Swoncho (sweater&poncho) is designed in two sizes. It is worked seamlessly top down. First, the ribbing with slip stitches in back loops only is worked vertically, then some short rows are done to raise the back neck. Then the deep and wide mosaic yoke is worked down to separation for body and sleeves. The sleeves are ribbed, and you can make them longer for a cuffed version. Then the lower body is worked in rounds to the desired length and is finished with ribbing.
INSTRUCTIONS
YOKE
Beg with Yarn A and 3mm hook.
Row 1: Ch7, 1ss in second ch from hook, 1ss in each ch across, turn – 6 ss.
Row 2: Ch1 (does not count as a st here and throughout), 1ss blo in each st across, turn.
Rep Row 2 until you have 68 (84) ridges (or 136 (168) rows in total).
Join short sides of the ribbing with flat zip method on RS and cont working along the long edge of the ribbing.
Round 1: Change to 3.5mm hook. Ch1, [1sc in next ridge, ch1] rep
around, ss to beg sc –
136 (168) sts counting every sc and every ch1-sp as a st; or 68 (84) sc
& ch-sps.
Round 2: Ch1, [1sc in next sp, ch1, skip 1 st] rep around, ss to beg sc.
SHORT ROWS
Short row 1: Ch1, 1sc in next sp (pm for BOR – centre back), [ch1, skip 1 st, 1sc in next sp] rep 16 (18) times, ch1, skip 1 st, 1ss in next sp, turn.
Short row 2: Ch1, skip ss, 1sc in next sp, [ch1, skip 1 st, 1sc in next sp] rep to BOR, ch1 (pm), skip BOR, 1sc in same sp as BOR, [ch1, skip 1 st, 1sc in next sp] rep 16 (18) times, ch1, skip 1 st, 1ss in next sp, turn.
Short row 3: Ch1, skip ss, 1sc in next sp, [ch1, skip 1 st, 1sc in next sp] rep to 4sc and 3 ch1-sps left before edge of prev short row (moving BOR m up to corr st/sp), ch1, skip 1 st, 1ss in next sp, turn.
Rep Short row 3 three more times.
Next row (RS): Ch1, skip ss, 1sc in next sp, [ch1, skip 1 st, 1sc in next sp] rep to last sc before marked BOR sp, ch1, skip 1 st, 1ss to marked sp, turn.
Resume working in rounds.
Next round (WS): Ch1, 1sc in next sp, ch1, skip 1 st, [1sc, ch1, skip 1
st] rep around skipping the bumps/steps on the edges of the short rows and
working sc in same sp as ss; at the same time work (1sc, ch1, 1sc) in any
space at centre front, join with ss to beg sc, turn –
68 (84) sc & ch-sps.
IMPORTANT! Gauge check: at this point the gauge should be 24 sts per 10cm/4in (slightly stretched or blocked) – to Mosaic Panel 5.
INC SET 1 (RS): Ch1, [1sc in next sp, ch1, skip 1 st, (1sc, ch1, 1sc) in next sp, ch1, skip 1 st] rep around, ss to beg sc, turn – 102 (126) sc & ch-sps.
Next round (WS): Ch1, 1sc in next sp, ch1, skip 1 st, [1sc, ch1, skip 1 st] rep around, ss to beg sc, turn.
MOSAIC PANEL 1
Round 1 (RS): Ch1 changing to Yarn B (do not cut Yarn A), 1sc in next sp, ch1, skip 1 st, [1sc, ch1, skip 1 st] rep around, ss to beg sc, turn.
Rounds 2-4: Cont with Yarn B and rep Round 1 alternating RS and WS.
Round 5 (RS): Ch1 changing to Yarn C (do not cut Yarn B), [1sc in next sp, 1dc in skipped st from 3 round below, 1sc in next sp, ch1, skip 1 st] rep around, ss to beg sc, turn.
Round 6 (WS): Cont with Yarn C. Ch1, [1sc in next sp, ch1, skip 1 st, 1sc in next st, ch1, skip 1 st] rep around, ss to beg sc, turn.
Round 7 (RS): Ch1 changing back to Yarn B by grabbing it up on WS (make sure the float of yarn does not pull) and cut Yarn C leaving approx. 25cm/10in tail for safe weaving, [1sc in next sp, ch1, skip 1 st, 1sc in next sp, 1dc in skipped st from 3 rounds below] rep around, ss to beg sc, turn.
Round 8 (WS): Cont with Yarn B. Ch1, [1sc in next st, ch1, skip 1 st, 1sc in next sp, ch1, skip 1 st] rep around, ss to beg sc, turn.
Round 9 (RS): Change back to Yarn A (cut Yarn B), rep Round 1.
MOSAIC PANEL 2
Rep Rounds 1-9 from Mosaic Panel 1 using Yarn D and Yarn E for contrast color. Then rep round 9 once more.
MOSAIC PANEL 3
Rep Rounds 1-9 from Mosaic Panel 1 using Yarn F and Yarn G for contrast color.
INC SET 3: Ch1, *[1sc in next st, ch1, skip 1 st] three times, (1sc, ch1, 1sc) in next sp, ch1, skip 1 st; rep from * around, ss to beg sc, turn – 170 (210) sc & ch-sps.
MOSAIC PANEL 4
Rep Rounds 1-9 from Mosaic Panel 1. Then rep round 9 once more.
MOSAIC PANEL 5
Change to 4mm hook or stay with 3.5mm and work a little looser. The gauge should change to approx. 22sts per 10cm/4in, slightly stretched, or blocked.
Rep Rounds 1-9 from Mosaic Panel 1 using Yarn D and Yarn E as contrast color.
INC SET 4: Ch1, *[1sc in next st, ch1, skip 1 st] four times, (1sc, ch1, 1sc) in next sp, ch1, skip 1 st; rep from * around, ss to beg sc, turn – 204 (252) sc & ch-sps.
MOSAIC PANEL 6
Rep Rounds 1-9 from Mosaic Panel 1 using Yarn F and Yarn G for contrast color. Then rep round 9 once more. Then rep Round 1 from Mosaic panel 1 – seven more times, alternating RS and WS in the following order of colors: C, A, E, A, G, A, C.
INC SET 5: Ch1, *[1sc in next st, ch1, skip 1 st] five times, (1sc, ch1, 1sc) in next sp, ch1, skip 1 st; rep from * around, ss to beg sc, turn – 238 (294) sc & ch-sps.
Cont with Yarn A and rep Round 1 from Mosaic Panel 1 until yoke is approx. 50cm/20in measured on front down from neck opening (should be just below elbow). Work last round on WS.

SEPARATION for BODY and SLEEVES
Separation round (RS): Ch1, 1sc in next st, [ch1, skip 1 st, 1sc in next sp] rep 45 (53) times for half back, ch7 (13), skip 55 (81) sts for one sleeve, 1sc in next sp, [ch1, skip 1 st, 1 sc in next sp] rep 91 (106) times for front, ch7 (13), skip 55 (81) sts for another sleeve, [1sc in next sp, ch1, skip 1 st] rep 46 (53) times, ss to beg sc, turn – 380 (452) sts for lower body counting both ch-bridges.

LOWER BODY
Round 1 (WS): Ch1, [1sc in next sp, ch1, skip 1 st] rep around treating every underarm ch as one st, ss to beg sc, turn – 190 (226) sc & ch-sps.
Round 2: Ch1, [1sc in next sp, ch1, skip 1 st] rep around, ss to beg sc, turn.
Rep round 2 until lower body is approx. 20 (25) cm/7¾ (9¾) in measured down from the underarm, or 2cm shorter than desired length. Then proceed to ribbing.
Ribbing for lower body
Work horizontally (side to side) around the bottom of the body with 3mm hook.
Row 1 (RS): Ch8, beg in second ch from hook, 7ss, 1ss in next sc lower body, turn – 8 sts.
Row 2 (WS): Ch1, skip ss worked on lower body, 7ss blo, turn – 7 sts.
Row 3 (RS): Ch1, 7ss, 1ss in next sc lower body, turn – 8 sts.
Row 4 (WS): Ch1, skip ss worked on lower body, 7ss blo, turn – 7 sts.
Rows 5-8: Rep Rows 3-4 twice.
Row 9: Ch1, 7ss blo, 1ss in next sp on lower body, turn – 8 sts.
Row 10: Ch1, skip ss worked on lower body, 7ss blo, turn – 7 sts.
Rep rows 3-10 around. Join short sides of ribbing with flat zip method, fasten off.

SLEEVES (both alike)
With RS facing you, attach Yarn A with ss in a central space in the underarm.
Round 1: Ch1 (doesn’t count as a st), 1sc in same sp as join, ch1, skip 1 st, [1sc in next sp, ch1, skip 1 st] rep around, ss to beg sc, turn – 31 (47) sc & ch-sps.
Round 2: Ch1, [1sc in next sp, ch1, skip 1 st] rep around, ss to beg sc, turn.
Rep round 2 until sleeve is approx. 13cm/5in measured from underarm. Proceed to Ribbing.

Ribbing for sleeves
Work horizontally (side to side) around the bottom of the body with 3mm hook.
Row 1 (RS): Ch32 (or more if you prefer a cuffed sleeve), beg in second ch from hook, 31ss, 1ss in next sc of lower body, turn – 32 sts.
Row 2 (WS): Ch1, skip ss worked on lower body, 31ss blo, turn – 31 sts.
Row 3 (RS): Ch1, 31ss, 1ss in next sc of lower body, turn – 32 sts.
Row 4 (WS): Ch1, skip ss worked on lower body, 31ss blo, turn – 31 sts.
Rows 5-8: Rep Rows 3-4 twice.
Row 9: Ch1, 31ss blo, 1ss in next sp on lower body, turn – 32 sts.
Row 10: Ch1, skip ss worked on lower body, 31ss blo, turn – 31 sts.
Rep rows 3-10 around. Join short sides of ribbing with flat zip method, fasten off.
Purchase ads-free printable pdf with Polar Poncho pattern on
Ravelry HERE
and
Etsy HERE. the file includes all written instructions and link to the video tutorial
without ads.
Congratulations! Your Polar Swoncho is now finished!
It took a little longer than I expected, but finally here it is! My new blanket design with a hexagonal shape. No name yet, I want it to be something special, so any ideas are welcome.

This blanket is very simple, yet elegant, and even timeless I’d say. I have come up with a nice textured stitch pattern with a repetition of just a few rounds. Easy to remember and joyful to crochet.

I am also happy with the choice of Scheepjes Metropolis yarn, one of my ever favorite. The blanket turned out to be light, warm with a fantastic drape.

It took almost 700g (14 skeins) and the measurements are approx. 160 cm/63in with a 3.5 mm hook. Perfect lap blanket size for TV evenings, or the sunsets outside in the garden. The textured design reminds me a flower, with the rays growing and thinning gradually.

You can follow the pattern on your own and repeat each section for more times for an even bigger blanket. It is finished with a small, delicate border. And I can imagine that this blanket will look gorgeous in every color.
The sample was kindly made by Esther Schippers, and I am sending sincere thanks to her :)

Next week, my family is taking a break. We will go for a short holiday to the mountains with a very limited internet connection. But after we come back home, the FREE pattern of this blanket will be released right away.

And in a meanwhile you can start preparing with the yarn. You can find
Metropolis yarn at your
local Scheepjes shops
and via online retailers:
Wool Warehouse* (UK, international shipping),
Caro’s Atelier* (NL, Europe),
Taemombo* (US&Canada).
Subscribe to a newsletter not to miss a single post. You can also follow me on Facebook, Pinterest and Instagram.
With a tiny delay, here is reveal of my furry hexagon blanket (no name yet, so any suggestions are more than welcome).
My blanket turned out of a lap size (with 18 hexagons and 4 halves), but no need to mention that with more hexagons and half hexagons you can create yours in any desired size. But probably good to keep in mind that this project is a yarn eater, and a huge blanket will be very heavy.
![]()
First, I chose 4 colors of the Scheepjes Furry Tales yarn, but in the process of making I decided to stay with just three: grey, green and pink. And to combine them with dark grey color of the Scheepjes Chunky Monkey.
The free pattern will be published next week on my blog, but you if you would like to go ahead and be prepared, here are my yarn mounts: Scheepjes Furry Tales (978 Cinderella x 3 balls, 985 Little Pig x 3 balls, 983 Tinkerbell x 3 balls) and Scheepjes Chunky Monkey 1099 Mid Grey x 6 balls).
And the size of my finished blanket is approx. 108cmx130cm/42½inx51¼in.
Both yarns can be found in Scheepjes local shops or via online retailers: Wool Warehouse* (UK, international shipping), Caro’s Atelier* (NL and Europe), Taemombo (US and Canada).
As you can see, the shape of the motif is simple and classy. Blankets made of hexagons are always the winner. To my taste they look much more interesting, that just squares.
If you have doubts about creating a hexagonal shape with furry yarn, do not be. I tried to work out a simple pattern. And using stitch markers should help you to crochet with fur without stress of finding stitches. The key is in creating chain-spaces and working into them on the next rounds.
I’m also planning to create a detailed photo-tutorial, so that you feel confident.
See you next week!
Subscribe to a newsletter not to miss a single post. You can also follow me on Facebook, Pinterest and Instagram.
Do you remember furry yarn I showed you last week? It has already grown into something. I still need to weave in ends and put all motifs together, but you can already see what it will be!

This time I have taken a challenge of designing hexagons with fur yarn. And my pattern worked! In my opinion, these fluffy motifs look chick in combination with regular chunky yarn.

I have made a few projects with Furry Tales yarn by Scheepjes, all with the same method I have kind of invented. Though it has been probably used before, and I just do not know about this. At least my small online research did not bring any results.
All projects I saw were made with a large hook and advice to “feel the stitches with your fingers”. I personally found this blind method almost impossible to perform. And decided to make chain-spaces instead of stitches, and then work stitches of the next rows/rounds into these large spaces, which are easy to identify and feel with your hands. Much easier than to look for stitches worked in a row next to each other.

The pattern I am working on right now will be free on my blog, and I will release it soon. It will contain written instructions, as well as lots of progress pictures.
Wait for next week and I will reveal my newest blanket design for you! (Yes, it will be a blanket, but I believe you have already guessed that).
Subscribe to a newsletter not to miss a single post. You can also follow me on Facebook, Pinterest and Instagram.
Furry yarn is adorably soft and squishy. I do not know of anyone who would not be happy to climb under such a mountain of cosiness. When touching gentle fluff, we, adults, are becoming kids again. The fluffy yarn provides an anti-stress effect, but working with it (especially, crocheting) can be a headache!
My furry adventure is nearly finished! The blanket is hot off the hook, and it is only left to write down the pattern. As promised, there will be a super-fast and easy way to work with fluffy yarn. I did my best to create as easy to follow instructions as possible.
The pattern will come in two versions.
One is for the squared pattern in intarsia crochet. I have chosen 5 colors of Scheepjes Furry Tales for my own blanket and worked with 7 different skeins at the same time.
And another version will be a simple and straightforward as-you-go blanket. Either done in one solid color, or in stripes.
Here is an example of what Loele van den Bergh has made with two colors of Furry Tales: 976 Buttons (10 skeins) and 983 Tinkerbell (5 skeins) (with three skeins of Chunky Monkey 2005 Navy).
My version is more for the kids I guess, with a mix of pink, purple and green (and neutrals). I used three skeins of furry Tales in each of 5 colors: 970 Snow White, 985 Little Pig, 983 Tinkerbell, 978 Cinderella and 988 Aladdin (with three skeins of Chunky Monkey 1099 Mid Grey).
And Laura Jackson decided to create a calm version with 977 Beauty, 978 Cinderella and 980 The Beast (and three skeins of Chunky Monkey 1302 Air Force Blue).
Furry Tales yarn is available in your local Scheepjes shops and also via online retailers: Wool Warehouse* and Black Sheep wools (UK, international shipping), Caro's Atelier* (NL, Europe), Taemombo (US and Canada).
This blanket will be the first in my “furry series”. In all excitement, I have already started to work on something new! And it is going very well.
See you soon!
Subscribe to a newsletter not to miss a single post. You can also follow me on Facebook, Pinterest and Instagram.


