
It’s been over two years since the Alma Sweater release, one of the most popular sweaters I have designed. At that time, I was taking small steps in the developing of the brioche crochet technique. I was investigating ways of simplifying instructions, finding the balance between the texture and the drape.

|
|
photo credit
@evakobz |
I continued designing in this wonderful technique, and I even created an online masterclass about brioche crochet, available via my blog. And as a result, I totally fell in love with this technique.
Today, I would like to introduce my new pattern, which I named Weave it! Sweater.
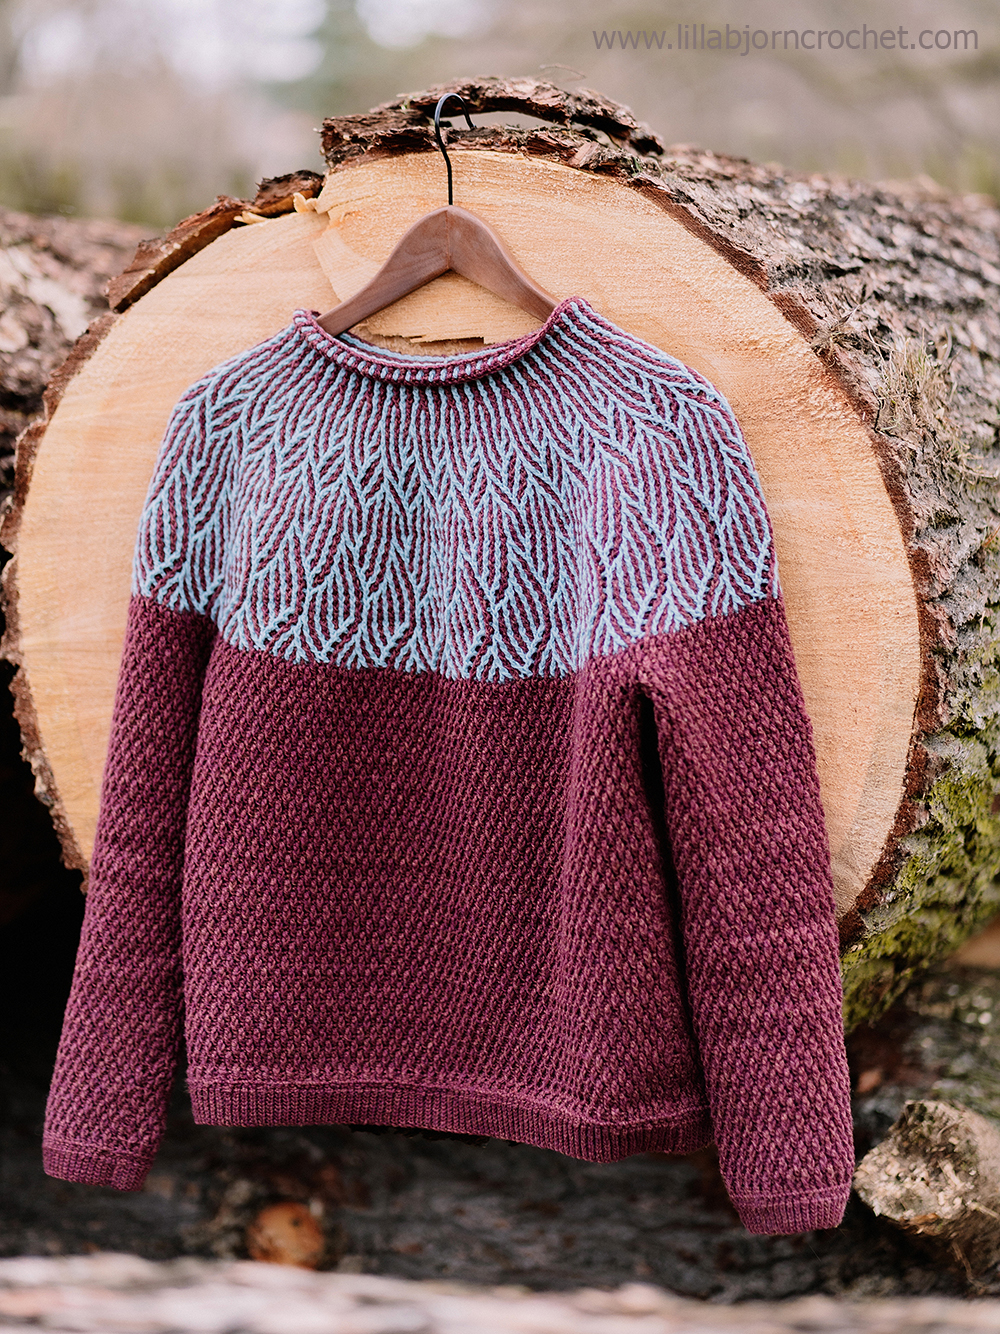
Those who made Alma sweaters in the past can see some reflections in this new design. However, this time I stepped away from the floral curvy lines and decided to make it more graphical and geometrical.
The pattern is available on Ravelry HERE and Etsy HERE with 20% discount through Monday, February 27th, 2023. You do not need to enter any codes, because the price has been discounted already.
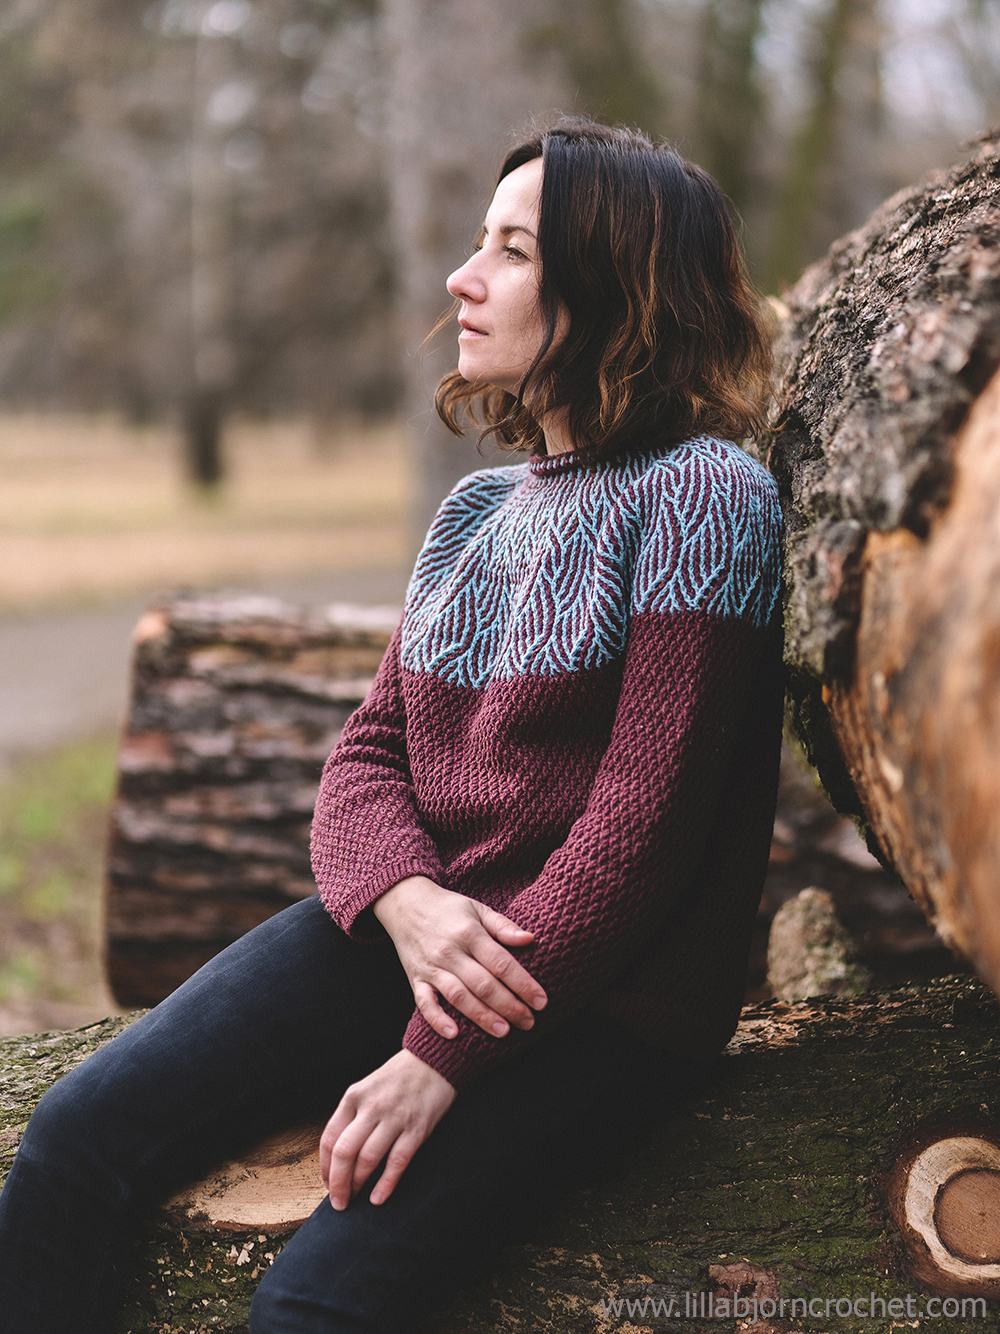
The deep textured yoke grows into the lower body made with an alpine crochet stitch for even more texture throughout the entire design. And slim knit-look ribbing on the sleeves and the bottom of the sweater adds a stylish detail.

If you ask me if I like how Weave it! Sweater turned out; I will say: I love it!
Like all my garments, it is worked from top down and comes in nine different sizes. In my opinion, the textured lower body matches the brioche yoke in the best way, but you can of course choose a different stitch pattern for the body and sleeves.

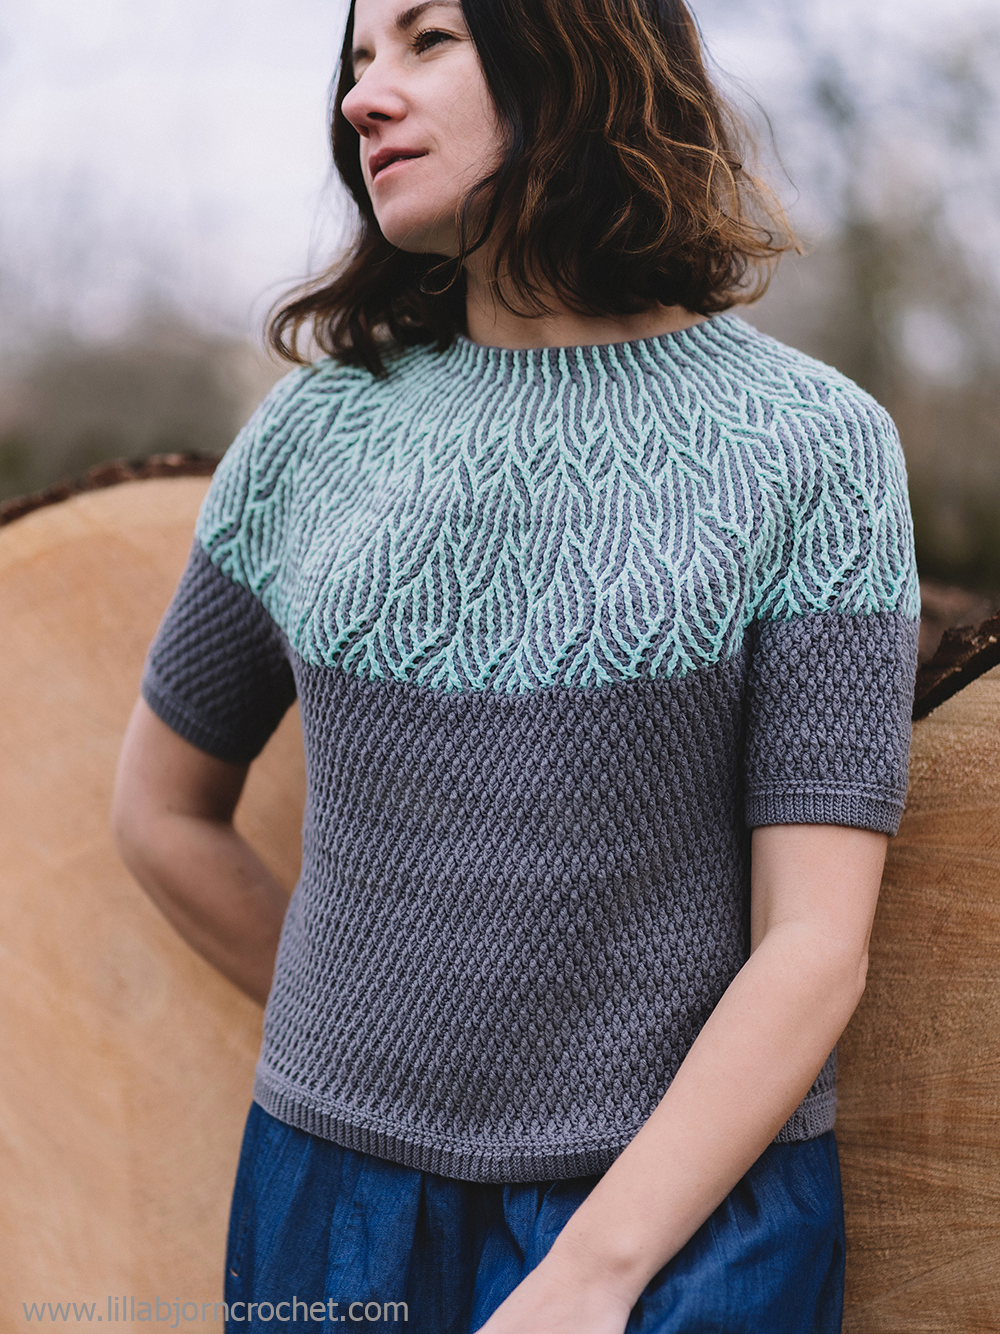
I chose Scheepjes Metropolis yarn, which is fingering weight and very soft. However, you can also opt for a short-sleeved version and choose soft cotton blend yarn for your sweater. Look at another sample made with Scheepjes Cotton 8 yarn.
Other alternative wool-free yarn options can be Scheepjes Whirlette (together with Scheepjes Spirit, for example), or Scheepjes Bamboo Soft.
You can find Scheepjes yarn in your
local Scheepjes store, or buy it online via international retailers:
Wool Warehouse* (UK, international shipping),
Caro's Atelier* (NL and Europe),
Taemombo (US and
Canada).

Weave it! Sweater is designed to fit with 5–12cm/2–5in of
positive ease at the bust. It is worked seamlessly from the top down. First
the yoke is worked in rounds to sleeve separation, then the lower body is
worked in rounds to the bottom, followed by the sleeves worked top down. The
length of both the body and the sleeves is easily adjustable.
Look at these beautiful samples created by our testers team:
Macarena Marskell, Laura Jackson, Lisa Marlow, Elizabeth Garcia Kalka,
Esther Schippers, Jenna Bowers, Claire Shipton and Sandra Veneman.

The yoke is worked in rounds, with only one color used per round. You do not cut the yarn, and do not have many tails to weave in.

The pattern comes with lots of progress pictures to help you. And additionally, I have recorded a video tutorial explaining the basis of the brioche crochet in the rounds, and showing the first few rounds of the yoke.
Grab your copy of the pattern on Ravelry or Etsy. Hope you will enjoy!

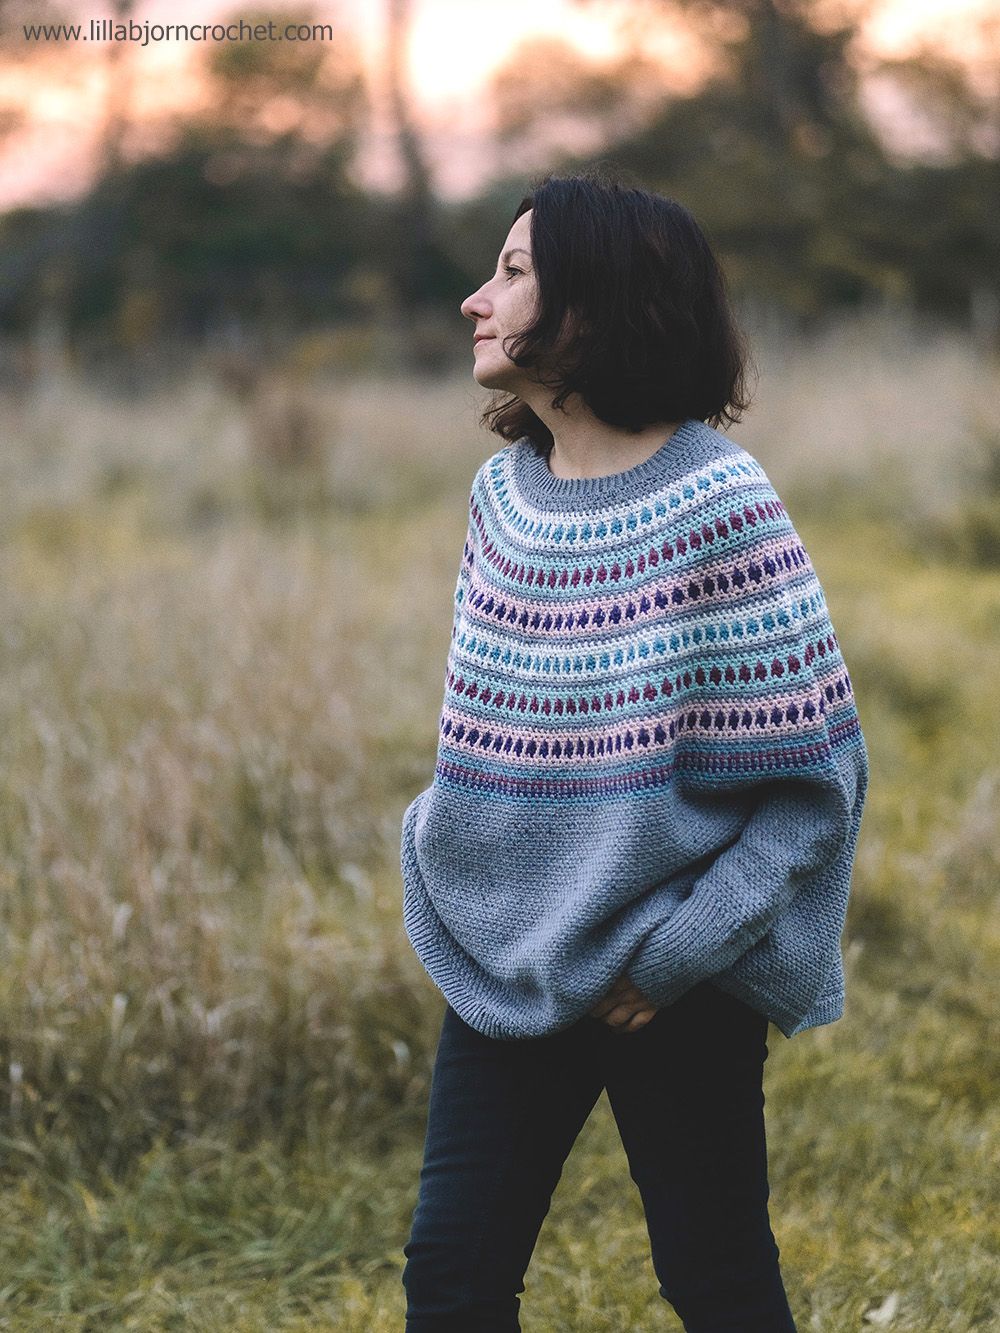
The swoncho (a mixed shape between the sweater and poncho) has been on my designing list for a couple of years now. And today I am excited to say that I have finally brought this idea to life. Let me introduce – a Polar Swoncho. A comfy and snaggy garment for everyday wear. The pattern is free on my blog below, but if you prefer an ads-free version in one printable pdf file, you can find it HERE on Ravelry and HERE on Etsy.

Materials:
Scheepjes Terrazzo (70% Recycled Mulesing Free Wool x 30% Recycled Viscose; 50g/175m)
You can find Terrazzo via your local Scheepjes shops, and via online retailers: Wool Warehouse* (UK, international shipping), Caro's Atelier* (NL and Europe), Taemombo (US and Canada).
Here is the list of the colors and yarn amounts for some colors. As you can
see, only 1/2 skein was used for some colors, so you can play around and use
less colors for your swoncho. Or go creative and use leftovers from your
stash.
Yarn A: 741 Cenere (747 Tortora) x8 balls / 13 balls
Yarn B: 745 Pergamena (740 Piuma) x1 ball /1 ball
Yarn C: 735 Fontana (749 Caffe Nero) x1 ball (21g) / 1 ball (25g)
Yarn D: 736 Bolle (746 Sabbia) x1 ball / 2 balls (52g)
Yarn E: 720 Sangria (710 Pera) x1 ball (25g) / 1 ball (27g)
Yarn F: 712 Sassolino (756 Guscio d'Uovo) x1 ball / 2 balls (57g)
Yarn G: 730 Melanzana (748 Cioccolato) x1 ball (30g) / 1 ball (33g)
3mm, 3.5mm and 4mm crochet hook (or the size to obtain correct gauge)

Sizes: 1 (2)
Size 1 will fit XXS-L
Size 2 will fit XL-3X
Lower body circumference: 172 (205) cm/68¼ (93¼) in
Sleeve circumference at elbow: 28 (42.5) cm/11 (16 ¾) in
Gauge for beginning of the yoke: 24 sts x 22 rows to measure 10 x 10cm/ 4 x 4in, blocked (every sc and every ch1 and will count as 1 st)
Gauge for lower body: 22 sts x 22 rows to measure 10 x 10cm/ 4 x 4in, blocked (every sc and every ch1 and will count as 1 st)
Abbreviations (US terms)
beg begin(ning)
blo back loop(s) only
BOR beginning of the round
ch chain stitch
cont continue
corr corresponding
dc double crochet
dc3tog double crochet 3 together
prev previous
RS right side
sc single crochet
ss slip stitch
st(s) stitch(es)
sp(s) space(s)
yo yarn over the hook
pm place marker
prev previous
WS wrong side
Pattern repeats:
[…] repeat instruction inside […] as many times as indicated in the pattern.
*…; rep instruction after * as many times as indicated in the pattern.
Pattern notes:
The Polar Swoncho (sweater&poncho) is designed in two sizes. It is worked seamlessly top down. First, the ribbing with slip stitches in back loops only is worked vertically, then some short rows are done to raise the back neck. Then the deep and wide mosaic yoke is worked down to separation for body and sleeves. The sleeves are ribbed, and you can make them longer for a cuffed version. Then the lower body is worked in rounds to the desired length and is finished with ribbing.
INSTRUCTIONS
YOKE
Beg with Yarn A and 3mm hook.
Row 1: Ch7, 1ss in second ch from hook, 1ss in each ch across, turn – 6 ss.
Row 2: Ch1 (does not count as a st here and throughout), 1ss blo in each st across, turn.
Rep Row 2 until you have 68 (84) ridges (or 136 (168) rows in total).
Join short sides of the ribbing with flat zip method on RS and cont working along the long edge of the ribbing.
Round 1: Change to 3.5mm hook. Ch1, [1sc in next ridge, ch1] rep
around, ss to beg sc –
136 (168) sts counting every sc and every ch1-sp as a st; or 68 (84) sc
& ch-sps.
Round 2: Ch1, [1sc in next sp, ch1, skip 1 st] rep around, ss to beg sc.
SHORT ROWS
Short row 1: Ch1, 1sc in next sp (pm for BOR – centre back), [ch1, skip 1 st, 1sc in next sp] rep 16 (18) times, ch1, skip 1 st, 1ss in next sp, turn.
Short row 2: Ch1, skip ss, 1sc in next sp, [ch1, skip 1 st, 1sc in next sp] rep to BOR, ch1 (pm), skip BOR, 1sc in same sp as BOR, [ch1, skip 1 st, 1sc in next sp] rep 16 (18) times, ch1, skip 1 st, 1ss in next sp, turn.
Short row 3: Ch1, skip ss, 1sc in next sp, [ch1, skip 1 st, 1sc in next sp] rep to 4sc and 3 ch1-sps left before edge of prev short row (moving BOR m up to corr st/sp), ch1, skip 1 st, 1ss in next sp, turn.
Rep Short row 3 three more times.
Next row (RS): Ch1, skip ss, 1sc in next sp, [ch1, skip 1 st, 1sc in next sp] rep to last sc before marked BOR sp, ch1, skip 1 st, 1ss to marked sp, turn.
Resume working in rounds.
Next round (WS): Ch1, 1sc in next sp, ch1, skip 1 st, [1sc, ch1, skip 1
st] rep around skipping the bumps/steps on the edges of the short rows and
working sc in same sp as ss; at the same time work (1sc, ch1, 1sc) in any
space at centre front, join with ss to beg sc, turn –
68 (84) sc & ch-sps.
IMPORTANT! Gauge check: at this point the gauge should be 24 sts per 10cm/4in (slightly stretched or blocked) – to Mosaic Panel 5.
INC SET 1 (RS): Ch1, [1sc in next sp, ch1, skip 1 st, (1sc, ch1, 1sc) in next sp, ch1, skip 1 st] rep around, ss to beg sc, turn – 102 (126) sc & ch-sps.
Next round (WS): Ch1, 1sc in next sp, ch1, skip 1 st, [1sc, ch1, skip 1 st] rep around, ss to beg sc, turn.
MOSAIC PANEL 1
Round 1 (RS): Ch1 changing to Yarn B (do not cut Yarn A), 1sc in next sp, ch1, skip 1 st, [1sc, ch1, skip 1 st] rep around, ss to beg sc, turn.
Rounds 2-4: Cont with Yarn B and rep Round 1 alternating RS and WS.
Round 5 (RS): Ch1 changing to Yarn C (do not cut Yarn B), [1sc in next sp, 1dc in skipped st from 3 round below, 1sc in next sp, ch1, skip 1 st] rep around, ss to beg sc, turn.
Round 6 (WS): Cont with Yarn C. Ch1, [1sc in next sp, ch1, skip 1 st, 1sc in next st, ch1, skip 1 st] rep around, ss to beg sc, turn.
Round 7 (RS): Ch1 changing back to Yarn B by grabbing it up on WS (make sure the float of yarn does not pull) and cut Yarn C leaving approx. 25cm/10in tail for safe weaving, [1sc in next sp, ch1, skip 1 st, 1sc in next sp, 1dc in skipped st from 3 rounds below] rep around, ss to beg sc, turn.
Round 8 (WS): Cont with Yarn B. Ch1, [1sc in next st, ch1, skip 1 st, 1sc in next sp, ch1, skip 1 st] rep around, ss to beg sc, turn.
Round 9 (RS): Change back to Yarn A (cut Yarn B), rep Round 1.
MOSAIC PANEL 2
Rep Rounds 1-9 from Mosaic Panel 1 using Yarn D and Yarn E for contrast color. Then rep round 9 once more.
MOSAIC PANEL 3
Rep Rounds 1-9 from Mosaic Panel 1 using Yarn F and Yarn G for contrast color.
INC SET 3: Ch1, *[1sc in next st, ch1, skip 1 st] three times, (1sc, ch1, 1sc) in next sp, ch1, skip 1 st; rep from * around, ss to beg sc, turn – 170 (210) sc & ch-sps.
MOSAIC PANEL 4
Rep Rounds 1-9 from Mosaic Panel 1. Then rep round 9 once more.
MOSAIC PANEL 5
Change to 4mm hook or stay with 3.5mm and work a little looser. The gauge should change to approx. 22sts per 10cm/4in, slightly stretched, or blocked.
Rep Rounds 1-9 from Mosaic Panel 1 using Yarn D and Yarn E as contrast color.
INC SET 4: Ch1, *[1sc in next st, ch1, skip 1 st] four times, (1sc, ch1, 1sc) in next sp, ch1, skip 1 st; rep from * around, ss to beg sc, turn – 204 (252) sc & ch-sps.
MOSAIC PANEL 6
Rep Rounds 1-9 from Mosaic Panel 1 using Yarn F and Yarn G for contrast color. Then rep round 9 once more. Then rep Round 1 from Mosaic panel 1 – seven more times, alternating RS and WS in the following order of colors: C, A, E, A, G, A, C.
INC SET 5: Ch1, *[1sc in next st, ch1, skip 1 st] five times, (1sc, ch1, 1sc) in next sp, ch1, skip 1 st; rep from * around, ss to beg sc, turn – 238 (294) sc & ch-sps.
Cont with Yarn A and rep Round 1 from Mosaic Panel 1 until yoke is approx. 50cm/20in measured on front down from neck opening (should be just below elbow). Work last round on WS.

SEPARATION for BODY and SLEEVES
Separation round (RS): Ch1, 1sc in next st, [ch1, skip 1 st, 1sc in next sp] rep 45 (53) times for half back, ch7 (13), skip 55 (81) sts for one sleeve, 1sc in next sp, [ch1, skip 1 st, 1 sc in next sp] rep 91 (106) times for front, ch7 (13), skip 55 (81) sts for another sleeve, [1sc in next sp, ch1, skip 1 st] rep 46 (53) times, ss to beg sc, turn – 380 (452) sts for lower body counting both ch-bridges.

LOWER BODY
Round 1 (WS): Ch1, [1sc in next sp, ch1, skip 1 st] rep around treating every underarm ch as one st, ss to beg sc, turn – 190 (226) sc & ch-sps.
Round 2: Ch1, [1sc in next sp, ch1, skip 1 st] rep around, ss to beg sc, turn.
Rep round 2 until lower body is approx. 20 (25) cm/7¾ (9¾) in measured down from the underarm, or 2cm shorter than desired length. Then proceed to ribbing.
Ribbing for lower body
Work horizontally (side to side) around the bottom of the body with 3mm hook.
Row 1 (RS): Ch8, beg in second ch from hook, 7ss, 1ss in next sc lower body, turn – 8 sts.
Row 2 (WS): Ch1, skip ss worked on lower body, 7ss blo, turn – 7 sts.
Row 3 (RS): Ch1, 7ss, 1ss in next sc lower body, turn – 8 sts.
Row 4 (WS): Ch1, skip ss worked on lower body, 7ss blo, turn – 7 sts.
Rows 5-8: Rep Rows 3-4 twice.
Row 9: Ch1, 7ss blo, 1ss in next sp on lower body, turn – 8 sts.
Row 10: Ch1, skip ss worked on lower body, 7ss blo, turn – 7 sts.
Rep rows 3-10 around. Join short sides of ribbing with flat zip method, fasten off.

SLEEVES (both alike)
With RS facing you, attach Yarn A with ss in a central space in the underarm.
Round 1: Ch1 (doesn’t count as a st), 1sc in same sp as join, ch1, skip 1 st, [1sc in next sp, ch1, skip 1 st] rep around, ss to beg sc, turn – 31 (47) sc & ch-sps.
Round 2: Ch1, [1sc in next sp, ch1, skip 1 st] rep around, ss to beg sc, turn.
Rep round 2 until sleeve is approx. 13cm/5in measured from underarm. Proceed to Ribbing.

Ribbing for sleeves
Work horizontally (side to side) around the bottom of the body with 3mm hook.
Row 1 (RS): Ch32 (or more if you prefer a cuffed sleeve), beg in second ch from hook, 31ss, 1ss in next sc of lower body, turn – 32 sts.
Row 2 (WS): Ch1, skip ss worked on lower body, 31ss blo, turn – 31 sts.
Row 3 (RS): Ch1, 31ss, 1ss in next sc of lower body, turn – 32 sts.
Row 4 (WS): Ch1, skip ss worked on lower body, 31ss blo, turn – 31 sts.
Rows 5-8: Rep Rows 3-4 twice.
Row 9: Ch1, 31ss blo, 1ss in next sp on lower body, turn – 32 sts.
Row 10: Ch1, skip ss worked on lower body, 31ss blo, turn – 31 sts.
Rep rows 3-10 around. Join short sides of ribbing with flat zip method, fasten off.
Purchase ads-free printable pdf with Polar Poncho pattern on
Ravelry HERE
and
Etsy HERE. the file includes all written instructions and link to the video tutorial
without ads.
Congratulations! Your Polar Swoncho is now finished!
I have been experimenting with different crochet techniques all my life. My kind of designing career started in early childhood when I was making weird clothes and accessories for my dolls, and also myself. And when I decided to start designing professionally and turn it into my daily job, I took overlay and mosaic crochet techniques onboard. But you live, you learn. There are still a lot of things and tricks you can learn. And today I would like to introduce you something I have never done before. Please, welcome – For Them Sweater.
You can find the pattern on Ravelry HERE and Etsy HERE and enjoy a 20% introductory discount through Monday, October 10th, 2022. No codes needed; the price has been discounted already.
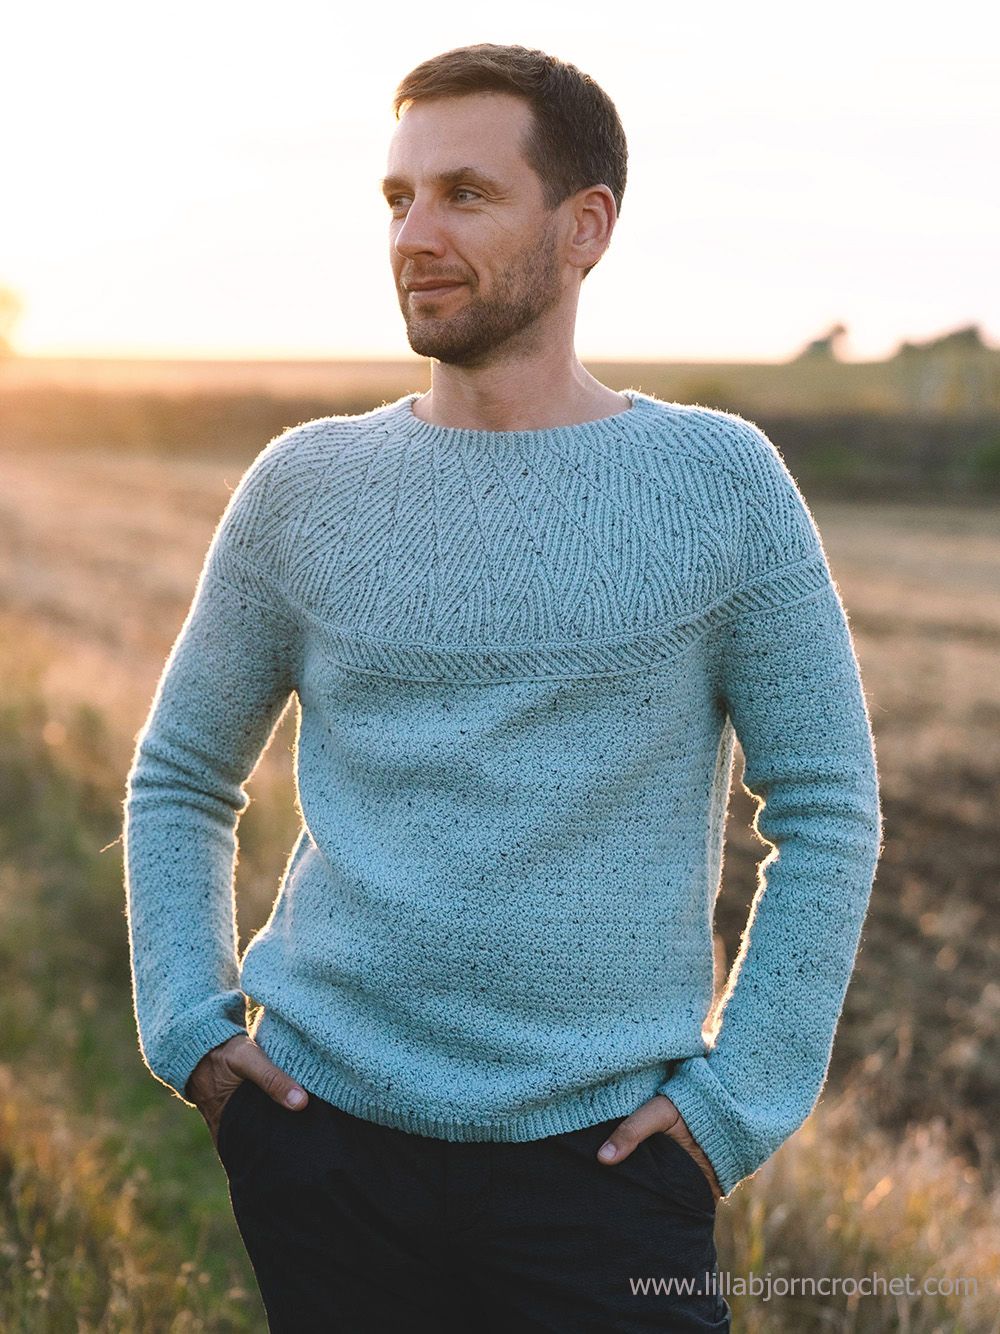
For Them Sweater is a top-down garment, and I always opt for this version because it is very easy to adjust as-you-go for your own body shape, and length for the lower body and sleeves. But if all my previous garments were worked from top in rows or rounds, the yoke for this sweater is done horizontally, from side to side using slip stitch crochet technique.

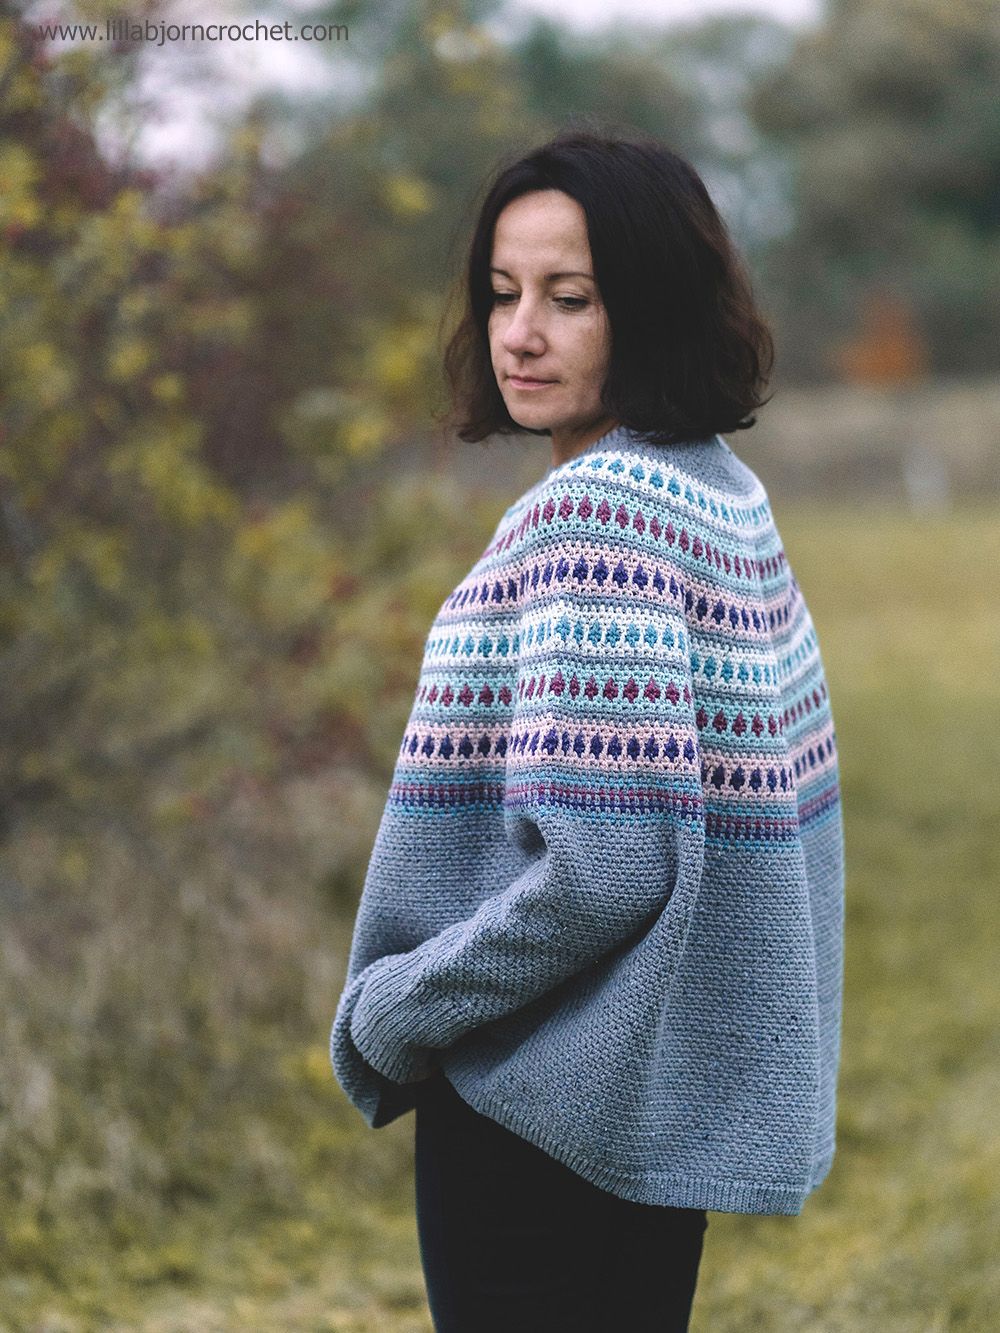
As you can see in the pictures, and what is hopefully clear from the name, For Them Sweater is a unisex garment perfect both for men and women. I also designed two yoke options which you can choose from. One is curly with leaves and another one is more graphical with “arrows” as I called them. In my opinion, both yoke designs are both male and female, but it is always nice to have a choice.

I made three samples myself: two with Scheepjes Terrazzo yarn, and one more short-sleeved sweater with Scheepjes Bamboo Soft. These yarns are different in weight (DK and Sport/Fingering), but as you can see, both worked just fine.
You can find all yarn mentioned in this blog post in your local
Scheepjes shop, or via
online retailers which ship internationally (affiliate links):
Wool Warehouse
(UK & worldwide),
Caro's Atelier
(NL & Europe), Taemombo (US &
Canada).

The pattern is written specifically for DK yarn with an exact gauge in mind, but you can absolutely use a smaller yarn and hook (like I did, and some of my testers). You will just need to follow the pattern’s recommendations carefully, make accurate measurements and adjust stitch counts for your own gauge (with a smaller hook you will obviously get more stitches in 10cm/4in). And if you do not want to do any additional maths, just choose the DK yarn and follow the pattern exactly as written.

If you make a search for slip stitch crochet, you will find quite a few wonderful examples done by other designers. This, in fact, simple way of crochet is very effective and resembles brioche knitting. And you would probably agree with me that it is always nice to achieve something like knit fabric but using just a normal crochet hook.

I have studied the patterns of other designers, but in the end decided to simplify everything and make my own pattern as easy as possible. So, if you are familiar with the slip stitch crochet already, my interpretation might seem a bit different from what you are used to. I am using only general slip stitches and single crochet stitches (all in US terms) and work them in back loops only.
I do not introduce any complicated additional stitches, and instructions for every row are amazingly short. You only need to follow them carefully and maybe mark already done rows in the pattern, as it is very easy to overlook something.

Because this technique is new to me, I have recorded several short video tutorials to accompany For Them Sweater pattern. In these videos I explain the sweater’s construction, how to choose the correct size, how to do slip stitch crochet (in my way and showing first rows of the pattern), how to adjust the yoke for your own body, how to make measurements and keep the gauge under control and give more helpful tips to make sure the sweater will fit you just fine.
My testers team did an amazing job for this pattern. Their notes and comments helped me to improve the pattern and clear up all tiny spots which could otherwise confuse you. Usually, I make a collage with testers’ work, but all their sweaters are so wonderful, that I decided to showcase them all here, on by one.
Esther Schippers chose Scheepjes Terrazzo yarn and made a lovely
sweater for her husband.

Elizabeth Garcia Kalka used Scheepjes Bamboo Soft yarn in purple shade and made a sweater for her son (in his favourite color).

For Sandra Veneman this sweater became a real “for them” garment as it perfectly fits herself and her husband. She also chose Scheepjes Terrazzo yarn in same color as Esther did but using Yoke 1 option.


Taylor O’Shea went for a short-sleeved top using Scheepjes Bamboo Soft yarn.

Loele van den Bergh made an oversized sweater for herself with Scheepjes Terrazzo and Yoke 1 option.

Laura Jackson picked a wonderful cream shade of Scheepjes Metropolis yarn and created a gentle sweater for herself.

Jenna Bowers also decided in favour of Scheepjes Metropolis and made a slightly oversized sweater for her husband.

Lisa Marlow was using Scheepjes Terrazzo and made a fantastic outdoor garment for her husband.

How cool are all those sweaters? I can’t stop looking at them. If you would like to know more details about the yarns our testers team did and sizing, please check their project pages on Ravelry.
You can find For Them Sweater pattern on Ravelry HERE and Etsy HERE and enjoy a 20% introductory discount through Monday, October 10th, 2022. No codes needed; the price has been discounted already.
Hope you enjoy.

The pattern is available on Etsy HERE and Ravelry HERE with 20% discount though Monday, April 27th, 2020. The price you see is already discounted and you don’t need any codes.
Recently I have taken an online class in grading knitwear garments (ohh, how thankful I am to find this course!), and Brioche Lane Sweater was the first one to which I applied my new knowledge. So it comes in more sizes than my previous garment designs – XXS-4X to fit the bust 32-48”.
 |
| Photo credit: frozen-photo.com |
The sweater was designed to fit with 8-15 in (20-38 cm) of positive ease at the bust and 1.25-2 in (3-5 cm) of positive ease at the upper arm. Because it’s an oversized design, it can also fit larger sizes. Just make sure to take accurate measurements of your actual bust and circumference of the upper arm to see which size might work best for you.

If you fall in between two sizes, I would suggest choosing the larger one. In the picture you can see size S (for bust 36”), and my actual bust is 35”. I like the spacious clothes, so I would probably go even for a wider one for myself.

The front of my new sweater is decorated with a brioche panel, and its width differs from size to size keep the final look of the sweater balanced. Brioche crochet is very easy to work, and progress pictures in the pattern will guide you through every round.

Because Brioche Lane Sweater was created as a summery garment, I chose Scheepjes Bamboo Soft yarn. It comes in nice and rich colors, and the yarn itself is very soft. My choice of colors was dark gray with golden. This combination is a bit out of my comfort zone (I am not a fan of yellow in general), but surprisingly I like it a lot. And I can already say that this summer my new brioche sweater will be one of the most worn pieces in my modest collection.
 |
| Photo credit: frozen-photo.com |
You can have a look at Bamboo Soft colors at your local Scheepjes yarn shops, or order yarn online via international retailers (some of them might postpone shipping worldwide in the time of this blog post, because of the lockdown in many countries):

Wool Warehouse*, Black Sheep Wools*
Caro’s Atelier* (NL and Europe),
Taemombo* (US and Canada)
And for another version I used muted hand-dyed Merino Super Wash yarn from a local dyer. It’s warmer of course, but still not too warm and very nice against the skin.
 |
| Photo credit: frozen-photo.com |
I am also very proud to show you work of my wonderful testers:
1. Sandra Veneman (L, Scheepjes Bamboo Soft)
2. Lisa Marlow (S, Scheepjes Skies)
3. Elizabeth Kalka (XS, Scheepjes Bamboo Soft)
4. Laura Jackson (XS, Scheepjes Bamboo Soft and Skies)
5. Esther Schippers (2X, Scheepjes Bamboo Soft)
6. Pam Hibbert (L, Scheepjes Bamboo Soft)
7. Loele van den Bergh (S, Scheepjes Bamboo Soft)
8. Sarah Fabbri (L, Scheepjes Organicon)
9. Jenna Bowers (L, Scheepjes Bamboo Soft)

How pretty are they?!..
And just to remind, Brioche Lane Sweater pattern is available on Etsy HERE and Ravelry HERE with 20% discount though Monday, April 27th, 2020. The price you see is already discounted and you don’t need any codes.
Wishing you peaceful weekend,
Subscribe to a newsletter not to miss a single post. You can also follow me on Facebook, Pinterest and Instagram.

Today I would like to show you my hot off the hook sweater. I made it following the video course Get Squared by Jenny King – a crochet designer from Australia. Jenny kindly gifted me this course to try it out and maybe to write a review. And now when my sweater is completed I would like to share my thoughts and experience with you.
What is Jenny’s course Get Squared about?
Get squared course is about creating garments with basic crochet granny stitch. You don’t need to be an experienced crocheter to make a unique sweater or cardigan for yourself. Jenny’s course is all about magic and it’s aimed to absolute beginners in crochet (as well as advanced makers who would like to learn a new method of creating garments).

You will need (any) yarn, 6mm crochet hook, several measurements of your body... and 10 minutes to watch the video. That’s it. Jenny has created a universal (and pretty much innovative) system of creating garments – without complicated measuring, shaping or sewing. Get Squared is a very clear, complexed and complete method explaining everything from beginning to end.
What you'll get with Get Squared
Get Squared course consists of several short videos: introduction and explanation on how to create five different garment styles – basic sweater/jumper, basic cardigan, cardigan with extended fronts, cardigan with V-neck shaping and a shrug.
Instructional videos give a very clear idea about basic shaping and with your own accents (like collar, hem, buttons, different length of sleeves) you can create endless variations of garments. You can create literally everything. And no need to mention that with 6mm hook and a “speedy” granny stitch your new garment will be made in almost no time. With some frogging and remaking it took me, guess, 9 hours in total to make my sweater.

The course will also provide you with a chart and table with measurements where you will add your own “magic numbers” – several simple measurements of your body.
My own experience with Get Squared
I first heard about Get Squared system at last Bloggers Days when creative director of Scheepjes – Simy Somer – was showing her nearly finished crochet shrug. To be honest I am not very fond of granny stitch. I am not even sure why… Maybe because I haven’t seen many crochet designs with this stitch which look modern. But Simy’s shrug inspired me to give this system a try.
In the very beginning I made two mistakes. I don’t normally use large hooks, and I thought that for 6mm hook I should take some bulky yarn. Which is not true at all! In her video Jenny is showing cardigan made with very fine yarn. And with large hook granny stitch is getting a very nice drape. So after a little bit of swatching I put away 20 skeins of bulky wool yarn and chose Merino Soft yarn* by Scheepjes instead. The label recommends 4.5mm hook, but with 6mm hook granny shells became nicely draping.

My second mistake was wrong sizing. With Jenny’s recommendations I made necessary measurements (for a perfect fit). But after I started to crochet I felt like adding much more ease to my sweater. To make it slightly oversized. And to get an oversized effect with granny stitch you should really add enough of space.

After both mistakes were corrected everything went very fast and smooth. I loved Jenny’s videos and the way she talks to you. Her voice is very soothing, she is taking time to explain every single detail. She is using both UK and US terms in her talking, so no chance to be lost. Jenny also mentions some tips and tricks I’ve never heard of before, and her decreases for sleeves are genius! With nice background music I had a feeling as if I was talking to an old friend in my living room.

And what I really loved about Get Squared course is that video's are not long at all. It takes up to 10-12 minutes to get a complete insight into every garment style! No endless hours of watching and trying to filter important information.
After approx. 9 hours of crochet my sweater was done. First I made it much longer. But then frogged almost half of it, added knit-look hem to the bottom and sleeves, and a long tunelneck collar. I turned my sweater inside out to make back side as a front. For some reason I like it much better like this. And ta-dah! The sweater is ready!

If you got interested in Jenny’s system of creating garments you might also want to have a look at your new Kids Squared course for children's garments. The course includes video tutition as well as 21 pattern shortcuts which can be made to fit children, from babies through to pre-teens. And I am sure it will not disappoint.

My fellow blogger friends also got hooked with Jenny King designs. Nerissa of Miss Neriss has created a classy cardigan (and also published an interview with Jenny on her blog HERE). And Susan of Felted Button went very creative with shaping. Check her colorful sweater HERE.
Subscribe to a newsletter not to miss a single post. You can also follow me on Facebook, Pinterest and Instagram.


