It is almost Granny Square Day! Each year on August 15th the crochet community all over the world celebrates this day by creating crochet squares and posting them on social media. Mostly Instagram. The tradition is young (first initiated in 2014) but has already gained popularity among crocheters from different countries in the world.
And that’s for a good reason.
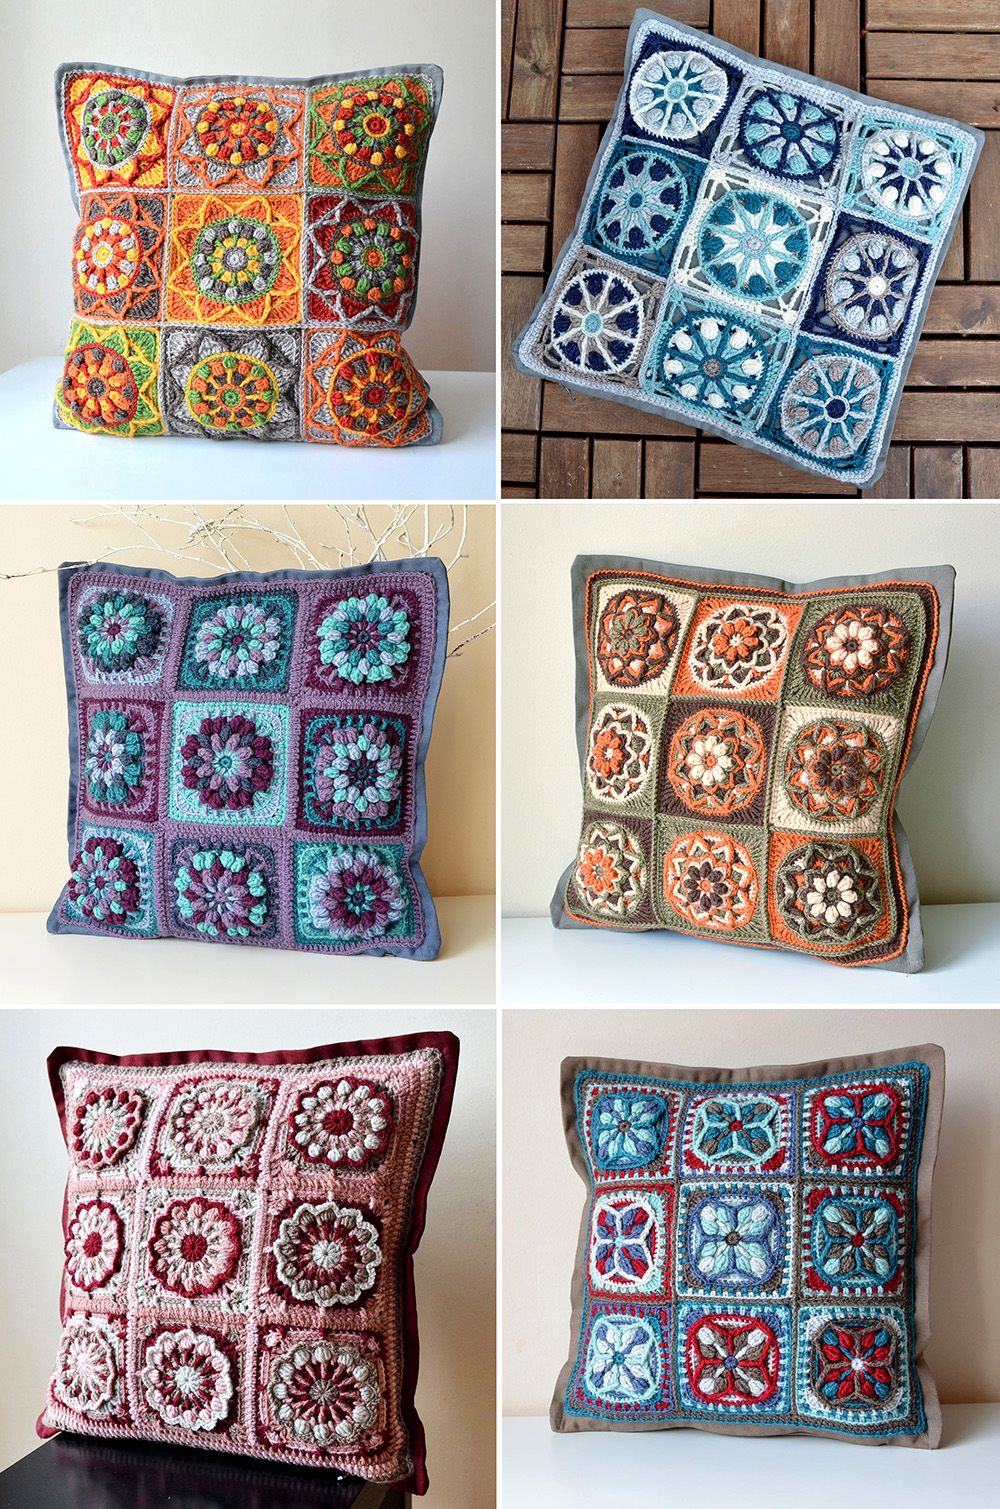
Granny Square is the first thing that comes to mind when we think about crochet. The square is the most universal shape, which we can use in so many ways. We can create throws and blankets, pillows, bags, chair pads and trivets, table decorations, and even clothes. And crochet squares should not necessarily be basic.
This year, I have decided to join celebrations of a granny square by putting up an e-book with 6 of my favourite square designs. This e-book includes 6 modern square patterns in overlay crochet. All of them are full of texture and colors.
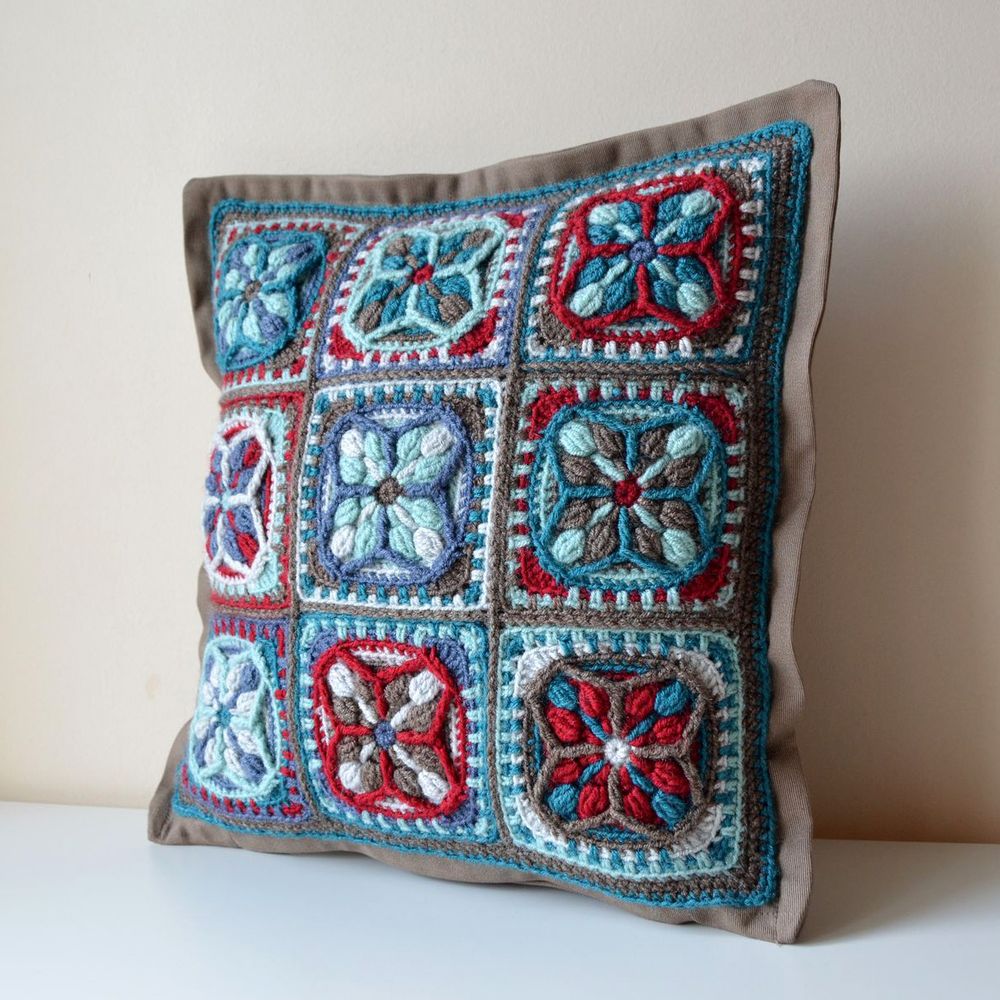
Each square uses tiny amounts of yarn in several colors and gives you a great possibility to use up leftovers of yarn from other projects. You can purchase a complete e-book via our website at a special price HERE, or find individual patterns on Ravelry.
The e-book includes Chocolate Lotus Square, Dahlia Square, Frozen Flowers Square, Pinky Mood Square, Lucky Quatrefoil Square and Sunflower Square (probably my most favourite of all time!)

Choose a palette and combine the colors for each square differently for a unique look of your project.
Hope you have fun!


I don’t know if you feel the same, but for me the summer always feels like a “short life”. Everything is slowed down on one hand. In summer I am always traveling to Belarus, my home country, to see my parents and to reunite with my family and friends. Usually, there is no much time for design and crochet. This summer I have picked up my hook maybe twice in two long months.
And later, when I am back home from all travels, it’s quite difficult to get back to a creative mood again. Somehow summer is the most relaxed, but the most busiest time as well.
When I returned from Belarus two weeks ago a small package from Scheepjes was waiting in my mail box. The package contained three skeins of newly release Chunky Monkey yarn – in cream and two shades of blue.

And because there is no better way to re-start designing than to grab the hook, a cup of coffee and to actually start crochet – I decided to play with new yarn a bit to see what happens. And… a new square was brought to life.

I started with a simple center with linen stitch and used only two colors for a “false brioche” look, as I call it. Then a small border was added around the center. And then I thought I’d play with linen stitch and cables for a textured fabric.

This was my first time trying Chunky Monkey yarn by Scheepjes. It’s a heavier version of existing Colour Crafter line – premium acrylic in aran weight. I’ve made several blankets with Colour Crafter yarn, and I am very happy with their softness and drape. They were washed several times in a washing machine already, and I am still pleased with how they look and feel.

New Chunky Monkey yarn was improved with anti-pilling quality for even more durability and perfect look. The yarn is super soft, it doesn’t split and stitch definition is nice. Just a perfect choice for quick chunky projects – both in knitting and crochet.

Chunky Monkey yarn comes in 100g balls with 116m/127yards. 5mm crochet hook is recommended but I’ve noticed that bigger hook gave my square a better drape. Of course, everything depends on the exact type of the projects, but I would choose 5.5-6mm hook for cables and such.
Scheepjes Chunky Monkey yarn is available in local Scheepjes shops and via online retailers: Wool Warehouse and Black Sheep Wools (both in UK with international shipping), Caro’s Atelier (NL and Europe).

A Sea Square pattern will come soon!
And for now – Happy Granny Square Day!
UPDATE: the pattern for Sea Square is available HERE.
Subscribe to a newsletter not to miss a single post. You can also follow me on Facebook, Pinterest and Instagram.


“Making crochet squares is gratifying in so many ways. They give you a sense of achievement, since you can complete a square easily in one sitting. You get to do a little happy dance every time you finish one.” Shelley Husband
DISCLOSURE: My copy of Granny Square Flair book arrived on August 28th – just on the day of my birthday. And opening the package delivered from UK felt like a real birthday gift. Shelley Husband sent me a copy of her book for review, but all thoughts and opinions are my own.
What’s inside Granny Square FLAIR book?
As already mentioned, Granny Square Flair book includes instructions for 50 modern granny squares. And all of them come in one size: approx. 15cm/6in when made with 8ply/DK/light worsted yarn and a 4mm (G) hook, if your tension is average. There are also suggestions given on how to adjust the size and make squares larger or smaller.

Before jumping to patterns’ instructions it might be helpful to study several chapters about different types of yarn and hooks, joining methods and pattern notes. I just love Shelley’s seamless tips – something new to learn and use in my own designing work.
Each pattern in placed on a separate page in the book together with written round-by-round instructions, a chart, a picture of a finished square (I love the idea of showing off all squares in one off-white color) and several colorful version with different shades.
Although I prefer to crochet with charts whenever possible, I found some of them to be difficult to read. Because of several layers being used at the same time. For these complex squares I would choose to follow written instructions (and they are easy to understand) with partial referral to the charts. In general I would say Flair book is perfect for both beginners and advanced crocheters, as everyone will find something for himself.
I couldn’t help myself and tried my hook on Iron Lace square. Isn’t its texture lovely?

Next chapter of Granny Square Flair book is not less exciting as it shows 11 crochet projects made with granny squares listed in the book. I honestly love all of them, but because recently I am all about gradient and variegated yarn, my absolute favourites are Melbourne Wrap and Dahlia Scarf.
Melbourne Wrap was made by Shelley with my own colorway of Our Tribe yarn by Scheepjes*.
 |
| Photo by Jo O’Keefe |
And Dahlia Scarf uses two skeins of Our Tribe yarn in shade Haak Maar Raak.
 |
| Photo by Jo O’Keefe |
Finally Shelley Husband suggests tips for how to design your own crochet projects using granny squares: how to choose yarn, patterns and layout. And how to estimate approx. yardages for a project.
In the very end of the Granny Square Flair book you will find a complete Glossary with all crochet stitches used in the patterns, their descriptions and explanation of symbols from the charts.
Where to Buy
The book is available as a hardcopy ($29.99) and as E-book ($14.99). If you’re in Australia, you can purchase the book directly through Shelley’s website (if you want to support crochet designers, please consider buying from them directly!) If you’re located elsewhere, you can find the book through other retailers such as:
Amazon.com* (paperback)
Amazon.co.uk (paperback)
Barnes & Nobles (paperback)
Bookdepository (paperback)
You can purchase the PDF E-book from Shelley’s website, too (link is listed above, just scroll down a little bit), no matter where you are located.

GIVEAWAY
Shelley has kindly gifted one hardcopy of Granny Square Flair book for a giveaway. If you would like to win it, please, comment below this post with an answer to a simple question:
Are you enjoying making granny squares? And why?
For an additional entry, please, follow lillabjorncrochet and Spincushions on Instagram, then come back to my blog and leave another comment here. The giveaway will run through September 24th, 2018, and a happy winner will be picked randomly and announced here on the same day. Good luck everyone!
________________________________________________________________________
UPDATE: the Giveaway is closed now! thank you very much for participation and lovely comments.
The winner was chosen randomly and it's Arja with comment: "I love making granny's and even the weaving ends when i finished one. You van make beautiful things with it als: pillows/blankets/bags/coasters/cardigans/sweaters and even à dress. It is endless, but in the end i just love à pile of granny's". Dear Arja, please, contact me for more details about your prize :)
________________________________________________________________________
Subscribe to a newsletter not to miss a single post. You can also follow me on Facebook, Pinterest and Instagram.


In some simple designs with plain stitches the join in the middle of the round can also be more or less visible. But it’s getting a bit tricky to hide the seam when we are making lace or textured fabric. And join in the corners can help a lot! Also joining in the corner makes stitch count very easy, as we are making the same repeat on each square’s side.

Here are two examples of how the squares with single crochet and double crochet stitches (US terms) look when joined on the side and in the corner.
When we work with double crochet stitches, we should make extra chains in the beginning of each round.

And square with single crochet stitches has a visible ridge in the place where rounds are joined.

To minimize both effects it’s better to join rounds in the corners. There are probably many different ways to do that. But here is how I am doing it. Stone Washed* yarn by Scheepjes was used for the needs of this photo-tutorial.
Abbreviations (US terms)
ch chain
sp space
yo yarn over
ss (slip stitch) – insert hook in indicated st, yo, draw yarn up and pull second loop through the first loop on hook.
sc (single crochet stitch) – insert hook in indicated stitch, yo, draw up a loop, yo and pull through both loops on hook.
dc (double crochet stitch) – yo, insert hook in indicated stitch, yo, draw up a loop, [yo, pull through 2 loops] twice.
1. Square with single crochet stitches
Make ch2 and 1sc in the same space in the corner, *continue with sc in every stitch along the square's side till you come to the next corner, (1sc, ch2, 1sc) in next space in the corner; repeat from * for next 2 sides. Make 1sc in each stitch on the last (fourth) side till you come to joining ss (slip stitch) of the previous round. Make 1sc in this ss and join the round with ss in ch2-sp in the beginning of the round.

2. Square with double crochet stitches
Make ch4 (or ch5 if you tend to crochet very tight) which will count as first dc+ch2. Make 2dc in same space. *Continue with dc in every stitch along the square's side till you come to the next corner, (2dc, ch2, 2dc) in next space in the corner; repeat from * for next 2 sides. Make 1dc in each stitch on the last (fourth) side till you come to joining ss of the previous round. Make 1dc in this ss, 1dc in space of previous round in the corner and join the round with ss in ch2-sp in the beginning of the round.

Subscribe to a newsletter not to miss a single post. You can also follow me on Facebook, Pinterest and Instagram.


Today I would like to show you my hot off the hook sweater. I made it following the video course Get Squared by Jenny King – a crochet designer from Australia. Jenny kindly gifted me this course to try it out and maybe to write a review. And now when my sweater is completed I would like to share my thoughts and experience with you.
What is Jenny’s course Get Squared about?
Get squared course is about creating garments with basic crochet granny stitch. You don’t need to be an experienced crocheter to make a unique sweater or cardigan for yourself. Jenny’s course is all about magic and it’s aimed to absolute beginners in crochet (as well as advanced makers who would like to learn a new method of creating garments).

You will need (any) yarn, 6mm crochet hook, several measurements of your body... and 10 minutes to watch the video. That’s it. Jenny has created a universal (and pretty much innovative) system of creating garments – without complicated measuring, shaping or sewing. Get Squared is a very clear, complexed and complete method explaining everything from beginning to end.
What you'll get with Get Squared
Get Squared course consists of several short videos: introduction and explanation on how to create five different garment styles – basic sweater/jumper, basic cardigan, cardigan with extended fronts, cardigan with V-neck shaping and a shrug.
Instructional videos give a very clear idea about basic shaping and with your own accents (like collar, hem, buttons, different length of sleeves) you can create endless variations of garments. You can create literally everything. And no need to mention that with 6mm hook and a “speedy” granny stitch your new garment will be made in almost no time. With some frogging and remaking it took me, guess, 9 hours in total to make my sweater.

The course will also provide you with a chart and table with measurements where you will add your own “magic numbers” – several simple measurements of your body.
My own experience with Get Squared
I first heard about Get Squared system at last Bloggers Days when creative director of Scheepjes – Simy Somer – was showing her nearly finished crochet shrug. To be honest I am not very fond of granny stitch. I am not even sure why… Maybe because I haven’t seen many crochet designs with this stitch which look modern. But Simy’s shrug inspired me to give this system a try.
In the very beginning I made two mistakes. I don’t normally use large hooks, and I thought that for 6mm hook I should take some bulky yarn. Which is not true at all! In her video Jenny is showing cardigan made with very fine yarn. And with large hook granny stitch is getting a very nice drape. So after a little bit of swatching I put away 20 skeins of bulky wool yarn and chose Merino Soft yarn* by Scheepjes instead. The label recommends 4.5mm hook, but with 6mm hook granny shells became nicely draping.

My second mistake was wrong sizing. With Jenny’s recommendations I made necessary measurements (for a perfect fit). But after I started to crochet I felt like adding much more ease to my sweater. To make it slightly oversized. And to get an oversized effect with granny stitch you should really add enough of space.

After both mistakes were corrected everything went very fast and smooth. I loved Jenny’s videos and the way she talks to you. Her voice is very soothing, she is taking time to explain every single detail. She is using both UK and US terms in her talking, so no chance to be lost. Jenny also mentions some tips and tricks I’ve never heard of before, and her decreases for sleeves are genius! With nice background music I had a feeling as if I was talking to an old friend in my living room.

And what I really loved about Get Squared course is that video's are not long at all. It takes up to 10-12 minutes to get a complete insight into every garment style! No endless hours of watching and trying to filter important information.
After approx. 9 hours of crochet my sweater was done. First I made it much longer. But then frogged almost half of it, added knit-look hem to the bottom and sleeves, and a long tunelneck collar. I turned my sweater inside out to make back side as a front. For some reason I like it much better like this. And ta-dah! The sweater is ready!

If you got interested in Jenny’s system of creating garments you might also want to have a look at your new Kids Squared course for children's garments. The course includes video tutition as well as 21 pattern shortcuts which can be made to fit children, from babies through to pre-teens. And I am sure it will not disappoint.

My fellow blogger friends also got hooked with Jenny King designs. Nerissa of Miss Neriss has created a classy cardigan (and also published an interview with Jenny on her blog HERE). And Susan of Felted Button went very creative with shaping. Check her colorful sweater HERE.
Subscribe to a newsletter not to miss a single post. You can also follow me on Facebook, Pinterest and Instagram.

When I started to design crochet three years ago I looked into round shapes and overlay technique. I have created several mandala’s (Dandelion, Joana’s, Spanish, Sunny, Labyrinth) which can be either enlarged into bigger circles or squared up with Dandelion Border. I’ve always thought about mandala’s as round pillows, chair pads, pillow decorations, maybe. But I was amazed by the amount of blankets people have created using overlay crochet mandalas. Look at Sophie Loves Lilla Bjorn Winter Blanket (by Emma Aldous), or Celtic Mandala Blanket (by Laura, aka @Taemombo on Ravelry), for example.

Generally pieces created in overlay crochet are quite stiff, because background is worked with single crochet stitches and long, complex stitches are added above. Unless very soft and draping yarn is used, entire blankets in overlay crochet might feel too stiff and heavy. And I was wondering how it is possible to solve this “problem”.

And I came up with an idea of square pattern which uses overlay crochet with a very draping background, and lacy parts. And this is how A Different Granny Square pattern was born. It is already available for purchase via Ravelry (HERE) and Etsy (HERE) and is offered with 30% discount through Monday, October 2, 2017 (no coupon code needed). After that date the pattern will be listed at a regular price.

A Different Granny Square consists of three parts: floral center, lacy border and overlay zig-zag border. They give you lots of possibilities to play with sizes. I believe this square is PERFECT for blankets, and I wish I have time in the future to complete one for myself. You can either crochet and join entire squares (each approx. 37cm (14.5in) large when made with DK yarn and 4mm crochet hook). Or another option is to leave out the border and only use central floral motifs which are very draping as well.

You can of course use A Different Granny Square in a variety of other ways: as decorations for pillows and chair pads (with crochet fabric stitched onto the ready foam), as trivets, and other. I have hand stitched one of the squares onto ready fabric throw from IKEA to make a pillow for my friend.
I've made squares in different color palettes and also with one colour only (off white). And all of them play differently. Lori Baran who helped me with test, made her square in solid grey, and it looks amazing!

If you are interested, I used Soft Fun yarn* (DK weight) by Scheepjes and 4mm (G) Amour Clover hook*
 (my favourite brand and type). For one square you will need approx. 88g of yarn which is almost 2 skeins if only one shade is used. And here are shades for grey and emerald square (you will find all information about “Fall” version of this square in the pattern): Yarn A - 2515, Yarn B - 2532, Yarn C - 2531, Yarn D - 3535, Yarn E - 2466.
The pattern is intermediate. Full version contains lots of detailed pictures so you have no chance to be lost. It doesn’t take long to finish, and finished project can make a wonderful (Christmas?..) gift.
Find A Different Granny Square pattern on Ravelry and Etsy with 30% discount through Monday, October 2 (no coupon code needed).
Subscribe to a newsletter not to miss a single post. You can also follow me on Facebook, Pinterest and Instagram.
* DISCLOSURE: This blog contains affiliate links (marked with *). I may be compensated with a tiny amount from each purchase made via these links, and it will not cost you a penny. By using affiliate links you support my blog. Thank you!


