Showing posts with label photo tutorial. Show all posts
Showing posts with label photo tutorial. Show all posts
Rozeta crochet-a-long
was definitely the biggest event in my designer’s life last year. Thousands of
people all over the world joined me and Scheepjes in the Rozeta
journey. And thousands of lovely Rozeta blanket have been created. New
pictures arrive to my social media feeds every day. And every day my heart is
melted with quiet happiness.
Most of the Rozeta’s are used as blankets. But some of them were turned into rugs, pillows… and wall hangings! I’ve received quite a few messages with questions about how to mount Rozeta on a wall.
To be honest I didn’t do it myself, and all my samples are proudly kept at Scheepjes HQ. The Rozeta, as any other crochet piece, can be just hang onto the wall, but because it is big and heavy, it can stretch a lot and lose its shape. That’s why a certain kind of frame is needed for mounting.
Some CAL followers mounted their blankets and shared pictures on Facebook and Instagram. One of them was Evelien van der Drift. She kindly gave me permission to republish her step-by-step pictures on my blog, with short description for each step.
Evelien used an old board from under the mattress and metal wire. This kind of boards with holes can be found in the building stores. The holes make it easy to weave in the wire, and also keep the board light weight.
Step 1. First Evelien cut the board to match the size of the Rozeta. Because crochet fabric is stretchy, the border should not be much smaller than the blanket – just enough to wrap the edges of the blanket and to pull it reasonably, without destroying the texture of the stitches.

Step 2. Then three wooden pieces were attached with nails onto the back side of the board: each on top and bottom, and third one to the middle of the board to keep it stable.

Step 3. Evelien wove the metal wire along all four sides of the board close to its edges.


Step 4. Then Rozeta was carefully wrapped around the board, slightly pulled and sewn along the edges to the wires on the back side of the board. Evelien used Scheepjes Whirlette yarn* - same as for the last rounds of Rozeta.

Step 5. A wooden piece was attached to the wall and finished Rozeta was hung onto it!

That’s it!
P.s. If you decided to keep your Rozeta just as a mandala, you can mount it to a round wire using the method of my friend Jellina. You can follow step-by-step tutorial HERE on her blog.
Subscribe to a newsletter not to miss a single post. You can also follow me on Facebook, Pinterest and Instagram.


|
| Photo credit: Evelien van der Drift |
Most of the Rozeta’s are used as blankets. But some of them were turned into rugs, pillows… and wall hangings! I’ve received quite a few messages with questions about how to mount Rozeta on a wall.
To be honest I didn’t do it myself, and all my samples are proudly kept at Scheepjes HQ. The Rozeta, as any other crochet piece, can be just hang onto the wall, but because it is big and heavy, it can stretch a lot and lose its shape. That’s why a certain kind of frame is needed for mounting.
Some CAL followers mounted their blankets and shared pictures on Facebook and Instagram. One of them was Evelien van der Drift. She kindly gave me permission to republish her step-by-step pictures on my blog, with short description for each step.
How to Mount a Crochet Blanket: Tutorial
Evelien used an old board from under the mattress and metal wire. This kind of boards with holes can be found in the building stores. The holes make it easy to weave in the wire, and also keep the board light weight.
Step 1. First Evelien cut the board to match the size of the Rozeta. Because crochet fabric is stretchy, the border should not be much smaller than the blanket – just enough to wrap the edges of the blanket and to pull it reasonably, without destroying the texture of the stitches.

Step 2. Then three wooden pieces were attached with nails onto the back side of the board: each on top and bottom, and third one to the middle of the board to keep it stable.

Step 3. Evelien wove the metal wire along all four sides of the board close to its edges.


Step 4. Then Rozeta was carefully wrapped around the board, slightly pulled and sewn along the edges to the wires on the back side of the board. Evelien used Scheepjes Whirlette yarn* - same as for the last rounds of Rozeta.

Step 5. A wooden piece was attached to the wall and finished Rozeta was hung onto it!

That’s it!
P.s. If you decided to keep your Rozeta just as a mandala, you can mount it to a round wire using the method of my friend Jellina. You can follow step-by-step tutorial HERE on her blog.

|
| Photo credit: Jelllinas Creations |
Subscribe to a newsletter not to miss a single post. You can also follow me on Facebook, Pinterest and Instagram.
Brioche Crochet is a technique that doesn’t stop to amaze me. With only two
colors and routine stitches used, it creates a nice textured fabric. And this
fabric is reversible: imitating beloved knitting brioche on the right size,
and with a knit look on the wrong side.

After the release of Brioche Waves Blanket, Esja Sweater and Brioche Heart patterns I’ve got a few requests about how to create a triangle shape with crochet brioche. So, here is a tutorial. You can use is for making shawls, for example.
Please, note that crochet brioche consists of two layers. And fabric is getting quite thick. So I suggest fine and soft yarns for wearable accessories.
Triangle shape in Brioche Crochet is worked in rows, back and forth, with one color used for each row. The colors are changed every other row in last yarn over of the final stitch – when there are still two loops left on the hook (see photo-tutorial below).
Please, note that work is turned after every two rows (unless otherwise stated in the pattern). So you’ll work two rows on the right side, two rows on the wrong side, and then again two rows on the right side. And so on.
Using this tutorial you can create a brioche crochet triangle in any desired size.

ch – chain
yo – yarn over
RS – right side
WS – wrong side
sc (single crochet) – insert hook in indicated stitch, yo, draw up a lp, yo and pull through both lps on hook.
dc (double crochet) – yo, insert hook in indicated st, yo, draw up a lp, *yo, pull through 2 lps* twice.
[…] repeat instruction inside […] as many times as indicated in the pattern

Yarns used in this tutorial:
Cover Sample - Colour Crafter* (1099 Wolvega) and Colour Crafter Velvet* (845 Astaire) by Scheepjes
Photo-tutorial - Stone Washed* by Scheepjes
INSTRUCTIONS
Copyright LillaBjornCrochet 2019. All rights reserved. This pattern is for unlimited personal use only. Do not reproduce or sell the pattern. The pattern may not be translated without permission or copied in any way (print or digitally), in part or in whole. No video tutorials are allowed! Items may be sold that are made from this pattern as long as the designer is credited. Please, read Copyright page for more information.
Row 1 - RS: With Yarn A make magic ring, ch1 (doesn’t count as a st), 3sc into magic ring, tighten ring, turn – 3 sc
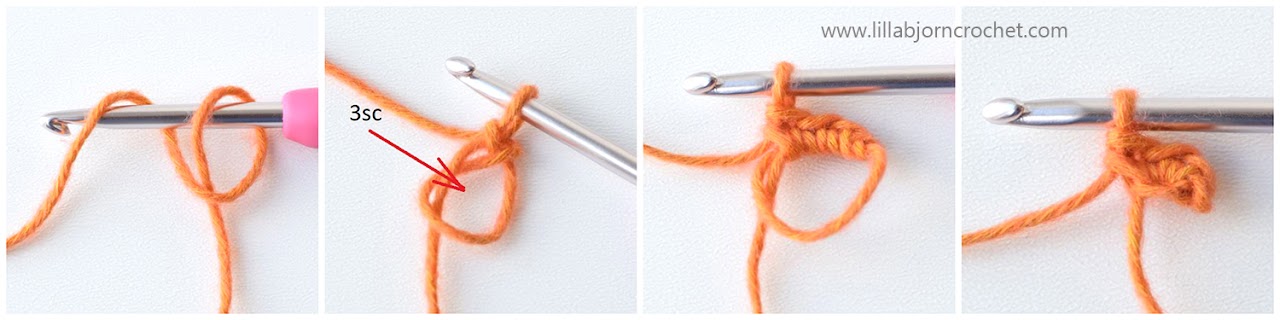
TIP: to add extra drape to fabric please feel free to replace all ch1 with ch2-sps.
Row 2 – WS: Ch3 (counts as first dc), dc in first st, ch1, skip next st, 2dc in last st (change to Yarn B in final st), turn – 4 dc, 1 ch1-sp

Row 3 – RS: Ch2 (doesn’t count as a st – here and throughout), 2sc in first st, ch1, skip next st, dc in skipped st from Row 1 below (in front of work), ch1, skip sp and next st, 2sc in third ch in the beginning of previous row, drop loop off the hook and don’t turn – 4 sc, 1 dc, 2 ch1-sps

Row 4 – RS: Insert hook in first st of the same row, grab Yarn A behind work and pull it through first st. Don't make the loop too tight to prevent pulling of the edge.
Ch2, 2sc in same st, ch1, skip next st, dc in skipped st of same color from 2 rows below (in front of work), ch1, skip sp and next st, dc in last skipped st of same color from 2 rows below (in front of work), ch1, skip sp and next st, 2sc in last st (change to Yarn B in final st by grabbing the loop in the end of the row and pulling it through two loops on the hook), turn – 4 sc, 2 dc, 3 ch1-sps
 Row 5 – WS: All dc and BPdc are made in/around sts of same color from
2 rows below – behind work!
Row 5 – WS: All dc and BPdc are made in/around sts of same color from
2 rows below – behind work!
Ch2, 2sc in first st, ch1, skip 1 st, dc in skipped st of same color from 2 rows below (behind work), ch1, skip sp and next st, BPdc around next st of same color from 2 rows below, ch1, skip sp and next st, dc in next skipped st of same color from 2 rows below (behind work), ch1, skip sp and next st, 2sc in last st, drop loop off the hook and don’t turn – 4 sc, 2 dc, 1 BPdc, 4 ch1-sps
 Row 6 – WS: Insert hook from back to front into first st of the same
row, grab Yarn A in front of work and pull it through first st. As on
previous row, all dc and BPdc are made in/around sts of same color from 2
rows below – behind work!
Row 6 – WS: Insert hook from back to front into first st of the same
row, grab Yarn A in front of work and pull it through first st. As on
previous row, all dc and BPdc are made in/around sts of same color from 2
rows below – behind work!
Ch2, 2sc in same st, ch1, skip 1 st, dc in skipped st of same color from 2 rows below (behind work), [ch1, skip sp and next st, BPdc around next st of same color below] repeat for all long sts of same color from 2 rows below, ch1, skip sp and next st, dc in last skipped st from 2 rows below (behind work), ch1, skip sp and next st, 2sc in last st (keep yarn A on the WS, change to Yarn B in final st by grabbing the loop in the end of the row and pulling it through two loops on the hook), turn – 4 sc, 2 dc, 2 BPdc, 5 ch1-sps
 Row 7 – RS: Work all dc and FPdc in/around sts of same color from 2
rows below – in front of work!
Row 7 – RS: Work all dc and FPdc in/around sts of same color from 2
rows below – in front of work!
Ch2, 2sc in same st, ch1, skip 1 st, dc in skipped st of same color from 2 rows below (in front of work), [ch1, skip sp and next st, FPdc around next st from 2 rows below] repeat for all long sts of same color from 2 rows below, ch1, skip sp and next st, dc in last skipped st from 2 rows below (in front of work), ch1, skip next st, 2sc in last st, drop loop off the hook, don’t turn – 4 sc, 2 dc, 3 FPdc, 6 ch1-sps
 Row 8 – RS: Insert hook in first st of the same row, grab Yarn A
behind work and pull it through first st.
Row 8 – RS: Insert hook in first st of the same row, grab Yarn A
behind work and pull it through first st.
As Row 7. Change to Yarn B in final st by grabbing the loop in the end of the row and pulling it through two loops on the hook, turn – 4 sc, 2 dc, 4 FPdc, 7 ch1-sps

Row 9 - WS: All dc and BPdc are made in/around sts of same color from 2 rows below – behind work!
Ch2, 2sc in same st, ch1, skip 1 st, dc in skipped st of same color from 2 rows below (behind work), [ch1, skip sp and next st, BPdc around next st of same color below] repeat for all long sts of same color from 2 rows below, ch1, skip sp and next st, dc in last skipped st from 2 rows below (behind work), ch1, skip sp and next st, 2sc in last st, drop loop off the hook, don’t turn – 4 sc, 2 dc, 5 BPdc, 8 ch1-sps
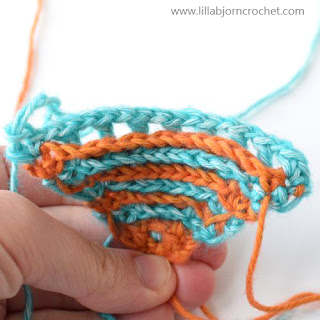
Repeat Rows 6-9 till you reach designed length of your fabric.

Last Row
To finish, make last row on RS.
Ch2, 2sc in first st, sc in next st, dc in skipped st from 2 rows below (in front of work), skip sp, sc in next st, [FPdc around next st of same color from 2 rows below, skip sp, sc in next st] repeat for all long sts of same color from 2 rows below, dc in next last skipped st from 2 rows below (in front of work), skip sp, sc in next st, 2sc in last st, fasten off.

Subscribe to a newsletter not to miss a single post. You can also follow me on Facebook, Pinterest and Instagram.


After the release of Brioche Waves Blanket, Esja Sweater and Brioche Heart patterns I’ve got a few requests about how to create a triangle shape with crochet brioche. So, here is a tutorial. You can use is for making shawls, for example.
Please, note that crochet brioche consists of two layers. And fabric is getting quite thick. So I suggest fine and soft yarns for wearable accessories.
Pattern Notes
Triangle shape in Brioche Crochet is worked in rows, back and forth, with one color used for each row. The colors are changed every other row in last yarn over of the final stitch – when there are still two loops left on the hook (see photo-tutorial below).
Please, note that work is turned after every two rows (unless otherwise stated in the pattern). So you’ll work two rows on the right side, two rows on the wrong side, and then again two rows on the right side. And so on.
Using this tutorial you can create a brioche crochet triangle in any desired size.

Abbreviations and Stitch Guide (US crochet terms)
ch – chain
yo – yarn over
RS – right side
WS – wrong side
sc (single crochet) – insert hook in indicated stitch, yo, draw up a lp, yo and pull through both lps on hook.
dc (double crochet) – yo, insert hook in indicated st, yo, draw up a lp, *yo, pull through 2 lps* twice.
Pattern repeats
[…] repeat instruction inside […] as many times as indicated in the pattern

Yarns used in this tutorial:
Cover Sample - Colour Crafter* (1099 Wolvega) and Colour Crafter Velvet* (845 Astaire) by Scheepjes
Photo-tutorial - Stone Washed* by Scheepjes
INSTRUCTIONS
Copyright LillaBjornCrochet 2019. All rights reserved. This pattern is for unlimited personal use only. Do not reproduce or sell the pattern. The pattern may not be translated without permission or copied in any way (print or digitally), in part or in whole. No video tutorials are allowed! Items may be sold that are made from this pattern as long as the designer is credited. Please, read Copyright page for more information.
Row 1 - RS: With Yarn A make magic ring, ch1 (doesn’t count as a st), 3sc into magic ring, tighten ring, turn – 3 sc

TIP: to add extra drape to fabric please feel free to replace all ch1 with ch2-sps.
Row 2 – WS: Ch3 (counts as first dc), dc in first st, ch1, skip next st, 2dc in last st (change to Yarn B in final st), turn – 4 dc, 1 ch1-sp

Row 3 – RS: Ch2 (doesn’t count as a st – here and throughout), 2sc in first st, ch1, skip next st, dc in skipped st from Row 1 below (in front of work), ch1, skip sp and next st, 2sc in third ch in the beginning of previous row, drop loop off the hook and don’t turn – 4 sc, 1 dc, 2 ch1-sps

Row 4 – RS: Insert hook in first st of the same row, grab Yarn A behind work and pull it through first st. Don't make the loop too tight to prevent pulling of the edge.
Ch2, 2sc in same st, ch1, skip next st, dc in skipped st of same color from 2 rows below (in front of work), ch1, skip sp and next st, dc in last skipped st of same color from 2 rows below (in front of work), ch1, skip sp and next st, 2sc in last st (change to Yarn B in final st by grabbing the loop in the end of the row and pulling it through two loops on the hook), turn – 4 sc, 2 dc, 3 ch1-sps

Ch2, 2sc in first st, ch1, skip 1 st, dc in skipped st of same color from 2 rows below (behind work), ch1, skip sp and next st, BPdc around next st of same color from 2 rows below, ch1, skip sp and next st, dc in next skipped st of same color from 2 rows below (behind work), ch1, skip sp and next st, 2sc in last st, drop loop off the hook and don’t turn – 4 sc, 2 dc, 1 BPdc, 4 ch1-sps

Ch2, 2sc in same st, ch1, skip 1 st, dc in skipped st of same color from 2 rows below (behind work), [ch1, skip sp and next st, BPdc around next st of same color below] repeat for all long sts of same color from 2 rows below, ch1, skip sp and next st, dc in last skipped st from 2 rows below (behind work), ch1, skip sp and next st, 2sc in last st (keep yarn A on the WS, change to Yarn B in final st by grabbing the loop in the end of the row and pulling it through two loops on the hook), turn – 4 sc, 2 dc, 2 BPdc, 5 ch1-sps

Ch2, 2sc in same st, ch1, skip 1 st, dc in skipped st of same color from 2 rows below (in front of work), [ch1, skip sp and next st, FPdc around next st from 2 rows below] repeat for all long sts of same color from 2 rows below, ch1, skip sp and next st, dc in last skipped st from 2 rows below (in front of work), ch1, skip next st, 2sc in last st, drop loop off the hook, don’t turn – 4 sc, 2 dc, 3 FPdc, 6 ch1-sps

As Row 7. Change to Yarn B in final st by grabbing the loop in the end of the row and pulling it through two loops on the hook, turn – 4 sc, 2 dc, 4 FPdc, 7 ch1-sps

Row 9 - WS: All dc and BPdc are made in/around sts of same color from 2 rows below – behind work!
Ch2, 2sc in same st, ch1, skip 1 st, dc in skipped st of same color from 2 rows below (behind work), [ch1, skip sp and next st, BPdc around next st of same color below] repeat for all long sts of same color from 2 rows below, ch1, skip sp and next st, dc in last skipped st from 2 rows below (behind work), ch1, skip sp and next st, 2sc in last st, drop loop off the hook, don’t turn – 4 sc, 2 dc, 5 BPdc, 8 ch1-sps

Repeat Rows 6-9 till you reach designed length of your fabric.

Last Row
To finish, make last row on RS.
Ch2, 2sc in first st, sc in next st, dc in skipped st from 2 rows below (in front of work), skip sp, sc in next st, [FPdc around next st of same color from 2 rows below, skip sp, sc in next st] repeat for all long sts of same color from 2 rows below, dc in next last skipped st from 2 rows below (in front of work), skip sp, sc in next st, 2sc in last st, fasten off.

Subscribe to a newsletter not to miss a single post. You can also follow me on Facebook, Pinterest and Instagram.
A square is the shape most widely used in crochet. Blankets, pillows, bags… and even garments can be made with squares. Some of them are worked seamlessly in continuous spiral. But most squares are crocheted in rounds – with join. And to get rid of visible seams it is better to join rounds in the corners.

In some simple designs with plain stitches the join in the middle of the round can also be more or less visible. But it’s getting a bit tricky to hide the seam when we are making lace or textured fabric. And join in the corners can help a lot! Also joining in the corner makes stitch count very easy, as we are making the same repeat on each square’s side.
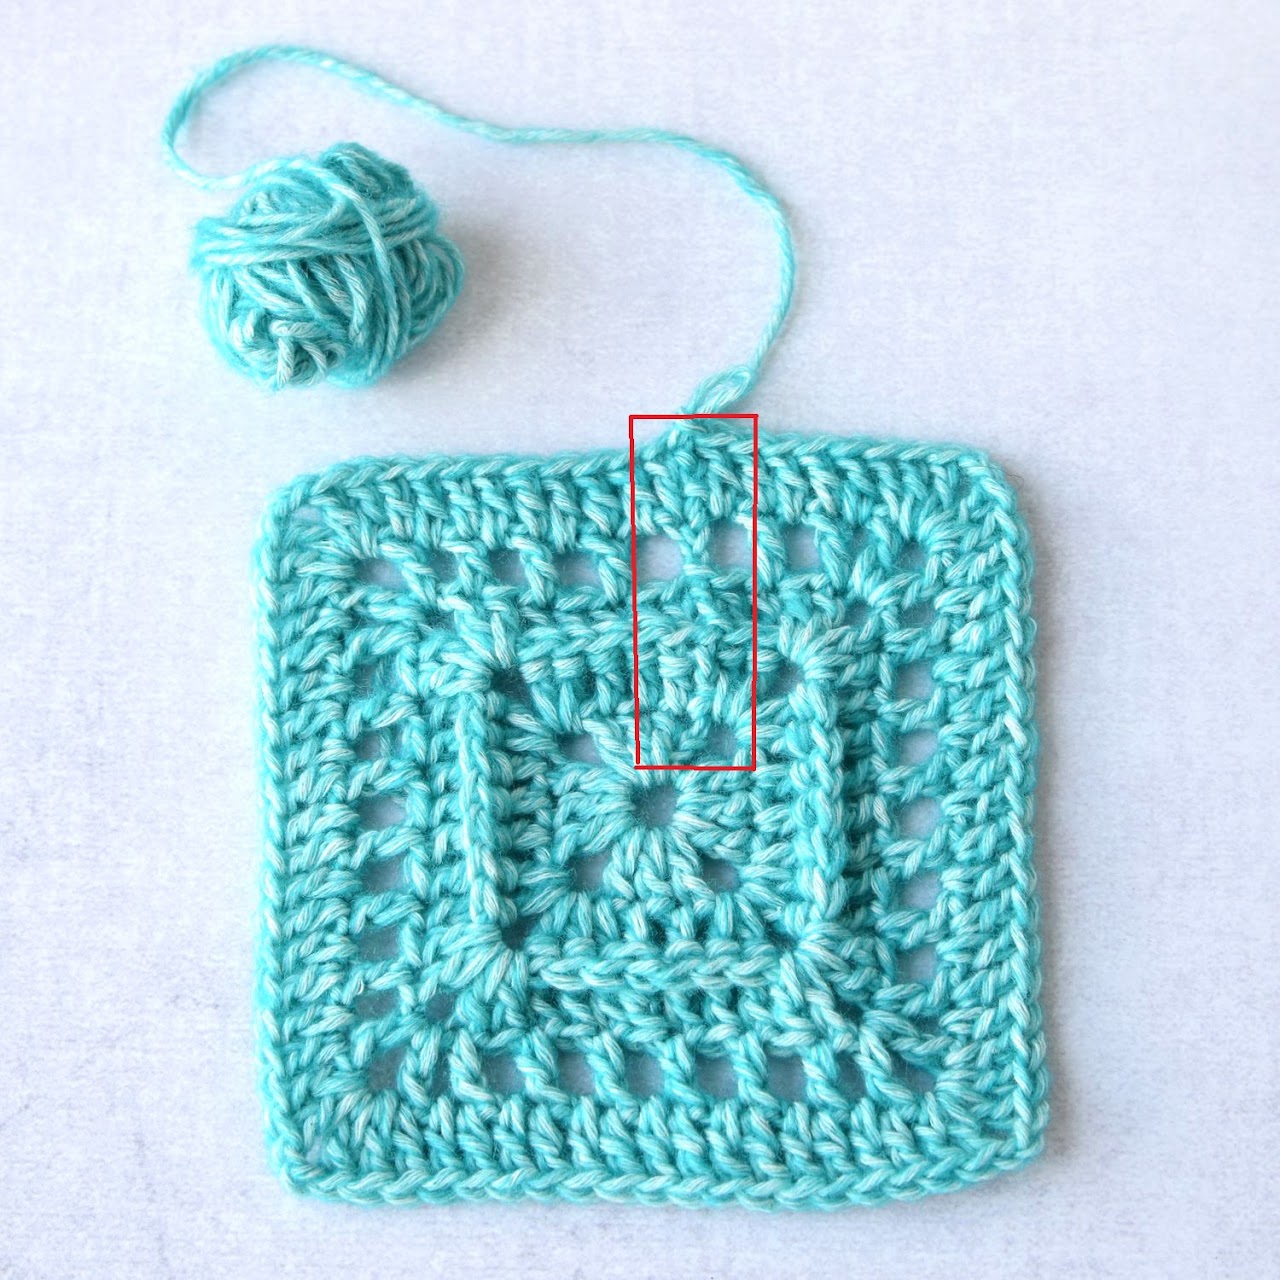
Here are two examples of how the squares with single crochet and double crochet stitches (US terms) look when joined on the side and in the corner.
When we work with double crochet stitches, we should make extra chains in the beginning of each round.

And square with single crochet stitches has a visible ridge in the place where rounds are joined.

To minimize both effects it’s better to join rounds in the corners. There are probably many different ways to do that. But here is how I am doing it. Stone Washed* yarn by Scheepjes was used for the needs of this photo-tutorial.
ch chain
sp space
yo yarn over
ss (slip stitch) – insert hook in indicated st, yo, draw yarn up and pull second loop through the first loop on hook.
sc (single crochet stitch) – insert hook in indicated stitch, yo, draw up a loop, yo and pull through both loops on hook.
dc (double crochet stitch) – yo, insert hook in indicated stitch, yo, draw up a loop, [yo, pull through 2 loops] twice.
Make ch2 and 1sc in the same space in the corner, *continue with sc in every stitch along the square's side till you come to the next corner, (1sc, ch2, 1sc) in next space in the corner; repeat from * for next 2 sides. Make 1sc in each stitch on the last (fourth) side till you come to joining ss (slip stitch) of the previous round. Make 1sc in this ss and join the round with ss in ch2-sp in the beginning of the round.

Make ch4 (or ch5 if you tend to crochet very tight) which will count as first dc+ch2. Make 2dc in same space. *Continue with dc in every stitch along the square's side till you come to the next corner, (2dc, ch2, 2dc) in next space in the corner; repeat from * for next 2 sides. Make 1dc in each stitch on the last (fourth) side till you come to joining ss of the previous round. Make 1dc in this ss, 1dc in space of previous round in the corner and join the round with ss in ch2-sp in the beginning of the round.

Subscribe to a newsletter not to miss a single post. You can also follow me on Facebook, Pinterest and Instagram.


In some simple designs with plain stitches the join in the middle of the round can also be more or less visible. But it’s getting a bit tricky to hide the seam when we are making lace or textured fabric. And join in the corners can help a lot! Also joining in the corner makes stitch count very easy, as we are making the same repeat on each square’s side.

Here are two examples of how the squares with single crochet and double crochet stitches (US terms) look when joined on the side and in the corner.
When we work with double crochet stitches, we should make extra chains in the beginning of each round.

And square with single crochet stitches has a visible ridge in the place where rounds are joined.

To minimize both effects it’s better to join rounds in the corners. There are probably many different ways to do that. But here is how I am doing it. Stone Washed* yarn by Scheepjes was used for the needs of this photo-tutorial.
Abbreviations (US terms)
ch chain
sp space
yo yarn over
ss (slip stitch) – insert hook in indicated st, yo, draw yarn up and pull second loop through the first loop on hook.
sc (single crochet stitch) – insert hook in indicated stitch, yo, draw up a loop, yo and pull through both loops on hook.
dc (double crochet stitch) – yo, insert hook in indicated stitch, yo, draw up a loop, [yo, pull through 2 loops] twice.
1. Square with single crochet stitches
Make ch2 and 1sc in the same space in the corner, *continue with sc in every stitch along the square's side till you come to the next corner, (1sc, ch2, 1sc) in next space in the corner; repeat from * for next 2 sides. Make 1sc in each stitch on the last (fourth) side till you come to joining ss (slip stitch) of the previous round. Make 1sc in this ss and join the round with ss in ch2-sp in the beginning of the round.

2. Square with double crochet stitches
Make ch4 (or ch5 if you tend to crochet very tight) which will count as first dc+ch2. Make 2dc in same space. *Continue with dc in every stitch along the square's side till you come to the next corner, (2dc, ch2, 2dc) in next space in the corner; repeat from * for next 2 sides. Make 1dc in each stitch on the last (fourth) side till you come to joining ss of the previous round. Make 1dc in this ss, 1dc in space of previous round in the corner and join the round with ss in ch2-sp in the beginning of the round.

Subscribe to a newsletter not to miss a single post. You can also follow me on Facebook, Pinterest and Instagram.

After a short but very nice holiday break I am entering year 2017 with a new design. You may have read about this in my previous post HERE. I am playing with Mini Nooodle* (T-shirt) yarn by Scheepjes and this time I am working on a new round pillow design. It will be free and soon published on my blog.

Nowadays crochet that looks like knitting is very popular, and I decided to try my hand in designing something very simple to contribute to this trend. I am playing with a Camel crochet stitch, working in rounds with colour changes on each round.

Camel stitch is very widely used in crochet wear design. Usually combined with half double crochet stitches (hdc - US term). But I thought it might be nice to try a bit “tighter version” with single crochet stitches (sc).
Camel stitch is very simple. The only difference is in a way you insert the crochet hook. If you are a beginner you may only have worked through both loops so far. You can also crochet in front loops or back loops only. And you can also crochet in 3rd loop – to obtain a “knit look” effect.
I’ve made pictures below to give you an idea of what “loops' anatomy” looks like. In 2nd picture you can see that 3rd loop lies just behind back loop on the wrong side of your work. And this is the one you need for a Camel stitch. It might be easier to see it in hdc stitches. If you would like to practice, you may use a free hat pattern recently released by Miss Neriss (available HERE).

For my new pillow project I work in rounds and change colours on every round. I decided to write this short photo-tutorial to show you the tips I have come up with (especially for joining the rounds). US terms and abbreviations are used here.
Round 1. To begin make a magic ring, ch1 (which doesn’t count as sc) and 6 sc into a magic ring. Join the round with slip stitch (ss) in 1st sc of the round after ch1 (insert the hook under both loops (front and back).
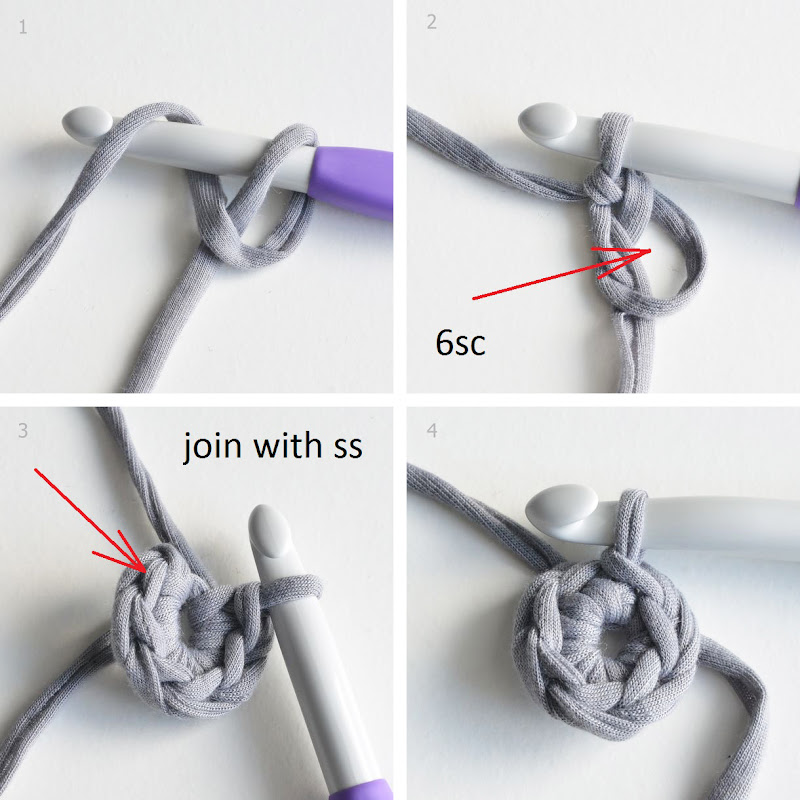
Round 2. Change yarn making ch1 with new colour. Now you will be working in 3rd loops of the stitches from round 1. The 1st sc is made in the same stitch as join.
Ch1, 2sc (3rd lp) in each stitch around; join with ss in 1st sc after ch1.

If you just join with ss, there might be a joining seam visible on right side. I was thinking of how it is possible to avoid it, and here is the tip I have come up with: after you join the round with ss, drop loop of yarn from the hook (pic.1 below), then insert the hook under back loop of same stitch as join (from back to front – pic.2), put the loop on the hook again and pull it under back loop to the wrong side of your work (pic.3). It should help to make the seam less visible.

Round 3. Change yarn again in the same way as on Round 2 and work again in 3rd loops of the stitches.

To make a flat circle, make 6 increases on each round. I will post complete instructions together with the pattern of my new pillow in 2 weeks. UPDATE: UFO pillow free crochet pattern is available HERE.
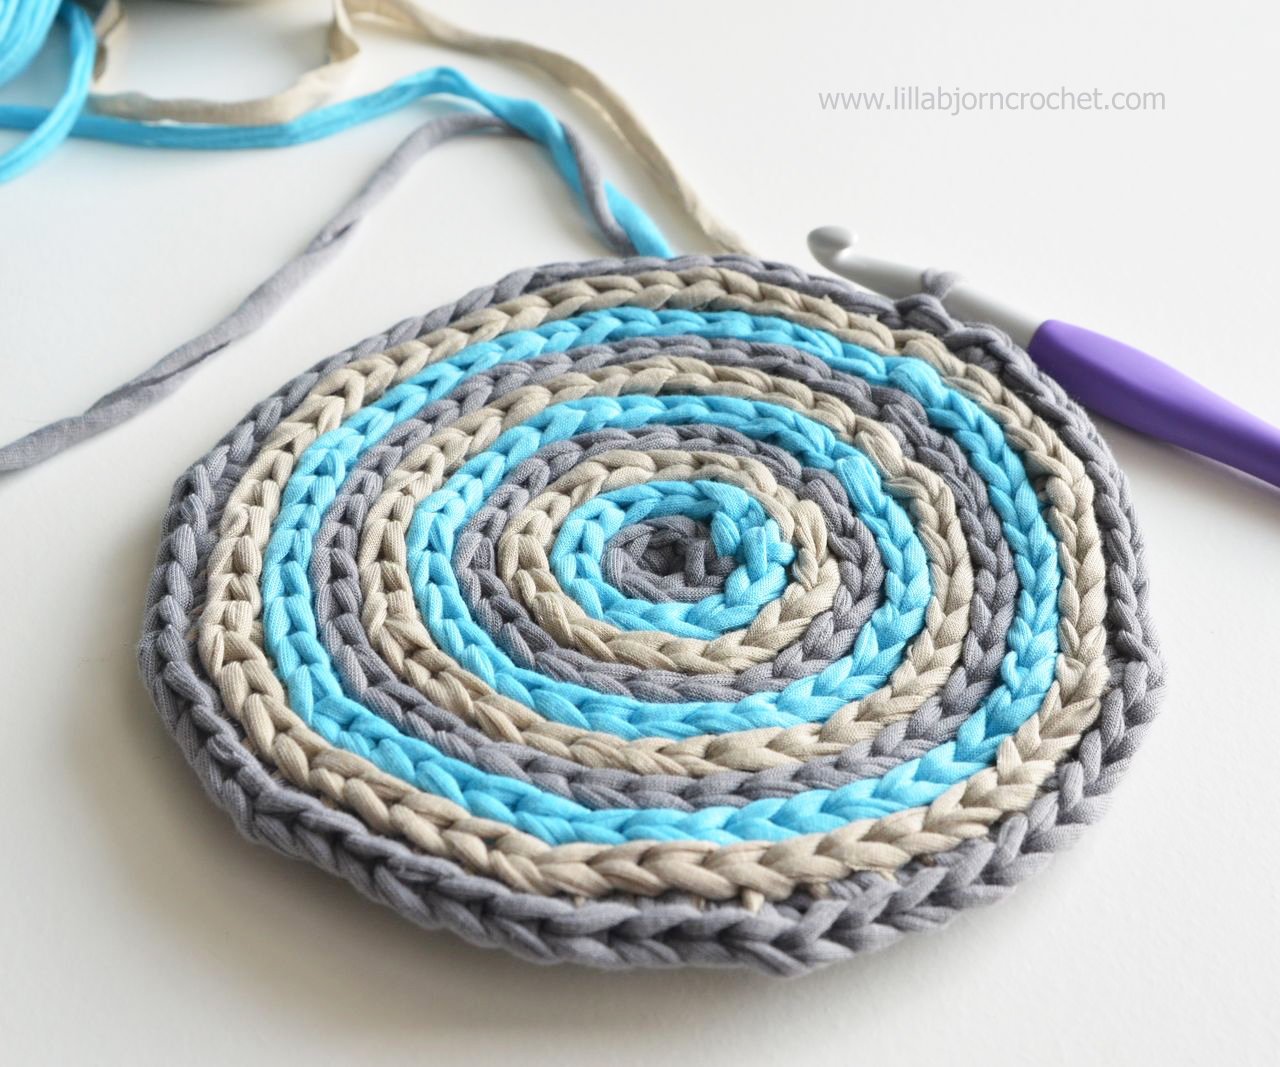
If you would like to try Mini Nooodle yarn, it's available via Wool Warehouse HERE* or from your local Scheepjes shops.
Have a nice weekend,

Subscribe to a newsletter not to miss a single post. You can also follow me on Facebook, Pinterest and Instagram.
p.s. Thank you for using my affiliate links (marked with *). It costs you nothing but helps to support my blog. It’s very much appreciated.

Nowadays crochet that looks like knitting is very popular, and I decided to try my hand in designing something very simple to contribute to this trend. I am playing with a Camel crochet stitch, working in rounds with colour changes on each round.

Camel stitch is very widely used in crochet wear design. Usually combined with half double crochet stitches (hdc - US term). But I thought it might be nice to try a bit “tighter version” with single crochet stitches (sc).
Camel stitch is very simple. The only difference is in a way you insert the crochet hook. If you are a beginner you may only have worked through both loops so far. You can also crochet in front loops or back loops only. And you can also crochet in 3rd loop – to obtain a “knit look” effect.
I’ve made pictures below to give you an idea of what “loops' anatomy” looks like. In 2nd picture you can see that 3rd loop lies just behind back loop on the wrong side of your work. And this is the one you need for a Camel stitch. It might be easier to see it in hdc stitches. If you would like to practice, you may use a free hat pattern recently released by Miss Neriss (available HERE).

Camel Crochet Stitch Tutorial
For my new pillow project I work in rounds and change colours on every round. I decided to write this short photo-tutorial to show you the tips I have come up with (especially for joining the rounds). US terms and abbreviations are used here.
Round 1. To begin make a magic ring, ch1 (which doesn’t count as sc) and 6 sc into a magic ring. Join the round with slip stitch (ss) in 1st sc of the round after ch1 (insert the hook under both loops (front and back).

Round 2. Change yarn making ch1 with new colour. Now you will be working in 3rd loops of the stitches from round 1. The 1st sc is made in the same stitch as join.
Ch1, 2sc (3rd lp) in each stitch around; join with ss in 1st sc after ch1.

If you just join with ss, there might be a joining seam visible on right side. I was thinking of how it is possible to avoid it, and here is the tip I have come up with: after you join the round with ss, drop loop of yarn from the hook (pic.1 below), then insert the hook under back loop of same stitch as join (from back to front – pic.2), put the loop on the hook again and pull it under back loop to the wrong side of your work (pic.3). It should help to make the seam less visible.

Round 3. Change yarn again in the same way as on Round 2 and work again in 3rd loops of the stitches.

To make a flat circle, make 6 increases on each round. I will post complete instructions together with the pattern of my new pillow in 2 weeks. UPDATE: UFO pillow free crochet pattern is available HERE.

If you would like to try Mini Nooodle yarn, it's available via Wool Warehouse HERE* or from your local Scheepjes shops.
Have a nice weekend,
Subscribe to a newsletter not to miss a single post. You can also follow me on Facebook, Pinterest and Instagram.
p.s. Thank you for using my affiliate links (marked with *). It costs you nothing but helps to support my blog. It’s very much appreciated.
Peacock Tail Bag CAL is finished. Last week final part 6 was released and you joined your bag together and added the band and D-rings. You can start using your bag right away or you can line it up with fabric.

If you missed some or all the parts of this CAL, please check page with General Information HERE, and also Part 1, Part 2, Part 3, Part 4, Part 5 and Part 6.
Add this pattern to your Ravelry queue!
I used Linen Soft yarn by Scheepjes and 2.75mm (С) Clover Soft Touch hook*. Linen Soft is available for purchase via Wool Warehouse HERE* (international shipping), Paradise Fibers (US) HERE* or in your local Scheepjes shop. Separate bag handles, magnetic clasps and D-rings are available via Wool Warehouse HERE*.
If you bought the kit, you should have all materials for the lining included: a piece of fabric, white interfacing and magnetic clasp.
You will also need a ruler, sewing chalk (or just a pencil), scissors, sewing pins (or normal pins if you don’t have sewing), sewing thread in matching color for crocheted band of your bag.
IMPORTANT: Please, be aware that all my patterns (free or paid) are protected by copyright. You are not allowed to copy, reproduce, redistribute, sell and edit them in part or as a whole. You are welcome to sell your finished items made by my patterns, but you cannot use my pictures to promote them. Please, always credit me as the designer of these patterns. You are not allowed to share pdf-files created from my posts with anyone. If you would like more people to join my CAL – please, share a link to my blog with them. If you own a yarn store and would like to sell kits for this CAL - please, contact me for details. You can check Copyright page for more information.
Note: Unfortunately there will be no video available for this part. But I am happy to announce translations will be added soon. But if you would like to translate it into your own language right away - please use "Translate" button in the right side on my blog.
There are different types of fabric included in Deep and Pastel kits. Deep version has a 100% polyester fabric, and pastel is rayon. If you have fabric made of natural fibre, you may want to wash it first and then iron. Please, be careful with ironing fabric from Deep kit!! It may leave paint on your ironing board! So better use a piece of other fabric underneath.
If you haven’t blocked your bag – now it’s the last chance to do it.

Picture 1: After your fabric is prepared, fold it inside out so that it’s enough for your bag. Put bag onto fabric.
Picture 2: Draw a line with chalk around the bag.
Picture 3: Remove the bag.
Picture 4: Pin 2 layers of fabric together with sewing pins.
Picture 5: Cut the detail leaving 1cm (1/2 inch) space from line.
Picture 6: Two main details are ready.
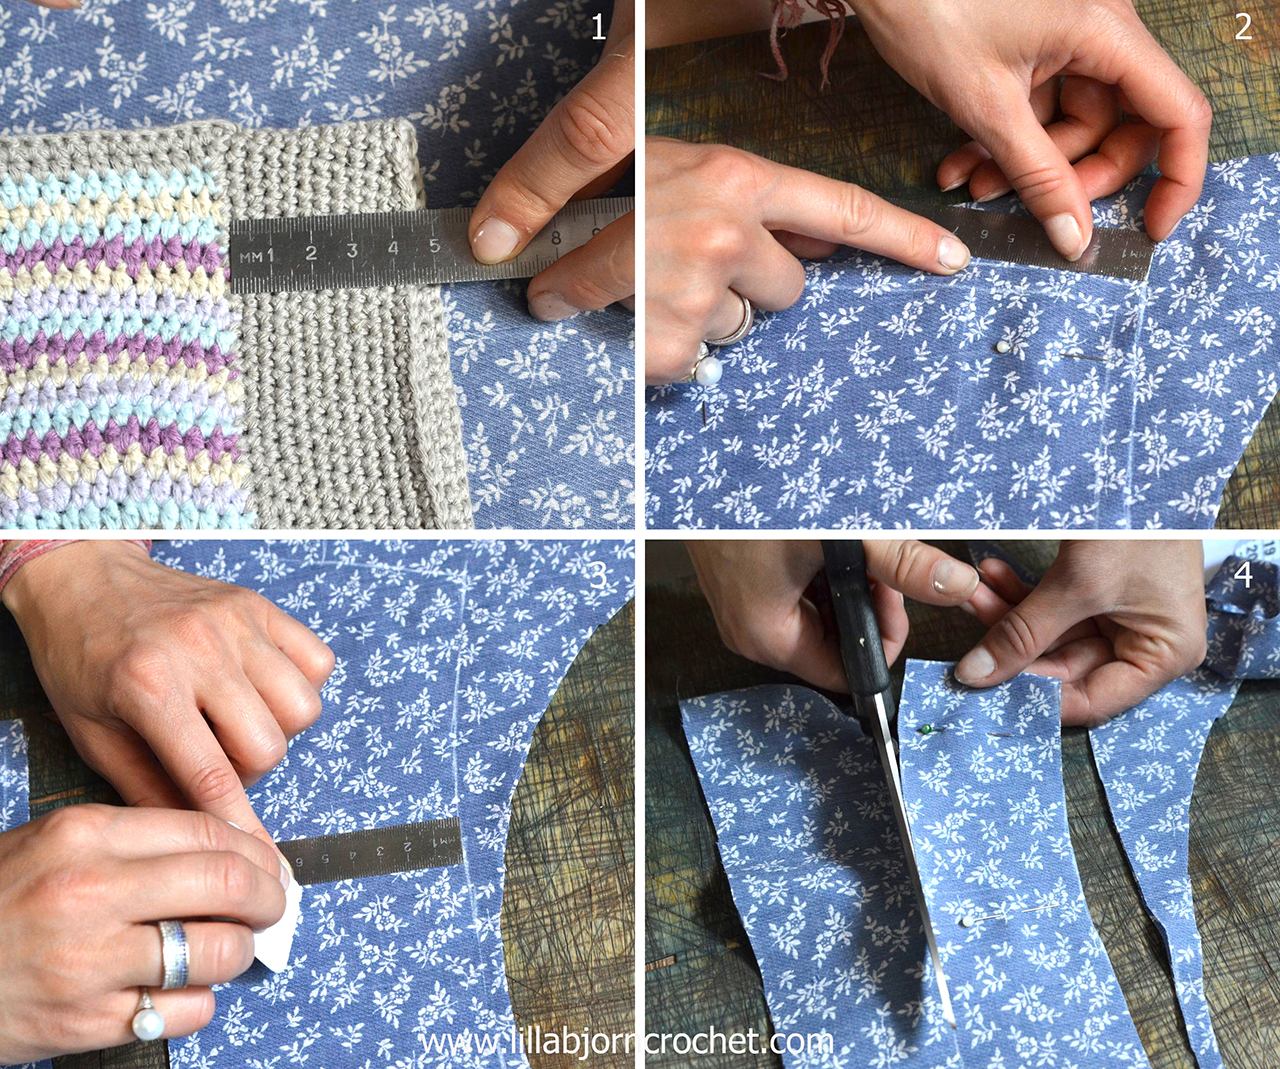
Picture 1: Measure depth of the band.
Picture 2: Fold fabric inside out and put main detail above. Draw a line along bag’s opening and two sides. Remove the bag.
Picture 3: Measure the depth of the band from the top of the opening + 1cm (1/2 inch). In my case the band is 5cm deep. So I measured 6cm depth for the band details.
Picture 4: Pin 2 layers of fabric together with sewing pins. Cut band details out.

Important!! I strongly recommend to try ironing with a small piece of fabric and interfacing to make sure you understand how everything works!!

Picture 1: Cut 2 band details from interfacing (fold interfacing, pin fabric band detail above and cut around).
Picture 2: Now you will iron interfacing band details onto the wrong side of main details. Place a piece of white fabric onto ironing board, one main detail (facing the board with right side) and interfacing band above.
Picture 3: Place damp white fabric onto interfacing and press firmly with your hand. Then iron for 12 seconds. When you remove the fabric your main detail and interfacing should be glued to each other.
Picture 4: Place fabric band onto top of main detail (covering interfacing) and pin all 3 details with sewing pins.
Repeat step 4 for second main detail.
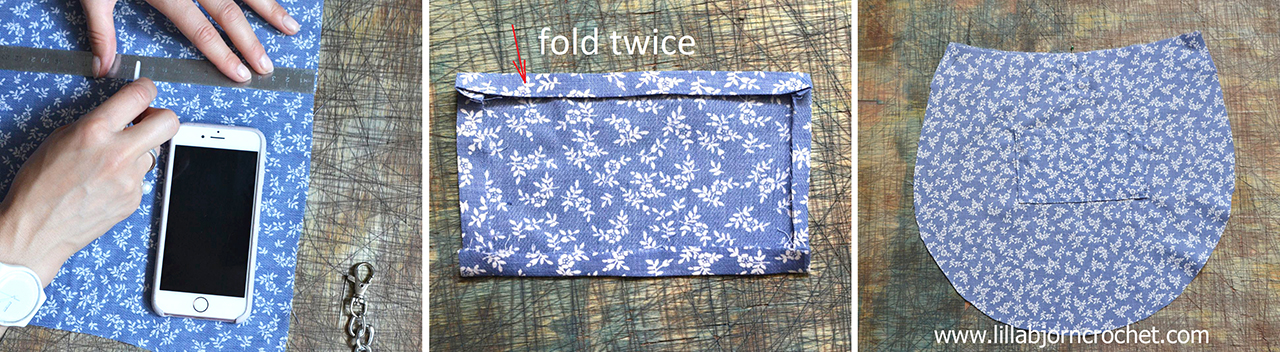
You can make a pocket for your bag if you wish. Cut a rectangle of needed shape. Fold upper edge twice and sew a line (with sewing machine of by hand) along it.
Then fold all three remaining edges and sew the pocket along three sides to one of the main details (on the right side).
This step is probably the most tricky. I have never inserted magnetic clasps before. And I was trying to find a solution how to add an extra thickness to fabric in a place where the clasp is attached. And I decided to add two small crocheted circles.
I made them with the same yarn as for the bag’s band.
Rnd 1. Make magic ring, ch1, 6sc into a ring.
Rnd 2. Skip ch1, make 2sc in each stitch. Finish with slip stitch into next stitch. Cut yarn, fasten off, weave yarn tails in.

It’s very important to exactly define the place where the clasp will be attached. Find a center of the band and mark the spot where you want the clasp to be. Please, remember that we left 1cm (1/2 inch) along the bag’s opening. So when deciding about the clasp position, don’t count this 1cm. to make it easier – place the clasp a little bit lower and closer to the bottom of the band rather than to the top. In the picture below you can see how I made it. But I would place the clasp even lower.

Picture 1: Make two tiny holes with scissors on the right side in a place marked for the clasp (through all three layers).
Picture 2: Insert the clasp through the holes.
Picture 3: Wear crocheted circle onto "legs" of clasp.
Picture 4: Place securing ring on the clasp and bend the clasp’s “legs” to the sides.
Insert second part of the clasp to another detail. Make sure that the position of both parts of a clasp is central and the height matches perfectly!!
Option: you can also insert a zipper into the opening of your bag. Like Esther’s mother did for her. Isn’t it just a perfect solution? Check more pictures HERE.

Place 2 main details onto each other with right sides facing, center them and sew along the sides and bottom of the bag (1cm (1/2 inch) from edge) leaving the bag’s opening unworked.

Picture 1: Turn lining inside out. Turn bag inside out. Wear lining onto the bag. (Wrong sides of bag and lining are facing each other), match seams on sides.
Picture 2: Fold upper edge of the lining inside for 1cm (1/2 inch) and pin it to the upper edge of the crocheted band. Sew lining to the crocheted band either with sewing machine or by hand.
Turn the whole bag inside out. Ta-dah!!!!! Your lining is finished!!

I really hope this tutorial is clear and easy to follow. I tried to describe each step in the most easiest way and I hope you could handle it!
Don’t forget to show our bags off on Facebook, Instagram, Pinterest and Ravelry. Please always use hashtag #PeacockTailBagCAL so that I could find them and admire!
Thank you so much for following this CAL. For me it was much of fun. I hope for you, too!
In the end I would like to mention people without whom this CAL would not be possible.
Esther from It’s All In a Nutshell. Thank you so much for you fantastic video’s!
My just the best testers! Cindy, Margo, Raquel, Dominique, Christine, Lori thank you very much for spending your precious time and helping me to test this project. I know it was not the easiest test and many corrections and adjustments were made. Without you this CAL would never go live!
Massiel Lago and fantastic team of translators. Thank you very much for translating my CAL into so many languages.
Susan Cutler Cutrer thank you so much for taking care of the CAL in Official CCC Social Group on Facebook. I know you had to get up early every Wednesday to post on time.
Donna Wilson thank you very much for taking care of our Ravelry group.
Scheepjes and Wool Warehouse*! Thank you very much for sponsoring this CAL and making kits available for purchase.
You can subscribe to a newsletter not to miss a single post. You can also follow me on Facebook, Pinterest and Instagram.

Lining is always a better solution for handmade bags, as it gives the bag a better hang and helps to keep its shape. Even if you are not a good sewer, and even if you don’t have a sewing machine – don’t worry. I am not good at sewing at all. I asked my friend Kate Tikota (a designer behind Tikota Unique) to help me with this tutorial. And we tried to make it as simple as possible. And you can sew the lining by hand!

If you missed some or all the parts of this CAL, please check page with General Information HERE, and also Part 1, Part 2, Part 3, Part 4, Part 5 and Part 6.
Add this pattern to your Ravelry queue!
I used Linen Soft yarn by Scheepjes and 2.75mm (С) Clover Soft Touch hook*. Linen Soft is available for purchase via Wool Warehouse HERE* (international shipping), Paradise Fibers (US) HERE* or in your local Scheepjes shop. Separate bag handles, magnetic clasps and D-rings are available via Wool Warehouse HERE*.
What you will need:
If you bought the kit, you should have all materials for the lining included: a piece of fabric, white interfacing and magnetic clasp.
You will also need a ruler, sewing chalk (or just a pencil), scissors, sewing pins (or normal pins if you don’t have sewing), sewing thread in matching color for crocheted band of your bag.
COPYRIGHT
IMPORTANT: Please, be aware that all my patterns (free or paid) are protected by copyright. You are not allowed to copy, reproduce, redistribute, sell and edit them in part or as a whole. You are welcome to sell your finished items made by my patterns, but you cannot use my pictures to promote them. Please, always credit me as the designer of these patterns. You are not allowed to share pdf-files created from my posts with anyone. If you would like more people to join my CAL – please, share a link to my blog with them. If you own a yarn store and would like to sell kits for this CAL - please, contact me for details. You can check Copyright page for more information.
Tutorial: Lining
Note: Unfortunately there will be no video available for this part. But I am happy to announce translations will be added soon. But if you would like to translate it into your own language right away - please use "Translate" button in the right side on my blog.
Step 1. Wash and Iron Fabric
There are different types of fabric included in Deep and Pastel kits. Deep version has a 100% polyester fabric, and pastel is rayon. If you have fabric made of natural fibre, you may want to wash it first and then iron. Please, be careful with ironing fabric from Deep kit!! It may leave paint on your ironing board! So better use a piece of other fabric underneath.
If you haven’t blocked your bag – now it’s the last chance to do it.
Step 2. Cut Main Detail (two)

Picture 1: After your fabric is prepared, fold it inside out so that it’s enough for your bag. Put bag onto fabric.
Picture 2: Draw a line with chalk around the bag.
Picture 3: Remove the bag.
Picture 4: Pin 2 layers of fabric together with sewing pins.
Picture 5: Cut the detail leaving 1cm (1/2 inch) space from line.
Picture 6: Two main details are ready.
Step 3. Cut Band Detail (two)

Picture 1: Measure depth of the band.
Picture 2: Fold fabric inside out and put main detail above. Draw a line along bag’s opening and two sides. Remove the bag.
Picture 3: Measure the depth of the band from the top of the opening + 1cm (1/2 inch). In my case the band is 5cm deep. So I measured 6cm depth for the band details.
Picture 4: Pin 2 layers of fabric together with sewing pins. Cut band details out.

Step 4. Interfacing
Interfacing is a special kind of material which is ironed onto fabric to give it extra thickness and sturdiness. We will use interfacing to strengthen the bag’s band. Interfacing has two side: one is with gloss – and this is the one where glue is. To stick fabric and interfacing together, you should place interfacing with glue onto fabric.
Important!! I strongly recommend to try ironing with a small piece of fabric and interfacing to make sure you understand how everything works!!

Picture 1: Cut 2 band details from interfacing (fold interfacing, pin fabric band detail above and cut around).
Picture 2: Now you will iron interfacing band details onto the wrong side of main details. Place a piece of white fabric onto ironing board, one main detail (facing the board with right side) and interfacing band above.
Picture 3: Place damp white fabric onto interfacing and press firmly with your hand. Then iron for 12 seconds. When you remove the fabric your main detail and interfacing should be glued to each other.
Picture 4: Place fabric band onto top of main detail (covering interfacing) and pin all 3 details with sewing pins.
Repeat step 4 for second main detail.
Step 5 (optional). Pocket
You can make a pocket for your bag if you wish. Cut a rectangle of needed shape. Fold upper edge twice and sew a line (with sewing machine of by hand) along it.
Then fold all three remaining edges and sew the pocket along three sides to one of the main details (on the right side).

Step 6. Magnetic Clasp
This step is probably the most tricky. I have never inserted magnetic clasps before. And I was trying to find a solution how to add an extra thickness to fabric in a place where the clasp is attached. And I decided to add two small crocheted circles.
I made them with the same yarn as for the bag’s band.
Rnd 1. Make magic ring, ch1, 6sc into a ring.
Rnd 2. Skip ch1, make 2sc in each stitch. Finish with slip stitch into next stitch. Cut yarn, fasten off, weave yarn tails in.

It’s very important to exactly define the place where the clasp will be attached. Find a center of the band and mark the spot where you want the clasp to be. Please, remember that we left 1cm (1/2 inch) along the bag’s opening. So when deciding about the clasp position, don’t count this 1cm. to make it easier – place the clasp a little bit lower and closer to the bottom of the band rather than to the top. In the picture below you can see how I made it. But I would place the clasp even lower.

Picture 1: Make two tiny holes with scissors on the right side in a place marked for the clasp (through all three layers).
Picture 2: Insert the clasp through the holes.
Picture 3: Wear crocheted circle onto "legs" of clasp.
Picture 4: Place securing ring on the clasp and bend the clasp’s “legs” to the sides.
Insert second part of the clasp to another detail. Make sure that the position of both parts of a clasp is central and the height matches perfectly!!
Option: you can also insert a zipper into the opening of your bag. Like Esther’s mother did for her. Isn’t it just a perfect solution? Check more pictures HERE.

Step 7. Finishing
Place 2 main details onto each other with right sides facing, center them and sew along the sides and bottom of the bag (1cm (1/2 inch) from edge) leaving the bag’s opening unworked.

Picture 1: Turn lining inside out. Turn bag inside out. Wear lining onto the bag. (Wrong sides of bag and lining are facing each other), match seams on sides.
Picture 2: Fold upper edge of the lining inside for 1cm (1/2 inch) and pin it to the upper edge of the crocheted band. Sew lining to the crocheted band either with sewing machine or by hand.
Turn the whole bag inside out. Ta-dah!!!!! Your lining is finished!!

I really hope this tutorial is clear and easy to follow. I tried to describe each step in the most easiest way and I hope you could handle it!
Don’t forget to show our bags off on Facebook, Instagram, Pinterest and Ravelry. Please always use hashtag #PeacockTailBagCAL so that I could find them and admire!
Thank you so much for following this CAL. For me it was much of fun. I hope for you, too!
Many thanks!
In the end I would like to mention people without whom this CAL would not be possible.
Esther from It’s All In a Nutshell. Thank you so much for you fantastic video’s!
My just the best testers! Cindy, Margo, Raquel, Dominique, Christine, Lori thank you very much for spending your precious time and helping me to test this project. I know it was not the easiest test and many corrections and adjustments were made. Without you this CAL would never go live!
Massiel Lago and fantastic team of translators. Thank you very much for translating my CAL into so many languages.
Susan Cutler Cutrer thank you so much for taking care of the CAL in Official CCC Social Group on Facebook. I know you had to get up early every Wednesday to post on time.
Donna Wilson thank you very much for taking care of our Ravelry group.
Scheepjes and Wool Warehouse*! Thank you very much for sponsoring this CAL and making kits available for purchase.
You can subscribe to a newsletter not to miss a single post. You can also follow me on Facebook, Pinterest and Instagram.
Subscribe to:
Posts (Atom)


