
Showing posts with label Rozeta CAL. Show all posts
Showing posts with label Rozeta CAL. Show all posts
Rozeta crochet-a-long
was definitely the biggest event in my designer’s life last year. Thousands of
people all over the world joined me and Scheepjes in the Rozeta
journey. And thousands of lovely Rozeta blanket have been created. New
pictures arrive to my social media feeds every day. And every day my heart is
melted with quiet happiness.
Most of the Rozeta’s are used as blankets. But some of them were turned into rugs, pillows… and wall hangings! I’ve received quite a few messages with questions about how to mount Rozeta on a wall.
To be honest I didn’t do it myself, and all my samples are proudly kept at Scheepjes HQ. The Rozeta, as any other crochet piece, can be just hang onto the wall, but because it is big and heavy, it can stretch a lot and lose its shape. That’s why a certain kind of frame is needed for mounting.
Some CAL followers mounted their blankets and shared pictures on Facebook and Instagram. One of them was Evelien van der Drift. She kindly gave me permission to republish her step-by-step pictures on my blog, with short description for each step.
Evelien used an old board from under the mattress and metal wire. This kind of boards with holes can be found in the building stores. The holes make it easy to weave in the wire, and also keep the board light weight.
Step 1. First Evelien cut the board to match the size of the Rozeta. Because crochet fabric is stretchy, the border should not be much smaller than the blanket – just enough to wrap the edges of the blanket and to pull it reasonably, without destroying the texture of the stitches.

Step 2. Then three wooden pieces were attached with nails onto the back side of the board: each on top and bottom, and third one to the middle of the board to keep it stable.

Step 3. Evelien wove the metal wire along all four sides of the board close to its edges.


Step 4. Then Rozeta was carefully wrapped around the board, slightly pulled and sewn along the edges to the wires on the back side of the board. Evelien used Scheepjes Whirlette yarn* - same as for the last rounds of Rozeta.

Step 5. A wooden piece was attached to the wall and finished Rozeta was hung onto it!

That’s it!
P.s. If you decided to keep your Rozeta just as a mandala, you can mount it to a round wire using the method of my friend Jellina. You can follow step-by-step tutorial HERE on her blog.
Subscribe to a newsletter not to miss a single post. You can also follow me on Facebook, Pinterest and Instagram.


|
| Photo credit: Evelien van der Drift |
Most of the Rozeta’s are used as blankets. But some of them were turned into rugs, pillows… and wall hangings! I’ve received quite a few messages with questions about how to mount Rozeta on a wall.
To be honest I didn’t do it myself, and all my samples are proudly kept at Scheepjes HQ. The Rozeta, as any other crochet piece, can be just hang onto the wall, but because it is big and heavy, it can stretch a lot and lose its shape. That’s why a certain kind of frame is needed for mounting.
Some CAL followers mounted their blankets and shared pictures on Facebook and Instagram. One of them was Evelien van der Drift. She kindly gave me permission to republish her step-by-step pictures on my blog, with short description for each step.
How to Mount a Crochet Blanket: Tutorial
Evelien used an old board from under the mattress and metal wire. This kind of boards with holes can be found in the building stores. The holes make it easy to weave in the wire, and also keep the board light weight.
Step 1. First Evelien cut the board to match the size of the Rozeta. Because crochet fabric is stretchy, the border should not be much smaller than the blanket – just enough to wrap the edges of the blanket and to pull it reasonably, without destroying the texture of the stitches.

Step 2. Then three wooden pieces were attached with nails onto the back side of the board: each on top and bottom, and third one to the middle of the board to keep it stable.

Step 3. Evelien wove the metal wire along all four sides of the board close to its edges.


Step 4. Then Rozeta was carefully wrapped around the board, slightly pulled and sewn along the edges to the wires on the back side of the board. Evelien used Scheepjes Whirlette yarn* - same as for the last rounds of Rozeta.

Step 5. A wooden piece was attached to the wall and finished Rozeta was hung onto it!

That’s it!
P.s. If you decided to keep your Rozeta just as a mandala, you can mount it to a round wire using the method of my friend Jellina. You can follow step-by-step tutorial HERE on her blog.

|
| Photo credit: Jelllinas Creations |
Subscribe to a newsletter not to miss a single post. You can also follow me on Facebook, Pinterest and Instagram.
Hello and welcome to the very last bit of Rozeta CAL. I hope you had a very
good rest during holidays with lots of time to finish your Rozeta. Most likely
you have yarn in some colors left. And you were probably guessing why there
was wooden ornament and embroidery thread
included into the Rozeta kits. So today I will answer your questions! We will be using leftovers and
wooden ornament to create a small hanging decoration – a micro Rozeta, as I
called this pattern.
Micro Rozeta pattern uses same stitches as you practiced a lot during the
CAL. The textured flower is made in overlay crochet technique. The pattern
is not tricky, and I hope that with the help of progress pictures below you
will have no difficulties to finish it.
Hanging ornament consists of two parts. The top is decorated with flower, and the bottom is plain. I added very simple embroidery onto the bottom. You received plenty of embroidery thread in your kits, and you can go a bit “wild” and creative with embroidery. And hopefully Rozeta leftovers will be enough to finish several micro hangings.
The pattern below uses US crochet terms. And you can also download pdf files in English (both US and UK) and Dutch. The pdfs contain only written instructions, and progress pictures are available for viewing on my blog. Please, note that there is no video available for this pattern.
Hope you’ll enjoy the pattern! And I can’t wait to see your pictures.
3mm crochet hook for Our Tribe yarn*,
3.5mm crochet hook for Colour Crafter yarn*
Wooden ornament, yarn needle, embroidery thread
Approx. 9cm/3.5” across with Our Tribe*
FPtr front post treble crochet
FPtr3tog front post treble crochet 3 together
rep(s) repeat(s)
RS right side
sc single crochet
st(s) stitch(es)
WS wrong side

Every round of the top flower is made with just one color. The yarns are not cut after every round but are carried up to next rounds on the wrong side. The colors are changed in the joining slip stitch (unless otherwise stated in the pattern).
The color key for Yarn A and B is just for the needs of this pattern and doesn’t correspond with the key for the Rozeta CAL blanket. Please, use the colors according to your taste, and use more than two colors per ornament, if you like.
All sc stitches are made into back loops (BL). Front loops (FL) stay unworked and overlay stitches from next rounds are anchored to them by inserting the hook from the bottom to top (see pics in the pattern). Stitches of the previous round are skipped (or not skipped) behind overlay long stitches as stated in the pattern. Please, be careful with skipping stitches.

********************************************************************
Copyright. An original LillaBjörnCrochet Design (Tatsiana Kupryianchyk). Copyright 2014-2020. All rights reserved. This pattern is for personal use only. It cannot be sold, redistributed or edited in any way. Translations and video tutorials are not allowed. You can sell your finished products, but you cannot use my pictures to promote them. Please, always note me as a designer of this pattern. Thank you!
Grab a ready to print file HERE on Ravelry and HERE on Etsy (in English with both US and UK terms and Dutch languages).
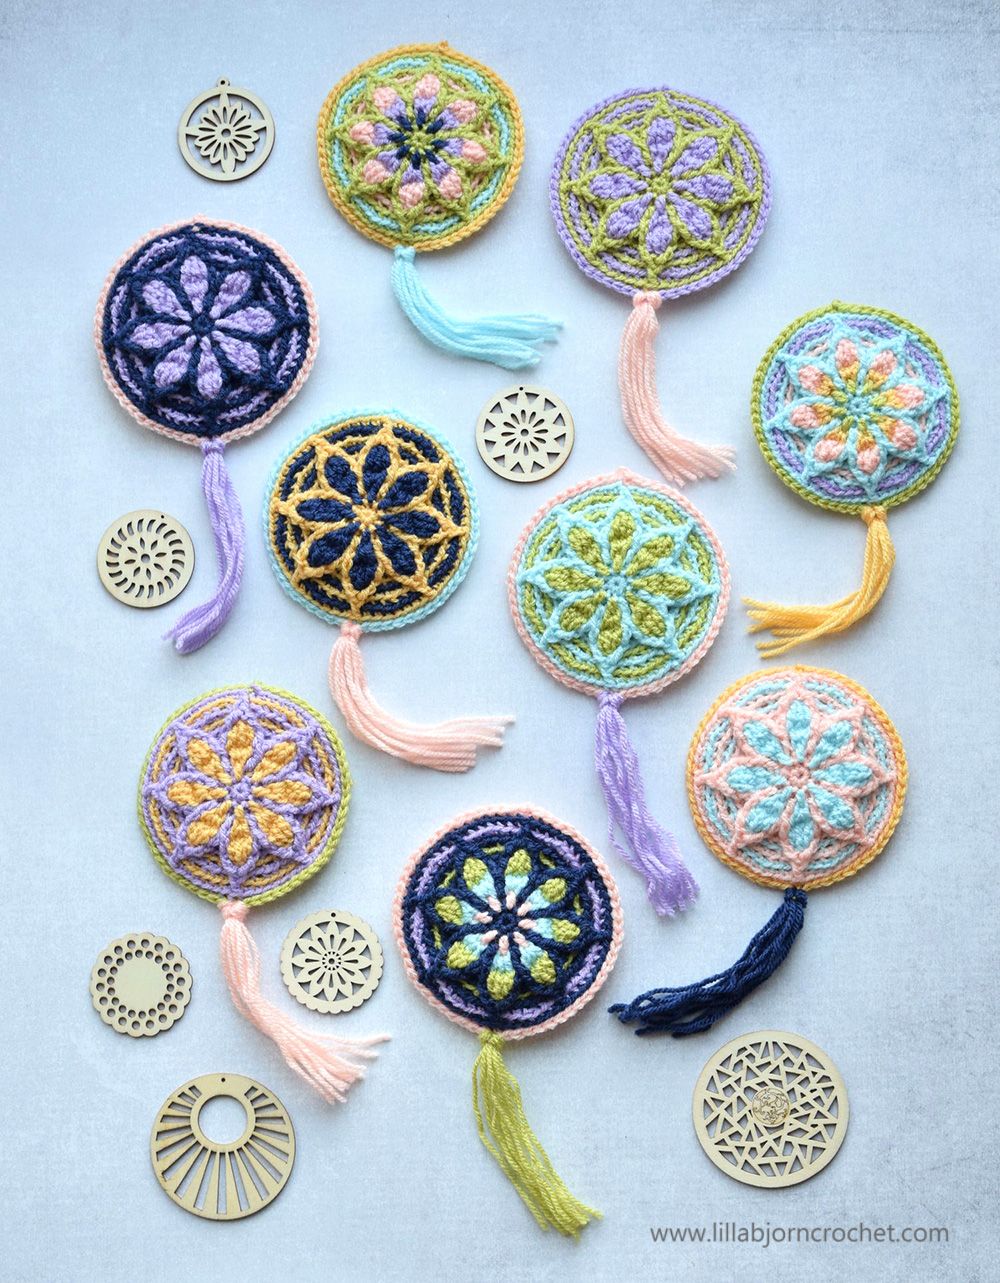
Hanging ornament consists of two parts. The top is decorated with flower, and the bottom is plain. I added very simple embroidery onto the bottom. You received plenty of embroidery thread in your kits, and you can go a bit “wild” and creative with embroidery. And hopefully Rozeta leftovers will be enough to finish several micro hangings.
The pattern below uses US crochet terms. And you can also download pdf files in English (both US and UK) and Dutch. The pdfs contain only written instructions, and progress pictures are available for viewing on my blog. Please, note that there is no video available for this pattern.
Hope you’ll enjoy the pattern! And I can’t wait to see your pictures.
*****************************************************
Micro Rozeta hanging decoration - FREE crochet pattern
Grab a ready to print file HERE on Ravelry and HERE on Etsy (in English with both US and UK terms and Dutch languages).
Materials
Yarn in two or more colors (leftovers from Rozeta CAL)3mm crochet hook for Our Tribe yarn*,
3.5mm crochet hook for Colour Crafter yarn*
Wooden ornament, yarn needle, embroidery thread
Gauge/Tension
The gauge is not important for this patternMeasurements
Approx. 10cm/4” across with Colour Crafter*Approx. 9cm/3.5” across with Our Tribe*
Abbreviations (US terms)
dc double crochetFPtr front post treble crochet
FPtr3tog front post treble crochet 3 together
rep(s) repeat(s)
RS right side
sc single crochet
st(s) stitch(es)
WS wrong side
Repeat Formats
*…….; rep from * once more/twice more/3 more times Work the instructions after * and then repeat that section a further number of times as stated. The same applies to any number of asterisks: **…….; rep from ** etc
Pattern Notes
Micro Rozeta hanging ornament consists of two parts: top with textured overlay flower, and plain bottom. Wooden ornament is stitched onto the bottom part, a little embroidery is optionally added onto the bottom part, then both parts are crocheted together (and stuffed if desired).Every round of the top flower is made with just one color. The yarns are not cut after every round but are carried up to next rounds on the wrong side. The colors are changed in the joining slip stitch (unless otherwise stated in the pattern).
The color key for Yarn A and B is just for the needs of this pattern and doesn’t correspond with the key for the Rozeta CAL blanket. Please, use the colors according to your taste, and use more than two colors per ornament, if you like.
All sc stitches are made into back loops (BL). Front loops (FL) stay unworked and overlay stitches from next rounds are anchored to them by inserting the hook from the bottom to top (see pics in the pattern). Stitches of the previous round are skipped (or not skipped) behind overlay long stitches as stated in the pattern. Please, be careful with skipping stitches.

********************************************************************
INSTRUCTIONS
Copyright. An original LillaBjörnCrochet Design (Tatsiana Kupryianchyk). Copyright 2014-2020. All rights reserved. This pattern is for personal use only. It cannot be sold, redistributed or edited in any way. Translations and video tutorials are not allowed. You can sell your finished products, but you cannot use my pictures to promote them. Please, always note me as a designer of this pattern. Thank you!
Grab a ready to print file HERE on Ravelry and HERE on Etsy (in English with both US and UK terms and Dutch languages).
TOP MANDALA with FLOWER
Round 1. With Yarn A. Make magic ring, ch1 (doesn’t count as a st here and throughout), 8sc into magic ring, join with ss in first sc – 8 sts

Round 2. On this and all next rounds all sc are made in BL.
Continue with Yarn A. Ch1, 2sc in same st as join, 2sc in each st around, join with ss in first sc (change to Yarn B) – 16 sts

Round 3. All eight FL on Round 1 will be occupied with one dc.
With B. Ch1, 1sc in same st as join, *1dc (FL) in a st of Round 1 directly below, skip no sts behind dc, 2sc; rep from * 6 more times, 1dc (as prev), skip no sts, 1sc, join with ss in first sc (change back to Yarn A) – 24 sts

Round 4. First sc is made in same st as join.
With A. Ch1, *3sc, 1dc (FL) in a st of Round 2 visible between two dc below, skip no sts; rep from * 7 more times, join with ss in first sc (change to B) – 32 sts

Round 5. First skipped st will be same st as join.
With B. Ch1, *1FPtr around dc of same color below, 2dc into the hole at the bottom of FPtr just made, skip 3 sts, 1sc in next dc of prev round; rep from * 7 more times, join with ss in first FPtr, ss in next dc (change to A) – 32 sts

Round 6. First sc is made in same st as last ss.
With A. Ch1, *1sc, 1FPtr around next dc of same color below, skip 1 st, 2sc in next st, 1FPtr around same dc below, skip 1 st; rep from * 7 more times, join with ss in first sc (change to B) – 40 sts

Round 7. First skipped st is same st as join.
With B. Ch1, *1FPtr3tog over FPtr and 2 dc of same color below, skip 1 st, 4sc making first sc in next FPtr; rep from * 7 more times, join with ss in first FPtr3tog (change to A) – 40 sts

Round 8. First skipped st is same as join.
With A. Ch1, *1FPtr2tog around two FPtr of same color below lying to the right and to the left of FPtr3tog below, skip 1 st, 2sc, 2sc in next st, 1sc; rep from * 7 more times, join with ss in first FPtr2tog (change to B) – 48 sts

Round 9. First sc is made in same st as join.
With B. Ch1, *2sc, 2sc in next st, 3sc; rep from * 7 more times, join with ss in first sc (change to A) – 56 sts

Round 10.First skipped st is same as join.
With A. Ch1, *1FPdc around FPtr2tog of same color below, skip 1 st, 7sc, 1FPdc (as prev), skip no sts, 6sc; rep from * 3 more times, join with ss in first FPtr (change to B or any other color, cut A) – 60 sts

BOTTOM
Round 1. With Yarn A. Make magic ring, ch2 (doesn’t count as a st here and throughout), 12dc into ring, join with ss in first dc – 12 sts
Round 2. Ch2, 2dc in same st as join, 2dc in each st around, join with ss in first dc – 24 sts
Round 3. Ch2, 1dc in same st as join, 2dc in next st, *1dc, 2dc in next st; rep from * 10 more times, join with ss in first dc – 36 sts
Round 4. Ch2, 1dc in same st as join, 1dc, 2dc in next st, *2dc, 2dc in next st; rep from * 10 more times, join with ss in first dc – 48 sts
Round 5. Ch2, 1dc in same st as join, 2dc, 2dc in next st, *3dc, 2dc in next st; rep from * 10 more times, join with ss in first dc – 60 sts
If after this round bottom is the same size as top with flower, please, fasten off. If bottom is smaller (or doesn’t fit wooden ornament in size), please, make one more round with sc (insert the hook through both loops), and then fasten off.
Finishing
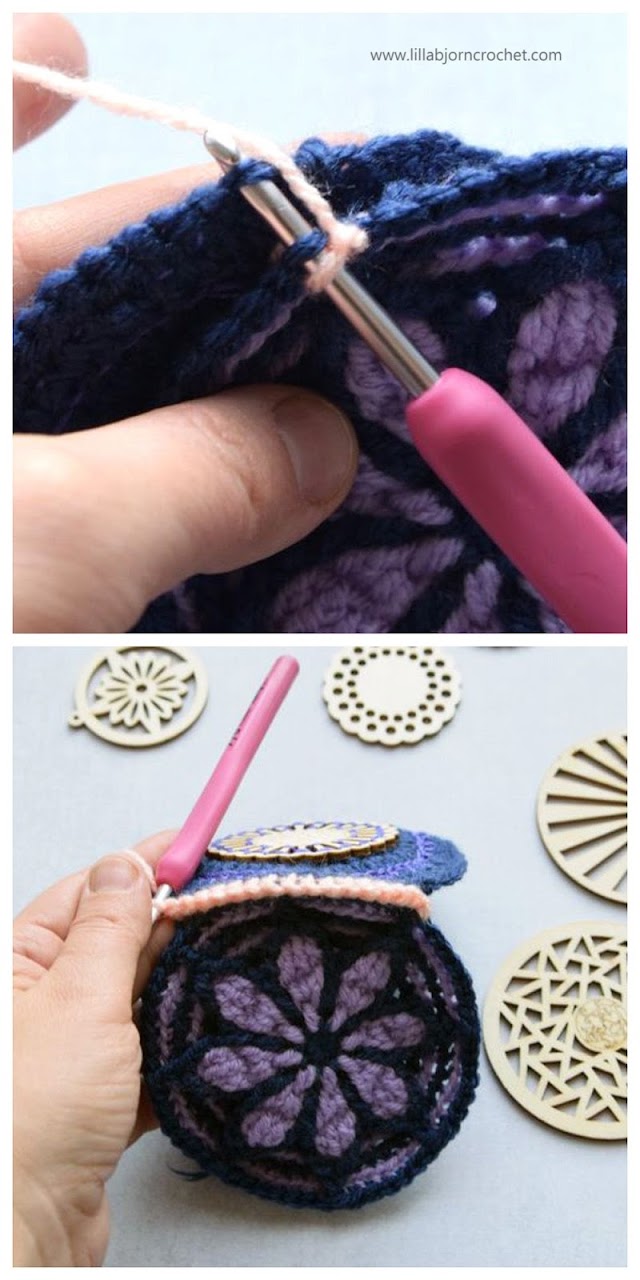
Sew wooden ornament onto the bottom part using yarn needle and embroidery thread. (Optional) Make embroidery as shown in the pictures.

Then place top and bottom parts together with WS facing each other and crochet them together with sc through BL of the last round. If you want to stuff ornament, please do it before two parts are completely joined. Join the round with ss into first sc, fasten off and hide the tail inside ornament. (Optional) Make a tassel.

Congratulations!! Your Micro Rozeta hanging ornament is now finished.
Subscribe to a newsletter not to miss a single post. You can also follow me on Facebook, Pinterest and Instagram.
Round 1. With Yarn A. Make magic ring, ch1 (doesn’t count as a st here and throughout), 8sc into magic ring, join with ss in first sc – 8 sts

Round 2. On this and all next rounds all sc are made in BL.
Continue with Yarn A. Ch1, 2sc in same st as join, 2sc in each st around, join with ss in first sc (change to Yarn B) – 16 sts

Round 3. All eight FL on Round 1 will be occupied with one dc.
With B. Ch1, 1sc in same st as join, *1dc (FL) in a st of Round 1 directly below, skip no sts behind dc, 2sc; rep from * 6 more times, 1dc (as prev), skip no sts, 1sc, join with ss in first sc (change back to Yarn A) – 24 sts

Round 4. First sc is made in same st as join.
With A. Ch1, *3sc, 1dc (FL) in a st of Round 2 visible between two dc below, skip no sts; rep from * 7 more times, join with ss in first sc (change to B) – 32 sts

Round 5. First skipped st will be same st as join.
With B. Ch1, *1FPtr around dc of same color below, 2dc into the hole at the bottom of FPtr just made, skip 3 sts, 1sc in next dc of prev round; rep from * 7 more times, join with ss in first FPtr, ss in next dc (change to A) – 32 sts

Round 6. First sc is made in same st as last ss.
With A. Ch1, *1sc, 1FPtr around next dc of same color below, skip 1 st, 2sc in next st, 1FPtr around same dc below, skip 1 st; rep from * 7 more times, join with ss in first sc (change to B) – 40 sts

Round 7. First skipped st is same st as join.
With B. Ch1, *1FPtr3tog over FPtr and 2 dc of same color below, skip 1 st, 4sc making first sc in next FPtr; rep from * 7 more times, join with ss in first FPtr3tog (change to A) – 40 sts

Round 8. First skipped st is same as join.
With A. Ch1, *1FPtr2tog around two FPtr of same color below lying to the right and to the left of FPtr3tog below, skip 1 st, 2sc, 2sc in next st, 1sc; rep from * 7 more times, join with ss in first FPtr2tog (change to B) – 48 sts

Round 9. First sc is made in same st as join.
With B. Ch1, *2sc, 2sc in next st, 3sc; rep from * 7 more times, join with ss in first sc (change to A) – 56 sts

Round 10.First skipped st is same as join.
With A. Ch1, *1FPdc around FPtr2tog of same color below, skip 1 st, 7sc, 1FPdc (as prev), skip no sts, 6sc; rep from * 3 more times, join with ss in first FPtr (change to B or any other color, cut A) – 60 sts

BOTTOM
Round 1. With Yarn A. Make magic ring, ch2 (doesn’t count as a st here and throughout), 12dc into ring, join with ss in first dc – 12 sts
Round 2. Ch2, 2dc in same st as join, 2dc in each st around, join with ss in first dc – 24 sts
Round 3. Ch2, 1dc in same st as join, 2dc in next st, *1dc, 2dc in next st; rep from * 10 more times, join with ss in first dc – 36 sts
Round 4. Ch2, 1dc in same st as join, 1dc, 2dc in next st, *2dc, 2dc in next st; rep from * 10 more times, join with ss in first dc – 48 sts
Round 5. Ch2, 1dc in same st as join, 2dc, 2dc in next st, *3dc, 2dc in next st; rep from * 10 more times, join with ss in first dc – 60 sts
If after this round bottom is the same size as top with flower, please, fasten off. If bottom is smaller (or doesn’t fit wooden ornament in size), please, make one more round with sc (insert the hook through both loops), and then fasten off.
Finishing
Sew wooden ornament onto the bottom part using yarn needle and embroidery thread. (Optional) Make embroidery as shown in the pictures.

Then place top and bottom parts together with WS facing each other and crochet them together with sc through BL of the last round. If you want to stuff ornament, please do it before two parts are completely joined. Join the round with ss into first sc, fasten off and hide the tail inside ornament. (Optional) Make a tassel.


Congratulations!! Your Micro Rozeta hanging ornament is now finished.
Subscribe to a newsletter not to miss a single post. You can also follow me on Facebook, Pinterest and Instagram.
Hello and welcome to Part 11 of the Rozeta CAL, aaaaannnd this is the last
week in our Rozeta journey. Some of you are right on track and ready to add
the final border around your blanket, some of you are a little behind. And
some of you has just started not long ago or will receive the kit as a
Christmas present. This or another way, I hope you are enjoying your journey.
I am! A lot! It feels incredible to see your beautiful creations in all
possible and impossible colors. And it feels incredible to know Rozeta is
being crocheted right now in almost every corner of the world.

UPDATE: Grab a complete Rozeta pattern in one printable pdf with progress
pictures on
Ravelry HERE
(and
Etsy HERE). Print friendly copy of the complete pattern without pictures is also
available for download.

The last week is starting today, and we will be making a very easy and relaxed
border around the blanket. If you are using the kit and your gauge was right
on spot, and if you weighted your masterpiece after every part as asked in the
pattern – you should be fine with the yarn. And you should have enough yarn to
finish the border.
But if for some reason you have run of the main color, or any of the other colors, on this part you can work with any leftovers you have. You can even finish half of the round with one color and join another color for the rest of the round. It doesn’t matter at all!
Written instructions for Week 11 are available on Scheepjes website HERE. If this is the first time you hear about Rozeta, please check General Information HERE and a photo-tutorial for Special Stitches and Techniques HERE.
Round 1. Yarn was not fastened off after last row of the bottom tapestry panel, so we will continue from there. If you don’t have Yarn A left, please choose another color.
The pattern gives exact number of stitches you need to make along the edges of the bottom tapestry panel. It might be tricky to space them evenly. Please, try to use this formula: 2dc in dc row, 1dc in sc row, 1dc in next dc row, 1sc in next sc row. Most likely you will need to make occasional increases (or decreases) to get a correct stitch count, but the formula mentioned above will give you a certain rhythm.

If for some reason you can’t get the exact stitch count, don’t worry and don’t frog too many times. Just make sure your edges are straight and don’t ruffle, and leave the first round as it is. You will play with skipped stitches on the next rounds to accommodate the stitch count.

TIP: to avoid visible holes on the edge, please, try insert the hook into the posts of the dc stitches (not under them). You will be “splitting” dc’s with the hook, and the holes won’t be so noticeable.

Join Round 1 in the corner as stated and change to Yarn D (E) in the last slip stitch.
Round 2. On this round we will be making small “scallops”. You should have 2 or 3 stitches left before the corner on each side. If you get different number (because of the different number of stitches on Round 1), you can just play and skip more or less stitches between some scallops. After joining in the corner, change back to Yarn A again grabbing it up behind your work.

Round 3. On this round we will be making V-stitches. They should be made over the edges of two scallops – not in front of them. V-stitches will pull the scallops down a bit, and they will get a kind of 3D shape.

Round 4. This round is about scallops again. They are made in ch1-spaces on top of the V-stitches from previous rounds.

Round 5. We will be making V-stitches again.

You can either fasten off after Round 7 or continue with scallops and V-stitches to make the border wider.
Annnd…. Your Rozeta is fully finished now!!! CONGRATULATIONS!

You can now block the blanket to give it a perfect rectangular shape. Please, first pin the large central mandala into a perfect circle. And then stretch a little bit the rest of the Rozeta’s body, and pin it. Please, don’t stretch too much, as it may pull the stitches and damage the texture.
And now… And now I don’t even know what else to add… Rozeta was such an experience for me – both as a crochet designer and the maker. It took a certain part of my life, and piece of my heart. And although Rozeta is out there already, it will still remain my little precious crochet baby. Thank you so very much for joining me. And for trusting the pattern.
p.s. I know you might be wondering what about those tiny wooden ornaments, and embroidery thread you got in the kit. I won’t reveal the secret yet. Let’s wait for January 8th, 2020 and see, what else is coming our way :)
Subscribe to a newsletter not to miss a single post. You can also follow me on Facebook, Pinterest and Instagram.
But if for some reason you have run of the main color, or any of the other colors, on this part you can work with any leftovers you have. You can even finish half of the round with one color and join another color for the rest of the round. It doesn’t matter at all!
Written instructions for Week 11 are available on Scheepjes website HERE. If this is the first time you hear about Rozeta, please check General Information HERE and a photo-tutorial for Special Stitches and Techniques HERE.
Find
Part 1 here,
Part 2 here,
Part 3 here,
Part 4 here,
Part 5 here,
Part 6 here,
Part 7 here,
Part 8 here,
Part 9 here
and
Part 10 here.
And don’t forget to check videos by Esther of It’s All in A Nutshell:
UK right-handed,
UK left-handed,
NL right-handed,
NL left-handed.Photo-tutorial
Round 1. Yarn was not fastened off after last row of the bottom tapestry panel, so we will continue from there. If you don’t have Yarn A left, please choose another color.
The pattern gives exact number of stitches you need to make along the edges of the bottom tapestry panel. It might be tricky to space them evenly. Please, try to use this formula: 2dc in dc row, 1dc in sc row, 1dc in next dc row, 1sc in next sc row. Most likely you will need to make occasional increases (or decreases) to get a correct stitch count, but the formula mentioned above will give you a certain rhythm.

If for some reason you can’t get the exact stitch count, don’t worry and don’t frog too many times. Just make sure your edges are straight and don’t ruffle, and leave the first round as it is. You will play with skipped stitches on the next rounds to accommodate the stitch count.

TIP: to avoid visible holes on the edge, please, try insert the hook into the posts of the dc stitches (not under them). You will be “splitting” dc’s with the hook, and the holes won’t be so noticeable.

Join Round 1 in the corner as stated and change to Yarn D (E) in the last slip stitch.
Round 2. On this round we will be making small “scallops”. You should have 2 or 3 stitches left before the corner on each side. If you get different number (because of the different number of stitches on Round 1), you can just play and skip more or less stitches between some scallops. After joining in the corner, change back to Yarn A again grabbing it up behind your work.

Round 3. On this round we will be making V-stitches. They should be made over the edges of two scallops – not in front of them. V-stitches will pull the scallops down a bit, and they will get a kind of 3D shape.

Round 4. This round is about scallops again. They are made in ch1-spaces on top of the V-stitches from previous rounds.

Round 5. We will be making V-stitches again.

You can either fasten off after Round 7 or continue with scallops and V-stitches to make the border wider.
Annnd…. Your Rozeta is fully finished now!!! CONGRATULATIONS!

You can now block the blanket to give it a perfect rectangular shape. Please, first pin the large central mandala into a perfect circle. And then stretch a little bit the rest of the Rozeta’s body, and pin it. Please, don’t stretch too much, as it may pull the stitches and damage the texture.
And now… And now I don’t even know what else to add… Rozeta was such an experience for me – both as a crochet designer and the maker. It took a certain part of my life, and piece of my heart. And although Rozeta is out there already, it will still remain my little precious crochet baby. Thank you so very much for joining me. And for trusting the pattern.
p.s. I know you might be wondering what about those tiny wooden ornaments, and embroidery thread you got in the kit. I won’t reveal the secret yet. Let’s wait for January 8th, 2020 and see, what else is coming our way :)
Subscribe to a newsletter not to miss a single post. You can also follow me on Facebook, Pinterest and Instagram.
Hello and welcome to Part 10 of the Rozeta CAL. We are almost finishing this
week – can you believe that?! Our Rozeta window will be completed and all we
need is just to frame it with the final border. And it means next week will be
the last one… Today we continue building bottom tapestry panel. We will work
in back and forth as on previous part. A few more popcorns will be added, and
the arches will be shaped at the bottom.

UPDATE: Grab a complete Rozeta pattern in one printable pdf with progress
pictures on
Ravelry HERE
(and
Etsy HERE). Print friendly copy of the complete pattern without pictures is also
available for download.

If you are using the kit, you might have noticed that some of the colors are
almost finished. If your gauge was on spot throughout the CAL and if you took
your time to carefully measure your blanket after every part and if you weight
the yarn after every part – then you could compare your usage of yarn with
numbers given in the pattern.
But if you haven’t done anything of mentioned above, you might start running out of the colors on this part already. Yarn B might be the tightest in both Our Tribe and Colour Crafter kits. This color will be only used this week for the bottom tapestry and we will not need it for the border. You’ll need approx. 13g of Yarn B in Our Tribe and 11g in Colour Crafter. But if you don’t have enough yarn already, don’t worry!! You can substitute it with Yarn F which you should still have plenty of!
Bottom tapestry panel (and especially final stained glass border which we will be making next week) is not strict with placement of colors. So if you feel like you are running out of some of them, you can play around and replace the colors to your taste.
If you feel like you are running out of the main color (Yarn A), you can simply omit several rows at the bottom of the tapestry panel to make it shorter, and use different colors for the final border.

But again, if your gauge was correct and if you used approximately the same amount of yarn for every part as noted in the pattern – you should not run out of yarn in any color by now. The yardages for the Rozeta kits were calculated based on the yarn usage from all testers (and we had lots of them). And the yarn usage given in the pattern is the maximum what testers used.
I hope I calmed you down, and now we can move on to the instructions! Written instructions for Week 10 are available on Scheepjes website HERE. If this is the first time you hear about Rozeta, please check General Information HERE and a photo-tutorial for Special Stitches and Techniques HERE.

Row 22. Starting with this row we will be building “branches with leaves” inside the arches. On this row make FPtr’s (US terms here and throughout) around the popcorns below. And don’t forget to skip one stitch behind every FPtr.


Row 24. The popcorns on this row are made around single crochet stitches from 2 rows below. Esther made them a bit differently in the video (she is making them around dc from previous row). Either way will work well, and the exact placement of popcorns should not give a significant difference in the final look. I just felt like it is easier to find fourth sc on both sides of FPtr below. Please, change color after every popcorn (in ch1 on top of it), and after FPtr. And don’t forget to skip the stitches.
After this row we will cut Yarn C for Colour Crafter and will be using only Yarn B for both versions for the next rows.


Row 25. Simple row with new color for Colour Crafter. If you don’t have enough of Yarn B, you can switch to Yarn F at this point.

Row 26. FPtr on this row are made around FPtr below. Skip one stitch behind every FPtr.

Row 28. Make popcorns in the same way as on Row 24.

Row 30. Repeat of Row 26. Cut Yarn B for both versions at the end of this row.

Row 31. On this and all next rows we will use only Yarn A and Yarn F.

Row 32. Repeat of Row 24 but with Yarn F.

Row 36.

Row 37. On this and all next rows we will be making increases and decreases to shape the bottom of the arches.
 Row 38.

Rows 39-43. Continue to work as per pattern shaping the bottom of the arches.
Congratulations!! Part 10 of the Rozeta CAL is completed! See you next week!
Subscribe to a newsletter not to miss a single post. You can also follow me on Facebook, Pinterest and Instagram.
But if you haven’t done anything of mentioned above, you might start running out of the colors on this part already. Yarn B might be the tightest in both Our Tribe and Colour Crafter kits. This color will be only used this week for the bottom tapestry and we will not need it for the border. You’ll need approx. 13g of Yarn B in Our Tribe and 11g in Colour Crafter. But if you don’t have enough yarn already, don’t worry!! You can substitute it with Yarn F which you should still have plenty of!
Bottom tapestry panel (and especially final stained glass border which we will be making next week) is not strict with placement of colors. So if you feel like you are running out of some of them, you can play around and replace the colors to your taste.
If you feel like you are running out of the main color (Yarn A), you can simply omit several rows at the bottom of the tapestry panel to make it shorter, and use different colors for the final border.

But again, if your gauge was correct and if you used approximately the same amount of yarn for every part as noted in the pattern – you should not run out of yarn in any color by now. The yardages for the Rozeta kits were calculated based on the yarn usage from all testers (and we had lots of them). And the yarn usage given in the pattern is the maximum what testers used.
I hope I calmed you down, and now we can move on to the instructions! Written instructions for Week 10 are available on Scheepjes website HERE. If this is the first time you hear about Rozeta, please check General Information HERE and a photo-tutorial for Special Stitches and Techniques HERE.
Find
Part 1 here,
Part 2 here,
Part 3 here,
Part 4 here,
Part 5 here,
Part 6 here,
Part 7 here,
Part 8 here
and
Part 9 here.
And don’t forget to check videos by Esther of It’s All in A Nutshell:
UK right-handed,
UK left-handed, NL right-handed,
NL left-handed.
PHOTO-TUTORIAL
Row 22. Starting with this row we will be building “branches with leaves” inside the arches. On this row make FPtr’s (US terms here and throughout) around the popcorns below. And don’t forget to skip one stitch behind every FPtr.


Row 24. The popcorns on this row are made around single crochet stitches from 2 rows below. Esther made them a bit differently in the video (she is making them around dc from previous row). Either way will work well, and the exact placement of popcorns should not give a significant difference in the final look. I just felt like it is easier to find fourth sc on both sides of FPtr below. Please, change color after every popcorn (in ch1 on top of it), and after FPtr. And don’t forget to skip the stitches.
After this row we will cut Yarn C for Colour Crafter and will be using only Yarn B for both versions for the next rows.


Row 25. Simple row with new color for Colour Crafter. If you don’t have enough of Yarn B, you can switch to Yarn F at this point.

Row 26. FPtr on this row are made around FPtr below. Skip one stitch behind every FPtr.

Row 28. Make popcorns in the same way as on Row 24.

Row 30. Repeat of Row 26. Cut Yarn B for both versions at the end of this row.

Row 31. On this and all next rows we will use only Yarn A and Yarn F.

Row 32. Repeat of Row 24 but with Yarn F.

Row 36.

Row 37. On this and all next rows we will be making increases and decreases to shape the bottom of the arches.


Rows 39-43. Continue to work as per pattern shaping the bottom of the arches.
Congratulations!! Part 10 of the Rozeta CAL is completed! See you next week!
Subscribe to a newsletter not to miss a single post. You can also follow me on Facebook, Pinterest and Instagram.
Subscribe to:
Posts (Atom)


