Showing posts with label Mystery CAL 2015. Show all posts
Showing posts with label Mystery CAL 2015. Show all posts
Today you will add one more flower to your Circles of the Sun pillow. What I like about overlay crochet (and you probably know already that I like it for many-many reasons) is that you can work with several layers at the same time. This gives a very nice structure to the project. Today’s square has a 3D flower. And you will get a nice opportunity to train your surface crochet once again as you will be making 3 (!) rounds of decorative slip stitches.


Another week has run away very fast and today is Friday again. It means those of you who follow my Circles of the Sun CAL will see a new – fifth! – block. You may probably recognize it from the picture, as it was used as an introductory sneak peek for this CAL. Today’s square is more graphic than floral, and it belongs to my personal favourites.


Greetings from the North Sea! I am travelling along the Belgian coast at the moment. And I should say it was quite a challenge to find a place with an internet here. So I decided to post from the first spot I found, with not keeping the timing... How many blocks from this CAL have you made already? Every day new "arrivals" are here and my heart is getting happier and happier after seeing all you masterpieces. Colors you choose are so different and each new combination makes the same square look absolutely unique. I know that some of you are planning to make bags and even blankets using the squares from Circles of the Sun CAL. And I really hope you will share your creations with me - on Facebook or Ravelry.


Unbelievable, but weeks have become so short recently and it is Friday again. I hope you are ready for the next part of my Circles of the Sun CAL as today there will be one of my favourite tutorials. In two previous weeks you made squares with floral motifs but today's block is mostly geometrical, with many overlaid stitches! If you joined this CAL only now, please, be sure to read general information first.

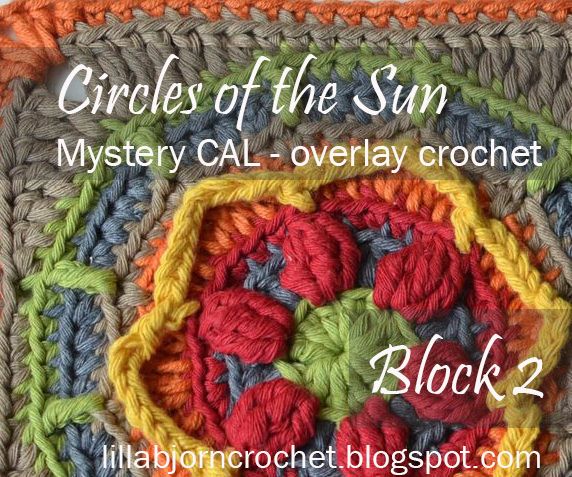
This is a second part of my Circles of the Sun CAL in overlay crochet. If you haven't done the first square, please, check general information about this CAL and a tutorial for the first block. And today we will make the second square. The pattern is a little bit more tricky than the previous one and you will also make your first overlay stitches.
Please, also check Part 1 of this CAL.
I was asked several times how many squares should be done with each pattern during this CAL. I suggest that you make only one (and 9 in total) and join them in one large square which will be used as a front decoration for a fabric pillow cover. But you can also make two squares by each pattern and as a result you will get two decorations which you can use as front and back for your pillow. And you will have the whole crocheted pillow in the end of this CAL. So, it's really up to you!
Dutch by Dianne Baan
German by Libminna
Portuguese by Estela Mizukawa
Video tutorial by Esther Dijkstra of It’s all in a Nutshell

Important Notes
I think that the most difficult about overlay crochet is to read the pattern correctly (and to write them, as well!). Projects in overlay crochet, big or small, always need a lot of attention: you should read the pattern and count the stitches carefully. It is very important to attach the yarn in the right stitch on every round because this will influence the position of all overlaid stitches. You should also clearly understand where exactly you should “anchor” overlay stitches. When working in overlay crochet you usually crochet background in back loops and front loops stay “free” – here you will attach overlaid stitches. Please, check more information about it HERE.
You should be careful with skipping stitches behind the overlaid ones. Please, be aware that the amount of skipped stitches is NOT always the same as the amount of overlaid stitches. You can read more information about this HERE.
And just a small remind that I suggest to join new yarn by simply pulling it in indicated stitch and making one or two chain stitches (which will count as the 1st sc, hdc or dc accordingly). And I also suggest that you join your rounds with a needle join, which will help to make joining sections invisible! You can read detailed information about these two aspects HERE and HERE. If you are not sure how to find front and back loops of the stitches, please, read THIS post.
Let's begin with the second block?
You will need:
The size of the finished square depends on the yarn and hook you use. My square is approx. 12.5 cm (5 inches) large.
Stitch guide and Abbreviations
US standard abbreviations are used in this pattern. But if you are used to other terms, please check this Crochet Translation Project which might be helpful in translation to your language.
rnd - round
st(s) - stitch(es)
ch - chain
sp(s) - space(s)
yo - yarn over
lp(s) - loop(s)
FL - front loop(s)
BL - back loop(s)
NJ - needle join
sk - skip st(s)
*…* - *crochet following directions* as many times as indicated
sl st (slip stitch) – insert hook in indicated st, yo, draw yarn up and pull 2nd lp through the 1st lp on hook.
sc (single crochet) – insert hook in indicated stitch, yo, draw up a lp, yo and pull through both lps on hook.
hdc (half double crochet) – yo, insert hook in indicated st, yo, draw up a lp, yo, pull through all three lps.
dc (double crochet) – yo, insert hook in indicated st, yo, draw up a lp, *yo, pull through 2 lps* twice.
tr (treble crochet) – yo twice, insert hook in indicated st, yo, draw up a lp, *yo, pull through 2 lps* three times.
tr3tog (treble crochet 3 together) – *yo twice, insert hook in indicated st, yo, draw up a lp, [yo, pull through 2 lps] twice* 3 times in the same st, yo, pull through all 4 lps on hook.
sc inc – crochet two sc in the same st.
dc inc – crochet two dc in the same st.
Copyright LillaBjornCrochet 2015. All rights reserved. This pattern is for unlimited personal use only. Do not reproduce or sell the pattern. The pattern may not be copied in any way (print or digitally), in part or in full. Items may be sold that are made from this pattern as long as the designer is credited. Shop owners, if you wish to make a kit with yarn using this pattern, please request permission and copyright details from me before offering any kits for sale. Please, read Copyright page for more information.
Color Key: C1 – Yellow, C2 – Beige, C3 –Orange
Rnd 1. Start with yarn C4.
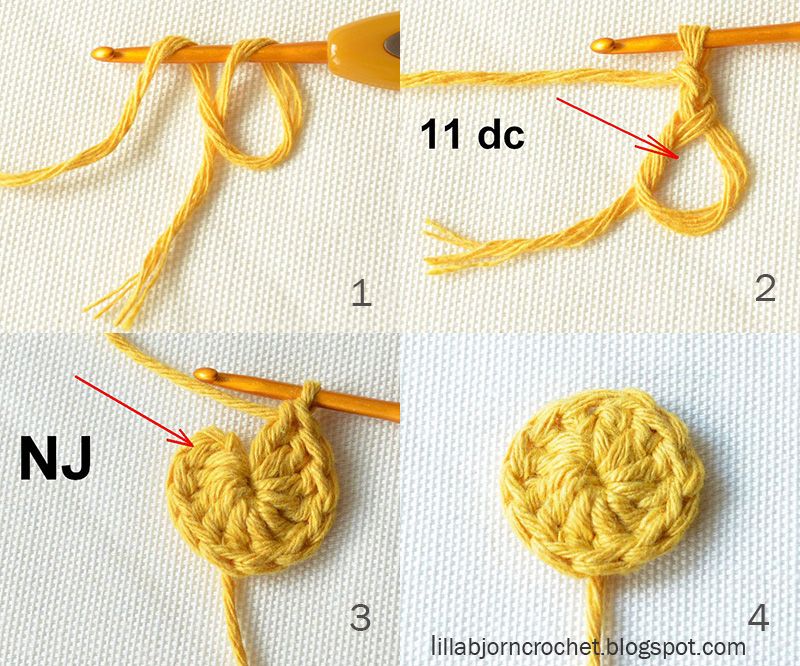
Make magic ring, ch2 (counts as first dc) and 11 dc in magic ring; NJ in the 1st dc after ch2 - 12 dc.

Rnd 2. Change to yarn C5. Attach yarn in any dc of rnd 1. Work this rnd in BL!
*1dc inc in each st of rnd 1 (first dc of the rnd will be ch2)* 12 times, NJ in first dc of the rnd after ch2 - 24 dc.

Rnd 3. Change to yarn C6. Attach yarn in first dc (BL) of any dc inc of rnd 2. Work this rnd in BL! All "legs" of each tr3tog are made in the same st of rnd 1. Please, make sure that your tr3tog's are made to the height of the working round.
*1sc (first sc of the rnd will be a ch), 1tr3tog (FL) in st of rnd 1 directly below, sk no sts on rnd 2, 2sc, 1sc inc* 6 times, NJ in first tr3tog of the rnd after ch1 - 36 sts.

Rnd 4. Change to yarn C3. Attach yarn in a st of rnd 3 (BL) that comes just after any tr3tog. Work this rnd in BL! Please, note that dc increases are made in tr3tog's and first sc of each sc inc of rnd 3.
*2dc (first dc of the rnd will be ch2), 1dc inc in next st* 12 times, NJ in first dc of the rnd after ch2 - 48 dc.
 Rnd 5. Change to yarn C1. Attach yarn in first dc (FL) of any dc inc of rnd 4 lying between two tr3tog’s. Work this rnd in FL!
Note: if your chain stitches are too loose, please, feel free to make ch3 instead of each ch4.
*2sc on rnd 4 (first sc of the rnd will be a ch), ch4, 1sc (FL) in tr3tog of rnd 3 below, ch4, sk 6 sts on rnd 4* 6 times, finish with a sl st in the same st of rnd 4 where yarn was attached. Fasten off, pull both yarn tails to the wrong side and secure them with a knot - 18 sc, 12 ch4-sps.

Rnd 6. Change to yarn C2. Attach yarn in second dc (BL) of dc inc of rnd 4 which lies above any tr3tog. Work this rnd in BL and some sc are made in spaces between two dc!
*4sc (first sc of the rnd will be a ch), 1sc inc, 3sc, 1sc in a space before next dc* 6 times, NJ in first sc of the rnd after ch1 - 60 sts.

Rnd 7. Change to yarn C5. Attach yarn in first sc (BL) of rnd 6 that comes just after any sc which was made between dc’s. Work this rnd in BL!
*9hdc (first hdc of the rnd will be ch2), 2hdc in next sc (which was made between dc’s)* 6 times, NJ in first hdc of the rnd after ch2 - 66 hdc.

Rnd 8. Change to yarn C4. Attach yarn in first hdc (BL) that comes after any hdc inc of rnd 7. Work this rnd in BL!
Note: This rnd is a bit tricky, so please read the instructions carefully before you start. Every repeat section contains two dc. And you should skip no sts on rnd 7 behind first dc, and then skip 1 st behind second dc. And, please, try to keep the gauge of dc under control: they should be neither too tight nor too loose and always made to the height of the working round!
*5sc (first sc of the rnd will be a ch), 1dc (FL) in first st of inc of rnd 6 below, sk no sts on rnd 7, 5sc, 1dc (FL) in sc of rnd 6 below (made in space between dc’s), sk 1 st on rnd 7* 6 times, NJ in first sc of the rnd after ch1 - 72 sts.

Rnd 9. Change to yarn C2. Attach yarn in first st (BL) after any dc of rnd 8. Work this rnd in BL! You will get 4 corners after this rnd.
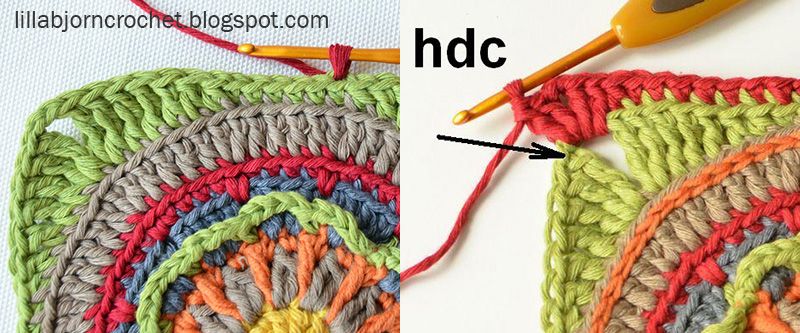
*6sc (first sc of the rnd will be a ch), 1hdc, 2dc, 2tr, 2tr in next st, ch2, 2tr in next st, 2tr, 2dc, 1hdc* 4 times, NJ in first sc of the rnd after ch1 - 80 sts and 4 ch2-sps.

Rnd 10. Change to yarn С3. Attach yarn in first sc (BL) of any group of six of rnd 9. Work this rnd in BL!
*12sc (first sc of the rnd will be a ch), 1hdc, 2dc in next ch2-sp, ch2, 2dc in the same ch2-sp, 1hdc, 6sc* 4 times, NJ in first sc of the rnd after ch1 - 96 sts, 4 ch2-sps.

Subscribe to a newsletter not to miss a single post. You can also follow me on Facebook, Pinterest and Instagram.

Please, also check Part 1 of this CAL.
I was asked several times how many squares should be done with each pattern during this CAL. I suggest that you make only one (and 9 in total) and join them in one large square which will be used as a front decoration for a fabric pillow cover. But you can also make two squares by each pattern and as a result you will get two decorations which you can use as front and back for your pillow. And you will have the whole crocheted pillow in the end of this CAL. So, it's really up to you!
TRANSLATIONS
Dutch by Dianne Baan
German by Libminna
Portuguese by Estela Mizukawa
Video tutorial by Esther Dijkstra of It’s all in a Nutshell

Important Notes
I think that the most difficult about overlay crochet is to read the pattern correctly (and to write them, as well!). Projects in overlay crochet, big or small, always need a lot of attention: you should read the pattern and count the stitches carefully. It is very important to attach the yarn in the right stitch on every round because this will influence the position of all overlaid stitches. You should also clearly understand where exactly you should “anchor” overlay stitches. When working in overlay crochet you usually crochet background in back loops and front loops stay “free” – here you will attach overlaid stitches. Please, check more information about it HERE.
You should be careful with skipping stitches behind the overlaid ones. Please, be aware that the amount of skipped stitches is NOT always the same as the amount of overlaid stitches. You can read more information about this HERE.
And just a small remind that I suggest to join new yarn by simply pulling it in indicated stitch and making one or two chain stitches (which will count as the 1st sc, hdc or dc accordingly). And I also suggest that you join your rounds with a needle join, which will help to make joining sections invisible! You can read detailed information about these two aspects HERE and HERE. If you are not sure how to find front and back loops of the stitches, please, read THIS post.
Let's begin with the second block?
You will need:
- Yarn in 6 colors. I used yarn “Cotton Light” by DROPS (50g/1.76 oz., 105 m/115 yds.) Yarn weight: DK. Texture: 8 ply (11 wpi)
- Crochet hook 3,25 mm (D) or size needed to obtain acceptable gauge. (Please, feel free to choose another yarn weights and the hook to get larger or smaller square).
- Scissors, tapestry needle to weave in ends (I prefer crochet hook for weaving in).
The size of the finished square depends on the yarn and hook you use. My square is approx. 12.5 cm (5 inches) large.
Stitch guide and Abbreviations
US standard abbreviations are used in this pattern. But if you are used to other terms, please check this Crochet Translation Project which might be helpful in translation to your language.
st(s) - stitch(es)
ch - chain
sp(s) - space(s)
yo - yarn over
lp(s) - loop(s)
FL - front loop(s)
BL - back loop(s)
NJ - needle join
sk - skip st(s)
*…* - *crochet following directions* as many times as indicated
sl st (slip stitch) – insert hook in indicated st, yo, draw yarn up and pull 2nd lp through the 1st lp on hook.
sc (single crochet) – insert hook in indicated stitch, yo, draw up a lp, yo and pull through both lps on hook.
hdc (half double crochet) – yo, insert hook in indicated st, yo, draw up a lp, yo, pull through all three lps.
dc (double crochet) – yo, insert hook in indicated st, yo, draw up a lp, *yo, pull through 2 lps* twice.
tr (treble crochet) – yo twice, insert hook in indicated st, yo, draw up a lp, *yo, pull through 2 lps* three times.
tr3tog (treble crochet 3 together) – *yo twice, insert hook in indicated st, yo, draw up a lp, [yo, pull through 2 lps] twice* 3 times in the same st, yo, pull through all 4 lps on hook.
sc inc – crochet two sc in the same st.
dc inc – crochet two dc in the same st.
Copyright LillaBjornCrochet 2015. All rights reserved. This pattern is for unlimited personal use only. Do not reproduce or sell the pattern. The pattern may not be copied in any way (print or digitally), in part or in full. Items may be sold that are made from this pattern as long as the designer is credited. Shop owners, if you wish to make a kit with yarn using this pattern, please request permission and copyright details from me before offering any kits for sale. Please, read Copyright page for more information.
Instructions
Color Key: C1 – Yellow, C2 – Beige, C3 –
Rnd 1. Start with yarn C4.
Make magic ring, ch2 (counts as first dc) and 11 dc in magic ring; NJ in the 1st dc after ch2 - 12 dc.

Rnd 2. Change to yarn C5. Attach yarn in any dc of rnd 1. Work this rnd in BL!
*1dc inc in each st of rnd 1 (first dc of the rnd will be ch2)* 12 times, NJ in first dc of the rnd after ch2 - 24 dc.

Rnd 3. Change to yarn C6. Attach yarn in first dc (BL) of any dc inc of rnd 2. Work this rnd in BL! All "legs" of each tr3tog are made in the same st of rnd 1. Please, make sure that your tr3tog's are made to the height of the working round.
*1sc (first sc of the rnd will be a ch), 1tr3tog (FL) in st of rnd 1 directly below, sk no sts on rnd 2, 2sc, 1sc inc* 6 times, NJ in first tr3tog of the rnd after ch1 - 36 sts.

Rnd 4. Change to yarn C3. Attach yarn in a st of rnd 3 (BL) that comes just after any tr3tog. Work this rnd in BL! Please, note that dc increases are made in tr3tog's and first sc of each sc inc of rnd 3.
*2dc (first dc of the rnd will be ch2), 1dc inc in next st* 12 times, NJ in first dc of the rnd after ch2 - 48 dc.

Note: if your chain stitches are too loose, please, feel free to make ch3 instead of each ch4.
*2sc on rnd 4 (first sc of the rnd will be a ch), ch4, 1sc (FL) in tr3tog of rnd 3 below, ch4, sk 6 sts on rnd 4* 6 times, finish with a sl st in the same st of rnd 4 where yarn was attached. Fasten off, pull both yarn tails to the wrong side and secure them with a knot - 18 sc, 12 ch4-sps.

Rnd 6. Change to yarn C2. Attach yarn in second dc (BL) of dc inc of rnd 4 which lies above any tr3tog. Work this rnd in BL and some sc are made in spaces between two dc!
*4sc (first sc of the rnd will be a ch), 1sc inc, 3sc, 1sc in a space before next dc* 6 times, NJ in first sc of the rnd after ch1 - 60 sts.

Rnd 7. Change to yarn C5. Attach yarn in first sc (BL) of rnd 6 that comes just after any sc which was made between dc’s. Work this rnd in BL!
*9hdc (first hdc of the rnd will be ch2), 2hdc in next sc (which was made between dc’s)* 6 times, NJ in first hdc of the rnd after ch2 - 66 hdc.

Rnd 8. Change to yarn C4. Attach yarn in first hdc (BL) that comes after any hdc inc of rnd 7. Work this rnd in BL!
Note: This rnd is a bit tricky, so please read the instructions carefully before you start. Every repeat section contains two dc. And you should skip no sts on rnd 7 behind first dc, and then skip 1 st behind second dc. And, please, try to keep the gauge of dc under control: they should be neither too tight nor too loose and always made to the height of the working round!
*5sc (first sc of the rnd will be a ch), 1dc (FL) in first st of inc of rnd 6 below, sk no sts on rnd 7, 5sc, 1dc (FL) in sc of rnd 6 below (made in space between dc’s), sk 1 st on rnd 7* 6 times, NJ in first sc of the rnd after ch1 - 72 sts.

Rnd 9. Change to yarn C2. Attach yarn in first st (BL) after any dc of rnd 8. Work this rnd in BL! You will get 4 corners after this rnd.
*6sc (first sc of the rnd will be a ch), 1hdc, 2dc, 2tr, 2tr in next st, ch2, 2tr in next st, 2tr, 2dc, 1hdc* 4 times, NJ in first sc of the rnd after ch1 - 80 sts and 4 ch2-sps.

Rnd 10. Change to yarn С3. Attach yarn in first sc (BL) of any group of six of rnd 9. Work this rnd in BL!
*12sc (first sc of the rnd will be a ch), 1hdc, 2dc in next ch2-sp, ch2, 2dc in the same ch2-sp, 1hdc, 6sc* 4 times, NJ in first sc of the rnd after ch1 - 96 sts, 4 ch2-sps.

Congratulations! Your first granny square from Circles of the Sun CAL 2015 is now finished. Don't forget to share it on Facebook and Ravelry. You can find a pin for this block on Pinterest - please, feel free to repin it and share with your friends!
And here is a video tutorial for Block 2 kindly recorded for Circles of the Sun CAL by Esther Dijkstra from It's All in a Nutshell! Have fun! :)
See you next Friday!

Today is a very exciting and important day as my Circles of the Sun CAL 2015 in overlay crochet starts. I really wanted to design and organize it in such a way that you could be introduced to an amazing technique of overlay crochet. I tried to design simple squares and write easy to follow patterns. And today we start with Block #1.

If you haven’t read general information about this CAL – please, check it HERE. There you will also find links to all the tutorials, I will add them once they are published. And yes, there will be videos available for each tutorial.. They will be kindly recorded by Esther Dijkstra from It’s all in a Nutshell. You can view the first video in the end of this post!
The first granny square is the easiest to make from the whole CAL. But it will also help you to get used to my style of writing the patterns and also to train some basic skills in attaching yarn, joining the rounds with a so called “needle join”, to train crochet in both and back loops, to see what your gauge is and if your first block is staying flat (and it has to!). You should really be relaxed with all these techniques as next week the pattern will be a bit more complicated and you will try to make your first overlaid stitches!
Important Notes
Here are some important things I would like to draw your attention to before you start to make your first block. I suggest that you join new yarn by simply pulling it in indicated stitch (in back loop, or front loop, or through both loops – as indicated in the pattern) and making one or two chain stitches (which will count as the 1st sc, hdc or dc accordingly). And I also suggest that you join your rounds with a needle join, which will help to make joining sections invisible! You can read detailed information about these two aspects HERE and HERE. But! If you feel comfortable with starting the rounds in another way, and finishing rounds in your own technique – please, feel free to do it as you wish. Just be sure that you attach yarn always in a right stitch and your stitch count after each round is correct. If you are not sure how to find front and back loops of the stitches, please, read THIS post.
Colors
You asked lots of questions about the colors. And I wrote several times that I want this CAL to be a leftover project. Please, look at these two examples of the first block. They both are made with same colors and by the same pattern. But as you see, they look completely different. What I want to say is that color key is not important in this project at all! You can take more than 6 colors and change them on every round according to your taste. And all your grannies will look unique. You can even take one pattern and make 9 blocks with it using different color keys – and you will get 9 different blocks as a result, and make a pillow of them.

So… Let’s get started!
Dutch by Dianne Baan
Portuguese by Estela Mizukawa
Stitch guide and Abbreviations
US standard abbreviations are used in this pattern. But if you are used to other terms, please check this Crochet Translation Project which might be helpful in translation to your language.
rnd - round
st(s) - stitch(es)
ch - chain
sp(s) - space(s)
yo - yarn over
lp(s) - loop(s)
FL - front loop(s)
BL - back loop(s)
NJ - needle join
sk - skip st(s)
*…* *crochet following directions* as many times as indicated
slst (slip stitch) – insert hook in indicated st, yo, draw yarn up and pull 2nd lp through the 1st lp on hook.
sc (single crochet) – insert hook in indicated stitch, yo, draw up a lp, yo and pull through both lps on hook.
hdc (half double crochet) – yo, insert hook in indicated st, yo, draw up a lp, yo, pull through all three lps.
dc (double crochet) – yo, insert hook in indicated st, yo, draw up a lp, *yo, pull through 2 lps* twice.
dc2tog (double crochet 2 together) – *yo, insert hook in indicated st, yo, draw up a lp, yo, pull through 2 lps* twice, yo, pull through all 3 lps on hook.
tr (treble crochet) – yo twice, insert hook in indicated st, yo, draw up a lp, *yo, pull through 2 lps* three times.
sc inc (single crochet increase) – crochet two sc in the same st.
dc inc (double crochet increase) – crochet two dc in the same st.
Copyright LillaBjornCrochet 2015. All rights reserved. This pattern is for unlimited personal use only. Do not reproduce or sell the pattern. The pattern may not be copied in any way (print or digitally), in part or in full. Items may be sold that are made from this pattern as long as the designer is credited. Shop owners, if you wish to make a kit with yarn using this pattern, please request permission and copyright details from me before offering any kits for sale. Please, read Copyright page for more information.
Color Key: C1 – Yellow, C2 – Beige, C3 – Orange, C4 – Green, C5 - Gray, C6 – Ruby.
Make magic ring, ch2 (counts as 1st dc) and 11 dc in magic ring; NJ in the 1st dc after ch2 - 12 dc.
Rnd 2. Change to yarn C2. Attach yarn in any st of rnd 1. Work this rnd through both lps.
Note: make "legs" of each dc2tog in the same st of rnd 1. First dc2tog of this rnd will be ch2 and 1 dc.
*1 dc2tog, ch1* 12 times, finish with a sl st in the 1st dc2tog of the rnd, fasten off - 12 dc2tog, 12 ch1-sps)

Rnd 3. Change to yarn C3. Attach yarn in any dc2tog of rnd 2. Work this rnd through both lps. Please, try to make tr's of this round to the height of the working round. They should neither be too tight, nor too loose. And place tr's AFTER dc2tog's.
*1sc in dc2tog (first sc of the rnd will be a ch), 1sc in next ch1-sp, 1tr in the same st of rnd 1 where dc2tog below was made* 12 times, NJ in first sc of the rnd after ch1 - 12 tr, 24 sc.

*1sc in tr of rnd 3 (first sc of the rnd will be a ch), ch4* 12 times, finish with a sl st in the same st where you attached yarn - 12 sc, 12 ch4-sps.

Rnd 5. Change to yarn C5. Attach yarn in first sc of any two of rnd 3 lying under ch4-sp.
On this round we are going to crochet in the unworked stitches of round 3. Work this rnd through both lps.
*1dc inc (first dc of the rnd will be ch2) in each of two sc under ch4-sp, sk next sc on rnd 3* 12 times, NJ in first dc of the rnd after ch2 - 48 sts.

Rnd 6. Change to yarn C6. Attach yarn in first dc of any group of four dc (BL) of rnd 5 lying above any ch4-sp. Work this rnd in BL. Some sc are made in spaces between two dc!
*4sc (first sc of the rnd will be a ch), 1sc in a space before next dc* 12 times, NJ in first sc of the rnd after ch1 - 60 sc.

Rnd 7. Change to yarn C2. Attach yarn in sc (BL) of rnd 6 that comes just after any sc made in a space between two dc’s. Work this rnd in BL!
*4dc (first dc of the rnd will be ch2), 1dc inc in next st (which is made in space between two dc’s)* 12 times, NJ in first dc of the rnd after ch2 - 72 dc.
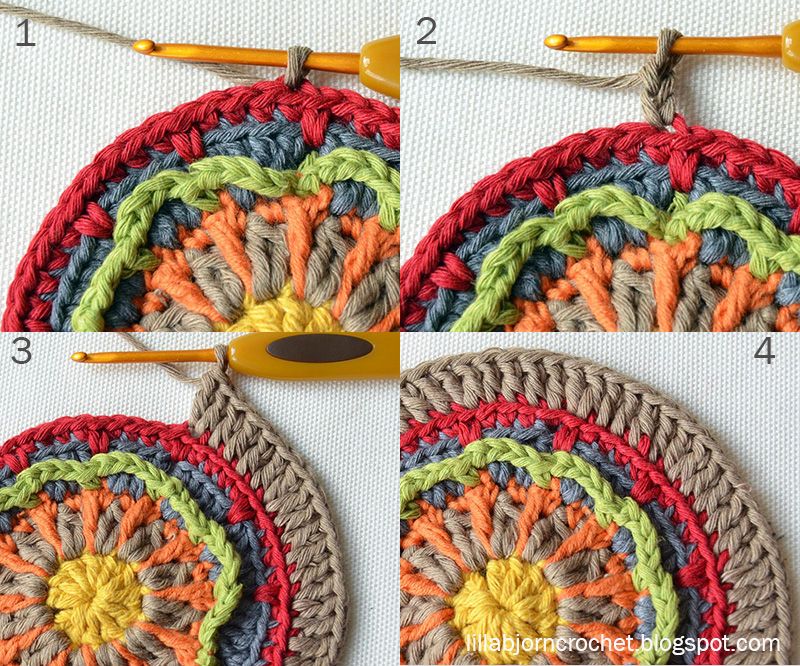
Rnd 8. Change to yarn C4. Attach yarn in second dc (BL) of any dc inc of rnd 7. Work this rnd in BL! After this rnd you will get 4 corners.
*6sc (first sc of the rnd will be a ch), 1hdc, 2dc, 2tr, 2tr in next st, ch2, 2tr in next st, 2tr, 2dc, 1hdc* 4 times, NJ in first sc of the rnd after ch1 - 80 sts, 4 ch2-sps.

Rnd 9. Change to yarn C6. Attach yarn in first sc (BL) of any group of six sc of rnd 8. Work this rnd in BL!
*12sc (first sc of the rnd will be a ch), 1hdc, 2dc in next ch2-sp, ch2, 2dc in the same ch2-sp, 1hdc, 6sc* 4 times, NJ in first sc of the rnd after ch1 - 96 sts, 4 ch2-sps.
Make a decorative rnd with surface sl sts on the rnd 7 using yarn C3. If you have never tried surface crochet (slip stitches) before, please, check THIS POST. There you will see a step-by-step tutorial with many pictures on how to make surface slip stitches and how to join the round.


If you haven’t read general information about this CAL – please, check it HERE. There you will also find links to all the tutorials, I will add them once they are published. And yes, there will be videos available for each tutorial.. They will be kindly recorded by Esther Dijkstra from It’s all in a Nutshell. You can view the first video in the end of this post!
The first granny square is the easiest to make from the whole CAL. But it will also help you to get used to my style of writing the patterns and also to train some basic skills in attaching yarn, joining the rounds with a so called “needle join”, to train crochet in both and back loops, to see what your gauge is and if your first block is staying flat (and it has to!). You should really be relaxed with all these techniques as next week the pattern will be a bit more complicated and you will try to make your first overlaid stitches!
Important Notes
Here are some important things I would like to draw your attention to before you start to make your first block. I suggest that you join new yarn by simply pulling it in indicated stitch (in back loop, or front loop, or through both loops – as indicated in the pattern) and making one or two chain stitches (which will count as the 1st sc, hdc or dc accordingly). And I also suggest that you join your rounds with a needle join, which will help to make joining sections invisible! You can read detailed information about these two aspects HERE and HERE. But! If you feel comfortable with starting the rounds in another way, and finishing rounds in your own technique – please, feel free to do it as you wish. Just be sure that you attach yarn always in a right stitch and your stitch count after each round is correct. If you are not sure how to find front and back loops of the stitches, please, read THIS post.
Colors
You asked lots of questions about the colors. And I wrote several times that I want this CAL to be a leftover project. Please, look at these two examples of the first block. They both are made with same colors and by the same pattern. But as you see, they look completely different. What I want to say is that color key is not important in this project at all! You can take more than 6 colors and change them on every round according to your taste. And all your grannies will look unique. You can even take one pattern and make 9 blocks with it using different color keys – and you will get 9 different blocks as a result, and make a pillow of them.

So… Let’s get started!
TRANSLATIONS
Dutch by Dianne Baan
Portuguese by Estela Mizukawa
Stitch guide and Abbreviations
US standard abbreviations are used in this pattern. But if you are used to other terms, please check this Crochet Translation Project which might be helpful in translation to your language.
rnd - round
st(s) - stitch(es)
ch - chain
sp(s) - space(s)
yo - yarn over
lp(s) - loop(s)
FL - front loop(s)
BL - back loop(s)
NJ - needle join
sk - skip st(s)
*…* *crochet following directions* as many times as indicated
slst (slip stitch) – insert hook in indicated st, yo, draw yarn up and pull 2nd lp through the 1st lp on hook.
sc (single crochet) – insert hook in indicated stitch, yo, draw up a lp, yo and pull through both lps on hook.
hdc (half double crochet) – yo, insert hook in indicated st, yo, draw up a lp, yo, pull through all three lps.
dc (double crochet) – yo, insert hook in indicated st, yo, draw up a lp, *yo, pull through 2 lps* twice.
dc2tog (double crochet 2 together) – *yo, insert hook in indicated st, yo, draw up a lp, yo, pull through 2 lps* twice, yo, pull through all 3 lps on hook.
tr (treble crochet) – yo twice, insert hook in indicated st, yo, draw up a lp, *yo, pull through 2 lps* three times.
sc inc (single crochet increase) – crochet two sc in the same st.
dc inc (double crochet increase) – crochet two dc in the same st.
Copyright LillaBjornCrochet 2015. All rights reserved. This pattern is for unlimited personal use only. Do not reproduce or sell the pattern. The pattern may not be copied in any way (print or digitally), in part or in full. Items may be sold that are made from this pattern as long as the designer is credited. Shop owners, if you wish to make a kit with yarn using this pattern, please request permission and copyright details from me before offering any kits for sale. Please, read Copyright page for more information.
Color Key: C1 – Yellow, C2 – Beige, C3 – Orange, C4 – Green, C5 - Gray, C6 – Ruby.
Instructions
Rnd 1. Start with yarn C1.Make magic ring, ch2 (counts as 1st dc) and 11 dc in magic ring; NJ in the 1st dc after ch2 - 12 dc.

Rnd 2. Change to yarn C2. Attach yarn in any st of rnd 1. Work this rnd through both lps.
Note: make "legs" of each dc2tog in the same st of rnd 1. First dc2tog of this rnd will be ch2 and 1 dc.
*1 dc2tog, ch1* 12 times, finish with a sl st in the 1st dc2tog of the rnd, fasten off - 12 dc2tog, 12 ch1-sps)

Rnd 3. Change to yarn C3. Attach yarn in any dc2tog of rnd 2. Work this rnd through both lps. Please, try to make tr's of this round to the height of the working round. They should neither be too tight, nor too loose. And place tr's AFTER dc2tog's.
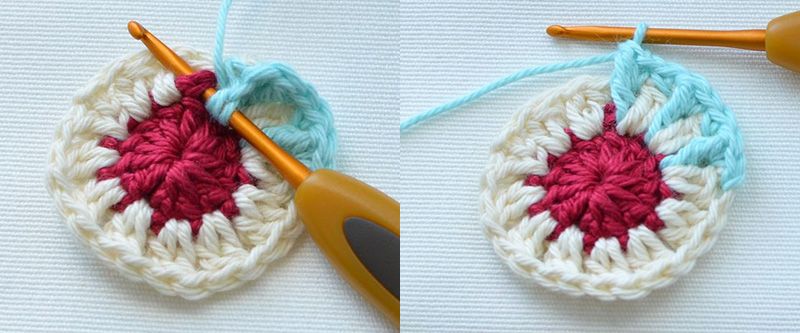
*1sc in dc2tog (first sc of the rnd will be a ch), 1sc in next ch1-sp, 1tr in the same st of rnd 1 where dc2tog below was made* 12 times, NJ in first sc of the rnd after ch1 - 12 tr, 24 sc.

Due to many questions about how to insert the hook on this rnd I decided to add two more pictures to explain it. While working tr's you should yo twice and insert the hook through both lps of the underlying st of rnd 1 (after dc2tog) and bring it to the front of your work. So tr's should be made in front of your work always.

Rnd 4. Change to yarn C4. Attach yarn in any tr of rnd 3. Work this rnd through both lps.
Because first sc of the rnd is ch1 – you will start this rnd with ch5. *1sc in tr of rnd 3 (first sc of the rnd will be a ch), ch4* 12 times, finish with a sl st in the same st where you attached yarn - 12 sc, 12 ch4-sps.

Rnd 5. Change to yarn C5. Attach yarn in first sc of any two of rnd 3 lying under ch4-sp.
On this round we are going to crochet in the unworked stitches of round 3. Work this rnd through both lps.
*1dc inc (first dc of the rnd will be ch2) in each of two sc under ch4-sp, sk next sc on rnd 3* 12 times, NJ in first dc of the rnd after ch2 - 48 sts.

Rnd 6. Change to yarn C6. Attach yarn in first dc of any group of four dc (BL) of rnd 5 lying above any ch4-sp. Work this rnd in BL. Some sc are made in spaces between two dc!
*4sc (first sc of the rnd will be a ch), 1sc in a space before next dc* 12 times, NJ in first sc of the rnd after ch1 - 60 sc.

Rnd 7. Change to yarn C2. Attach yarn in sc (BL) of rnd 6 that comes just after any sc made in a space between two dc’s. Work this rnd in BL!
*4dc (first dc of the rnd will be ch2), 1dc inc in next st (which is made in space between two dc’s)* 12 times, NJ in first dc of the rnd after ch2 - 72 dc.

Rnd 8. Change to yarn C4. Attach yarn in second dc (BL) of any dc inc of rnd 7. Work this rnd in BL! After this rnd you will get 4 corners.
*6sc (first sc of the rnd will be a ch), 1hdc, 2dc, 2tr, 2tr in next st, ch2, 2tr in next st, 2tr, 2dc, 1hdc* 4 times, NJ in first sc of the rnd after ch1 - 80 sts, 4 ch2-sps.

Rnd 9. Change to yarn C6. Attach yarn in first sc (BL) of any group of six sc of rnd 8. Work this rnd in BL!
*12sc (first sc of the rnd will be a ch), 1hdc, 2dc in next ch2-sp, ch2, 2dc in the same ch2-sp, 1hdc, 6sc* 4 times, NJ in first sc of the rnd after ch1 - 96 sts, 4 ch2-sps.

Make a decorative rnd with surface sl sts on the rnd 7 using yarn C3. If you have never tried surface crochet (slip stitches) before, please, check THIS POST. There you will see a step-by-step tutorial with many pictures on how to make surface slip stitches and how to join the round.

Congratulations! Your first granny square from Circles of the Sun CAL 2015 is now finished. Don't forget to share it on Facebook and Ravelry. You can find a pin for this block on Pinterest - please, feel free to repin it and share with your friends!
And here is the video made by Esther Dijkstra from It's All In a Nutshell. Enjoy! :)
See you next Friday!
Subscribe to a newsletter not to miss a single post. You can also follow me on Facebook, Pinterest and Instagram.
Only five days are left till the official beginning of my summer Mystery CAL 2015 (as the first pattern will be published next Friday, on 26th of June) and it’s the right time to give you more details about this project. Oh! I’ve actually come up with the name. My CAL will be named "Circles of the Sun". All 9 granny squares are different but still made in the same style, and they remind me of small suns. There are both floral and geometrical elements, so I really hope you will like them. After I posted brief information about this upcoming CAL I got many questions from you. So I will try to answer them in this post.

What is this Mystery CAL about?
As I’ve announced earlier, this Mystery CAL will be about Overlay crochet and granny squares. The main aim of this project is to introduce Overlay Crochet technique to you. If you have never heard about it before it will be a nice opportunity to start mastering it. And if you've tried my patterns already – then you will get a chance to make one more project in this amazing technique.
During this CAL you will create a front decoration for a pillow cover consisting of 9 squares made in overlay crochet. There will be no pattern for the back side of the pillow, so you will need a fabric pillow cover onto which you will sew your crocheted decoration.
IMPORTANT: Please, be aware that all my patterns (free or paid) are protected by copyright. All patterns are for personal use only. You are not allowed to copy, reproduce, redistribute, sell and edit them in part or as a whole. Translations and video tutorials are NOT allowed without permission. You are welcome to sell your finished items made by my patterns, but you cannot use my pictures to promote them. Please, always credit me as the designer of these patterns. You are not allowed to share pdf-files created from my posts with anyone. If you would like more people to join my CAL – please, share a link to my blog with them. You can check Copyright page for more details.
Resources
Stitch Abbreviations
US standard abbreviations are used in this pattern. But if you are used to other terms, please check this Crochet Translation Project which might be helpful in translation to your language. There will be detailed instructions about how to make every stitch given in the pattern for each block.
Skill level: Beginner or Intermediate?
I am very often asked if this CAL is also suitable for beginners… In general overlay crochet is considered to be intermediate to advance technique. But I have my own opinion on this and I expressed it in this post. In fact overlay crochet uses the same stitches as "classical" one and the only difference is in a way you attach overlaid stitches.
I tried to design not tricky patterns with advanced beginners in mind. I think that due to a huge amount of pictures this CAL should be not a problem. But everything of course depends on your personal level.
You should already know how to crochet in rounds, in front or back loops, how to join rounds, how to make magic ring, (US terms here) chain, slip stitch, single crochet, double crochet, treble crochet and their variations like dc3tog, dc4tog, tr2tog and so on.
If you haven’t done this yet – please, check Overlay Crochet section on my blog. I published all the important information about this technique. I would recommend to you to have a look at it before you start the CAL. Especially it is important to know how to attach the yarn and how to join the rounds. I will of course link up to certain articles from every tutorial.
Yarn and colors
I used Cotton Light yarn (DK) by DROPS for this CAL in 6 colors: beige, gray, ruby, yellow, green and orange… Well, I should be honest with you now as I actually used one skein of Safran yarn (Sport weight) by DROPS (orange) which is a different weight.
It happened because I wanted to add orange but this shade was not available and I decided to take a risk by adding one skein in different weight. And… And it worked! :) There was lots of orange yarn left so I am safe to say: if you choose 6 skeins of Cotton Light – that should be enough.

BUT! Please, be aware that the amount of yarn YOU will use for your CAL depends on many factors: on the yarn you use, on the size of the hook and on your personal crochet style. I used a 3.25 mm (D) hook and I would say I am a tight crocheter.
While designing this decoration for a pillow I really wanted to keep you away from purchasing new yarn as I wanted it to be a stush buster project.
So before actually buying new yarn, please, dig deeper into your stash and may be you will find some yarn there. If you have a small amount of each color – you can use more colors for this CAL (not just 6).
Overlay crochet is about drawing with yarn. Making each square you will change the colors on ever round and it’s not really necessary to exactly follow the color key given in each pattern. You can change the colors according to your taste, and your pillow will be unique!
I am often asked which colors would work best for this CAL. Well, I would recommend solid and contrasting colors. But if you rather want to take several shades of two or three colors, please, be sure to use light and dark shades.
If you take similar colors the whole image of each square will not be so vivid. And I would also recommend to use stiffer yarns rather that soft. And with no “arty” effects. Please, feel free to check this post where I show in examples how different yarns can influense the look of the project in overlay crochet.
Size
The size of each block and a pillow as a result will naturally depend on yarn and hook chosen. My squares are 12.5 cm x 12.5 cm (5” x 5”) large. And my front decoration with the border is 40 cm x 40 cm (16” x 16”).
Gauge
There is no gauge listed here as it will also depend on your yarn and hook. And also on your crochet style. The only important guideline here is that every your block should be flat and of the same size.
Circles of the Sun Timeline (Links to all the tutorials as they become available)
Block 1 26 June 2015
Block 2 3 July 2015
Block 3 10 July 2015
Block 4 17 July 2015
Block 5 24 July 2015
Block 6 31 July 2015
Block 7 7 August 2015
Block 8 14 August 2015
Block 9 21 August 2015
Joining and the Border 28 August 2015
Seems like this is all for now… Please, leave a comment to this post if I missed something important.
Remember to subscribe to a weekly newsletter not to miss a single pattern and tutorial. And you can also follow me on Facebook, Pinterest and Instagram.

What is this Mystery CAL about?
As I’ve announced earlier, this Mystery CAL will be about Overlay crochet and granny squares. The main aim of this project is to introduce Overlay Crochet technique to you. If you have never heard about it before it will be a nice opportunity to start mastering it. And if you've tried my patterns already – then you will get a chance to make one more project in this amazing technique.
During this CAL you will create a front decoration for a pillow cover consisting of 9 squares made in overlay crochet. There will be no pattern for the back side of the pillow, so you will need a fabric pillow cover onto which you will sew your crocheted decoration.
IMPORTANT: Please, be aware that all my patterns (free or paid) are protected by copyright. All patterns are for personal use only. You are not allowed to copy, reproduce, redistribute, sell and edit them in part or as a whole. Translations and video tutorials are NOT allowed without permission. You are welcome to sell your finished items made by my patterns, but you cannot use my pictures to promote them. Please, always credit me as the designer of these patterns. You are not allowed to share pdf-files created from my posts with anyone. If you would like more people to join my CAL – please, share a link to my blog with them. You can check Copyright page for more details.
Resources
- Tutorials. The patterns of each block will be published here, on my blog, every Friday.
- Newsletter. If you haven’t done this yet, be sure to subscribe to my Weekly Newsletter not to miss a single beat of this CAL. I also offer a free pattern of Macaron Pin Cushion exclusively to my subscribers. If you have some problems with subscribing, please feel free to do it on any page of my blog.
- Ravelry. Please, add this CAL to your Ravelry queue. You can also join my official group on Ravelry where the information about each tutorial will be published and where you can also share your finished blocks.
- Facebook. Don’t forget to join my Facebook club. And be sure to check Official CCC Social Group which will host Circles of the Sun CAL 2015.
- Pinterest. I’ve created a new board on Pinterest where all the tutorials of this CAL will be added after being published on my blog.
- Video. All videos for this CAL will be kindly recordered by Esther Dijkstra from It’s all in a Nutshell. You can view the video in the end of each post!
- CAL version in Dutch and German. I am happy to announce that my CAL will be kindly translated to Dutch by Dianne Baan from Haakdingen.nl. You can read general information about this CAL and ready tutorials in Dutch HERE. And translation of this CAL to German is made by Libminna. Please, read general information in German HERE. The links to translation of each tutorial will also be added to separate posts.
Stitch Abbreviations
US standard abbreviations are used in this pattern. But if you are used to other terms, please check this Crochet Translation Project which might be helpful in translation to your language. There will be detailed instructions about how to make every stitch given in the pattern for each block.
Skill level: Beginner or Intermediate?
I am very often asked if this CAL is also suitable for beginners… In general overlay crochet is considered to be intermediate to advance technique. But I have my own opinion on this and I expressed it in this post. In fact overlay crochet uses the same stitches as "classical" one and the only difference is in a way you attach overlaid stitches.
I tried to design not tricky patterns with advanced beginners in mind. I think that due to a huge amount of pictures this CAL should be not a problem. But everything of course depends on your personal level.
You should already know how to crochet in rounds, in front or back loops, how to join rounds, how to make magic ring, (US terms here) chain, slip stitch, single crochet, double crochet, treble crochet and their variations like dc3tog, dc4tog, tr2tog and so on.
If you haven’t done this yet – please, check Overlay Crochet section on my blog. I published all the important information about this technique. I would recommend to you to have a look at it before you start the CAL. Especially it is important to know how to attach the yarn and how to join the rounds. I will of course link up to certain articles from every tutorial.
Yarn and colors
I used Cotton Light yarn (DK) by DROPS for this CAL in 6 colors: beige, gray, ruby, yellow, green and orange… Well, I should be honest with you now as I actually used one skein of Safran yarn (Sport weight) by DROPS (orange) which is a different weight.
It happened because I wanted to add orange but this shade was not available and I decided to take a risk by adding one skein in different weight. And… And it worked! :) There was lots of orange yarn left so I am safe to say: if you choose 6 skeins of Cotton Light – that should be enough.

BUT! Please, be aware that the amount of yarn YOU will use for your CAL depends on many factors: on the yarn you use, on the size of the hook and on your personal crochet style. I used a 3.25 mm (D) hook and I would say I am a tight crocheter.
While designing this decoration for a pillow I really wanted to keep you away from purchasing new yarn as I wanted it to be a stush buster project.
So before actually buying new yarn, please, dig deeper into your stash and may be you will find some yarn there. If you have a small amount of each color – you can use more colors for this CAL (not just 6).
Overlay crochet is about drawing with yarn. Making each square you will change the colors on ever round and it’s not really necessary to exactly follow the color key given in each pattern. You can change the colors according to your taste, and your pillow will be unique!
I am often asked which colors would work best for this CAL. Well, I would recommend solid and contrasting colors. But if you rather want to take several shades of two or three colors, please, be sure to use light and dark shades.
If you take similar colors the whole image of each square will not be so vivid. And I would also recommend to use stiffer yarns rather that soft. And with no “arty” effects. Please, feel free to check this post where I show in examples how different yarns can influense the look of the project in overlay crochet.
Size
The size of each block and a pillow as a result will naturally depend on yarn and hook chosen. My squares are 12.5 cm x 12.5 cm (5” x 5”) large. And my front decoration with the border is 40 cm x 40 cm (16” x 16”).
Gauge
There is no gauge listed here as it will also depend on your yarn and hook. And also on your crochet style. The only important guideline here is that every your block should be flat and of the same size.
Circles of the Sun Timeline (Links to all the tutorials as they become available)
Block 1 26 June 2015
Block 2 3 July 2015
Block 3 10 July 2015
Block 4 17 July 2015
Block 5 24 July 2015
Block 6 31 July 2015
Block 7 7 August 2015
Block 8 14 August 2015
Block 9 21 August 2015
Joining and the Border 28 August 2015
Seems like this is all for now… Please, leave a comment to this post if I missed something important.
Remember to subscribe to a weekly newsletter not to miss a single pattern and tutorial. And you can also follow me on Facebook, Pinterest and Instagram.
It seems like it’s time to announce my Mystery CAL 2015 (with official start on 26th of June). This will be the first CAL in my life and no need to say how excited and nervous I am about it. I sent you a newsletter not long ago and since then I’ve got lost of requests on this CAL: what it will be, when it starts and so on. So the right time has come to tell something (not everything yet) about it.


Subscribe to:
Posts (Atom)


