
April Showers Mandala crochet make-a-long is over now. Thank you very much for participating. I truly enjoyed seeing all your beautiful mandalas and color combinations. Since this pattern was released I have received lots of messages asking what crochet mandala’s can be used for. Well, they can be used in many-many ways: as wall hangings, table decorations, pillow décor and even stool covers. Laura Jackson (aka @taemombo on IG) turned her April Showers Mandala into a pouf!! She kindly allowed me to publish her instructions together with progress pictures. So here we go! p.s. And it's still not late to make your own mandala. Instructions will stay forever free here on my blog ;)
Stone Washed yarn is available in local Scheepjes shops and via online retailers (affiliate links are marked with *. I might be compensated with a tiny amount if you make a purchase via these links while you will not pay anything extra):
Wool Warehouse*, Black Sheep Wools*, Deramores* (all in UK with international shipping)
Caro’s Atelier* (NL and Europe)
Taemombo* (US and Canada), Knotty House* (Canada)

Row 1. Ch62, 1dc in sixth ch from the hook, ch1, skip 1 ch, dc in next ch, [ch3, skip 2 chains, sc in next chain, ch3, skip 2 chains, dc in next chain] until 2 chains left, ch1, skip 1 ch, dc in last ch, turn.
Row 2. Ch4 (counts as first dc and ch1-sp), dc in the next dc, [ch1 dc] in every ch3-sp and dc across (all sc will be skipped), turn.
Row 3. Ch4, dc in next dc, [ch3, skip next ch1-sp and dc, sc in next sp, ch3, skip next dc and ch1-sp, dc in next dc] repeat to last sp, ch1, dc in third ch in the beginning of previous row, turn.
Repeat Rows 2 and 3 until you reach desired length. Repeat Row 2 once more. Fasten off.

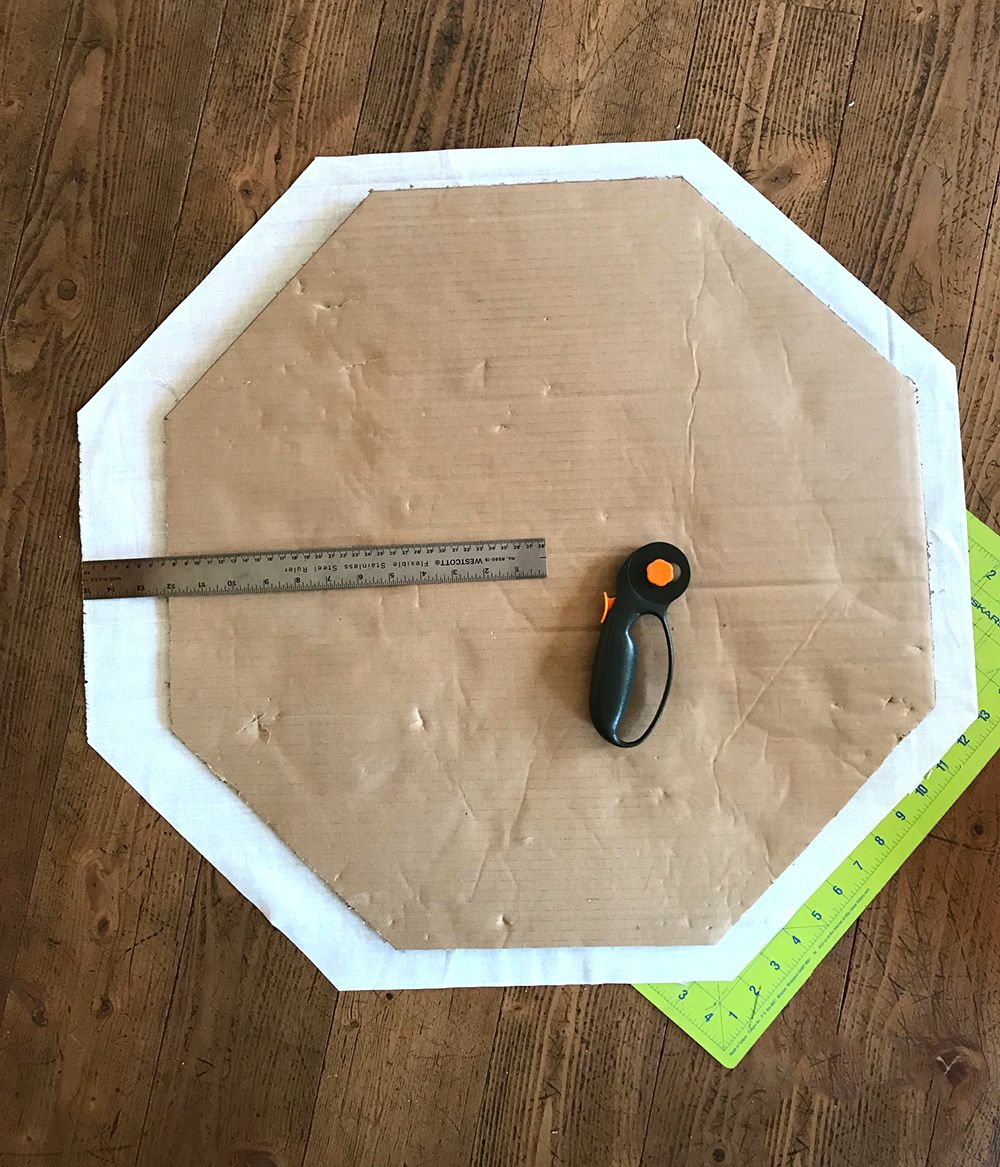
Step 1: Measure your April Showers Mandala without petals on the edge. Make an octagon cardboard template in the size of your mandala. You can use these directions for drawing an octagon.


Step 2: Cut out fabric octagon for the pouf’s top using your cardboard template. Allow approx. 2.5cm/1in on each side for the seam.

Step 3: Cut out another fabric octagon for the bottom of your pouf. Make it 5cm/2” wider to allow space for zipper.
Step 4: Cut bottom (wider) octagon in half for zipper. Insert zipper.

Step 5: Block crocheted side rectangle to needed measurements. The width of your rectangle is the height of the pouf. And the length of your rectangle is circumference of your top octagon. Laura blocked hers to 35.5cm/14” and 200cm/79”.

Cut out fabric for the side of your pouf in same size as your blocked crocheted piece with extra 2.5cm/1” on all sides – for seams.

Step 6 (optional): Process edges of all fabric pieces to prevent them from crumbling.

Step 7: Sew crocheted rectangle onto fabric allowing space on all edges for seams. Then fold rectangle in half with crocheted piece facing inside and sew short sides of the fabric rectangle together.

Step 8: Sew April Showers Mandala onto the top fabric octagon.

Step 9: Draw a line around cardboard octagon template onto the back of fabric top octagon (with sewn mandala). You will line up side rectangle with this line.

Step 10: Pin the side rectangle with top octagon together with right sides facing each other. Sew them together and then do the same for the bottom.

TIP: For an easier and even placement, put fabric rectangle around the cardboard template and then place it onto the top fabric octagon. Pin rectangle with sewing pins onto fabric octagon.

Step 11: Turn your ready sewn piece inside out and stuff the pouf with firm stuffing until it looks too full. It will squish down later.

Ta-dahh!! Your April Shower Pouf is now finished!!
Subscribe to a newsletter not to miss a single post. You can also follow me on Facebook, Pinterest and Instagram.
 |
| Photo credit for all pictures in this blog post: Laura Jackson |
You will need:
- Yarn to crochet a side of your pouf. Laura used 5 extra skeins of Stone Washed yarn for the side of your pouf. If you used different yarn or your April Showers Mandala was made with Stone Washed but became larger or smaller than stated in the pattern (after blocking), you might need more or less yarn for the side of the pouf.
Stone Washed yarn is available in local Scheepjes shops and via online retailers (affiliate links are marked with *. I might be compensated with a tiny amount if you make a purchase via these links while you will not pay anything extra):
Wool Warehouse*, Black Sheep Wools*, Deramores* (all in UK with international shipping)
Caro’s Atelier* (NL and Europe)
Taemombo* (US and Canada), Knotty House* (Canada)
- Lining fabric enough to make two octagons (in your mandala size with 5cm/2” allowance for the seam) and one side rectangle with approx. 35.4cm width. The length will be a circumference of your mandala with 5cm/2” allowance for the seam.
- Crochet hook – same size as you used for April Showers Mandala
- Firm stuffing, ruler, scissors, zipper (with approx. the same length and height of your crochet mandala measured from side to side), sewing pins, blocking tools, sewing machine – or you can sew everything by hand!

Side Rectangle instructions:
Row 1. Ch62, 1dc in sixth ch from the hook, ch1, skip 1 ch, dc in next ch, [ch3, skip 2 chains, sc in next chain, ch3, skip 2 chains, dc in next chain] until 2 chains left, ch1, skip 1 ch, dc in last ch, turn.
Row 2. Ch4 (counts as first dc and ch1-sp), dc in the next dc, [ch1 dc] in every ch3-sp and dc across (all sc will be skipped), turn.
Row 3. Ch4, dc in next dc, [ch3, skip next ch1-sp and dc, sc in next sp, ch3, skip next dc and ch1-sp, dc in next dc] repeat to last sp, ch1, dc in third ch in the beginning of previous row, turn.
Repeat Rows 2 and 3 until you reach desired length. Repeat Row 2 once more. Fasten off.

Sewing Instructions
Step 1: Measure your April Showers Mandala without petals on the edge. Make an octagon cardboard template in the size of your mandala. You can use these directions for drawing an octagon.


Step 3: Cut out another fabric octagon for the bottom of your pouf. Make it 5cm/2” wider to allow space for zipper.


Step 5: Block crocheted side rectangle to needed measurements. The width of your rectangle is the height of the pouf. And the length of your rectangle is circumference of your top octagon. Laura blocked hers to 35.5cm/14” and 200cm/79”.

Cut out fabric for the side of your pouf in same size as your blocked crocheted piece with extra 2.5cm/1” on all sides – for seams.

Step 6 (optional): Process edges of all fabric pieces to prevent them from crumbling.

Step 7: Sew crocheted rectangle onto fabric allowing space on all edges for seams. Then fold rectangle in half with crocheted piece facing inside and sew short sides of the fabric rectangle together.

Step 8: Sew April Showers Mandala onto the top fabric octagon.

Step 9: Draw a line around cardboard octagon template onto the back of fabric top octagon (with sewn mandala). You will line up side rectangle with this line.

Step 10: Pin the side rectangle with top octagon together with right sides facing each other. Sew them together and then do the same for the bottom.

TIP: For an easier and even placement, put fabric rectangle around the cardboard template and then place it onto the top fabric octagon. Pin rectangle with sewing pins onto fabric octagon.

Step 11: Turn your ready sewn piece inside out and stuff the pouf with firm stuffing until it looks too full. It will squish down later.

Ta-dahh!! Your April Shower Pouf is now finished!!
Subscribe to a newsletter not to miss a single post. You can also follow me on Facebook, Pinterest and Instagram.


I am in the process of making one, only I am trying to make top open for afghan storage.
ReplyDeleteYou could make loops and sew them onto the top. Attach some buttons to the corresponding areas of the sides and then just put the loop over the button to close after you stuff your ottoman with your afghans.
Delete