Showing posts with label how to make. Show all posts
Showing posts with label how to make. Show all posts
I am a true believer that pillows can never be too many. I mean they can be of course, but if you have pillows in different colors, and sizes, and with different patterns, you can change them on the sofa regularly. And give a new look to your livingroom every time. Crocheted mandala’s are still very hot in interior design and they can make wonderful round cushions. I’ve recently finished two with my new pattern Spanish Mandala (available for purchase in Ravelry and Etsy shops). When you make a round crocheted pillow, it is very important that stuffing fits the size very well. Sometimes it is really hard to find a pillow form of an exactly needed size. But good news is that it is very easy to make it! And you don’t even need a sewing machine for that!

|
| Spanish Mandala Cushion |
Disclaimer: this tutorial is in no way a professional sewing guide. Quite the opposite! It is aimed to absolute beginners. I am not a professional sewer, but I find this way of making a round pillow form very easy to follow.
What you will need:
- There are two ways: You may either purchase fabric and stuffing separately OR you can buy a ready square pillow form, which can be probably found in any store with home accessories. I purchased mine in Ikea. It was cheap and large enough: 50cm x 50 cm (20” x 20”). Many different square pillow forms are also available on Amazon. For exmaple, you can check them HERE*. But please, make sure you choose the right size!!
- You will also need scissors, sewing pins, a needle and sewing thread of matching (or any) color.
- And then you will also need patience and time :)
Copyright LillaBjornCrochet 2016. All rights reserved. This tutorial is for unlimited personal use only. Do not reproduce it. The tutorial may not be copied in any way (print or digitally), in part or in full. Please, read Copyright page for more information.
STEP 0.
Before you start remaking a pillow form, make sure that your crocheted mandala pillowcase is properly blocked and stretched, and its size is final!STEP 1.
If you are, like me, using a ready square pillow, frog one of the seams a bit and take ALL the stuffing out. Please, be prepared. Even if your pillow is small, you can get LOTS of it. And if you have pets, you should better hide somewhere to finish this step, as very shortly the stuffing, like snow, will be all over your house… What actually happened to me thanks to my wonderful and curious dog.I got a real mountain of stuffing!
STEP 2.
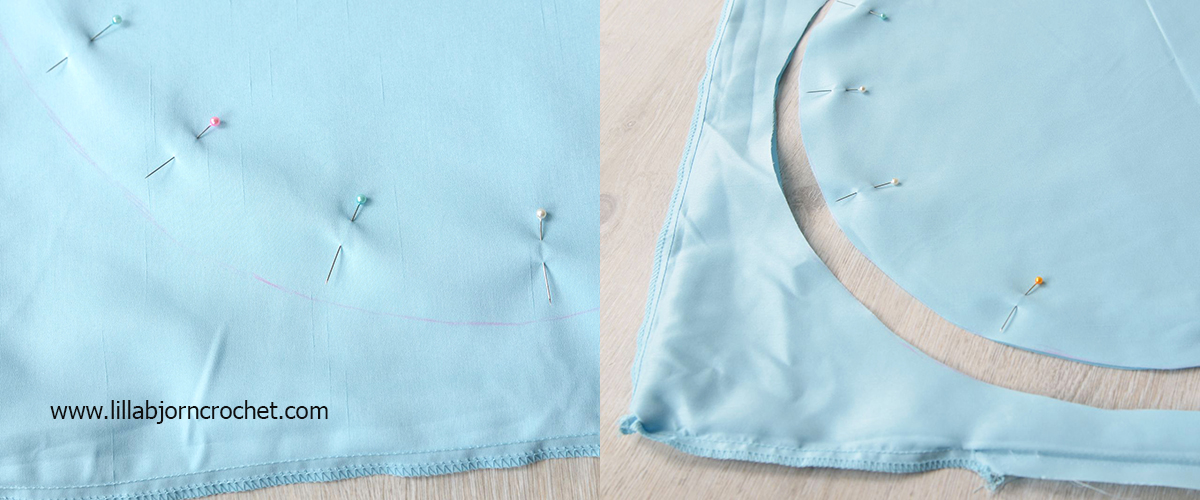
Put the stuffing away (you may want to put it in a box, or a big plastic bag), and turn fabric pillowcase inside out.Now place your crocheted mandala pillowcase onto the fabric and center it. Draw a circle around the mandala stepping approx. 3-3.5cm/1 (1 ½)” from edge. (Note: in the second picture below you can see that I drew a line just around the crocheted piece. DON’T do that! If you cut it like that, your pillow form will appear to be very small, and it will not suit perfectly).
Remove crocheted mandala and pin fabric along the line with a few sewing pins.
Cut fabric along the line with scissors. Now your new round pillow form is ready to be put together.
STEP 3.
If you have a sewing machine – great! But if not, don’t worry – you can sew your pillow form by hand. Take a needle and sewing thread and start sewing along the edge stepping away approx. 0.7cm/ ¼” with running stitch. Every time insert the needle on the top of previous stitch and make small stitches, so that your sewing is dense. (see pics below) Sew around the edge leaving approx. 10-15cm/4-6” opening.You can also secure the edge with blanket stitch to prevent fabric from unweaving.
STEP 4.
Turn fabric inside out and put the stuffing inside. You will most likely need less stuffing than there was in a square pillow. Stuff the pillow according to your taste (I prefer the pillows to be not very firm).Now wrap the egdes of the opening inside, pin them with 2-3 sewing pins and close the opening with the same running stitch.
Ta-dah!!! Your new pillow form is finished! And you can now put it inside your crocheted Mandala Pillowcase!

|
| Spanish Mandala Cushion |
Don't forget to subscribe to my Newsletter not to miss a single post. And you can also follow me on Facebook, Pinterest and Instagram.

*This blog post contains affiliate links. Thanks for your support!
I have entered a totally different and new part of the crochet world recently. During last weeks I had been working on free pattern of Autumn Winds Cowl which was released last Tuesday (you can find it HERE). I usually design in overlay crochet and create detailed written instructions with lots of progress pictures. But my new cowl consists of granny squares and from the very beginning I was thinking how great it would be to create crochet charts and to provide them along with the written instructions. To make a crochet chart was a very important step for me as I’ve never done this before and had no clue which software to choose. At nearly the same time I heard from Annelies Baes (a designer behind Vicarno) about the release of new free software Crochet Charts. And that was the answer to my hesitation. So I decided to try it.
Subscribe to:
Posts (Atom)


