Showing posts with label Furry Tales. Show all posts
Showing posts with label Furry Tales. Show all posts
I am happy to introduce – Rock Star Coat, a free knitting pattern. Instructions are written for eight different sizes, and it’s easy to adjust the pattern to your specific needs: make the yoke deeper, add more space for the body, make longer sleeves. Hope you enjoy!

Add this pattern to your Ravelry Queue
Rock Star Coat is worked seamlessly in rounds from the top down. First some short rows are worked back and forth to shape the neck. Raglan increases are then worked to the final yoke depth. The yoke is divided for body and sleeves (stitches for sleeves are placed on hold), and from this point the lower body is worked in rounds to the lower ribbing. Sleeve stitches are picked up again to work the sleeves in rounds down to the cuffs (the sleeves are designed for ¾ length, and have no decreases). A bigger ease is recommended for sleeves due to the fluffy yarn. Then a collar is worked along neck opening.
Purchase a ready-to-print pdf with all instructions without advertisements HERE on Ravelry and HERE on Etsy. Pdf is only available in English.
**************************************************************************
An original LillaBjörnCrochet Design (Tatsiana Kupryianchyk). Copyright 2014-2020. All rights reserved. This pattern is for personal use only. It cannot be sold, redistributed or edited in any way. Translations and video tutorials are not allowed. You can sell your finished products, but you cannot use my pictures to promote them. Please, always credit me as a designer of this pattern. Thank you!

Scheepjes Furry Tales
x 6 (7, 7, 8, 9, 10, 11, 12) balls
US 11 (8mm) and US 10.5 (7mm) – 16” (40cm) and 32” (80cm) circular needles
Stitch markers in three different colors, yarn needle to weave in tails
Furry Tales yarn is available in Scheepjes local shops and via online retailers:
Wool Warehouse*, Black Sheep Wools* (UK, international shipping)
Caro’s Atelier* (NL and Europe)
Taemombo* (US and Canada)

Sizes: XS (S, M, L, XL, 2X, 3X, 4X)
Finished bust circumference:
44.5 (46.5: 48.5: 51.5: 53.5: 56.5: 58.5: 62.5)”
111 (116: 121: 128.5: 133.5: 141: 146: 156) cm
Suggested ease: 12-16” (30-40 cm) for the body and 2.5-3.5” (6-9 cm) for the upper arm. A bigger ease for the sleeves is suggested.
Gauge: 8 sts and 12 rows to measure approx. 10 x 10 cm (4 x 4”) in Stockinette. The gauge swatch before and after blocking will be approx. the same.
approx.: approximate
BOR: beginning of the round
circ: circumference
CO: cast on
foll: following
inc: increase (insert right needle under the bar between current and next st knit- or purlwise (depending on if you are on RS or WS), complete knit st (on RS) or purl st (on WS) in usual way as if you worked into yarn over)
k: knit
k2tog: knit 2 stitches together
m: marker
p: purl
pm: place marker
rep: repeat
rm: raglan marker
rnd(s): round(s)
RS: right side
sl m: slip marker
st(s): stitch(es)
WS: wrong side
w&t: wrap and turn (knit to the point where you will wrap and turn. Bring the yarn to the front between the needles. Slip the next stitch on the left needle to the right needle, purlwise. Bring the yarn to the back between the needles. Slip the stitch from the right needle back to the left. Turn.

YOKE
With US 11 (8mm) longer needles CO 44 (44, 48, 48, 48, 56, 56, 60) sts using your preferred method (I used long tail CO).
SET-UP row (place markers for front bands and raglan increases)
Note: use stitch markers in different colors for the front bands
WS: K10, pm for front band, p2 (2, 3, 3, 3, 4, 4, 4) for front, pm for raglan, p4 (4, 4, 4, 4, 6, 6, 8) for sleeve, pm for raglan, p12 (12, 14, 14, 14, 16, 16, 16) for back, pm for raglan, p4 (4, 4, 4, 4, 6, 6, 8) for sleeve, pm for raglan, p2 (2, 3, 3, 3, 4, 4, 4) for front, pm for front band, k10, turn.
SHORT-ROW shaping for back
Short row 1 (inc for back and sleeves): (RS) K22 (22, 24, 24, 24, 28, 28, 30), pm for BOR (use different color), knit to one st left before next rm, inc, k1, sl rm, k1, inc, k1 (1, 1, 1, 1, 2, 2, 3), w&t; (WS) purl to BOR (sl m when you reach them – here and throughout), sl m, purl to one st left before next rm, inc (purl), p1, sl rm, p1, inc (purl), p1 (1, 1, 1, 1, 2, 2, 3), w&t. [4 sts inc’d]
You’ll have 14 (14, 16, 16, 16, 18, 18, 18) sts for back, 5 (5, 5, 5, 5, 7, 7, 8) sts for each sleeve, 12 (12, 13, 13, 13, 14, 14, 14) sts for each front.
Short row 2 (inc for back, fronts and sleeves): (RS) Knit to BOR, sl m, *knit to one st left before next rm, inc, k1, sl rm, k1, inc; rep from * once more, k1, w&t; (WS) purl to BOR, sl m, **purl to one st left before next rm, inc (purl), p1, sl rm, p1, inc (purl); rep from ** once more, p1, w&t. [8 sts inc’d]
You’ll have 16 (16, 18, 18, 18, 20, 20, 20) sts for back, 7 (7, 7, 7, 7, 9, 9, 11) sts for each sleeve, 13 (13, 14, 14, 14, 15, 15, 15) sts for each front
Next row – RS: knit to end (remove BOR m).
Next row – WS: K10, sl m, purl to next front m, sl m, k10, turn.
RAGLAN increases
INC SET 1 (2 rows) – for all sizes except 4X. For 4X size proceed to INC SET 2
Row 1 – RS (inc for body and sleeves): K10, sl m, *knit to one st left before next rm, inc, k1, sl rm, k1, inc; rep from * three more times, knit to next front m, sl m, knit to end, turn. [8 sts inc’d]
Row 2 – WS (no inc): K10, sl m, purl to next front m, sl m, k10, turn.
You’ll have 18 (18, 20, 20, 20, 22, 22, -) sts for back, 9 (9, 9, 9, 9, 11, 11, -) sts for each sleeve, 14 (14, 15, 15, 15, 16, 16, -) sts for each front
Repeat last 2 rows – 0 (1, 1, 0, 1, 1, 2, -) more times
You’ll have 18 (20, 22, 20, 22, 24, 26, -) sts for back, 9 (11, 11, 9, 11, 13, 15, -) sts for each sleeve, 14 (15, 16, 15, 16, 17, 18, - ) sts for each front.
INC SET 2 (4 rows)
Row 1 – RS (inc for body and sleeves): K10, sl m, *knit to one st left before next rm, inc, k1, sl rm, k1, inc; rep from * three more times, knit to next front m, sl m, knit to end, turn. [8 sts inc’d]
Row 2 – WS (no inc): K10, sl m, purl to next front m, sl m, k10, turn.
Row 3 – RS (inc for back and fronts only): K10, sl m, *knit to one st left before next rm, inc, k1, sl rm, k to next rm, sl rm, k1, inc; rep from * once more, knit to next front m, sl m, knit to end, turn. [4 sts inc’d]
Row 4 – WS (no inc): Rep Row 2.
You’ll have 22 (24, 26, 24, 26, 28, 30, 24) sts for back, 11 (13, 13, 11, 13, 15, 17, 13) sts for each sleeve, 16 (17, 18, 17, 18, 19, 20, 17) sts for each front.
Repeat last 4 rows – 4 (4, 4, 5, 5, 5, 5, 7) more times
You’ll have 38 (40, 42, 44, 46, 48, 50, 52) sts for back, 19 (21, 21, 21, 23, 25, 27, 27) sts for each sleeve, 24 (25, 26, 27, 28, 29, 30, 31) sts for each front.
At this point yoke measures 22.5 (24.2: 24.2: 25.8: 27.5: 28.8: 30.4: 33.3) cm/ 9 (9.7: 9.7: 10.3: 11: 11.5: 12.2: 13.3) in

SEPARATE for body and sleeves
(RS) K10, sl m, knit to next rm, remove rm, slip foll 19 (21, 21, 21, 23, 25, 27, 27) sts on waste yarn, remove rm, using the backwards loop method (or your preferred method) CO 4 (4, 4, 5, 5, 6, 6, 8) sts for underarm, knit to next rm, remove rm, slip foll 19 (21, 21, 21, 23, 25, 27, 27) sts on waste yarn, CO 4 (4, 4, 5, 5, 6, 6, 8) sts for underarm, knit to next front m, sl m, knit to end.
Next row - WS: K10, sl m, purl to approx. center back, inc (purl), purl to next front m, sl m, k10, turn – 95 (99, 103, 109, 113, 119, 123, 131) sts for body (back and front together).
LOWER BODY
Row 1 – RS: K10, sl m, knit to next front m, sl m, k10, turn.
Row 2 – WS: K10, sl m, purl to next front m, sl m, k10, turn.
Repeat last two rows until body measures approx. 20.5 (21.25: 22: 22.25: 22.5: 22.75: 23: 23.5)” / 52 (54: 56: 56.5: 57: 57.5: 58.5: 59) cm, or 1” (2.5 cm) less than desired length from back neck. Remove both front m.
Ribbing
Change to US 10.5 (7mm) needles.
Row 1: *K1, p1; rep from * to last st, k1, turn.
Row 2: *P1, k1; rep from * to last st, p1, turn.
Rep Row 1 once more. BO loosely knitwise.
SLEEVES
Note: it is highly recommended to use BOR marker for sleeves, even though they have no decreases. Furry Tales is a very fluffy yarn, and BOR marker will help to keep accurate row count for both sleeves.
Set up rnd: Using US 11 (8mm) needles, with RS facing you and beg at approx. center of the underarm, pick up and knit 2 (2, 2, 3, 3, 3, 3, 4) sts, pick up and knit one more st in the corner, place 19 (21, 21, 21, 23, 25, 27, 27) sts and knit across them, pick up and knit one st in next corner, pick up and knit 2 (2, 2, 2, 2, 3, 3, 4) more sts at the underarm, pm for BOR. [25 (27, 27, 28, 30, 33, 35, 37) sts for a sleeve]
Knit in the rounds until sleeve measures approx. 1” (2.5cm) before ¾ of the arm length (approx. 15”/38cm). Dec one st on the last round by working k2tog, then proceed to ribbing.
Ribbing
Change to US 10.5 (7mm) shorter needles. *k1, p1; rep from * around. Rep last rnd two more times; then BO loosely. Rep for other sleeve.
COLLAR
Using 7 mm needles pick up and knit 44 (44, 48, 48, 48, 48, 56, 56, 60) sts along neck opening. Knit in rows back and forth until the collar measures approx. 3-4” (7-10 cm) in height. BO loosely. Weave in all ends.
Congratulations! Your Rock Star Coat is now finished!
Schematics

Measurements in cm:
A: 55.5 (58: 60.5: 64.25: 66.75: 70.5: 73: 78)
B: 31.5 (34: 34: 35.5: 38: 42: 44.5: 47)
C: 22.5 (24.2: 24.2: 25.8: 27.5: 28.8: 30.4: 33.3)
D: 23.3 (23.2: 24.5: 23: 23.3: 22.2: 20: 18.8: 17.5)
Measurements in inches:
A: 22.25 (23.25: 24.25: 25.75: 26.75: 28.25: 29.25: 31.25)
B: 12.5 (13.5: 13.5: 14: 15: 16.5: 17.5: 18.5)
C: 9 (9.7: 9.7: 10.3: 11: 11.5: 12.2: 13.3)
D: 9.2 (9.2: 9.6: 9: 9.2: 8.8: 8: 7.4: 6.9)
Purchase a ready-to-print pdf with all instructions without advertisements HERE on Ravelry and HERE on Etsy. Pdf is only available in English.
Subscribe to a newsletter not to miss a single post. You can also follow me on Facebook, Pinterest and Instagram.


Add this pattern to your Ravelry Queue
Rock Star Coat is worked seamlessly in rounds from the top down. First some short rows are worked back and forth to shape the neck. Raglan increases are then worked to the final yoke depth. The yoke is divided for body and sleeves (stitches for sleeves are placed on hold), and from this point the lower body is worked in rounds to the lower ribbing. Sleeve stitches are picked up again to work the sleeves in rounds down to the cuffs (the sleeves are designed for ¾ length, and have no decreases). A bigger ease is recommended for sleeves due to the fluffy yarn. Then a collar is worked along neck opening.
Purchase a ready-to-print pdf with all instructions without advertisements HERE on Ravelry and HERE on Etsy. Pdf is only available in English.
**************************************************************************
ROCK STAR COAT: free knitting pattern
An original LillaBjörnCrochet Design (Tatsiana Kupryianchyk). Copyright 2014-2020. All rights reserved. This pattern is for personal use only. It cannot be sold, redistributed or edited in any way. Translations and video tutorials are not allowed. You can sell your finished products, but you cannot use my pictures to promote them. Please, always credit me as a designer of this pattern. Thank you!

Materials:
Scheepjes Furry Tales
x 6 (7, 7, 8, 9, 10, 11, 12) balls
US 11 (8mm) and US 10.5 (7mm) – 16” (40cm) and 32” (80cm) circular needles
Stitch markers in three different colors, yarn needle to weave in tails
Furry Tales yarn is available in Scheepjes local shops and via online retailers:
Wool Warehouse*, Black Sheep Wools* (UK, international shipping)
Caro’s Atelier* (NL and Europe)
Taemombo* (US and Canada)

Sizes: XS (S, M, L, XL, 2X, 3X, 4X)
Finished bust circumference:
44.5 (46.5: 48.5: 51.5: 53.5: 56.5: 58.5: 62.5)”
111 (116: 121: 128.5: 133.5: 141: 146: 156) cm
Suggested ease: 12-16” (30-40 cm) for the body and 2.5-3.5” (6-9 cm) for the upper arm. A bigger ease for the sleeves is suggested.
Gauge: 8 sts and 12 rows to measure approx. 10 x 10 cm (4 x 4”) in Stockinette. The gauge swatch before and after blocking will be approx. the same.
 |
| Phot credit: Jenna Bowers |
ABBREVIATIONS
approx.: approximate
BOR: beginning of the round
circ: circumference
CO: cast on
foll: following
inc: increase (insert right needle under the bar between current and next st knit- or purlwise (depending on if you are on RS or WS), complete knit st (on RS) or purl st (on WS) in usual way as if you worked into yarn over)
k: knit
k2tog: knit 2 stitches together
m: marker
p: purl
pm: place marker
rep: repeat
rm: raglan marker
rnd(s): round(s)
RS: right side
sl m: slip marker
st(s): stitch(es)
WS: wrong side
Special technique:
w&t: wrap and turn (knit to the point where you will wrap and turn. Bring the yarn to the front between the needles. Slip the next stitch on the left needle to the right needle, purlwise. Bring the yarn to the back between the needles. Slip the stitch from the right needle back to the left. Turn.
Repeat Formats
*…….; rep from * once more/twice more/3 more times Work the instructions after * and then repeat that section a further number of times as stated.
INSTRUCTIONS
YOKE
With US 11 (8mm) longer needles CO 44 (44, 48, 48, 48, 56, 56, 60) sts using your preferred method (I used long tail CO).
SET-UP row (place markers for front bands and raglan increases)
Note: use stitch markers in different colors for the front bands
WS: K10, pm for front band, p2 (2, 3, 3, 3, 4, 4, 4) for front, pm for raglan, p4 (4, 4, 4, 4, 6, 6, 8) for sleeve, pm for raglan, p12 (12, 14, 14, 14, 16, 16, 16) for back, pm for raglan, p4 (4, 4, 4, 4, 6, 6, 8) for sleeve, pm for raglan, p2 (2, 3, 3, 3, 4, 4, 4) for front, pm for front band, k10, turn.
SHORT-ROW shaping for back
Short row 1 (inc for back and sleeves): (RS) K22 (22, 24, 24, 24, 28, 28, 30), pm for BOR (use different color), knit to one st left before next rm, inc, k1, sl rm, k1, inc, k1 (1, 1, 1, 1, 2, 2, 3), w&t; (WS) purl to BOR (sl m when you reach them – here and throughout), sl m, purl to one st left before next rm, inc (purl), p1, sl rm, p1, inc (purl), p1 (1, 1, 1, 1, 2, 2, 3), w&t. [4 sts inc’d]
You’ll have 14 (14, 16, 16, 16, 18, 18, 18) sts for back, 5 (5, 5, 5, 5, 7, 7, 8) sts for each sleeve, 12 (12, 13, 13, 13, 14, 14, 14) sts for each front.
Short row 2 (inc for back, fronts and sleeves): (RS) Knit to BOR, sl m, *knit to one st left before next rm, inc, k1, sl rm, k1, inc; rep from * once more, k1, w&t; (WS) purl to BOR, sl m, **purl to one st left before next rm, inc (purl), p1, sl rm, p1, inc (purl); rep from ** once more, p1, w&t. [8 sts inc’d]
You’ll have 16 (16, 18, 18, 18, 20, 20, 20) sts for back, 7 (7, 7, 7, 7, 9, 9, 11) sts for each sleeve, 13 (13, 14, 14, 14, 15, 15, 15) sts for each front
Next row – RS: knit to end (remove BOR m).
Next row – WS: K10, sl m, purl to next front m, sl m, k10, turn.
 |
| Photo credit: Laura Jackson and Theresa Pearson |
RAGLAN increases
INC SET 1 (2 rows) – for all sizes except 4X. For 4X size proceed to INC SET 2
Row 1 – RS (inc for body and sleeves): K10, sl m, *knit to one st left before next rm, inc, k1, sl rm, k1, inc; rep from * three more times, knit to next front m, sl m, knit to end, turn. [8 sts inc’d]
Row 2 – WS (no inc): K10, sl m, purl to next front m, sl m, k10, turn.
You’ll have 18 (18, 20, 20, 20, 22, 22, -) sts for back, 9 (9, 9, 9, 9, 11, 11, -) sts for each sleeve, 14 (14, 15, 15, 15, 16, 16, -) sts for each front
Repeat last 2 rows – 0 (1, 1, 0, 1, 1, 2, -) more times
You’ll have 18 (20, 22, 20, 22, 24, 26, -) sts for back, 9 (11, 11, 9, 11, 13, 15, -) sts for each sleeve, 14 (15, 16, 15, 16, 17, 18, - ) sts for each front.
INC SET 2 (4 rows)
Row 1 – RS (inc for body and sleeves): K10, sl m, *knit to one st left before next rm, inc, k1, sl rm, k1, inc; rep from * three more times, knit to next front m, sl m, knit to end, turn. [8 sts inc’d]
Row 2 – WS (no inc): K10, sl m, purl to next front m, sl m, k10, turn.
Row 3 – RS (inc for back and fronts only): K10, sl m, *knit to one st left before next rm, inc, k1, sl rm, k to next rm, sl rm, k1, inc; rep from * once more, knit to next front m, sl m, knit to end, turn. [4 sts inc’d]
Row 4 – WS (no inc): Rep Row 2.
You’ll have 22 (24, 26, 24, 26, 28, 30, 24) sts for back, 11 (13, 13, 11, 13, 15, 17, 13) sts for each sleeve, 16 (17, 18, 17, 18, 19, 20, 17) sts for each front.
Repeat last 4 rows – 4 (4, 4, 5, 5, 5, 5, 7) more times
You’ll have 38 (40, 42, 44, 46, 48, 50, 52) sts for back, 19 (21, 21, 21, 23, 25, 27, 27) sts for each sleeve, 24 (25, 26, 27, 28, 29, 30, 31) sts for each front.
At this point yoke measures 22.5 (24.2: 24.2: 25.8: 27.5: 28.8: 30.4: 33.3) cm/ 9 (9.7: 9.7: 10.3: 11: 11.5: 12.2: 13.3) in

SEPARATE for body and sleeves
(RS) K10, sl m, knit to next rm, remove rm, slip foll 19 (21, 21, 21, 23, 25, 27, 27) sts on waste yarn, remove rm, using the backwards loop method (or your preferred method) CO 4 (4, 4, 5, 5, 6, 6, 8) sts for underarm, knit to next rm, remove rm, slip foll 19 (21, 21, 21, 23, 25, 27, 27) sts on waste yarn, CO 4 (4, 4, 5, 5, 6, 6, 8) sts for underarm, knit to next front m, sl m, knit to end.
Next row - WS: K10, sl m, purl to approx. center back, inc (purl), purl to next front m, sl m, k10, turn – 95 (99, 103, 109, 113, 119, 123, 131) sts for body (back and front together).
LOWER BODY
Row 1 – RS: K10, sl m, knit to next front m, sl m, k10, turn.
Row 2 – WS: K10, sl m, purl to next front m, sl m, k10, turn.
Repeat last two rows until body measures approx. 20.5 (21.25: 22: 22.25: 22.5: 22.75: 23: 23.5)” / 52 (54: 56: 56.5: 57: 57.5: 58.5: 59) cm, or 1” (2.5 cm) less than desired length from back neck. Remove both front m.
Ribbing
Change to US 10.5 (7mm) needles.
Row 1: *K1, p1; rep from * to last st, k1, turn.
Row 2: *P1, k1; rep from * to last st, p1, turn.
Rep Row 1 once more. BO loosely knitwise.
SLEEVES
Note: it is highly recommended to use BOR marker for sleeves, even though they have no decreases. Furry Tales is a very fluffy yarn, and BOR marker will help to keep accurate row count for both sleeves.
Set up rnd: Using US 11 (8mm) needles, with RS facing you and beg at approx. center of the underarm, pick up and knit 2 (2, 2, 3, 3, 3, 3, 4) sts, pick up and knit one more st in the corner, place 19 (21, 21, 21, 23, 25, 27, 27) sts and knit across them, pick up and knit one st in next corner, pick up and knit 2 (2, 2, 2, 2, 3, 3, 4) more sts at the underarm, pm for BOR. [25 (27, 27, 28, 30, 33, 35, 37) sts for a sleeve]
Knit in the rounds until sleeve measures approx. 1” (2.5cm) before ¾ of the arm length (approx. 15”/38cm). Dec one st on the last round by working k2tog, then proceed to ribbing.
Ribbing
Change to US 10.5 (7mm) shorter needles. *k1, p1; rep from * around. Rep last rnd two more times; then BO loosely. Rep for other sleeve.
COLLAR
Using 7 mm needles pick up and knit 44 (44, 48, 48, 48, 48, 56, 56, 60) sts along neck opening. Knit in rows back and forth until the collar measures approx. 3-4” (7-10 cm) in height. BO loosely. Weave in all ends.
Congratulations! Your Rock Star Coat is now finished!
Schematics

Measurements in cm:
A: 55.5 (58: 60.5: 64.25: 66.75: 70.5: 73: 78)
B: 31.5 (34: 34: 35.5: 38: 42: 44.5: 47)
C: 22.5 (24.2: 24.2: 25.8: 27.5: 28.8: 30.4: 33.3)
D: 23.3 (23.2: 24.5: 23: 23.3: 22.2: 20: 18.8: 17.5)
Measurements in inches:
A: 22.25 (23.25: 24.25: 25.75: 26.75: 28.25: 29.25: 31.25)
B: 12.5 (13.5: 13.5: 14: 15: 16.5: 17.5: 18.5)
C: 9 (9.7: 9.7: 10.3: 11: 11.5: 12.2: 13.3)
D: 9.2 (9.2: 9.6: 9: 9.2: 8.8: 8: 7.4: 6.9)
Purchase a ready-to-print pdf with all instructions without advertisements HERE on Ravelry and HERE on Etsy. Pdf is only available in English.
Subscribe to a newsletter not to miss a single post. You can also follow me on Facebook, Pinterest and Instagram.
Life is good! Recently I’ve taken a few very simple rules on board in my quarantine life: not to worry about small things and find a reason to smile every day. The sun is shining brightly, my wip basket is full of new projects, and surprisingly I find time to work on new patterns every day.

Today I would like to share my newest knitting experiment with you. I should say, I am pretty much in love with it! You know that feeling, when your expectations and ideas come true into exactly what you planned from the beginning.
My furry coat is finished and free knitting pattern is on its way!

I called it Rock Star coat, haha. Not because I feel like a rock star myself, but because I was inspired by Jenna’s pictures, who was helping me to test this pattern.
Rock Star coat is a total beginner-friendly knitting pattern. You literally only need to know just basic stitches (purl and knit). The coat is worked top down in rows. First several short rows are made to raise back neck, and you will need to make wraps & turns, but with furry yarn no one will see your mistakes in case you make them.

After that the yoke is worked with raglan increases until the separation point for body and sleeves. And then lower body and sleeves are finished separately. I chose ¾ length for my sleeves, but you can of course make them longer. As you can see in Jenna’s picture, she made the whole coat longer as well.
The coat was designed as oversized, and I would recommend going for a bigger ease in the body and especially the sleeves. That’s because furry yarn “eats” ease quite a bit, and the sleeves might become tight.
The front bands are worked together with the yoke and body, and I didn’t plan buttons… I am thinking about either not adding any closure at all, or maybe invisible clasps. But to be honest, I am happy with my coat as it is!
No need to say my Rock Star coat was inspired by Scheepjes Furry Tales yarn (yarn review HERE). Softest and coziest yarn I have ever tried. In my opinion it works best with knitting (check my Furry Cloud Cowl), but can be used for crochet as well – see my Baby Bear of Furry Tales.

Furry Tales yarn is available in Scheepjes local shops and via online retailers:
Wool Warehouse*, Black Sheep Wools* (UK, international shipping)
Caro’s Atelier* (NL and Europe)
Taemombo* (US and Canada)

With 8 mm needles the coat is finished in almost no time! Though you must be very careful with increases and use trustable markers not to lose the raglan seams.
Look at my silly jumping pictures! I am so very happy with my new coat. And I am jumping of happiness. You know why? Because life is good!

Would you like to try it out? Wait for the free pattern to come out next Friday!
Subscribe to a newsletter not to miss a single post. You can also follow me on Facebook, Pinterest and Instagram.

Today I would like to share my newest knitting experiment with you. I should say, I am pretty much in love with it! You know that feeling, when your expectations and ideas come true into exactly what you planned from the beginning.
My furry coat is finished and free knitting pattern is on its way!

I called it Rock Star coat, haha. Not because I feel like a rock star myself, but because I was inspired by Jenna’s pictures, who was helping me to test this pattern.
 |
| Photo credit: Jenna Bowers |
Rock Star coat is a total beginner-friendly knitting pattern. You literally only need to know just basic stitches (purl and knit). The coat is worked top down in rows. First several short rows are made to raise back neck, and you will need to make wraps & turns, but with furry yarn no one will see your mistakes in case you make them.

After that the yoke is worked with raglan increases until the separation point for body and sleeves. And then lower body and sleeves are finished separately. I chose ¾ length for my sleeves, but you can of course make them longer. As you can see in Jenna’s picture, she made the whole coat longer as well.
 |
| Photo credit: Jenna Bowers |
The coat was designed as oversized, and I would recommend going for a bigger ease in the body and especially the sleeves. That’s because furry yarn “eats” ease quite a bit, and the sleeves might become tight.
The front bands are worked together with the yoke and body, and I didn’t plan buttons… I am thinking about either not adding any closure at all, or maybe invisible clasps. But to be honest, I am happy with my coat as it is!
No need to say my Rock Star coat was inspired by Scheepjes Furry Tales yarn (yarn review HERE). Softest and coziest yarn I have ever tried. In my opinion it works best with knitting (check my Furry Cloud Cowl), but can be used for crochet as well – see my Baby Bear of Furry Tales.

Furry Tales yarn is available in Scheepjes local shops and via online retailers:
Wool Warehouse*, Black Sheep Wools* (UK, international shipping)
Caro’s Atelier* (NL and Europe)
Taemombo* (US and Canada)

With 8 mm needles the coat is finished in almost no time! Though you must be very careful with increases and use trustable markers not to lose the raglan seams.
Look at my silly jumping pictures! I am so very happy with my new coat. And I am jumping of happiness. You know why? Because life is good!

Would you like to try it out? Wait for the free pattern to come out next Friday!
Subscribe to a newsletter not to miss a single post. You can also follow me on Facebook, Pinterest and Instagram.
Furry Cloud Cowl is here! Please, find a FREE knitting pattern below.
Scheepjes River Washed (78% Cotton x 22% Acrylic, 50g/130m)
950 Wheaton x5 balls
Scheepjes Furry Tales (100% Polyester, 100g/57m)
Prince Charming 975 x3 balls
Furry Tales and Colour Crafter yarn is available from local Scheepjes stockists and international retailers:
Wool Warehouse*, Black Sheep Wools* (UK, international shipping)
Caro’s Atelier* (NL and Europe)
US 2.5 (3mm) and US 11 (8mm) 16” (40 cm or longer) circular needles
Yarn needle to weave in ends
River Washed: 24 sts x 30 rows = 10cm/4” with cabled pattern on 3mm needles after blocking
Furry Tales: 8 sts x 12 rows = 10cm/4” with Stockinette stitch on 8mm needles.
CO: cast on
k: knit
p: purl
RS: right side
3/3 LC: slip next 3 stitches to cable needle and place at front of work, k3, then k3 from cable needle.
3/3 RC: slip next 3 stitches to cable needle and place at back of work, k3, then k3 from cable needle.
WS: wrong side
Size: approx. 30cm x 150cm

Copyright. An original LillaBjörnCrochet Design (Tatsiana Kupryianchyk). Copyright 2014-2020. All rights reserved. This pattern is for personal use only. It cannot be sold, shared, republished (online and off-line), redistributed, translated without permission or edited in any way – in part or in a whole. Video tutorials for this pattern are not allowed. Please, always credit me as a designer. Thank you!
Cabled Top
With Scheepjes River Washed (Wheaton 950) and 3mm needles CO 73 sts.
Row 1 (RS): K5, p3, [k9, p3] x5, k5, turn – 73 sts
Row 2 and all WS rows: K8, [p9, k3] x5, k8, turn.
Row 3: Repeat row 1.
Row 5: K5, p3, [3/3 LC, k3, p3] x5, k5, turn.
Row 7: Repeat row 1.
Row 9: K5, p3, [k3, 3/3 RC, p3] x5, k5, turn.
Row 10: K8, [p9, k3] x5, k8, turn.
Repeat rows 3-10 until piece measures approx. 150cm. Then repeat rows 3-4 once more and fasten off loosely.

Furry Bottom
With Scheepjes Furry Tales (Prince Charming 975) and 8mm needles CO 25 sts.
Row 1 (RS): k25, turn.
Row 2 (WS): p25, turn.
Repeat rows 1-2 until piece measures approx. 150cm, then fasten off loosely.
Finishing
Sew Cabled Top and Furry Bottom along short edges shaping two cowls (be careful not to twist). Then place top and bottom facing each other with WS and sew both layers together along the edges using yarn needle and River Washed yarn – with mattress stitch. Weave in all tails.
Congratulations! Your Furry Cowl is now finished!
Subscribe to a newsletter not to miss a single post. You can also follow me on Facebook, Pinterest and Instagram.
P.s. Links marked with * are affiliate. If you make a purchase through these links I might be compensated with a tiny amount while you will not pay anything extra. Thank you for supporting my blog!
 |
| Photo credit: Oleg Ignatovich |
Materials:
Scheepjes River Washed (78% Cotton x 22% Acrylic, 50g/130m)
950 Wheaton x5 balls
Scheepjes Furry Tales (100% Polyester, 100g/57m)
Prince Charming 975 x3 balls
Furry Tales and Colour Crafter yarn is available from local Scheepjes stockists and international retailers:
Wool Warehouse*, Black Sheep Wools* (UK, international shipping)
Caro’s Atelier* (NL and Europe)
US 2.5 (3mm) and US 11 (8mm) 16” (40 cm or longer) circular needles
Yarn needle to weave in ends
Gauge:
River Washed: 24 sts x 30 rows = 10cm/4” with cabled pattern on 3mm needles after blocking
Furry Tales: 8 sts x 12 rows = 10cm/4” with Stockinette stitch on 8mm needles.
Abbreviations:
CO: cast on
k: knit
p: purl
RS: right side
3/3 LC: slip next 3 stitches to cable needle and place at front of work, k3, then k3 from cable needle.
3/3 RC: slip next 3 stitches to cable needle and place at back of work, k3, then k3 from cable needle.
WS: wrong side
Size: approx. 30cm x 150cm

INSTRUCTIONS
Copyright. An original LillaBjörnCrochet Design (Tatsiana Kupryianchyk). Copyright 2014-2020. All rights reserved. This pattern is for personal use only. It cannot be sold, shared, republished (online and off-line), redistributed, translated without permission or edited in any way – in part or in a whole. Video tutorials for this pattern are not allowed. Please, always credit me as a designer. Thank you!
Cabled Top
With Scheepjes River Washed (Wheaton 950) and 3mm needles CO 73 sts.
Row 1 (RS): K5, p3, [k9, p3] x5, k5, turn – 73 sts
Row 2 and all WS rows: K8, [p9, k3] x5, k8, turn.
Row 3: Repeat row 1.
Row 5: K5, p3, [3/3 LC, k3, p3] x5, k5, turn.
Row 7: Repeat row 1.
Row 9: K5, p3, [k3, 3/3 RC, p3] x5, k5, turn.
Row 10: K8, [p9, k3] x5, k8, turn.
Repeat rows 3-10 until piece measures approx. 150cm. Then repeat rows 3-4 once more and fasten off loosely.

Furry Bottom
With Scheepjes Furry Tales (Prince Charming 975) and 8mm needles CO 25 sts.
Row 1 (RS): k25, turn.
Row 2 (WS): p25, turn.
Repeat rows 1-2 until piece measures approx. 150cm, then fasten off loosely.
Finishing
Sew Cabled Top and Furry Bottom along short edges shaping two cowls (be careful not to twist). Then place top and bottom facing each other with WS and sew both layers together along the edges using yarn needle and River Washed yarn – with mattress stitch. Weave in all tails.
Congratulations! Your Furry Cowl is now finished!
 |
| Photo credit: Oleg Ignatovich |
Subscribe to a newsletter not to miss a single post. You can also follow me on Facebook, Pinterest and Instagram.
P.s. Links marked with * are affiliate. If you make a purchase through these links I might be compensated with a tiny amount while you will not pay anything extra. Thank you for supporting my blog!
Hi there! We discussed different ways of knitting last week and came to the conclusion that whatever way you knit, it’s fine. If it works for you and if your stitches look right in the end. I decided to relax about my “weird” way of knitting. Especially after hearing that lots of other people successfully use it in the different parts of the world. Truly, there is no right or wrong knitting!
In a meanwhile, I have finished my Furry Cloud Cowl! These pictures arrived from Minsk, from my dear friends Oleg (photographer) and Natasha (model).
This winter in the Czech Republic is incredibly warm. We had a little bit of snow just once or twice, and it didn’t last for long. In Belarus there were just a few snowy days as well, and we were lucky to catch them in the pictures.
So here is my brand new Furry Cloud Cowl! A very simple knit with two layers: cables were knitted with Scheepjes River Washed yarn* (Wheaton (950) - 5 balls), and the bottom is straightforward stockinette fabric with Scheepjes Furry Tales yarn* (Prince Charming (975) - 3 balls).

As you can see in the pictures, my cowl is pretty long – approx. 150cm in length (30cm width), because I wanted it to be enough to double wrap around the neck. To make it very cozy and snuggly. This way you can even pull one wrap over the head, to make an improvised hood.
But it is very easy to make the cowl shorter, for just one wrap. All you need is to make both layers twice shorter. And you’ll need twice less yarn, obviously.
I chose a very simple knit pattern for the top. It consists of five 9-stitched braids. Easy to remember and meditative to knit.

And the bottom is just one fluffy cloud of 25 stitches. With large (8mm) needles and Furry Tales you won’t even notice when it will be finished! The fabric is growing in your hands very fast... And it also makes the cowl reversable!
Free pattern will follow next week! So stay tuned.
Subscribe to a newsletter not to miss a single post. You can also follow me on Facebook, Pinterest and Instagram.
P.s. Links marked with * are affiliate. If you make a purchase through these links I might be compensated with a tiny amount while you will not pay anything extra. Thank you for supporting my blog!
 |
| Photo credit: Oleg Ignatovich |
In a meanwhile, I have finished my Furry Cloud Cowl! These pictures arrived from Minsk, from my dear friends Oleg (photographer) and Natasha (model).
This winter in the Czech Republic is incredibly warm. We had a little bit of snow just once or twice, and it didn’t last for long. In Belarus there were just a few snowy days as well, and we were lucky to catch them in the pictures.
 |
| Photo credit: Oleg Ignatovich |
So here is my brand new Furry Cloud Cowl! A very simple knit with two layers: cables were knitted with Scheepjes River Washed yarn* (Wheaton (950) - 5 balls), and the bottom is straightforward stockinette fabric with Scheepjes Furry Tales yarn* (Prince Charming (975) - 3 balls).

As you can see in the pictures, my cowl is pretty long – approx. 150cm in length (30cm width), because I wanted it to be enough to double wrap around the neck. To make it very cozy and snuggly. This way you can even pull one wrap over the head, to make an improvised hood.
 |
| Photo credit: Oleg Ignatovich |
But it is very easy to make the cowl shorter, for just one wrap. All you need is to make both layers twice shorter. And you’ll need twice less yarn, obviously.
I chose a very simple knit pattern for the top. It consists of five 9-stitched braids. Easy to remember and meditative to knit.

And the bottom is just one fluffy cloud of 25 stitches. With large (8mm) needles and Furry Tales you won’t even notice when it will be finished! The fabric is growing in your hands very fast... And it also makes the cowl reversable!
 |
| Photo credit: Oleg Ignatovich |
Free pattern will follow next week! So stay tuned.
Subscribe to a newsletter not to miss a single post. You can also follow me on Facebook, Pinterest and Instagram.
P.s. Links marked with * are affiliate. If you make a purchase through these links I might be compensated with a tiny amount while you will not pay anything extra. Thank you for supporting my blog!
I’ve always thought about myself as very conservative when it comes to yarns. I’ve always wanted solid colors, preferably DK weight which goes together well with a certain hook size, no fancy content… But being a blogger and collaborating with a yarn company means that new yarn samples land on my table from time to time (quite often to be honest). And then of course you want to try them!
This is what happened to Whirl*. I was pretty sure that gradient or variegated yarn is not a good match to my crochet esthetics. But then I tried Whirl and a new love affair began (remember my Whirl Mandala Cardigan?). And it has been lasting for a few years now.
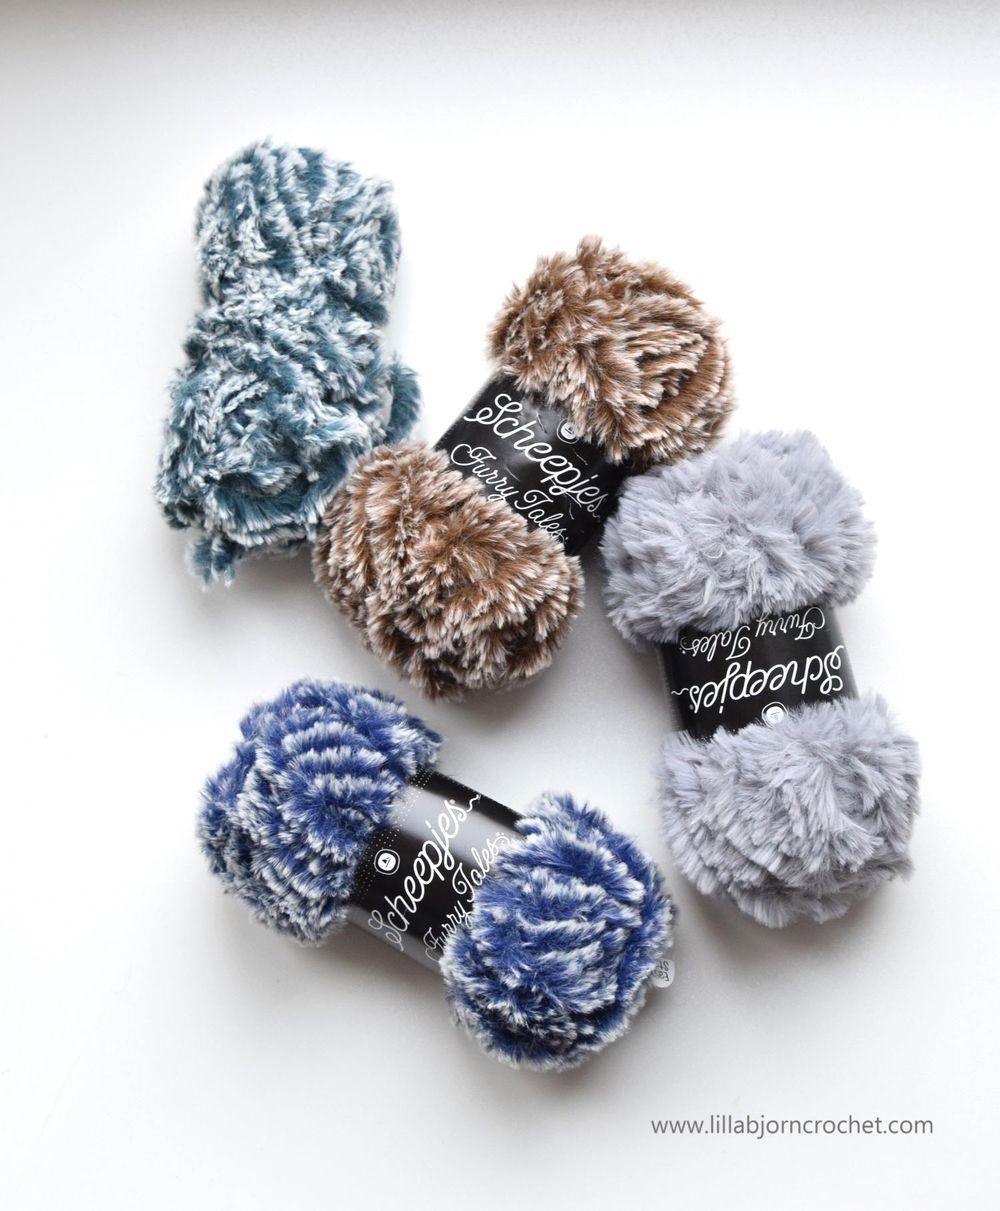
In last November soft fluffy coziness landed in my mail box. Those were four skeins of brand new Scheepjes yarn called Furry Tales. I decided to give it a try and design a baby bear (free crochet pattern) for the launch of this yarn. And it felt so incredibly soft. So… of course I knew I need to use it again, somehow.

Furry Tales is obviously not the first faux fur yarn out there. They’ve been presented on the yarn market for a while now, and became especially popular last year with all the fluffy madness in interior and fashion design.


To stand out Scheepjes introduced different colors – very bright and even rainbow – to aim not only for interior and adults fashion, but also for the kids. I have a son, and rainbows with unicorns are not for him. But I thought I would use Furry Tales to design something for an adult. A cute and cozy accessory for both women and men, to keep us warm during cold times.
I’m thinking of the knitting cables. But because they will be not visible with furry yarn, I decide to combine it with something else – River Washed*, for example. I wanted to go for greens, or blues…

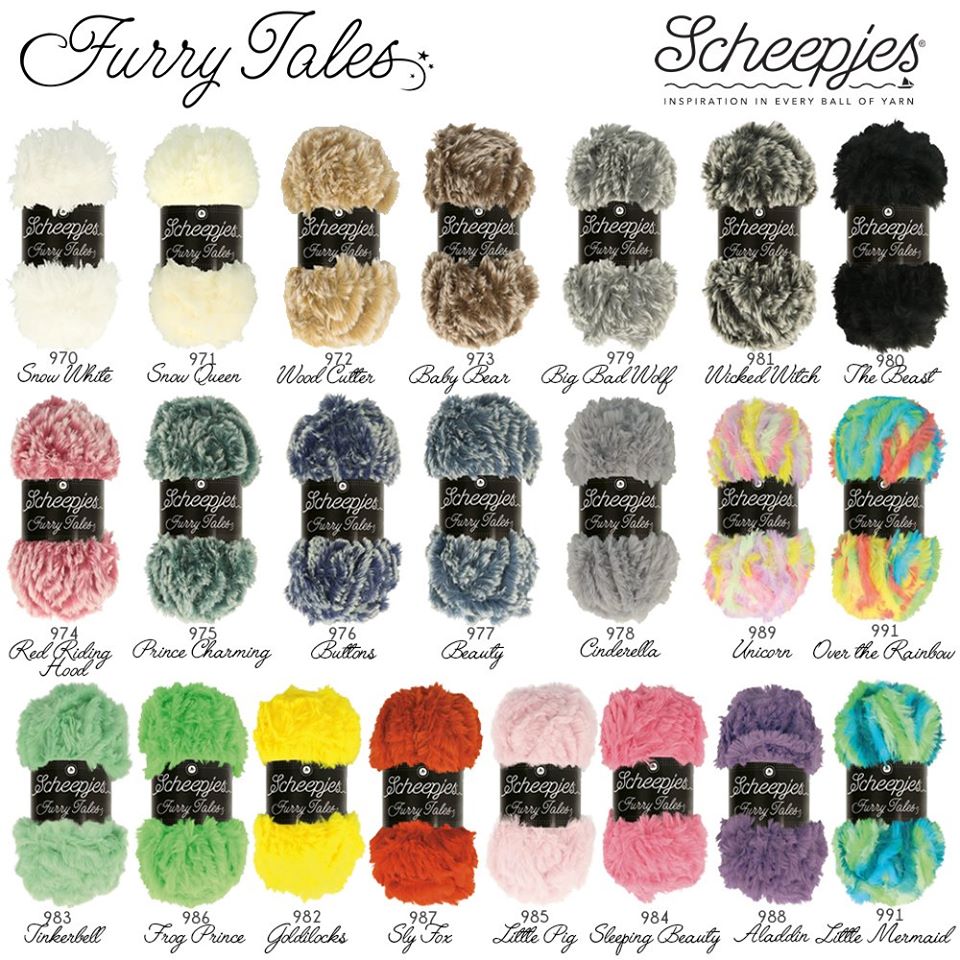
It was not an easy task to choose and match the shades. But I think I am ok now – 950 Wheaton in River Washed* and 975 Prince Charming in Furry Tales* they will be.
If you are wondering about Furry Tales yarn and would like to put your hands onto it, here are some brief facts. It’s Super Bulky yarn sold in 100g skeins with 57m each (22 colors are available). The content is 100% polyester. 9mm hook and needles are recommended by the label, but I think I will try smaller needles – 8mm. Will see how it works.
Furry Tales yarn is available from local Scheepjes stockists and international retailers:
Wool Warehouse*, Black Sheep Wools* (UK, international shipping)
Caro’s Atelier* (NL and Europe)
Subscribe to a newsletter not to miss a single post. You can also follow me on Facebook, Pinterest and Instagram.
P.s. Links marked with * are affiliate. If you make a purchase through these links I might be compensated with a tiny amount while you will not pay anything extra. Thank you for supporting my blog!

This is what happened to Whirl*. I was pretty sure that gradient or variegated yarn is not a good match to my crochet esthetics. But then I tried Whirl and a new love affair began (remember my Whirl Mandala Cardigan?). And it has been lasting for a few years now.
In last November soft fluffy coziness landed in my mail box. Those were four skeins of brand new Scheepjes yarn called Furry Tales. I decided to give it a try and design a baby bear (free crochet pattern) for the launch of this yarn. And it felt so incredibly soft. So… of course I knew I need to use it again, somehow.

Furry Tales is obviously not the first faux fur yarn out there. They’ve been presented on the yarn market for a while now, and became especially popular last year with all the fluffy madness in interior and fashion design.


To stand out Scheepjes introduced different colors – very bright and even rainbow – to aim not only for interior and adults fashion, but also for the kids. I have a son, and rainbows with unicorns are not for him. But I thought I would use Furry Tales to design something for an adult. A cute and cozy accessory for both women and men, to keep us warm during cold times.

I’m thinking of the knitting cables. But because they will be not visible with furry yarn, I decide to combine it with something else – River Washed*, for example. I wanted to go for greens, or blues…

It was not an easy task to choose and match the shades. But I think I am ok now – 950 Wheaton in River Washed* and 975 Prince Charming in Furry Tales* they will be.

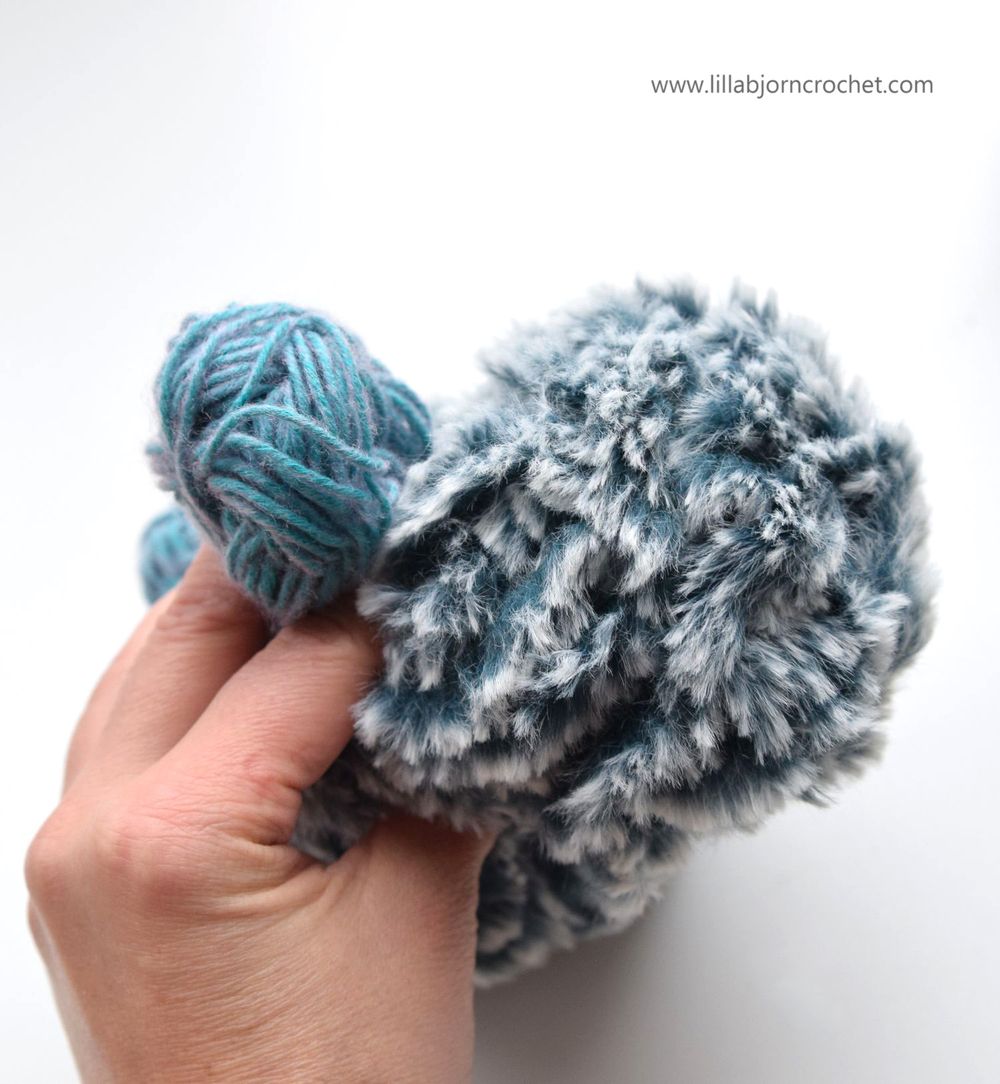
If you are wondering about Furry Tales yarn and would like to put your hands onto it, here are some brief facts. It’s Super Bulky yarn sold in 100g skeins with 57m each (22 colors are available). The content is 100% polyester. 9mm hook and needles are recommended by the label, but I think I will try smaller needles – 8mm. Will see how it works.
Furry Tales yarn is available from local Scheepjes stockists and international retailers:
Wool Warehouse*, Black Sheep Wools* (UK, international shipping)
Caro’s Atelier* (NL and Europe)
Subscribe to a newsletter not to miss a single post. You can also follow me on Facebook, Pinterest and Instagram.
P.s. Links marked with * are affiliate. If you make a purchase through these links I might be compensated with a tiny amount while you will not pay anything extra. Thank you for supporting my blog!
Subscribe to:
Posts (Atom)


