Showing posts with label Bathroom organizer. Show all posts
Showing posts with label Bathroom organizer. Show all posts
I can finally share the pattern of my new Bloom Bathroom Organizer with you! This project is very flexible (quick and easy to make) and can be easily adjusted according to your needs. You can make the pockets wider and deeper. You can make additional pockets, if you wish. And you can use any colors you like to match your bathroom interior. We will hopefully move to another apartment in a few months, and my new bathroom will be grey and white. And my new organizer will fit it just perfect! Enjoy! :)

Disclosure: this blog post contains affiliate links (marked with *). I may be compensated with a very tiny amount for purchases made via these links – with no extra expenses for you. Thank you for support!
Level: Beginner
Size. The size of each finished pocket will depend on yarn and hook you choose and also on your personal gauge. My pockets are approx. 30cm (12in) and 18cm (7in) large.
st(s) - stitch(es)
ch - chain
sp(s) - space(s)
yo - yarn over
sk - skip
*…* *crochet following directions* as many times as indicated
sl st (slip stitch) – insert hook in indicated st, yo, draw yarn up and pull 2nd lp through the 1st lp on hook.
sc (single crochet) – insert hook in indicated stitch, yo, draw up a lp, yo and pull through both lps on hook.
hdc (double crochet) – yo, insert hook in indicated st, yo, draw up a lp, yo, pull through 3 lps.
dc2tog (double crochet 2 together) - *yo, insert hook in indicated st, yo, draw up a lp, yo, pull through 2 lps* twice in same st, yo, pull through all 3 lps on hook.
dc3tog (double crochet 3 together) - *yo, insert hook in indicated st, yo, draw up a lp, yo, pull through 2 lps* 3 times, yo, pull through all 4 lps on hook.

Rnd 1. With yarn 421 - ch56, beginning in 2nd ch from hook make sc in 54 next ch, 3sc in last ch, using the other half of chain sc in next 54ch, 2sc in next ch (the same ch where 1st sc of this rnd was made), join with sl st in 1st sc. (113sts)

Rnd 2. *Ch3, sk 1 st, dc3tog in next st, ch3, sk 1 st, sc in next st* 28 times. (28 dc3tog's + 28 sc +56 ch3-sps).

Rnd 3. Ch2 and dc2tog in base ch (= 1st dc3tog), *ch2, sc in next dc3tog, ch2, dc3tog in next sc* 27 times, ch2, sc in next dc3tog, ch2, sl st in 1st dc2tog. (28 dc3tog's +28sc + 56 ch2-sps)

Rnd 4. ch2 (= 1st sc + ch1), *hdc in next sc, ch1, sc in next dc3tog, ch1* 27 times, hdc in next sc, ch1, sl st in 1st ch. (28 hdc + 28 sc + 56 ch1-sps)
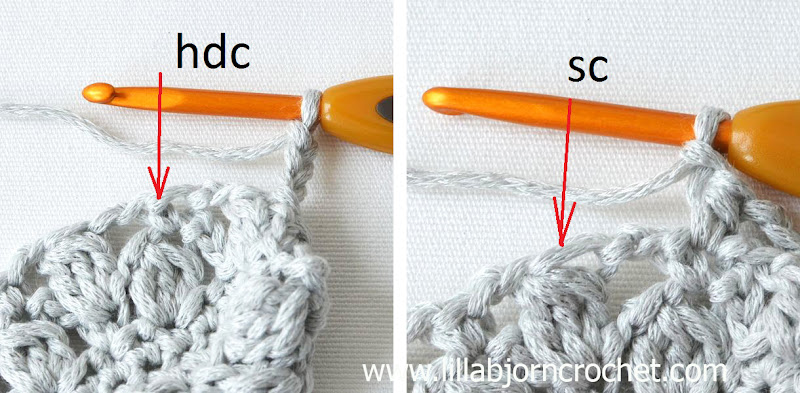
Rnd 5. ch1 (doesn't count as st), sc in base ch, *sc in next ch1-sp, sc in next st* 55 times, sc in next ch1-sp, sl st in 1st sc after ch1 in the beginning of the rnd. (112 sts)
Rnd 6. ch1 (doesn't count as st), sc in base ch, sc in next 111 sts, sl st in 1st sc after ch1. (112 sts)

Repeat rnds 2-6 four more times.
Rnd 27. ch1 (doesn't count as st), sc in base ch, sc in next 4 sts, sc in next 60 sts AND around a needle at the same time, sc in next 47 sts, sl st in 1st sc after ch1. Fasten off, weave yarn tail in. (112 sts)

First pocket for your organizer is finished! Make another one with yarn 422.
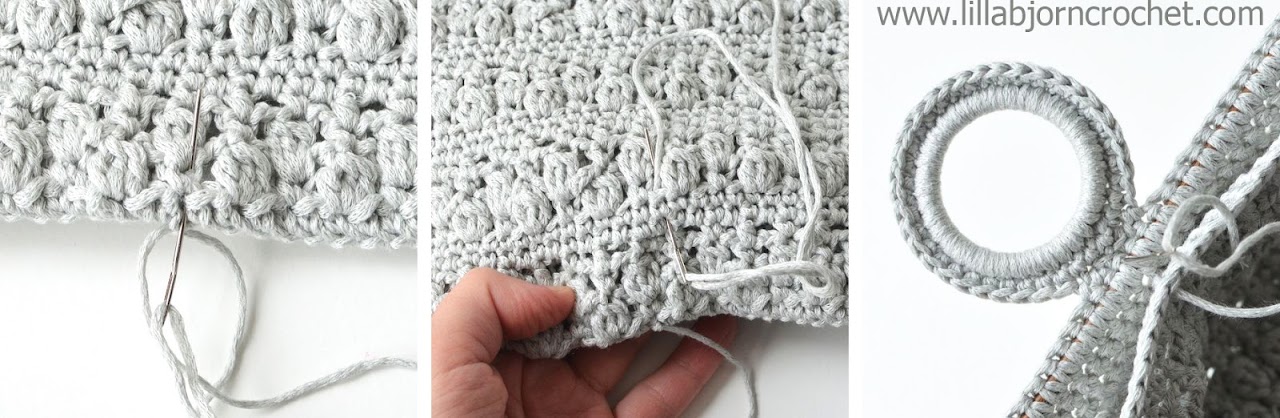
 Using tapestry needle and yarn of matching color, sew 2 rings to the sides of one pocket, and to the bottom corners of another pocket. Find the center of upper pocket and sew 3rd ring to the stitches made around the needle.

If you would like to divide the pocket into two smaller parts, you can sew through it with runnning stitch using tapestry needle and yarn of matching color.
Congratulations!! Your new Bloom Bathroom organizer is now finished!
You can subscribe to weekly newsletter not to miss a single post. You can also follow me on Facebook, Pinterest and Instagram.


Disclosure: this blog post contains affiliate links (marked with *). I may be compensated with a very tiny amount for purchases made via these links – with no extra expenses for you. Thank you for support!
You will need:
- Bloom yarn by Scheepjes in shades 421 (Old Lily) and 422 (Grey Thistle) - 130g (3 skeins) of each.
- Crochet hook Clover Soft Touch 4 mm crochet hook*
- Curtain rings 4-5 cm - three pieces
- A pair of wooden or metal needles 35cm long
- Scissors and tapestry needle to weave yarn tails in.
Level: Beginner
Size. The size of each finished pocket will depend on yarn and hook you choose and also on your personal gauge. My pockets are approx. 30cm (12in) and 18cm (7in) large.
Stitch guide and Abbreviations
US standard abbreviations are used in this pattern. But if you are used to other terms, please check this Crochet Translation Project which might be helpful in translation to your native language.
st(s) - stitch(es)
ch - chain
sp(s) - space(s)
yo - yarn over
sk - skip
*…* *crochet following directions* as many times as indicated
sl st (slip stitch) – insert hook in indicated st, yo, draw yarn up and pull 2nd lp through the 1st lp on hook.
sc (single crochet) – insert hook in indicated stitch, yo, draw up a lp, yo and pull through both lps on hook.
hdc (double crochet) – yo, insert hook in indicated st, yo, draw up a lp, yo, pull through 3 lps.
dc2tog (double crochet 2 together) - *yo, insert hook in indicated st, yo, draw up a lp, yo, pull through 2 lps* twice in same st, yo, pull through all 3 lps on hook.
dc3tog (double crochet 3 together) - *yo, insert hook in indicated st, yo, draw up a lp, yo, pull through 2 lps* 3 times, yo, pull through all 4 lps on hook.
Copyright LillaBjornCrochet 2016. All rights reserved. This pattern is for unlimited personal use only. Do not reproduce or sell the pattern. The pattern may not be copied in any way (print or digitally), in part or in full. Items may be sold that are made from this pattern as long as the designer is credited. Shop owners, if you wish to make a kit with yarn using this pattern, please request permission and copyright details from me before offering any kits for sale. Please, read Copyright page for more information.

Instructions
Add this Pattern to your Ravelry QueueRnd 1. With yarn 421 - ch56, beginning in 2nd ch from hook make sc in 54 next ch, 3sc in last ch, using the other half of chain sc in next 54ch, 2sc in next ch (the same ch where 1st sc of this rnd was made), join with sl st in 1st sc. (113sts)

Rnd 2. *Ch3, sk 1 st, dc3tog in next st, ch3, sk 1 st, sc in next st* 28 times. (28 dc3tog's + 28 sc +56 ch3-sps).

Rnd 3. Ch2 and dc2tog in base ch (= 1st dc3tog), *ch2, sc in next dc3tog, ch2, dc3tog in next sc* 27 times, ch2, sc in next dc3tog, ch2, sl st in 1st dc2tog. (28 dc3tog's +28sc + 56 ch2-sps)

Rnd 4. ch2 (= 1st sc + ch1), *hdc in next sc, ch1, sc in next dc3tog, ch1* 27 times, hdc in next sc, ch1, sl st in 1st ch. (28 hdc + 28 sc + 56 ch1-sps)

Rnd 5. ch1 (doesn't count as st), sc in base ch, *sc in next ch1-sp, sc in next st* 55 times, sc in next ch1-sp, sl st in 1st sc after ch1 in the beginning of the rnd. (112 sts)
Rnd 6. ch1 (doesn't count as st), sc in base ch, sc in next 111 sts, sl st in 1st sc after ch1. (112 sts)

Repeat rnds 2-6 four more times.
Rnd 27. ch1 (doesn't count as st), sc in base ch, sc in next 4 sts, sc in next 60 sts AND around a needle at the same time, sc in next 47 sts, sl st in 1st sc after ch1. Fasten off, weave yarn tail in. (112 sts)

First pocket for your organizer is finished! Make another one with yarn 422.
Putting organizer together
Crochet around curtain rings using THIS tutorial (base round and then one round with sc). Make two with yarn 421 and one with yarn 422.

If you would like to divide the pocket into two smaller parts, you can sew through it with runnning stitch using tapestry needle and yarn of matching color.

Congratulations!! Your new Bloom Bathroom organizer is now finished!
You can subscribe to weekly newsletter not to miss a single post. You can also follow me on Facebook, Pinterest and Instagram.
Ta-dah (…and this is how all my posts with reveals of new finished projects begin)! My Bloom Bathroom Organizer is finally finished. It took a little bit longer to put everything together as I was distracted by other crochet projects going on… And then I suddenly got pain in my hands and wrists and was not able to crochet for 3 (!) days. But as soon as my hands felt better again, I came back to my organizer immediately. And here is what I made.
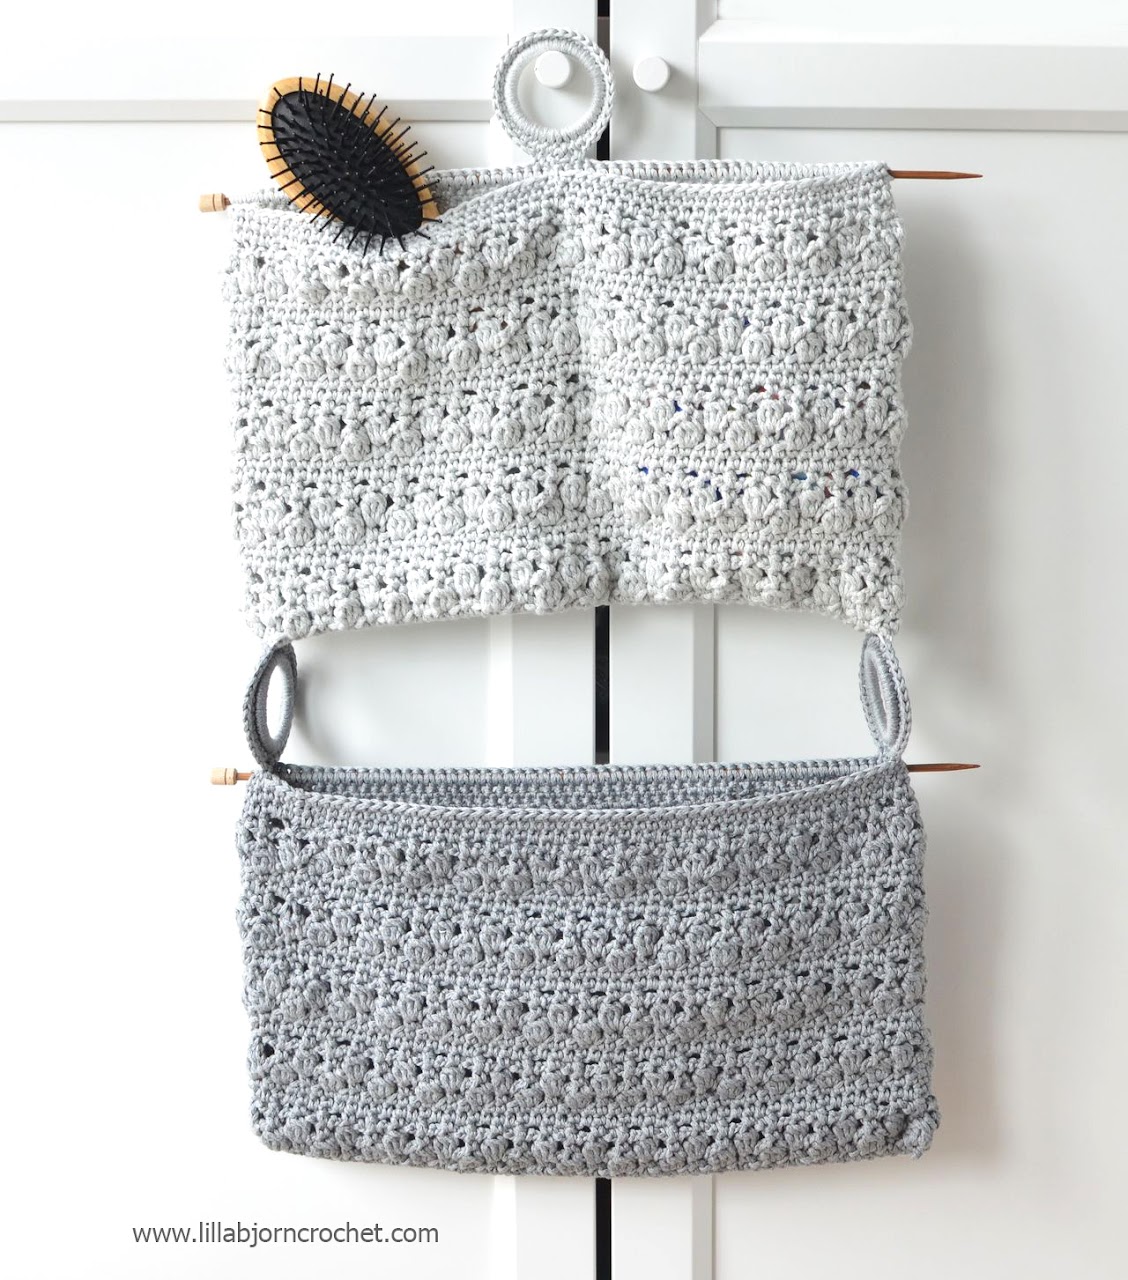
I was hoping that by the day my new organizer is finished, we will finally move to another apartment with a nice bathroom with walls covered by white and grey tiles. But it seems like our move is delayed and my dream to put new organizer onto the wall should wait a bit… But anyway. Here it is. I used 100% cotton Bloom yarn by Scheepjes to make it in two grey shades: 421 (Old Lily) and 422 (Grey Thistle). They were meant to suit the interior of my new bathroom in the best way, and they definitely will!


Disclosure: this blog post contains affiliate links (marked with *). I may be compensated with a very tiny amount for purchases made via these links – with no extra expenses for you. Thank you for support!
I was hoping that by the day my new organizer is finished, we will finally move to another apartment with a nice bathroom with walls covered by white and grey tiles. But it seems like our move is delayed and my dream to put new organizer onto the wall should wait a bit… But anyway. Here it is. I used 100% cotton Bloom yarn by Scheepjes to make it in two grey shades: 421 (Old Lily) and 422 (Grey Thistle). They were meant to suit the interior of my new bathroom in the best way, and they definitely will!

I also used wooden knitting needles for this project. When a sneak peek was posted on my Facebook page a week ago, it was fun to hear your ideas about what exactly needles were used for. I learned a few interesting tips (like, to use needles for keeping stitches “alive” for future joining, or use needles for spacing the stitches, so that they are a bit longer but all of the same length). This is very interesting, and maybe I will use some of your tips for my future projects. But this time the task of knitting needles is very simple: I used them to strengthen one of the long sides of each pocket, so that it keeps its shape well.

Bloom yarn comes in a variety of shades. You can read my review about it HERE. And you can also have a look at color charts on Wool Warehouse* and Deramores* (both retailers ship order internationally), Paradise Fibers* (US) or at Scheepjes website (NL and BE).
I didn’t want my organizer to be very long and large, and I made only two pockets. The upper one is divided into two sections for some smaller bathroom accessories or pieces of make-up. And bottom pocket can be used for larger pieces, and maybe even small extra towels.

But you can of course make your own organizer much longer (free pattern for this project will published next week here on my blog) by adding one or even two pockets. Then you will probably want to use metal needles instead of wooden. As you can see in the picture below, when I put my fen to the bottom pocket, the upper needle started to bend, so I suppose if I fill the pocket with something heavier it can simply break.

I like the look of natural wood in combination with grey yarn, but practical aspects should also be taken into consideration. But I also think that even if my needle is broken, I can easily replace it with a new one. Bloom yarn is very strong, it’s not delicate at all and it allows a variety of manipulations with already finished project.
I used my own crochet stitch for this pattern. I mean I came up with it myself, but who knows – maybe it is an existing stitch, and it’s just me who doesn’t know about it. I also used Clover Soft Touch 4 mm crochet hook
 *, and it’s smaller than recommended for Bloom yarn. But I wanted my crochet fabric to be dense, with no obvious holes in the lace parts. I want to store my make-up in this organizer, and it would be not fun at all if my eye-pencils would slide through the holes…
So this is my Bloom Bathroom Organizer. What do you think? :)
UPDATE: the pattern is available HERE.
You can subscribe to weekly newsletter not to miss a single post. You can also follow me on Facebook, Pinterest and Instagram.
My new project with Bloom yarn by Scheepjes is growing every day. I am still not disappointed with colors, and still think that grey was a great choice. I’ve changed my mind about the crochet stitch a few times, and finally decided to stick with this version. I made up this crochet stitch myself, but if it exists already (because you never know…) and you know its name – I will be happy to hear that. Please, comment on this post below.

Last week I published a review about Bloom yarn by Scheepjes (read it HERE), which is 100% cotton and has a very interesting structure. I still like working with it and in my opinion the definition of the stitches is very good. I am using 4mm hook for my new design, which is too small for this exact yarn. But from the very beginning I wanted to get very dense fabric. So for me this size of the hook works just perfect.

Bloom is available for purchase via Wool Warehouse* and Deramores* (both with international shipping), via Paradise Fibers* (US) and local Scheepjes shops.

As you can see in the pictures, I am also using needles for this project. For what reason? I will not tell you yet. I am so bad at keeping secrets, but I need to practice. But you probably can guess from the pictures. And I can only tell you it will be a bathroom organizer. :) And that it will be a FREE pattern very soon published here, on my blog.

This post is a little bit short, as crochet is keeping all my attention. I need to finish a few designs, and write the patterns down… So, I am off to my crochet again.
See you next week!!!
UPDATE: the pattern is available HERE.
Don't forget to subscribe to my Newsletter not to miss a single post. And you can also follow me on Facebook, Pinterest and Instagram.
*This blog post contains affiliate links. Thanks for your support!
Subscribe to:
Posts (Atom)


