Showing posts with label Bloom. Show all posts
Showing posts with label Bloom. Show all posts
Indian Star Basket design was inspired by Native American textile and fiber art. I don’t really know if it’s a global trend at the moment, but I have noticed that today more and more designing companies (making clothes and interior accessories) look into the “tribal” theme. I can see lots of geometry in today’s design. I browsed images on Pinterest and fell in love with these geometrical ornaments. And decided to create something myself.
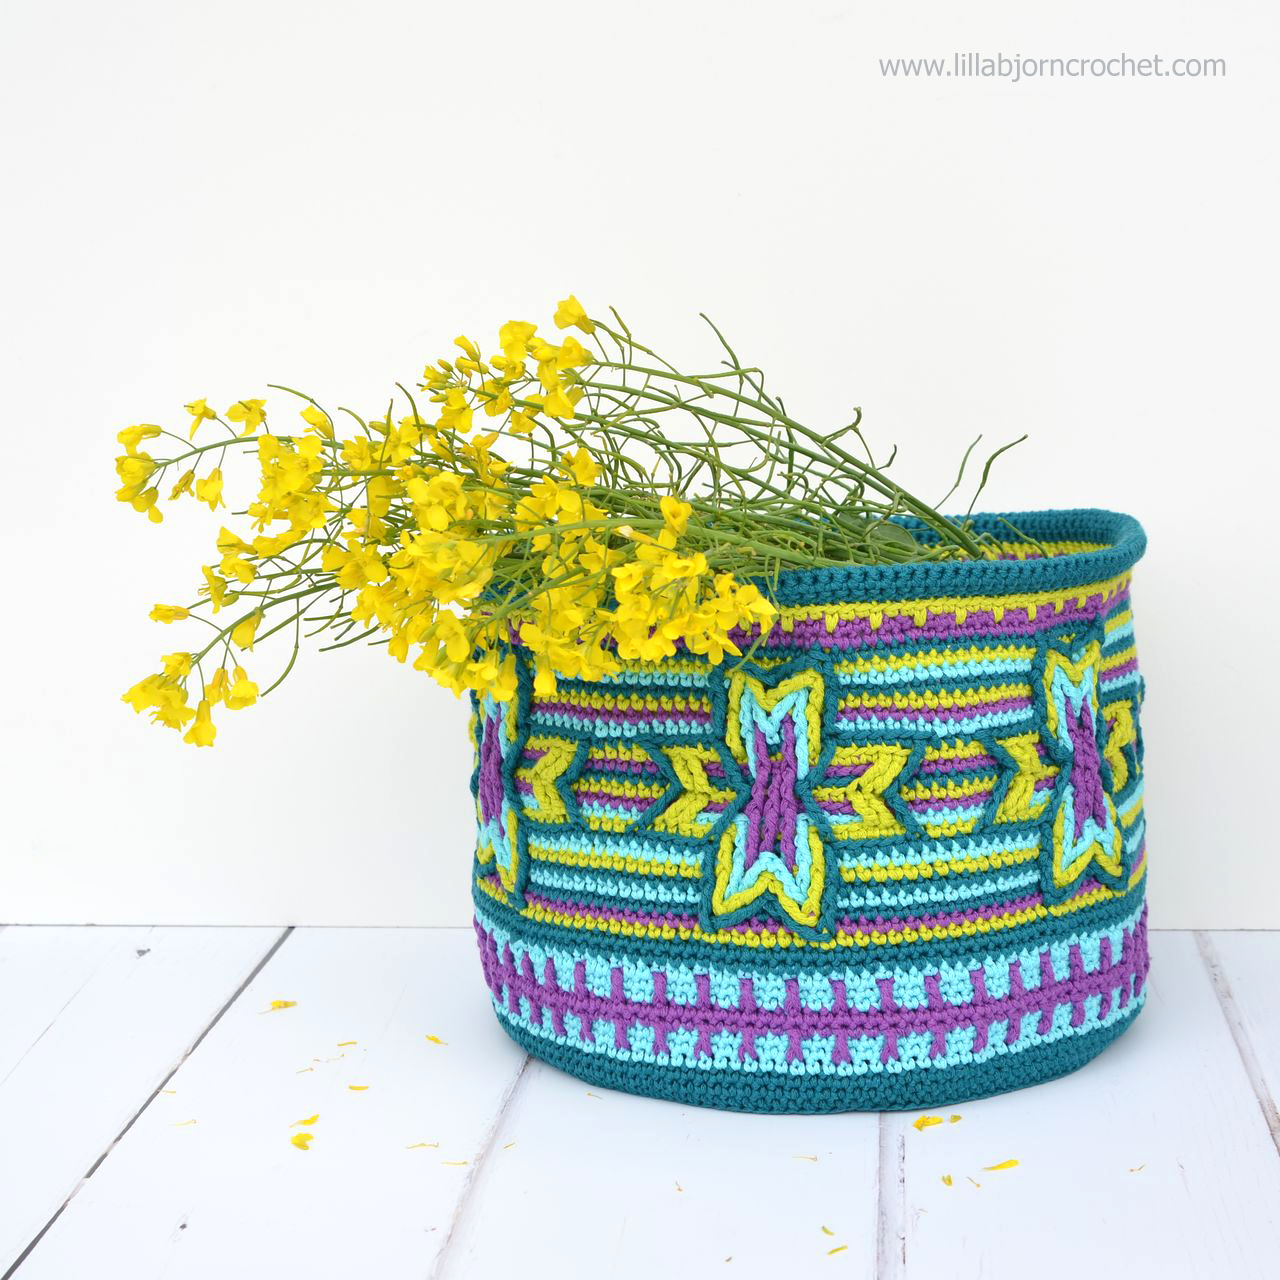
Just to make it clear, I didn’t intend to recreate real Native American patterns or symbols. And my own design doesn’t have any deep meaning. It’s just a colorful ornament I had fun with.
My first idea was to create a basket. Baskets and other containers, boxes are always good. They help to keep yarn and wips in order, they can be used in the kitchens, bathrooms, bedrooms in the kids rooms. They help to organize everyday’s chaos and at the same time add beautiful colorful accents to our interiors.

Add this pattern to your Ravelry Queue
Indian Star Basket is made in overlay crochet technique with lots of front post stitches which give it a nice structure and create ornamental pattern on the plain background. The basket’s size can be easily adjusted, and you can make a smaller/taller one (which can also serve as a crochet vase), or wider and bigger.
Indian Star Basket pattern is available in my Ravelry store HERE on Etsy HERE with 30% discount through Monday, May 29 (no coupon code needed).
So that basket keeps its shape well and its sides don’t collapse (it’s important especially for large pieces) it is recommended to line it with a sturdy fabric. One the testers, Lori Baran, who helped me to polish the pattern, used old jeans fabric to line her basket. And it worked out just great!

Stiff and sturdy yarns are recommended since it’s a basket and it should be sturdy. I used Bloom (worsted yarn) by Scheepjes, which is 100% cotton and comes in a range of bright and happy colors. You can check this yarn in local Scheepjes shops, at Wool Warehouse* and Deramores*. 4.5mm Amour Clover hook* worked best for me but you can of course choose any other size which will give you acceptable gauge.
As I mentioned, Indian Star overlay crochet pattern can be used not only for baskets. When my own basket was finished I thought it might be nice to try the same pattern for a pillow. It is worked in the same way as the basket (in rounds) but the bottom part is skipped. To save yarn I only made star ornaments on the front of my new pillow throw. And the rest was crocheted with just single crochet stitches (US term) and ribbed stripes.

A complete tutorial about how to make a pillow is also included to the pattern. I used Soft Fun* (DK) yarn by Scheepjes and 4mm (G) crochet hook, and the pillow turned to be approx. 40cm/16” large.

After pillow throw was ready I thought why not to try something with just ribbed stripes. And this is how my make-up pouch was created. I just followed instructions for ribbed stripe and crocheted in round. When the desired height was reached, I sew the bottom with tapestry needle and yarn in same color as first rounds and inserted a zip into the upped edge (same as for pillow). Ta-daaah! Here it is!

I just love when crochet patterns can be used in many ways and I always try to adjust my own patterns. And I think Indian Star Basket is a very nice example.
*************************************
About Indian Star Basket pattern in brief:
Subscribe to a newsletter not to miss a single post. You can also follow me on Facebook, Pinterest and Instagram.

* DISCLOSURE: This blog contains affiliate links (marked with *). I may be compensated with a tiny amount from each purchase made via these links, and it will not cost you a penny. By using affiliate links you support my blog. Thank you!

Just to make it clear, I didn’t intend to recreate real Native American patterns or symbols. And my own design doesn’t have any deep meaning. It’s just a colorful ornament I had fun with.
My first idea was to create a basket. Baskets and other containers, boxes are always good. They help to keep yarn and wips in order, they can be used in the kitchens, bathrooms, bedrooms in the kids rooms. They help to organize everyday’s chaos and at the same time add beautiful colorful accents to our interiors.

Add this pattern to your Ravelry Queue
Indian Star Basket is made in overlay crochet technique with lots of front post stitches which give it a nice structure and create ornamental pattern on the plain background. The basket’s size can be easily adjusted, and you can make a smaller/taller one (which can also serve as a crochet vase), or wider and bigger.
Indian Star Basket pattern is available in my Ravelry store HERE on Etsy HERE with 30% discount through Monday, May 29 (no coupon code needed).
So that basket keeps its shape well and its sides don’t collapse (it’s important especially for large pieces) it is recommended to line it with a sturdy fabric. One the testers, Lori Baran, who helped me to polish the pattern, used old jeans fabric to line her basket. And it worked out just great!

Stiff and sturdy yarns are recommended since it’s a basket and it should be sturdy. I used Bloom (worsted yarn) by Scheepjes, which is 100% cotton and comes in a range of bright and happy colors. You can check this yarn in local Scheepjes shops, at Wool Warehouse* and Deramores*. 4.5mm Amour Clover hook* worked best for me but you can of course choose any other size which will give you acceptable gauge.
As I mentioned, Indian Star overlay crochet pattern can be used not only for baskets. When my own basket was finished I thought it might be nice to try the same pattern for a pillow. It is worked in the same way as the basket (in rounds) but the bottom part is skipped. To save yarn I only made star ornaments on the front of my new pillow throw. And the rest was crocheted with just single crochet stitches (US term) and ribbed stripes.

A complete tutorial about how to make a pillow is also included to the pattern. I used Soft Fun* (DK) yarn by Scheepjes and 4mm (G) crochet hook, and the pillow turned to be approx. 40cm/16” large.

After pillow throw was ready I thought why not to try something with just ribbed stripes. And this is how my make-up pouch was created. I just followed instructions for ribbed stripe and crocheted in round. When the desired height was reached, I sew the bottom with tapestry needle and yarn in same color as first rounds and inserted a zip into the upped edge (same as for pillow). Ta-daaah! Here it is!

I just love when crochet patterns can be used in many ways and I always try to adjust my own patterns. And I think Indian Star Basket is a very nice example.
*************************************
About Indian Star Basket pattern in brief:
- Level: Intermediate (front post stitches)
- Materials: Worsted yarn in 4 colours (Bloom by Scheepjes), 4.5mm Amour Clover crochet hook*, stitch markers, scissors, tapestry needle to weave in ends and assemble toy.
- Size: The size of the finished basket/pillow depends on the yarn and hook you use. My basket is approx. 82cm/32in in circumference - 25cm/10in wide across the bottom, and 21cm/8 ½ in high. The pilllow is approx. 40cm/16” large.
- Language: English
- Instructions: US crochet terms and abbreviations (including complete stitch guide), written instructions, step-by-step pictures showing how to make each detail and put the toy together.
- Indian Star Basket pattern is available in my Ravelry store HERE and on Etsy HERE.
- Add this pattern to your Ravelry Queue
Subscribe to a newsletter not to miss a single post. You can also follow me on Facebook, Pinterest and Instagram.
* DISCLOSURE: This blog contains affiliate links (marked with *). I may be compensated with a tiny amount from each purchase made via these links, and it will not cost you a penny. By using affiliate links you support my blog. Thank you!
Last month Labyrinth Mandala pillow pattern was released (you can read about it HERE). It was inspired by monochromic vector illustrations. This design became a big success, I got lots of lovely messages and comments, and recently quite a few projects have been finished (yay!). For some this pattern looks like Aztec, others see Greek motifs… When I finished several pillows, I thought it would be nice to grow Labyrinth Mandala in something bigger. Into a rug maybe. And today I am happy to introduce Labyrinth Border to you.

Add this pattern to your Ravelry Queue
Labyrinth Border was designed especially for Labyrinth Mandala, but it can be used for any mandala (or any crocheted circle) with 208 stitches on the last round. It’s the same in style and in stitch pattern, and it also imitates Brioche knitting stitch.
Border is available for purchase as a separate pattern HERE on Ravelry. If you would like to purchase Border together with Labyrinth Mandala, please put them TOGETHER in cart and 2$ discount will be automatically offered at the check-out. Previous purchases will also count. Even if you bought Mandala pattern before - please, put it to cart together with the Border. Ravelry system will see it as already purchased and you will not pay twice.

The border consists of two parts: wide part with graphical petals and narrow geometrical edge. I recommend to use only 2 colors for each section as it helps the pattern to pop up well. But you can also go creative and mix ombre shades together. I bet it will look very pretty, too!

As Labyrinth Mandala, the border is also made in overlay crochet technique with lots of front post stitches. The pattern is not very tricky (though you may say the opposite looking at the pictures), and lots of progress pictures are included to help you with every round.
It’s true that this pattern requires lots of attention and concentration. If you are fond of counting – then it is right for you. And if you are not fond of counting – both Labyrinth patterns will teach you to be patient. And it’s just always nice to try and learn something new.

I have created two Labyrinth rugs – both using Bloom yarn by Scheepjes* (16 skeins in total for both Mandala and Border). One of them is with 2 shades only (804 and 813). And while making another one I wanted to experiment with colors a little bit. My idea was to start with dark green and to gradient change to light green-yellow-white by the edge. Well, to be honest, I didn’t like how it was turning out. So several sections were frogged and I continued to work with only 3 colors. I believe it looks nice, what do you think? And did you know that green is a new color for year 2017? Great! My rug is in trend!
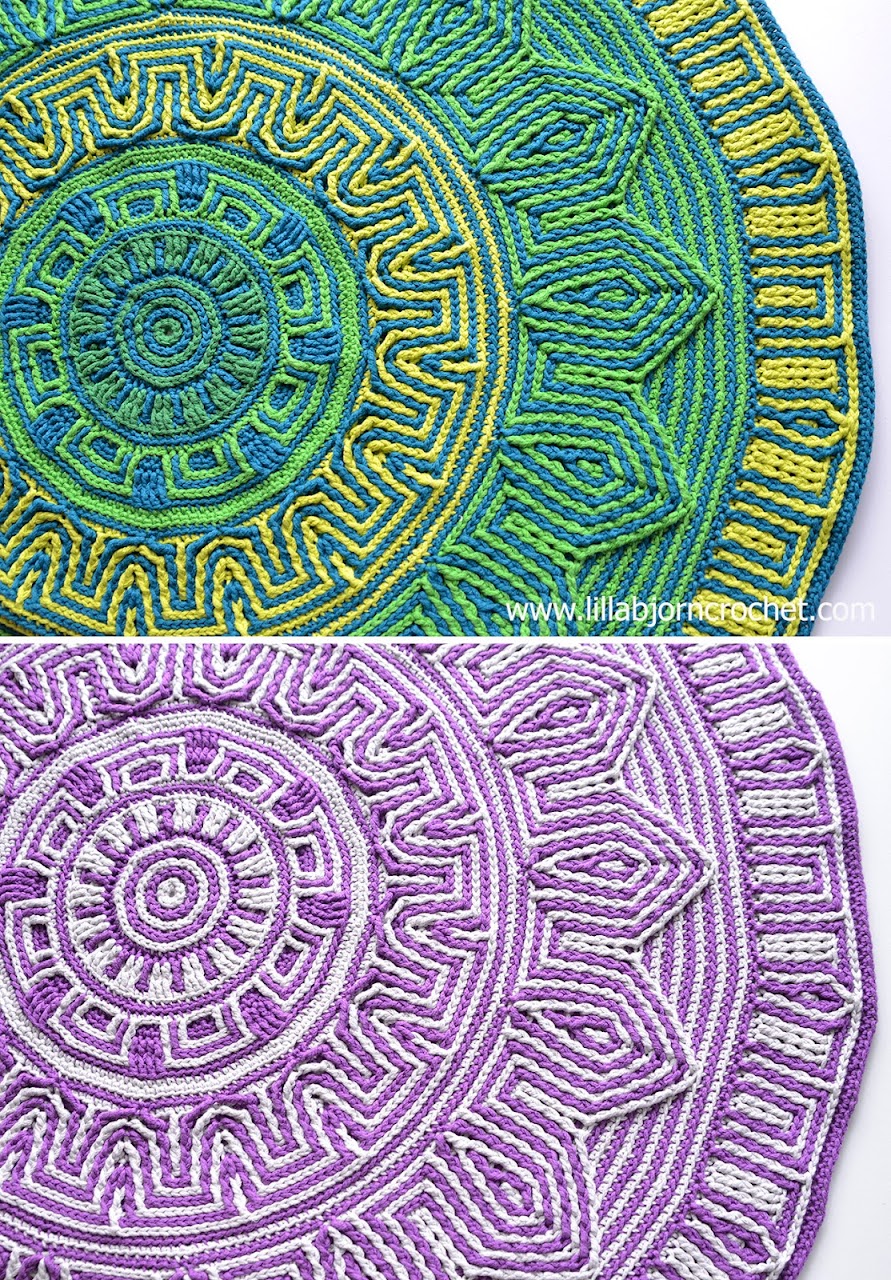
Bloom is Worsted yarn, and both rugs are approx. 82cm (32in) large across. I used 4.5mm (US7) Clover Amour crochet hook* and it gave me just the right tension. The fabric is sturdy and keeping its shape very well. Of course, if you use yarn in another weight, your rug will become either bigger or smaller.

If you intend to use this design as a rug, please, make sure you add anti-slip protection. Because this is not a lace design the anti-slip carpet pads can be a very good solution. Please, read HERE more about how to make your crocheted rugs non-slip.

About Labyrinth Border pattern in brief:
• Level: Intermediate (front post stitches, working in 3rd loop)
• Materials: Worsted yarn in 2 colours (Bloom by Scheepjes - available via Wool Warehouse HERE*, Deramores HERE*, Paradise Fibers (US)* and in your local Scheepjes shops), 4.5mm (US7) crochet hook*, stitch markers, scissors, tapestry needle to weave in ends.
• Size: The size of the finished border depends on the yarn and hook you use. My rug is approx. 82 cm (32 inches) in diameter (including central mandala).
• Language: English
• Instructions: US crochet terms and abbreviations (including complete stitch guide), written instructions, step-by-step pictures. Print friendly copy of the pattern is available (with no pictures)
Subscribe to a newsletter not to miss a single post. You can also follow me on Facebook, Pinterest and Instagram.
* thank you for using my affiliate links. It costs you nothing and helps to support my blog.

Add this pattern to your Ravelry Queue
Labyrinth Border was designed especially for Labyrinth Mandala, but it can be used for any mandala (or any crocheted circle) with 208 stitches on the last round. It’s the same in style and in stitch pattern, and it also imitates Brioche knitting stitch.
Border is available for purchase as a separate pattern HERE on Ravelry. If you would like to purchase Border together with Labyrinth Mandala, please put them TOGETHER in cart and 2$ discount will be automatically offered at the check-out. Previous purchases will also count. Even if you bought Mandala pattern before - please, put it to cart together with the Border. Ravelry system will see it as already purchased and you will not pay twice.

The border consists of two parts: wide part with graphical petals and narrow geometrical edge. I recommend to use only 2 colors for each section as it helps the pattern to pop up well. But you can also go creative and mix ombre shades together. I bet it will look very pretty, too!

As Labyrinth Mandala, the border is also made in overlay crochet technique with lots of front post stitches. The pattern is not very tricky (though you may say the opposite looking at the pictures), and lots of progress pictures are included to help you with every round.
It’s true that this pattern requires lots of attention and concentration. If you are fond of counting – then it is right for you. And if you are not fond of counting – both Labyrinth patterns will teach you to be patient. And it’s just always nice to try and learn something new.

I have created two Labyrinth rugs – both using Bloom yarn by Scheepjes* (16 skeins in total for both Mandala and Border). One of them is with 2 shades only (804 and 813). And while making another one I wanted to experiment with colors a little bit. My idea was to start with dark green and to gradient change to light green-yellow-white by the edge. Well, to be honest, I didn’t like how it was turning out. So several sections were frogged and I continued to work with only 3 colors. I believe it looks nice, what do you think? And did you know that green is a new color for year 2017? Great! My rug is in trend!

Bloom is Worsted yarn, and both rugs are approx. 82cm (32in) large across. I used 4.5mm (US7) Clover Amour crochet hook* and it gave me just the right tension. The fabric is sturdy and keeping its shape very well. Of course, if you use yarn in another weight, your rug will become either bigger or smaller.

If you intend to use this design as a rug, please, make sure you add anti-slip protection. Because this is not a lace design the anti-slip carpet pads can be a very good solution. Please, read HERE more about how to make your crocheted rugs non-slip.

About Labyrinth Border pattern in brief:
• Level: Intermediate (front post stitches, working in 3rd loop)
• Materials: Worsted yarn in 2 colours (Bloom by Scheepjes - available via Wool Warehouse HERE*, Deramores HERE*, Paradise Fibers (US)* and in your local Scheepjes shops), 4.5mm (US7) crochet hook*, stitch markers, scissors, tapestry needle to weave in ends.
• Size: The size of the finished border depends on the yarn and hook you use. My rug is approx. 82 cm (32 inches) in diameter (including central mandala).
• Language: English
• Instructions: US crochet terms and abbreviations (including complete stitch guide), written instructions, step-by-step pictures. Print friendly copy of the pattern is available (with no pictures)
Subscribe to a newsletter not to miss a single post. You can also follow me on Facebook, Pinterest and Instagram.
* thank you for using my affiliate links. It costs you nothing and helps to support my blog.
First mandala design of the year 2017 is here! Or technically it is second design as last week my UFO pillow was published… But that was just an experiment with Camel crochet stitch and through it’s round and reminds of a mandala a bit, I would say that my true mandala was born today. Let me introduce: Labyrinth Mandala pillow.
 Add this pattern to your Ravelry Queue
I feel magic when designs are being born fast. When true inspiration comes and you just need to grab yarns and hook at once and start crocheting immediately. I felt something similar when Spanish mandala was created. The same strong stream of creative energy and a few sleepless nights.
The story behind Labyrinth mandala is very simple. I was browsing black and white vector graphics on Pinterest the other day. Late at night of course. And I was amazed by how many graphical mandalas are out there. Suddenly those illustrations reminded me of a knitting brioche stitch. And ta-dah! Idea was already standing behind me. It was probably a very powerful idea because instead of going to bed, I went to bedroom to pick yarns. Not that I chose the yarns. I just grabbed first two skeins that came to my hands in the darkness (everyone in the house was sleeping already…). And started to crochet. After 2 hours it was clear my idea can work (and I could finally fall asleep, haha).
When next day my husband saw the wip he said: Labyrinth.

So here is my Labyrinth Mandala. I’ve made quite a few already trying different color combinations. And the possibilities of this design are really huge. You can make it with many shades, or only 2 shades. My dream is to try crocheting it once again with just black and white. As I take lots of progress pictures for all my patterns, black yarn would not work well as the stitches would not be seen. But one day when I have more time I will definitely recreate Labyrinth Mandala to make it look exactly like a black and white vector illustration.

I really-really wanted to imitate brioche knitting stitch, and to obtain a knit-look effect. And I think it worked well thanks to front post stitches and working in 3rd loops on some rounds. I used the same technique for UFO pillow, you can check a detailed tutorial HERE.

I made 2 pillow covers using Labyrinth Mandala. Both are reversible, with different color combination (or colourway) on each side. So that it’s easy to wash my pillowcases I inserted a zip closure. But if you don’t feel like sewing you can just join two mandalas by crocheting around, with single crochet stitches, for example.

For my pillow I used Soft Touch Clover hook (4mm/G)* and Soft Fun cotton yarn by Scheepjes. This yarn is available in a wide range of shades, so you can create bright or pastel versions. Or you can even mix unexpected colors together. Whatever palette you choose, it’s better to use only two shades for each of three sections. Exact yardages for each section are given in the pattern. You can find Soft Fun at Wool Warehouse (HERE*), Deramores (HERE*) and your local Scheepjes shops.

And here is another version with Bloom yarn* by Scheepjes:
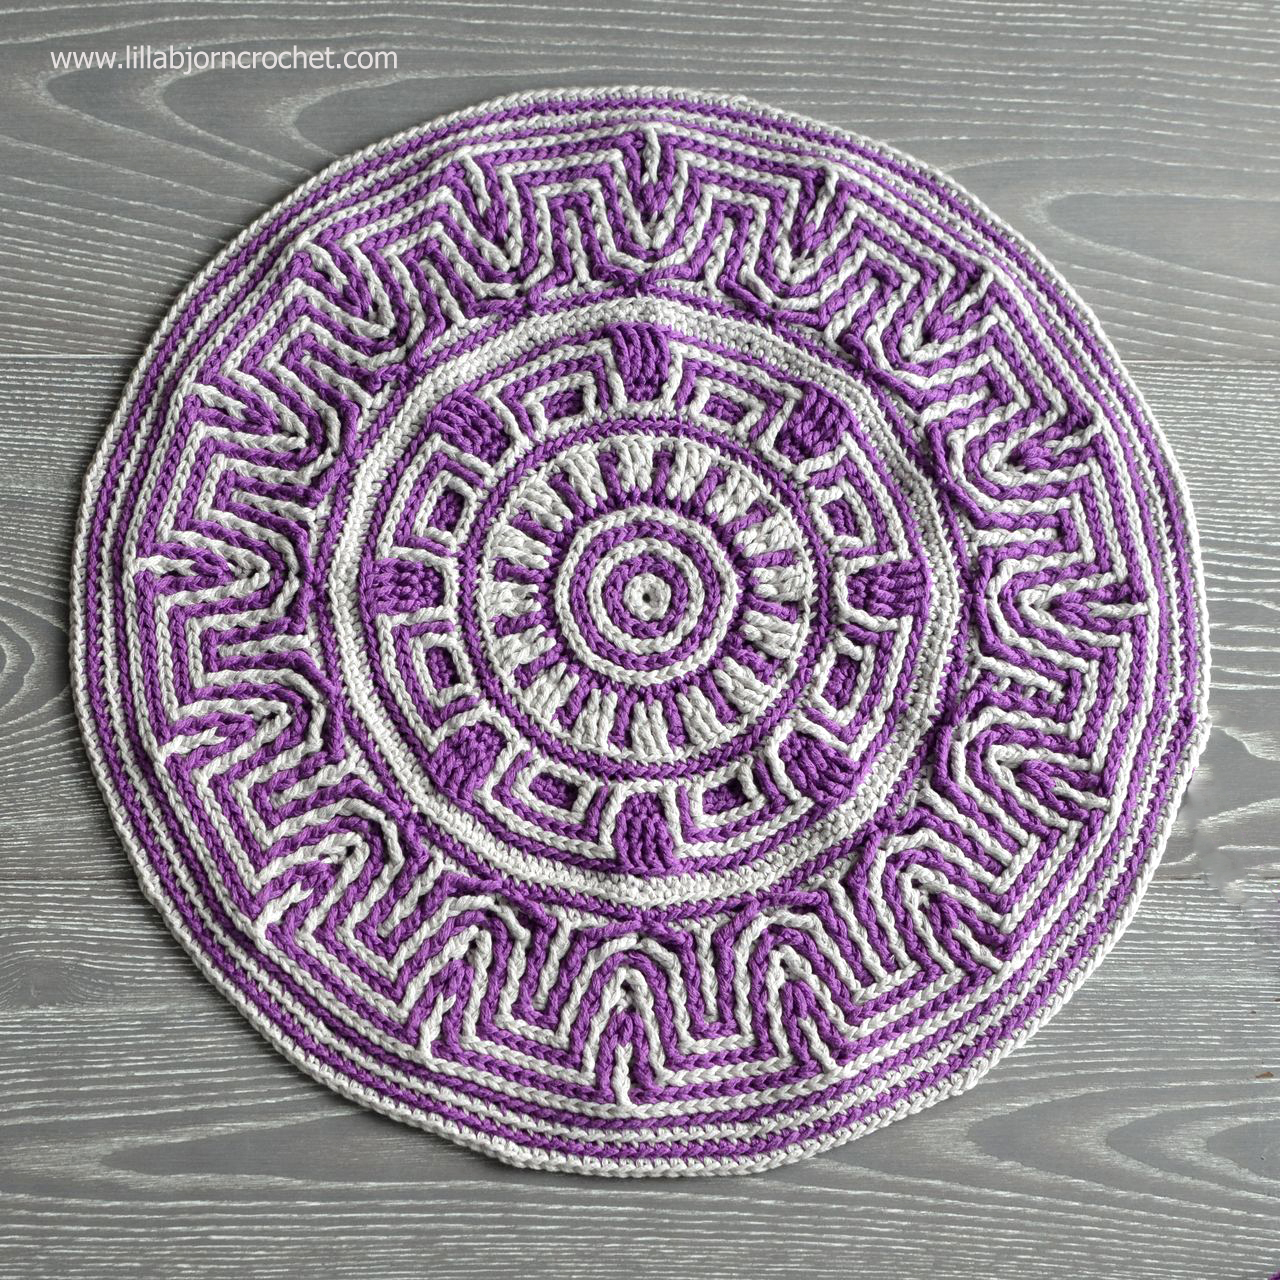
If you don’t need another pillow, there are many more ways to use Labyrinth Mandala pattern. You can make stool covers, trivets, wall hanging… and even a purse maybe? I am actually thinking about attaching two handles and adding fabric lining to one of my mandala’s. If you do so, please don’t forget to share pictures with me. I LOVE to see finished projects (please, use #labyrinthcrochetmandala to share them on social media).
The pattern is available for purchase in my Ravelry store HERE.

Here is brief information about the pattern:
* thank you for using my affiliate links. It costs you nothing and helps to support my blog.

I feel magic when designs are being born fast. When true inspiration comes and you just need to grab yarns and hook at once and start crocheting immediately. I felt something similar when Spanish mandala was created. The same strong stream of creative energy and a few sleepless nights.
The story behind Labyrinth mandala is very simple. I was browsing black and white vector graphics on Pinterest the other day. Late at night of course. And I was amazed by how many graphical mandalas are out there. Suddenly those illustrations reminded me of a knitting brioche stitch. And ta-dah! Idea was already standing behind me. It was probably a very powerful idea because instead of going to bed, I went to bedroom to pick yarns. Not that I chose the yarns. I just grabbed first two skeins that came to my hands in the darkness (everyone in the house was sleeping already…). And started to crochet. After 2 hours it was clear my idea can work (and I could finally fall asleep, haha).
When next day my husband saw the wip he said: Labyrinth.

So here is my Labyrinth Mandala. I’ve made quite a few already trying different color combinations. And the possibilities of this design are really huge. You can make it with many shades, or only 2 shades. My dream is to try crocheting it once again with just black and white. As I take lots of progress pictures for all my patterns, black yarn would not work well as the stitches would not be seen. But one day when I have more time I will definitely recreate Labyrinth Mandala to make it look exactly like a black and white vector illustration.

I really-really wanted to imitate brioche knitting stitch, and to obtain a knit-look effect. And I think it worked well thanks to front post stitches and working in 3rd loops on some rounds. I used the same technique for UFO pillow, you can check a detailed tutorial HERE.

I made 2 pillow covers using Labyrinth Mandala. Both are reversible, with different color combination (or colourway) on each side. So that it’s easy to wash my pillowcases I inserted a zip closure. But if you don’t feel like sewing you can just join two mandalas by crocheting around, with single crochet stitches, for example.

For my pillow I used Soft Touch Clover hook (4mm/G)* and Soft Fun cotton yarn by Scheepjes. This yarn is available in a wide range of shades, so you can create bright or pastel versions. Or you can even mix unexpected colors together. Whatever palette you choose, it’s better to use only two shades for each of three sections. Exact yardages for each section are given in the pattern. You can find Soft Fun at Wool Warehouse (HERE*), Deramores (HERE*) and your local Scheepjes shops.

And here is another version with Bloom yarn* by Scheepjes:

If you don’t need another pillow, there are many more ways to use Labyrinth Mandala pattern. You can make stool covers, trivets, wall hanging… and even a purse maybe? I am actually thinking about attaching two handles and adding fabric lining to one of my mandala’s. If you do so, please don’t forget to share pictures with me. I LOVE to see finished projects (please, use #labyrinthcrochetmandala to share them on social media).
The pattern is available for purchase in my Ravelry store HERE.

Here is brief information about the pattern:
- Level: Intermediate (front post stitches, working in 3rd loop)
- Materials: DK yarn in 2-6 colours (Soft Fun by Scheepjes*), 4mm (G) crochet hook, stitch markers, scissors, tapestry needle to weave in ends, zip (optional), ready pillow form. You can make one yourself using THIS tutorial.
- Size: The size of the finished mandala depends on the yarn and hook you use. My mandala is approx. 39 cm (15 ½ inches) in diameter.
- Language: English
- Instructions: US crochet terms and abbreviations (including complete stitch guide), written instructions, step-by-step pictures. Print friendly copy of the pattern is available (with no pictures)
* thank you for using my affiliate links. It costs you nothing and helps to support my blog.
I find something magic and mystery about Celtic knots. They have been attracting me for a long time, and I have always wanted to crochet something with them. If you search with key words “celtic crochet knots” or “celtic crochet” you will most likely see lots of crocheted cowls, and scarves, and mittens, and maybe cardigans. But there are not so many Celtic Mandala’s. I thought it’s unfair and decided to think of one myself. And this is how my new Celtic Cabled Mandala was created.

Add this pattern to your Ravelry Queue
Celtic Cabled Mandala pattern is available in my Ravelry shop HERE.
To be honest I made first attempts in Celtic designing a year ago when I was working on my Joana’s Mandala and Border patterns. But unfortunately that time my inspiration took me into absolutely different direction and finished design didn’t look Celtic at all. But still I loved it a lot. So I named this mandala after my friend and let idea of designing something truly Celtic go. For a while.
I believe that ideas live their own lives, and sometimes they are very stubborn. They are knocking the door to your creative world again and again. And they just don’t want to leave you alone. This was the case of my Celtic idea. And also my husband insisted I should come back to this and finally create something with Celtic knots.

I started to browse lots and lots of images and illustrations to see which knots can suit my idea the best. I was amazed how widely Celtic elements and signs are being used in contemporary art and design: in painting, jewelry, leather art. Everywhere. And there are lots and lots of Celtic tattoos out there.
During my visit to Sweden I saw a man on the beach. And he had a Celtic mandala tattoo on his leg. Such an absolutely ideal, wonderful tattoo with 4 Celtic knots framed inside the circle. After I came home I started to search for similar knots, and found one which seemed not very difficult to be translated into crochet. I couldn’t find its meaning. But as far as I understood it’s a variation of Triquetra (Trinity) Celtic knot which symbolizes eternal life or the never ending circle of life. If you have a deep knowledge about Celtic culture I will be very grateful if you could help me to find the meaning of this knot.

And I started to crochet… Well… It was not easy. Not easy at all. After probably 5 attempts I could come up with a simplified version of this pattern which was the most elegant in my opinion. Because of working in rounds, I had also to struggle with “turning effect”, and had to apply some tricks to keep the pattern symmetrical. And I am so happy it worked out!! After main part was finished I also came up with a small border, which helped to enlarge this mandala a bit.

This pattern was tested and approved by 14 experienced testers. The difficulty level is Advanced (or Advanced Intermediate). This pattern uses lots of front post stitches, and although they are not difficult themselves, their placement can be tricky. But there are tons of pictures in the pattern to walk you through every single round and stitch. This is the most detailed pattern I have ever created. So if you are familiar and comfortable with cabling (front and back posts stitches), you will handle it. But, please, be aware that it needs lots of attention, concentration and counting!!

This pattern contains complete instructions to make a round Mandala purse. Its size will depend on yarn, hook and your personal gauge. Mine is approx. 26cm (10 1/2 in) large across and 2.5cm (1in) deep. In the picture below you can see what the back of my bag looks like.

But this pattern can be used in many more ways. As a chair pad (with extended version), table decoration, potholder, wall hanging and even a pillow throw. You name it! By the way if you decide to make a pillow cover, you can later make a pillow form yourself just in exact size needed. Please, check THIS tutorial.
I used yarn in one solid color to make purse and chair pad. I chose Bloom by Scheepjes for the bag (you can purchase it at Wool Warehouse*, Deramores*, Paradise Fibers (US)* and in your local Scheepjes shops) and Soft Fun yarn by Scheepjes for chair pads (available at Wool Warehouse*, Deramores* and local Scheepjes shops).
You will obviously need a crochet hook (I used Clover Soft Touch 4mm hook*) and zipper, 2 metal rings and strap for the bag. Here is the detail of bag’s closure. To make it look more professional you can line it with fabric using THIS sewing tutorial.

After 5 solid mandalas were finished, I decided to try something else. To make Celtic Cabled Mandala in tapestry crochet with two colours at once: one for overlay image, and another one for background (with Stone Washed* yarn by Scheepjes). It was tricky, but possible! And I decided to create another tutorial about how to use tapestry crochet for this pattern. It is offered as a bonus to the main “solid” version.

What else to add? I am VERY happy with my new purse. And I think I will make another one. Or maybe two? And what about you? :)
You can subscribe to monthly newsletter not to miss a single post. You can also follow me on Facebook, Pinterest and Instagram.

Add this pattern to your Ravelry Queue
Celtic Cabled Mandala pattern is available in my Ravelry shop HERE.
A Story Behind the Design…
To be honest I made first attempts in Celtic designing a year ago when I was working on my Joana’s Mandala and Border patterns. But unfortunately that time my inspiration took me into absolutely different direction and finished design didn’t look Celtic at all. But still I loved it a lot. So I named this mandala after my friend and let idea of designing something truly Celtic go. For a while.
I believe that ideas live their own lives, and sometimes they are very stubborn. They are knocking the door to your creative world again and again. And they just don’t want to leave you alone. This was the case of my Celtic idea. And also my husband insisted I should come back to this and finally create something with Celtic knots.

I started to browse lots and lots of images and illustrations to see which knots can suit my idea the best. I was amazed how widely Celtic elements and signs are being used in contemporary art and design: in painting, jewelry, leather art. Everywhere. And there are lots and lots of Celtic tattoos out there.
During my visit to Sweden I saw a man on the beach. And he had a Celtic mandala tattoo on his leg. Such an absolutely ideal, wonderful tattoo with 4 Celtic knots framed inside the circle. After I came home I started to search for similar knots, and found one which seemed not very difficult to be translated into crochet. I couldn’t find its meaning. But as far as I understood it’s a variation of Triquetra (Trinity) Celtic knot which symbolizes eternal life or the never ending circle of life. If you have a deep knowledge about Celtic culture I will be very grateful if you could help me to find the meaning of this knot.

And I started to crochet… Well… It was not easy. Not easy at all. After probably 5 attempts I could come up with a simplified version of this pattern which was the most elegant in my opinion. Because of working in rounds, I had also to struggle with “turning effect”, and had to apply some tricks to keep the pattern symmetrical. And I am so happy it worked out!! After main part was finished I also came up with a small border, which helped to enlarge this mandala a bit.

About the Pattern and Different Ways to Use
This pattern was tested and approved by 14 experienced testers. The difficulty level is Advanced (or Advanced Intermediate). This pattern uses lots of front post stitches, and although they are not difficult themselves, their placement can be tricky. But there are tons of pictures in the pattern to walk you through every single round and stitch. This is the most detailed pattern I have ever created. So if you are familiar and comfortable with cabling (front and back posts stitches), you will handle it. But, please, be aware that it needs lots of attention, concentration and counting!!

This pattern contains complete instructions to make a round Mandala purse. Its size will depend on yarn, hook and your personal gauge. Mine is approx. 26cm (10 1/2 in) large across and 2.5cm (1in) deep. In the picture below you can see what the back of my bag looks like.

But this pattern can be used in many more ways. As a chair pad (with extended version), table decoration, potholder, wall hanging and even a pillow throw. You name it! By the way if you decide to make a pillow cover, you can later make a pillow form yourself just in exact size needed. Please, check THIS tutorial.
What You Will Need
I used yarn in one solid color to make purse and chair pad. I chose Bloom by Scheepjes for the bag (you can purchase it at Wool Warehouse*, Deramores*, Paradise Fibers (US)* and in your local Scheepjes shops) and Soft Fun yarn by Scheepjes for chair pads (available at Wool Warehouse*, Deramores* and local Scheepjes shops).
You will obviously need a crochet hook (I used Clover Soft Touch 4mm hook*) and zipper, 2 metal rings and strap for the bag. Here is the detail of bag’s closure. To make it look more professional you can line it with fabric using THIS sewing tutorial.

After 5 solid mandalas were finished, I decided to try something else. To make Celtic Cabled Mandala in tapestry crochet with two colours at once: one for overlay image, and another one for background (with Stone Washed* yarn by Scheepjes). It was tricky, but possible! And I decided to create another tutorial about how to use tapestry crochet for this pattern. It is offered as a bonus to the main “solid” version.

What else to add? I am VERY happy with my new purse. And I think I will make another one. Or maybe two? And what about you? :)
You can subscribe to monthly newsletter not to miss a single post. You can also follow me on Facebook, Pinterest and Instagram.
DISCLOSURE: This blog contains affiliate links. If you purchase a (any) product via a link on my blog, I get a small percentage contribution from the store which enables me to keep providing you with free patterns. It costs you nothing extra to visit the store via my link, but ensure I get the credit for the sale. Thank you for your support!
Öresund Sky Bathmat was inspired by my latest trip to Sweden, where I tried to escape from my real life, to switch off, recharge by the sea and to feel happy again. I spent long hours at the beach in Malmö making this bathmat. It didn’t have any name even after being finished. I asked for help on my page on Facebook and was given so many nice and creative suggestions! One of them was to call it Evening Sky. And this name resonated with what I felt and saw in Malmö. So I decided to call my new design Öresund Sky Bathmat. Read the whole story behind this design HERE and check more pictures of a finished bathmat HERE.
 DISCLOSURE: This blog contains affiliate links. If you purchase a (any) product via a link on my blog, I get a small percentage contribution from the store which enables me to keep providing you with free patterns. It costs you nothing extra to visit the store via my link, but ensure I get the credit for the sale. Thank you for your support!

Öresund is a strait between South of Sweden and Denmark. Famous bridge is connecting both lands with Malmö on one side and Copenhagen on the other. It only takes 30 minutes by train to go to Copenhagen city center. And when you travel over the sea you can see a wonderful view on not less famous Turning Torso building. It is situated in my favorite part of Malmö called Västra Hamnen. I came here every morning to have a cup of coffee and to enjoy crochet by the sea. And in the evening I saw my first Malmö sunset in 15 years. And it was fantastic…

Add this pattern to your Ravelry Queue
You will need:
- Yarn in 5 shades. I used Bloom by Scheepjes in shades 417 (3 skeins), 419 (3 skeins), 421 (3 skeins), 403 (2 skeins), 409 (2 skeins)
- Crochet hook Clover Amour* 4.5mm
- Scissors and tapestry needle to weave yarn tails in.
Finished Measurements
The size of finished bathmat will depend on yarn and hook you choose, and also on your personal gauge. My mathmat is approx. 55cm x 75cm (21 ½” x 29 ½”).
Gauge
18 sts x 20 rows = 10cm x 10cm (4” x 4”)Level
Intermediate (though I believe advanced beginners can handle this pattern as well).
Stitch guide and Abbreviations
US standard abbreviations are used in this pattern. But if you are used to other terms, please check this Crochet Translation Project which might be helpful in translation to your native language.
st(s) - stitch(es)
ss (slip stitch) – insert hook in indicated st, yo, draw yarn up and pull 2nd lp through the 1st lp on hook.
ch - chain
sc (single crochet) – insert hook in indicated stitch, yo, draw up a lp, yo and pull through both lps on hook.
FPtr (front post treble crochet) - yo twice, insert hook from front to back to front around he post of indicated stitch, yo, draw up a lp, *yo, pull through 2 lps* 3 times.
RS right side
WS wrong side
Important Notes and Tips
- Ch1 in the beginning of every row doesn’t count as sc. So 1st sc of every row is made in 1st sc of previous row.
- FPtr's should be made to the height of working row. They must not be too loose or pull.
- Always skip 1st of previous row behind every FPtr just made.
- You can easily adjust the size of Öresund Sky Bathmat. To make it wider make any even number of ch in the beginning. To make it longer, just crochet more rows in each stripe.
- To reduce the amount of yarn tails, don’t cut yarn while making colorful stripes. You will get floats of yarn on the sides but they will be hidden by the border. (So cut yarn before and after each colorful stripe always leaving 20 cm/8in tail).
- Change colour on the last yarn-over of the last sc of the relevant row.

INSTRUCTIONS
Add this pattern to Ravelry Queue
Copyright LillaBjornCrochet 2016. All rights reserved. This pattern is for unlimited personal use only. Do not reproduce or sell the pattern. The pattern may not be copied in any way (print or digitally), in part or in full. Items may be sold that are made from this pattern as long as the designer is credited. Shop owners, if you wish to make a kit with yarn using this pattern, please request permission and copyright details from me before offering any kits for sale. Please, read Copyright page for more information.
Öresund Sky Bathmat consists of 7 colorful stripes divided by 6 narrow stripes in gray. Colorway for each colorful stripe is given below.
C1 – 417 (Blue), C2 – 419 (Light Turqiouse), C3 – 421 (Gray), C4 – 403 (Dark Purple), C5 – 409 (Pink)
Colorful stripe 1
Ch 86.
Row 1. 1sc in 2nd ch from hook, 1sc in every ch to the end. Turn. (85sc – same stitch count is for the rest of the pattern)
Row 2-3. Ch1 (doesn’t count as sc here and throughout), 85sc. Turn.

Row 4. Ch1, *1sc, skip 1 st on row 1, 1FPtr around next st of row 1, skip 1st behind FPtr just made; repeat from * to the end leaving 1 st unworked, 1sc in last st. Turn.

Row 5. Ch1, 85sc. Turn.
Row 6. Ch1, 1sc in 2sts, *1FPtr around st from 3 rows below visible just after FPtr below, skip 1 st, 1sc in next st; repeat from * to the end leaving 1 st unworked, 1sc in last st. Turn.

Row 7. Ch1, 85sc. Turn.
Row 8. Ch1, *1sc, 1FPtr around 2nd st from 3 rows below, skip 1 st, 1sc in next st, *1FPtr around st from 3 rows below visible just after FPtr below, skip 1 st, 1sc in next st; repeat from * to the end. Turn.
Rows 9-12. Repeat rows 5-8
Row 13. As Row 5
Row 14. As Row 6
Row 15. As row 7
Gray stripe
Row 16-20. With C3. Ch1, 85 sc, turn.
Colorful Stripe 2
Row 1. Ch1, 85sc, turn.
Row 2-15. As for colorful stripe 1.

Continue with the pattern alternating colorful and grey stripes (repeating rows 1-20) for 135 rows in total. You should get 7 colorful stripes and 6 gray stripes between them.
Colorway for stripes:
Stripes 1 and 5:
Rows 1-6 with C1.
Rows 7-10 with C2.
Rows 11-12 with C1
Rows 13-15 with C2
Stripes 2 and 6:
Rows 1-6 with C4
Rows 7-10 with C5
Rows 11-12 with C4
Rows 13-15 with C5
Stripes 3 and 7
Rows 1-6 with C2
Rows 7-10 with C1
Rows 11-12 with C2
Rows 13-15 with C1
Stripe 4
Rows 1-6 with C5
Rows 7-10 with C4
Rows 11-12 with C5
Rows 13-15 with C4
Border
After row 135 change to C3, turn and start working the border around the bathmat. The border is made in back and forth, so in the eand of each row join with slip stitch in 1st sc and turn.
TIP: to hide floats of yarn – crochet 1st round of the border over them.
Round 1. In this rnd mark 2nd sc of 3 in each corner.
(RS) Ch1, 3sc in 1st st, 83 sc, 3sc in last sc, turn quarter, 108 sc along next side (make 12sc evenly in each colorful stripe and 4 sc in each grey stripe), turn quarter, 3sc in 1st ch, 83sc, 3sc in last ch, turn quarter, 108sc along next side (as previous); join with ss in 1st sc of this rnd. Turn. (83 sts on each short side, 108 sts on long side, 3sc in each corner = 394sc in total)

Round 2. In this rnd mark 2nd sc of 3 in each corner.
(WS) Ch1, 1sc in 1st sc. Continue crocheting with sc around the blanket making 3 sc in each marked st, join with ss in 1st sc. Turn.

Round 3-5. As Round 2. Fasten off. Weave in all yarn tails.
Congratulations!! Your Öresund Sky Bathmat is now finished!
You can subscribe to monthly newsletter not to miss a single post. You can also follow me on Facebook, Pinterest and Instagram.
p.s. This bathmat is quite slippery. If you want to use for a bathroom you shoould add some anti-slip material underneath. I have 2 ideas about how it prevent it from being slippery. And I will share my thoughts with you next week! UPDATE: my review about 3 ways to make a crochet rug non slip is HERE.
It’s time for a new reveal. My bathmat is finished and I am very excited to share pictures with you today! I know I promised to show them earlier, but I was so busy with all the projects going on at the same time and writing a lining tutorial for Peacock Tail Bag CAL. But anyway the right time has come and here is my new design! Please stay tuned as next week I will share a FREE pattern for this bathmat.

DISCLOSURE: This blog contains affiliate links. If you purchase a (any) product via a link on my blog, I get a small percentage contribution from the store which enables me to keep providing you with free patterns. It costs you nothing extra to visit the store via my link, but ensure I get the credit for the sale. Thank you for your support!
This design was born several weeks ago in Malmö where I escaped to be on my own for a while and to enjoy being lonely and being by the sea. If you missed my story you can read it HERE. Creating this bathmat had a very big therapeutic impact on my soul, and I will always connect my sea memories with this design.

I used Bloom yarn by Scheepjes which is 100% cotton, very sturdy but light and airy at the same time. This yarn has been on my list of favourites for a while already and I am sure I will use it again and again. As in my opinion it is perfect for interior decorations (not the blankets, though). Please read my review about this yarn HERE. And you can have a look at complete color chart and choose your very own shades at Wool Warehouse, Deramores, Paradise Fibers (US) or in your local Scheepjes stores.
I had quite a few ideas about what I want this bathmat to look like. First of all I wanted it to match my Bloom Bathroom Organizer (FREE pattern is HERE), but my inspiration had its own plan. And after a short play with yarn and hook on the beach I decided to use a totally different stitch for this design.

My bathmat (which doesn’t have any official name yet, so any suggestions are very welcome!) is covered with front post stitches. They give a very nice structure and mix of colors. The crocheted fabric appeared to be quite firm and textured. And it’s very nice to stand on it barefoot.

I grouped pink and purple, and blue and turquoise together to make alternating stripes. And I also added a little bit of grey to frame and put the whole design together. I would really love to try making another bathmat with only one color. I bet the structure will be popping up very well.

The pattern will be very simple and easy to follow. I am sure that advanced beginners will handle it with no major problems. This pattern is also very adjustable: you can in fact make your own rug in any size. Mine turned out approx. 55cm x 75cm (21 ½ in x 29 ½ in).

Stay tuned! Free pattern will be published very soon!
UPDATE: this design is finished and pattern is available HERE.
You can subscribe to a newsletter not to miss a single post. You can also follow me on Facebook, Pinterest and Instagram.

DISCLOSURE: This blog contains affiliate links. If you purchase a (any) product via a link on my blog, I get a small percentage contribution from the store which enables me to keep providing you with free patterns. It costs you nothing extra to visit the store via my link, but ensure I get the credit for the sale. Thank you for your support!
This design was born several weeks ago in Malmö where I escaped to be on my own for a while and to enjoy being lonely and being by the sea. If you missed my story you can read it HERE. Creating this bathmat had a very big therapeutic impact on my soul, and I will always connect my sea memories with this design.

I used Bloom yarn by Scheepjes which is 100% cotton, very sturdy but light and airy at the same time. This yarn has been on my list of favourites for a while already and I am sure I will use it again and again. As in my opinion it is perfect for interior decorations (not the blankets, though). Please read my review about this yarn HERE. And you can have a look at complete color chart and choose your very own shades at Wool Warehouse, Deramores, Paradise Fibers (US) or in your local Scheepjes stores.
I had quite a few ideas about what I want this bathmat to look like. First of all I wanted it to match my Bloom Bathroom Organizer (FREE pattern is HERE), but my inspiration had its own plan. And after a short play with yarn and hook on the beach I decided to use a totally different stitch for this design.

My bathmat (which doesn’t have any official name yet, so any suggestions are very welcome!) is covered with front post stitches. They give a very nice structure and mix of colors. The crocheted fabric appeared to be quite firm and textured. And it’s very nice to stand on it barefoot.

I grouped pink and purple, and blue and turquoise together to make alternating stripes. And I also added a little bit of grey to frame and put the whole design together. I would really love to try making another bathmat with only one color. I bet the structure will be popping up very well.

The pattern will be very simple and easy to follow. I am sure that advanced beginners will handle it with no major problems. This pattern is also very adjustable: you can in fact make your own rug in any size. Mine turned out approx. 55cm x 75cm (21 ½ in x 29 ½ in).

Stay tuned! Free pattern will be published very soon!
UPDATE: this design is finished and pattern is available HERE.
You can subscribe to a newsletter not to miss a single post. You can also follow me on Facebook, Pinterest and Instagram.
Subscribe to:
Posts (Atom)


