Showing posts with label crochet cables. Show all posts
Showing posts with label crochet cables. Show all posts
End of the year is the time to make resolutions and put some goals for the coming year. I haven’t put any strict goals or must-do-s for myself, as I know my creativity will bring me somewhere else anyway. But what I really want to accomplish this year is to design more crochet garments. My modest collection is slowly growing. And today I would like to introduce a new addition. Copenhagen Cardigan.
The pattern is available online on Etsy and Ravelry and is offered with 30% discount through the first release weekend (until Monday, January 27th, 2020). The pattern has been discounted already and the price you see is final, so no additional codes are needed.
This is the fifth garment design following Esja Sweater, Huldra Sweater, Fjell Cardigan and Metropolis Cardigan. Same as all previous designs, Copenhagen Cardigan is also worked top down without the seams. But this time I tried something new and used a raglan shape for sleeves.

Round yoked sweaters are very trendy and hot right now, but they don’t fit equally well everyone. And kind of “set-in”, “controlled” sleeves might be a better option for someone.
I should admit that designing a cardigan with shaped neck together with growing raglans and cabled mesh pattern on fronts was a bit of a designing struggle for me. But in the end I won this battle! And it’s proved by the fantastic testres’ work.

Copenhagen Cardigan is designed to fit with 4-10cm (2-4in) of positive ease at the bust. This cardigan is worked seamlessly from top down. First the raglan yoke is worked in rows to separation for body and sleeves. The lower body is worked in rows to bottom. Sleeves are worked top down to the cuffs. The length of the body and sleeves is easily adjustable.

I made two samples myself. One is long sleeved in a natural brown-ish color – cozy and casual. And another one is in deep blue with short sleeves – perfect as a summer version for warm days (if made with linen, cotton or bamboo yarns). And a nice fit for a dress, for example.

The name to Copenhagen Cardigan was given by the name of the shade I used for the very first (natural brown) sample. Have I ever shared my love for Scheepjes Metropolis yarn* with you? I’ve already used it once for Metropolis Cardigan last year, and I am pretty sure I’ll choose it again and again. Because this yarn is on top of my favourites.

Metropolis is 4ply yarn targeted as the sock yarn (it was released with the picture of socks hand knitted in all colors). It contains 75% Merino extra fine and 25% Nylon, but because it is very soft, in my opinion it is just great for knitted and crochet garments!

Not to mention 80 gorgeous heathered colors. Each of them contains 3 different shades which are blended together tastefully. I chose shades Copenhagen (066) and Cairo (070) for my samples. And my testers decided to crochet their cardigans with Metropolis yarn as well. Looky look at their color choices (just to be precise, some of the testers used stash yarn, and two cardigans were made with Scheepjes Bamboo Soft – a nice option for those with allergy to wool).

1. Sandra Veneman (size XL, Scheepjes Metropolis)
2. Esther Schippers (size 2X, Scheepjes Metropolis)
3. Elizabeth Kalka (size M, Scheepjes Bamboo Soft)
4. Loele van den Bergh (size S, Scheepjes Metropolis)
5. Laura Jackson (size S, Scheepjes Bamboo Soft)

1. Sarah Fabbri (size L, stash yarn)
2. Lisa Marlow (size S, Scheepjes Metropolis)
3. Faye Pike (size XL, Scheepjes Bamboo Soft)
4. Elizabeth Barraclough (size M, Scheepjes Metropolis)
If you’d like to have a look at all the shades of Metropolis yarn, check it in local Scheepjes shops worldwide, or via international online retailers:
WoolWarehouse*, Black Sheep Wools* (both in UK, international shipping)
Caro’s Atelier* (NL, Europe)
Taemombo* (Canada and US)

I’d say Copenhagen Cardigan is a classy design and everyday wearable. It has mesh decorative panels on both fronts with cables and lace. I first tried of lace and cables for Living Lagom shawl, and liked it very much.

I played with the stitch pattern a bit and used different stitches for front and back. Please, keep in mind that the pattern has two gauges and they should be very similar. If you fails to keep the same gauge for the front and the back, your fronts will be growing faster – good for the big bust owners For the others, like me, longer fronts will result into a modern stylish fit.

And just to remind you, Copenhagen Cardigan pattern is available online on Etsy and Ravelry and is offered with 30% discount through the first release weekend (until Monday, January 27th, 2020).
Subscribe to a newsletter not to miss a single post. You can also follow me on Facebook, Pinterest and Instagram.

 |
| Photo credit to all pictures (except of the testers' work): www.frozen-photo.com |
The pattern is available online on Etsy and Ravelry and is offered with 30% discount through the first release weekend (until Monday, January 27th, 2020). The pattern has been discounted already and the price you see is final, so no additional codes are needed.
This is the fifth garment design following Esja Sweater, Huldra Sweater, Fjell Cardigan and Metropolis Cardigan. Same as all previous designs, Copenhagen Cardigan is also worked top down without the seams. But this time I tried something new and used a raglan shape for sleeves.

Round yoked sweaters are very trendy and hot right now, but they don’t fit equally well everyone. And kind of “set-in”, “controlled” sleeves might be a better option for someone.
I should admit that designing a cardigan with shaped neck together with growing raglans and cabled mesh pattern on fronts was a bit of a designing struggle for me. But in the end I won this battle! And it’s proved by the fantastic testres’ work.

Copenhagen Cardigan is designed to fit with 4-10cm (2-4in) of positive ease at the bust. This cardigan is worked seamlessly from top down. First the raglan yoke is worked in rows to separation for body and sleeves. The lower body is worked in rows to bottom. Sleeves are worked top down to the cuffs. The length of the body and sleeves is easily adjustable.

I made two samples myself. One is long sleeved in a natural brown-ish color – cozy and casual. And another one is in deep blue with short sleeves – perfect as a summer version for warm days (if made with linen, cotton or bamboo yarns). And a nice fit for a dress, for example.

The name to Copenhagen Cardigan was given by the name of the shade I used for the very first (natural brown) sample. Have I ever shared my love for Scheepjes Metropolis yarn* with you? I’ve already used it once for Metropolis Cardigan last year, and I am pretty sure I’ll choose it again and again. Because this yarn is on top of my favourites.

Metropolis is 4ply yarn targeted as the sock yarn (it was released with the picture of socks hand knitted in all colors). It contains 75% Merino extra fine and 25% Nylon, but because it is very soft, in my opinion it is just great for knitted and crochet garments!

Not to mention 80 gorgeous heathered colors. Each of them contains 3 different shades which are blended together tastefully. I chose shades Copenhagen (066) and Cairo (070) for my samples. And my testers decided to crochet their cardigans with Metropolis yarn as well. Looky look at their color choices (just to be precise, some of the testers used stash yarn, and two cardigans were made with Scheepjes Bamboo Soft – a nice option for those with allergy to wool).

1. Sandra Veneman (size XL, Scheepjes Metropolis)
2. Esther Schippers (size 2X, Scheepjes Metropolis)
3. Elizabeth Kalka (size M, Scheepjes Bamboo Soft)
4. Loele van den Bergh (size S, Scheepjes Metropolis)
5. Laura Jackson (size S, Scheepjes Bamboo Soft)

1. Sarah Fabbri (size L, stash yarn)
2. Lisa Marlow (size S, Scheepjes Metropolis)
3. Faye Pike (size XL, Scheepjes Bamboo Soft)
4. Elizabeth Barraclough (size M, Scheepjes Metropolis)
If you’d like to have a look at all the shades of Metropolis yarn, check it in local Scheepjes shops worldwide, or via international online retailers:
WoolWarehouse*, Black Sheep Wools* (both in UK, international shipping)
Caro’s Atelier* (NL, Europe)
Taemombo* (Canada and US)

I’d say Copenhagen Cardigan is a classy design and everyday wearable. It has mesh decorative panels on both fronts with cables and lace. I first tried of lace and cables for Living Lagom shawl, and liked it very much.

I played with the stitch pattern a bit and used different stitches for front and back. Please, keep in mind that the pattern has two gauges and they should be very similar. If you fails to keep the same gauge for the front and the back, your fronts will be growing faster – good for the big bust owners For the others, like me, longer fronts will result into a modern stylish fit.

And just to remind you, Copenhagen Cardigan pattern is available online on Etsy and Ravelry and is offered with 30% discount through the first release weekend (until Monday, January 27th, 2020).
Subscribe to a newsletter not to miss a single post. You can also follow me on Facebook, Pinterest and Instagram.
Crochet Cables will always be in trend. They are fun to make and they add a nice texture to crochet fabric. Over last couple of years classical crochet cables were rethought, transformed and mixed with overlay crochet. They can be made over any stitch. And that’s even more fun. My Shells and Stones Cabled shawl is an example of such “new cables”.

Shells and Stones shawl pattern was designed exclusively for Happily Hooked Magazine. And now when copyright came back to me, it can finally be published as a stand-alone pattern.
Instructions were polished, and I have added two charts (yay!), rectangular version of the shawl and a tutorial of how to make it with two colors. A step-by-step photo tutorial is also available in the end of the pattern. Pictures show tricky places and explain placement of the stitches.

Shells and Stones Shawl is available with 30% discount HERE on Ravelry and HERE on Etsy through Monday, January 28, 2019. The price you see is final and no codes are needed. After that day the pattern will be listed at a regular price.
Shells and Stones Shawl has an asymmetrical triangular shape with gentle cables and bobbles placed over airy “linen stitch” fabric. The pattern is repetitive, and once you get the rhythm it becomes pretty mindless.

Shawl’s body is made on one color, and then linen border is added along two sides, with a gentle lace edging.
The pattern was written for a fine and soft yarn (fingering), and in combination with a slightly larger hook it creates a very draping and “squishy” fabric.

For my sample I used Our Tribe yarn by Scheepjes in two shades: 880 Silver Birch (3 skeins) and 882 Blue Flower Haze (1 skein), and 4mm crochet hook which is slightly bigger for this yarn.
Our Tribe yarn is available for purchase via local Scheepjes shops and online retailers:
Wool Warehouse*, Deramores*, Black Sheep Wools* (all three in UK, international shipping)
Caro’s Atelier* (NL and Europe)
Taemombo (US and Canada)
Knotty House* (Canada)
Laura Jackson was helping me with testing, and she chose Blue Flower Haze in combination with Iris Garden.

And Astrid Keijser went for bright orange in combination with cream.

Shells and Stones pattern can be easily adapted for a rectangular shape, and I’ve included both written row-by-row instructions and another chart to help you. If you decide to make a blanket, please tag me, or share a picture with me. I would like to see, and I bet it will feel great!
I used single color for a cabled stitch pattern, but it can also be made with two colors at the same time. Here is the effect you can achieve with 2 yarns.

In case you would like to recreate it either with triangular or rectangular shape – please, check a detailed tutorial in the end of the pattern explaining how to use two yarns and how to change color in the end of the rows.

Shells and Stones Shawl is available with 30% discount HERE on Ravelry and HERE on Etsy through Monday, January 28, 2019. The price you see is final and no codes are needed. After that day the pattern will be listed at a regular price.
Subscribe to a newsletter not to miss a single post. You can also follow me on Facebook, Pinterest and Instagram.


Shells and Stones shawl pattern was designed exclusively for Happily Hooked Magazine. And now when copyright came back to me, it can finally be published as a stand-alone pattern.
Instructions were polished, and I have added two charts (yay!), rectangular version of the shawl and a tutorial of how to make it with two colors. A step-by-step photo tutorial is also available in the end of the pattern. Pictures show tricky places and explain placement of the stitches.

Shells and Stones Shawl is available with 30% discount HERE on Ravelry and HERE on Etsy through Monday, January 28, 2019. The price you see is final and no codes are needed. After that day the pattern will be listed at a regular price.
Shells and Stones Shawl has an asymmetrical triangular shape with gentle cables and bobbles placed over airy “linen stitch” fabric. The pattern is repetitive, and once you get the rhythm it becomes pretty mindless.

Shawl’s body is made on one color, and then linen border is added along two sides, with a gentle lace edging.
The pattern was written for a fine and soft yarn (fingering), and in combination with a slightly larger hook it creates a very draping and “squishy” fabric.

For my sample I used Our Tribe yarn by Scheepjes in two shades: 880 Silver Birch (3 skeins) and 882 Blue Flower Haze (1 skein), and 4mm crochet hook which is slightly bigger for this yarn.
Our Tribe yarn is available for purchase via local Scheepjes shops and online retailers:
Wool Warehouse*, Deramores*, Black Sheep Wools* (all three in UK, international shipping)
Caro’s Atelier* (NL and Europe)
Taemombo (US and Canada)
Knotty House* (Canada)
Laura Jackson was helping me with testing, and she chose Blue Flower Haze in combination with Iris Garden.

And Astrid Keijser went for bright orange in combination with cream.

Shells and Stones pattern can be easily adapted for a rectangular shape, and I’ve included both written row-by-row instructions and another chart to help you. If you decide to make a blanket, please tag me, or share a picture with me. I would like to see, and I bet it will feel great!
I used single color for a cabled stitch pattern, but it can also be made with two colors at the same time. Here is the effect you can achieve with 2 yarns.

In case you would like to recreate it either with triangular or rectangular shape – please, check a detailed tutorial in the end of the pattern explaining how to use two yarns and how to change color in the end of the rows.

Shells and Stones Shawl is available with 30% discount HERE on Ravelry and HERE on Etsy through Monday, January 28, 2019. The price you see is final and no codes are needed. After that day the pattern will be listed at a regular price.
Subscribe to a newsletter not to miss a single post. You can also follow me on Facebook, Pinterest and Instagram.
It’s Wednesday! And it’s time to show my current wip. I’ve been working on a new crochet design recently, using heavenly soft Namaste* yarn by Scheepjes. My idea was to combine lace, open parts with simple cables. And to achieve a chunky, but light look. And it worked pretty well, I believe. I still need to block my shawl before I can reveal it. But I couldn’t help myself and here are several wips.

You know what is the most difficult in crochet design for me? Not to find an idea. They stick pretty well, and they are too many. And not to actually design – that also comes out naturally. Pattern writing can be a problem, especially if design is a bit tricky and it’s necessary to simplify instructions.
But the most difficult part in releasing a new pattern for me is… to think of a nice name! In very rare occasions the name comes first. And that was the case of the Living Lagom Shawl.
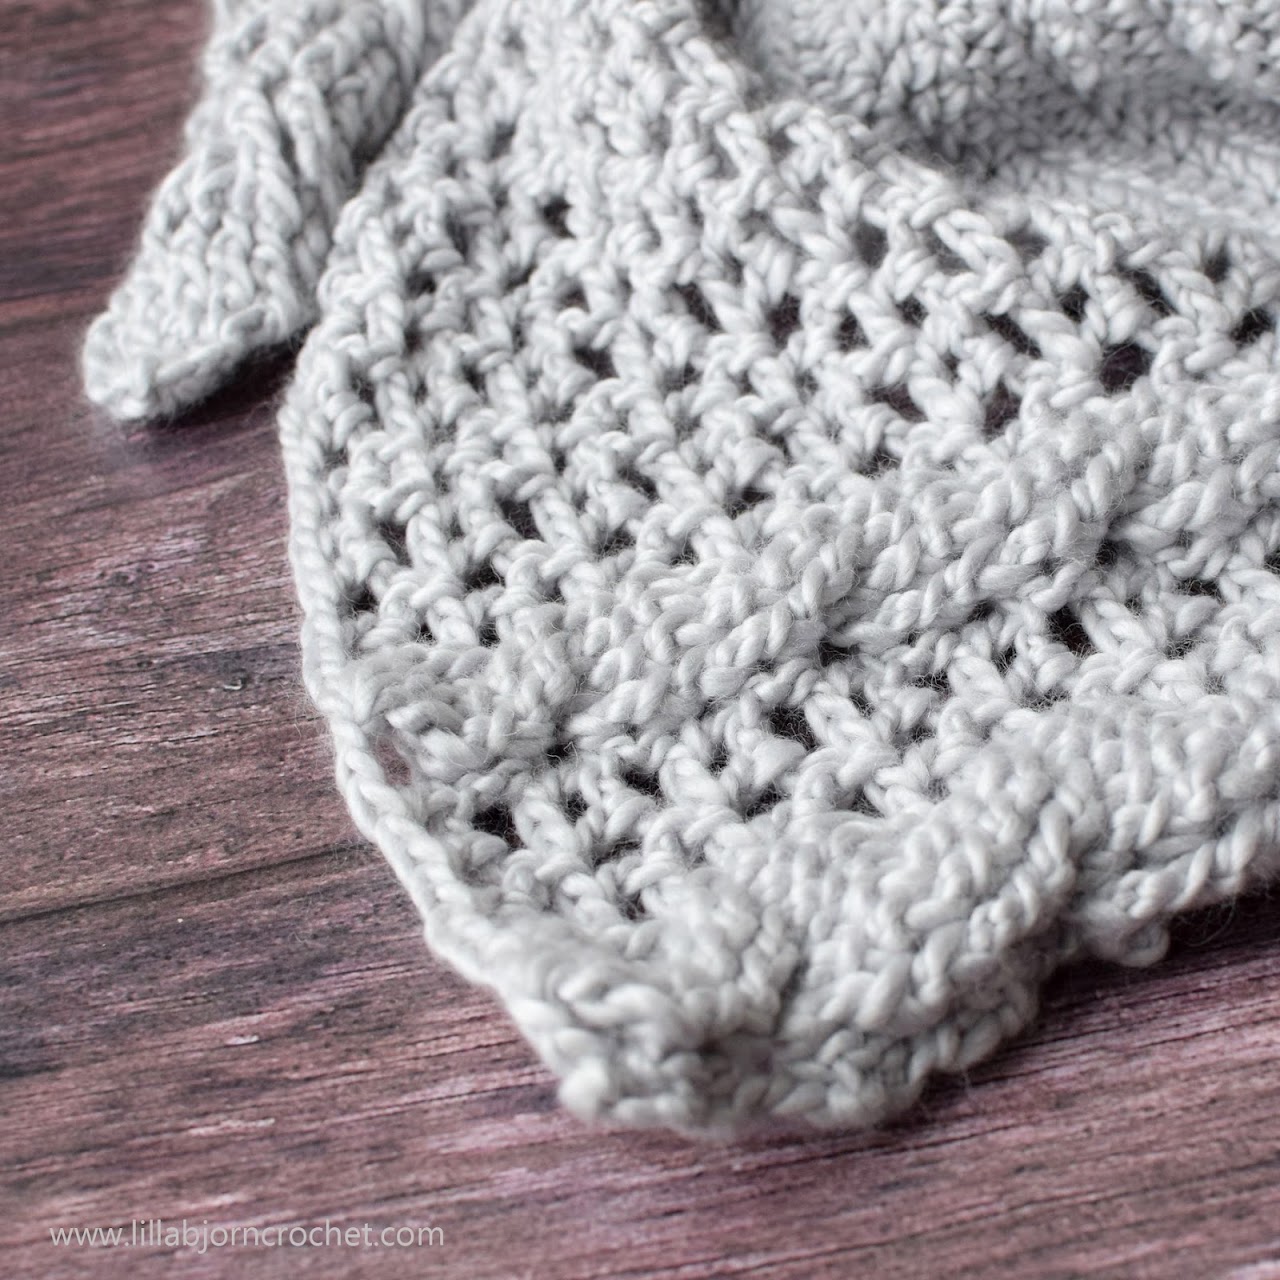
If you follow my blog for a while now, you might know that I fell in love with Sweden. And if you ask me why, I am not sure I could explain it clearly. Well, I couldn’t before last summer, when I suddenly came across a fantastic book by Niki Brantmark. The book is called “Lagom. The Swedish Art of Living a Balanced, Happy Life”*.
Niki is running a very successful and inspiring blog My Scandinavian Home. If you are looking for open, airy, laconic interiors inspired by light, make sure to check it out. I have been reading her blog for a while now, and I find inspiration in every single blog post.

So Lagom… Every time I come to Sweden I smell something in the air, and I feel it with my skin. Something I still can’t put into words. Something that makes me feel very comfortable and relaxed. And something I am trying to exercise in my daily life now. Sometimes it works, sometimes it doesn’t.
I am not sure if there is translation of “lagom” word in English… Probably not. But it literally means “not too much, and not too small. Just right”. And it can be applied to any area of life: personal life, relationship, home, work, parenthood, your inner world… For me “lagom” is about staying calm and feel balanced.

And my new Living Lagom Shawl is just like this. Soft, hugging, bringing peace and quite.
Today when I was taking pictures for this blog post it suddenly started to snow… Magic :)
See you next week for a reveal?
Subscribe to a newsletter not to miss a single post. You can also follow me on Facebook, Pinterest and Instagram.

You know what is the most difficult in crochet design for me? Not to find an idea. They stick pretty well, and they are too many. And not to actually design – that also comes out naturally. Pattern writing can be a problem, especially if design is a bit tricky and it’s necessary to simplify instructions.
But the most difficult part in releasing a new pattern for me is… to think of a nice name! In very rare occasions the name comes first. And that was the case of the Living Lagom Shawl.

If you follow my blog for a while now, you might know that I fell in love with Sweden. And if you ask me why, I am not sure I could explain it clearly. Well, I couldn’t before last summer, when I suddenly came across a fantastic book by Niki Brantmark. The book is called “Lagom. The Swedish Art of Living a Balanced, Happy Life”*.
Niki is running a very successful and inspiring blog My Scandinavian Home. If you are looking for open, airy, laconic interiors inspired by light, make sure to check it out. I have been reading her blog for a while now, and I find inspiration in every single blog post.

So Lagom… Every time I come to Sweden I smell something in the air, and I feel it with my skin. Something I still can’t put into words. Something that makes me feel very comfortable and relaxed. And something I am trying to exercise in my daily life now. Sometimes it works, sometimes it doesn’t.
I am not sure if there is translation of “lagom” word in English… Probably not. But it literally means “not too much, and not too small. Just right”. And it can be applied to any area of life: personal life, relationship, home, work, parenthood, your inner world… For me “lagom” is about staying calm and feel balanced.

And my new Living Lagom Shawl is just like this. Soft, hugging, bringing peace and quite.
Today when I was taking pictures for this blog post it suddenly started to snow… Magic :)
See you next week for a reveal?
Subscribe to a newsletter not to miss a single post. You can also follow me on Facebook, Pinterest and Instagram.
Celtic Tiles Blanket consists of 20 squares made in overlay crochet technique with simple border. It’s not as well draping as other cabled crochet blankets, but it gives a very nice feeling of coziness and warmness. Perfect for winter times. Read more about this blanket in THIS blog post (with more reveal pictures).

* DISCLOSURE: This blog contains affiliate links (marked with *). If you purchase a product via a link on my blog, I may get a small percentage contribution from the store which enables me to keep providing you with free patterns. It costs you nothing extra to visit the store via my link, but ensure I get the credit for the sale. Thank you for your support!
st(s) stitch(es)
ch chain
yo yarn over
lp(s) loop(s)
BL back loop(s)
WS wrong side
RS right side
sk skip st(s)
*…* *crochet following directions* as many times as indicated
ss (slip stitch) – insert hook in indicated st, yo, draw yarn up and pull 2nd lp through the 1st lp on hook.
sc (single crochet) – insert hook in indicated stitch, yo, draw up a lp, yo and pull through both lps on hook.
dc (double crochet) – yo, insert hook in indicated st, yo, draw up a lp, *yo, pull through 2 lps* twice.
FPtr (front post treble crochet) - yo twice, insert hook from front to back to front around the post of indicated stitch, yo, draw up a lp, *yo, pull through 2 lps* 3 times.
FPtr2tog (front post treble 2 together) - * yo twice, insert hook from front to back to front around the post of indicated stitch, yo, draw up a lp, [yo, pull through 2 lps] twice* twice, yo, pull through all 3 lps on hook.
FPdtr (front post double treble crochet) – yo 3 times, insert hook from front to back to front around the post of indicated stitch, yo, draw up a lp, *yo, pull through 2 lps* 4 times.
FPdtr2tog (front post double treble crochet 2 together) - *yo 3 times, insert hook from front to back around the post of indicated stitch, yo, draw up a lp,[yo, pull through 2 lps] 3 times*, twice, yo, pull through all 3 lps on hook.
1. Reading the pattern. This pattern contains written instructions and a lot of pictures showing to which sts the overlaid stitches should be added (these sts are marked by arrows). I would strongly recommend using both kinds of instructions. It will be easier to read and understand the written instructions after looking at the pictures. This pattern is written for right-handed people.
2. Turning ch1/ch2. This square is worked in rows, back and forth. Ch1/ch2 in the beginning of each row doesn’t count as a st. So 1st st is always made in 1st st of previous row.
3. Gauge. Overlaid stitches are used to crochet this square, that’s why it is very important to have their gauge under control: they should be neither too loose nor too tight, because this will lead to a deformation of the shape. The right tensioned overlay stitches should be made to the height of the working round. And width of your square should stay the same after each row.

4. Skipping sts. Overlaid stitches “hide” the stitches of background and this is the reason, why sc of the working round should be skipped. Please note that the number of overlaid stitches is always the same as the number of skipped sts. And stitch count after each row is the same.
It might be tricky to keep track on skipped sts. Stitch markers can help you. After completing sc before each group of next FPsts, insert stitch marker in next sts. Then make indicated FPsts. And now 1st marked sts behind them will be counted at 1st skipped st.

Because you always skip sts behind FPsts, you will have gaps behind them. They are adding drape to the square and prevent it from being stiff. If you would like to get rid of these gaps, you can “close” them working on wrong side. To do so, insert the hook in back loops of skipped stitches and under both loops of corresponding FPsts of previous row (see pics below).

5. Inserting hook. If you make a front post stitch, the hook is always inserted from front to back and then again to front around the post (vertical part) of the indicated st. In other words, the hook will be inserted behind the post.

******************************************************
*Purchase an ad-free and ready-to-print PDF of this pattern (including all Important Notes, material list, stitch guide, complete instructions and photo tutorials) HERE on Ravelry. There is also a print friendly copy of the pattern available for download - with no pictures*
VIDEO. Esther of It's All In A Nutshell has made a very detailed and professional video for this pattern (HERE). She will guide you through every single stitch.
Copyright LillaBjornCrochet 2017. All rights reserved. This pattern is for unlimited personal use only. Do not reproduce or sell the pattern. The pattern may not be copied in any way (print or digitally), in part or in full. Items may be sold that are made from this pattern as long as the designer is credited. Shop owners, if you wish to make a kit with yarn using this pattern, please request permission and copyright details from me before offering any kits for sale. Please, read Copyright page for more information.
******************************************************
To complete one square you will need approx. 86-87g of Stone Washed XL. Please, make sure you use not more than this amount, because otherwise yarn in the kit will not be enough to complete the blanket.
Row 1. (WS) Ch38. 1dc in 3rd ch from hook, 1dc in each ch to the end. Turn. (36 sts)
Row 2. (RS) Ch1 (doesn’t count as st here and throughout), 1sc in each st to the end. Turn (36 sts)
Row 3. Ch2 (doesn’t count as st here and throughout), 1dc in each st to the end. Turn.
Row 4. Note: all front post stitches are made around sts from 2 rows below – here and throughout the pattern.
Ch1, 3sc, 1FPtr around 6th sc from 2 rows below, 1FPtr around each of next 2 sts, skip 3 sts behind FPtr’s just made, 3sc, 1FPtr around same sc from 2 rows below, 1FPtr around next sc, skip 2 sts behind FPtr’s just made, 14sc, 1FPtr around 9th sc (from the end of the row) from 2 rows below, 1FPtr around next sc, skip 2 sts behind FPtr’s just made, 3sc, 1FPtr around same sc, 1FPtr around each of next 2 sc, skip 3 sts behind FPtr just made, 3sc; turn.
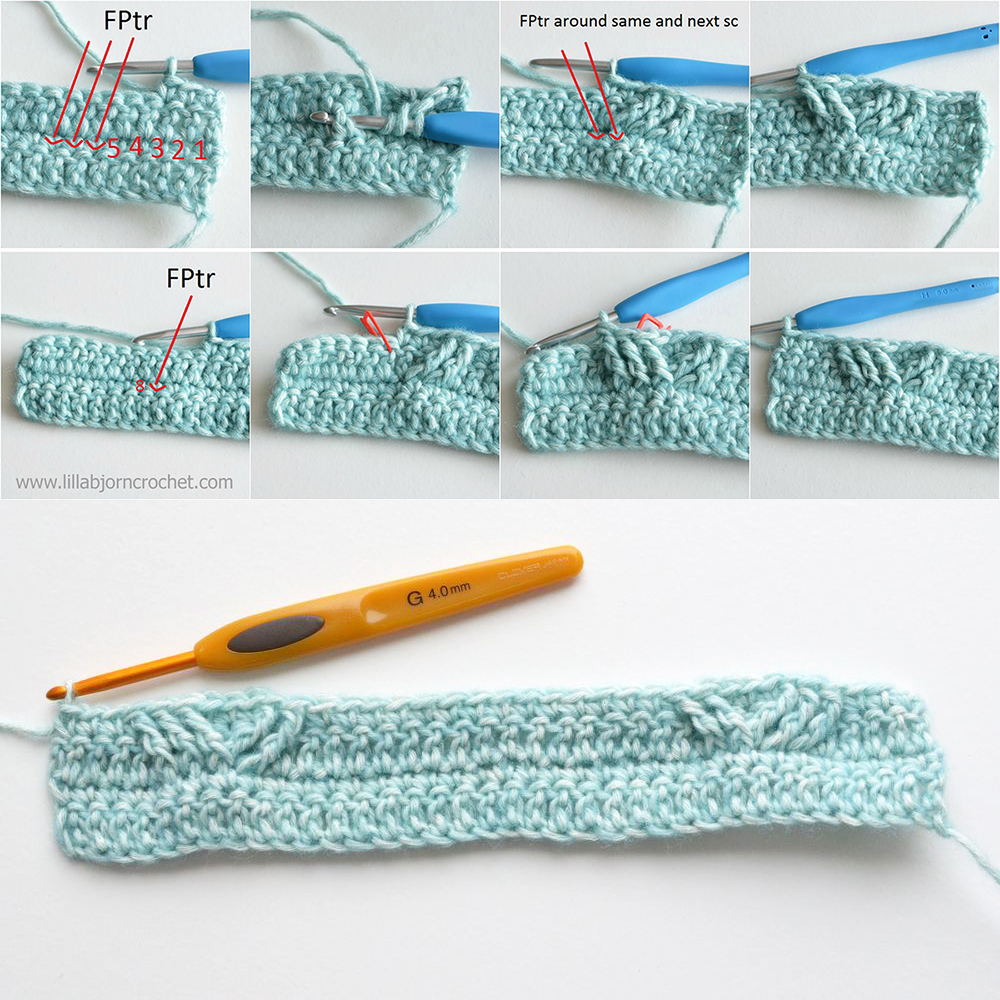
Row 5. As row 3.
Row 6. Ch1, 5sc, 1FPtr around 1st FPtr below, 1FPtr2tog around next 2 FPtr, skip 2 sts, 3sc, 1FPtr around each of 2FPtr below, skip 2sc on row 4, 1FPtr around each of next 2 sc, skip 4 sts on row 5, 2sc, 1FPtr around same sc from 2 rows below, 1FPtr around next sc, skip 4 sc on row 4, 1FPtr around each of next 2 sc, skip 4 sts on row 5, 2sc, 1FPtr around same sc from 2 rows below, 1FPtr around next sc, 1FPtr around each of next 2 FPtr below, skip 4 sts on row 5, 3sc, 1FPtr2tog around next 2FPtr, 1FPtr around next FPtr, skip 2 sts on row 5, 5sc; turn.
 Row 7. As row 3.
Row 8. Note: on this and all next rows by “skipped sts” are meant sts of previous row, hidden behind front post stitches just made.
Ch1, 7sc, 1FPdtr around 1st FPtr below, 1FPdtr around next FPtr2tog, *skip next 2 FPtr, 1FPdtr around each of next 2 FPtr, skip 4 sts, 2sc, 1FPdtr around each of 2 skipped FPtr below* 3 times, 1FPdtr around next FPtr2tog, 1FPdtr around next FPtr, skip 4sts, 7sc; turn.

Row 9. As row 3.
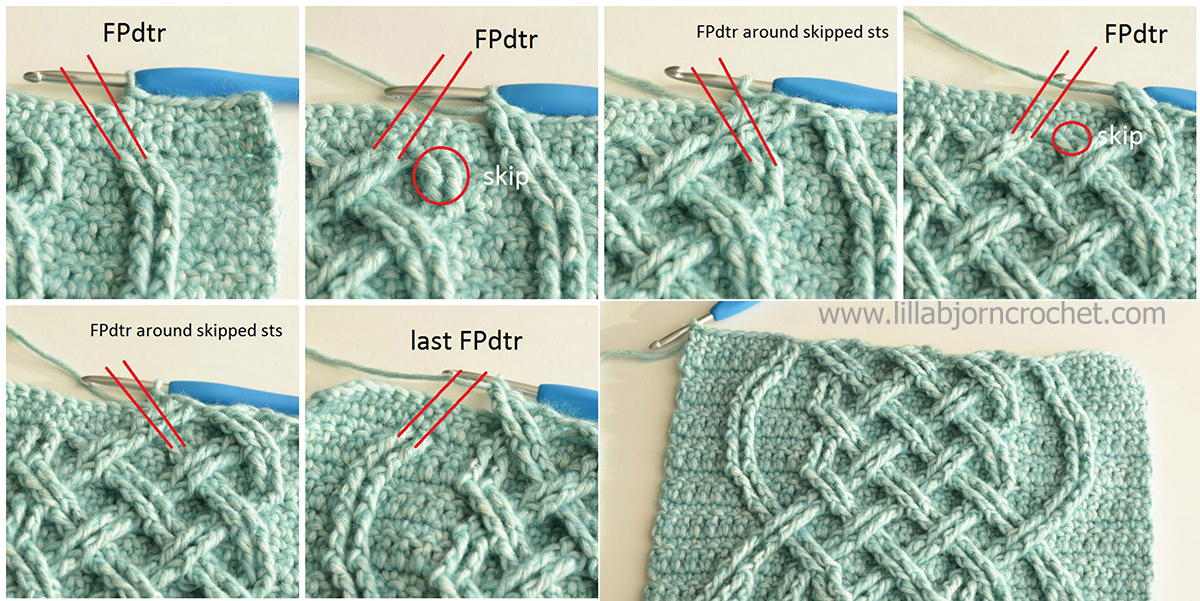
Row 10. Ch1, 6sc, skip 2 FPdtr below, 1FPdtr around each of next 2 FPdtr, skip 2 sts, 2sc, *1FPdtr around each of 2 skipped FPdtr placing them under FPdtr just made (see pics below), skip next 2 FPdtr, 1FPdtr around each of next 2 FPdtr, skip 4 sts, 2sc* 3 times, 1FPdtr around each of 2 skipped FPdtr placing them under FPdtr just made, skip 2 sts, 6sc; turn.
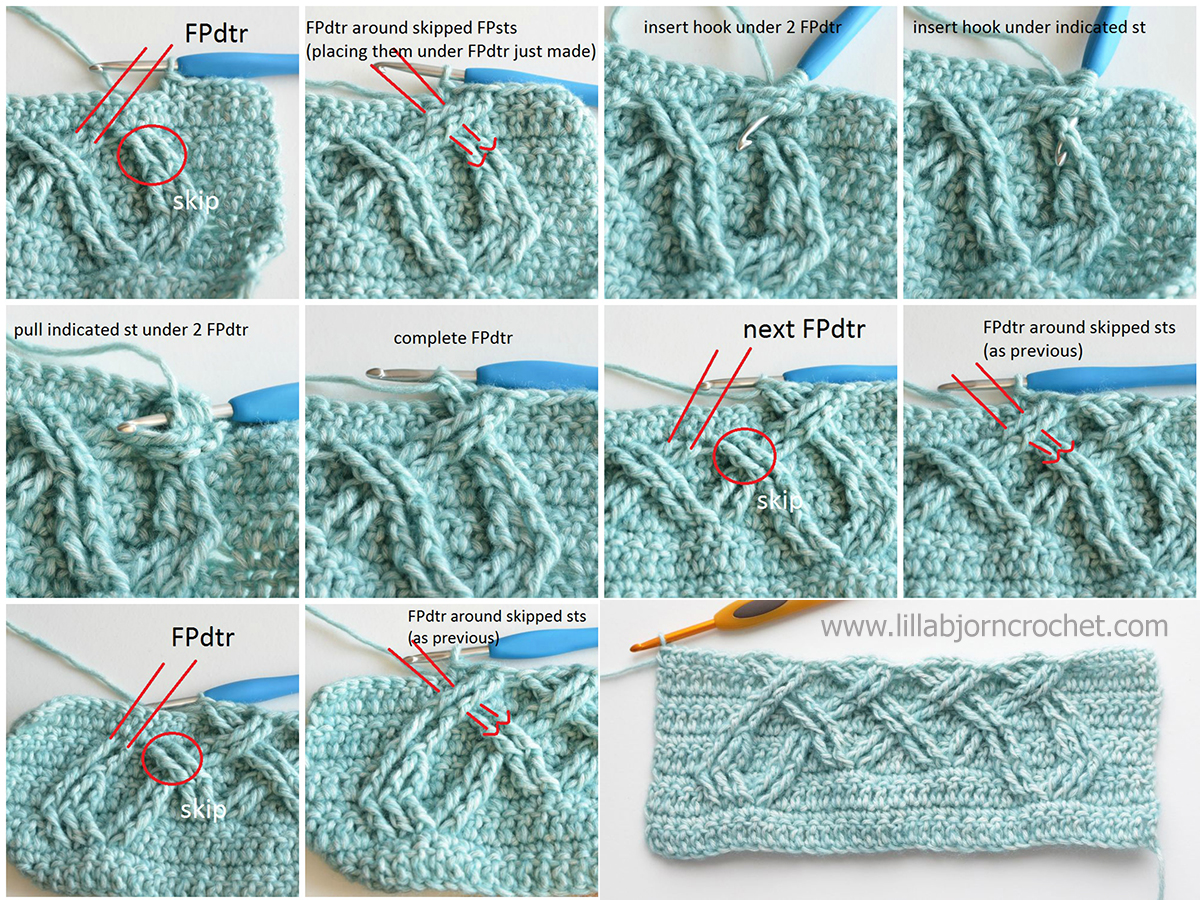
Row 11. As row 3.
Row 12. Ch1, 4sc, 1FPdtr around each of 2 FPdtr below, skip 2 sts, 3sc, skip next 2 FPdtr, 1FPdtr around each of next 2 FPdtr, skip 2 sts, 2sc, *1FPdtr around each of 2 skipped FPdtr, skip next 2 FPdtr, 1FPdtr around each of next 2 FPdtr, skip 4 sts, 2sc* twice, 1FPdtr around each of 2 skipped FPdtr, skip 2 sts, 3sc, 1FPdtr around each of 2 FPdtr below, skip 2 sts, 4sc; turn.

Row 13. As row 3.
Row 14. Ch1, 4sc, 1FPtr around each of 2 FPdtr below, skip 2 sts, 4sc, 1FPtr around each of 2 FPdtr below, skip next 2 FPdtr, 1FPdtr around each of next 2 FPdtr, skip 4sts, 2sc,
1FPdtr around each of 2 skipped FPdtr placing them under FPdtr just made, skip next 2 FPdtr, 1FPdtr around each of next 2 FPdtr, skip 4 sts, 2sc,
1FPdtr around each of 2 skipped FPdtr placing them under FPdtr just made, 1FPtr around each of next 2 FPdtr below, skip 4 sts, 4sc, 1FPtr around each of 2 FPdtr below, skip 2 sts, 4sc; turn.

Row 15. As row 3.
Row 16. Ch1, 4sc, 1FPtr around each of 2 FPtr below, skip 2 sts, 3sc, skip next 2 FPdtr, 1FPdtr around each of next 2 FPdtr, skip 2 sts, 2sc, *1FPdtr around each of 2 skipped FPdtr, skip next 2 FPdtr, 1FPdtr around each of next 2 FPdtr, skip 4 sts, 2sc* twice, 1FPdtr around each of 2 skipped FPdtr, skip 2 sts, 3sc, 1FPtr around each of 2 FPtr below, skip 2 sts, 4sc; turn.

Row 17. As row 3.
Row 18. Ch1, 6sc, 1FPdtr around each of 2 FPtr below, skip 2 sts, 2sc, 1FPtr around each of 2 FPdtr below, skip next 2 FPdtr, 1FPdtr around each of next 2 FPdtr, skip 4sts, 2sc,
1FPdtr around each of 2 skipped FPdtr below placing them under FPdtr just made, skip next 2 FPdtr, 1FPdtr around each of next 2 FPdtr, skip 4 sts, 2sc,
1FPdtr around each of 2 skipped FPdtr below placing them under FPdtr just made, 1FPtr around each of next 2 FPdtr below, skip 4 sts, 2sc, 1FPdtr around each of 2 FPdtr below, skip 2 sts, 6sc; turn.

Row 19. As row 3.
Row 20. Ch1, 7sc, 1FPdtr around each of 2 FPdtr below, skip next 2 FPtr, 1FPdtr around each of next 2 FPdtr below, skip 4sts, 2sc, *1FPdtr around each of 2 skipped FPtr, skip next 2 FPdtr, 1FPdtr around each of next 2 FPdtr, skip 4 sts, 2sc* twice, 1FPdtr around each of 2 skipped FPdtr, 1FPdtr around each of next 2 FPtr, skip 4sts, 7sc; turn.
Row 21. As row 3.
Row 22. Ch1, 5sc, skip 2 FPdtr below, 1FPdtr around each of next 2 FPdtr, skip 2 sts, 3sc, *1FPdtr around each of 2 skipped FPdtr below placing them under FPdtr just made, skip next 2 FPdtr, 1FPdtr around each of next 2 FPdtr, skip 4 sts, 2sc* 3 times, 1sc, 1FPdtr around each of 2 skipped FPdtr below placing them under FPdtr just made, skip 2 sts, 5sc; turn.

Row 23. As row 3.
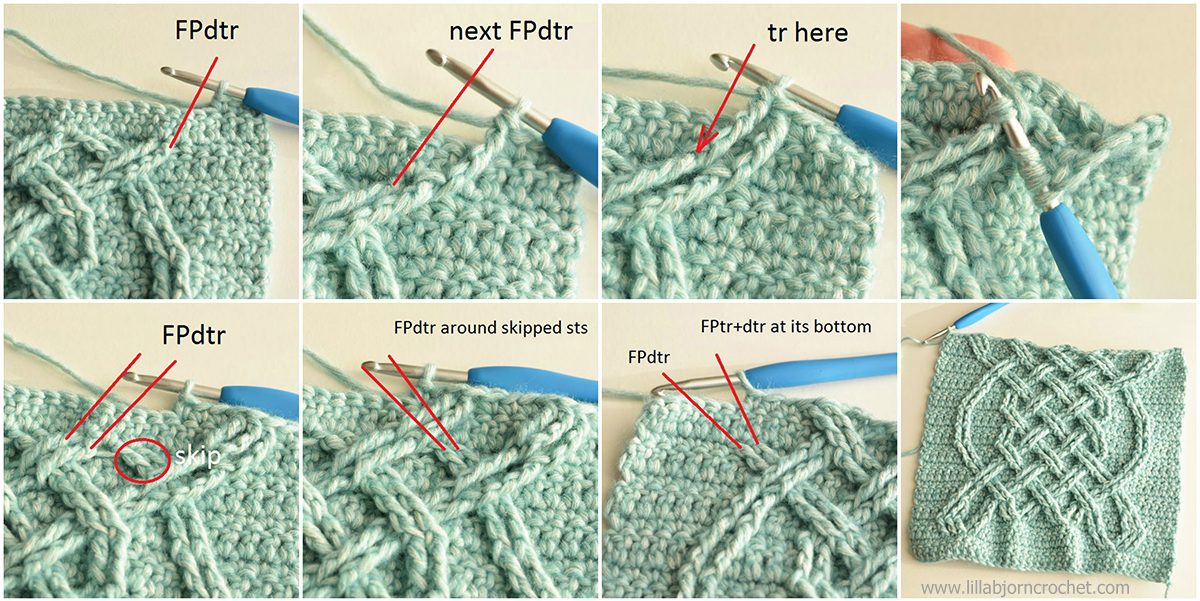
Row 24. Note: for a neater result instead of 2 FPdtr around same st, make 1FPdtr around indicated st and then 1tr inserting the hook in a hole at the bottom of FPdtr just made (see pic’s below).
Ch1, 3sc, 1FPdtr around 1st FPdtr below, 2FPdtr around next FPdtr below, skip 3sts, 3sc, skip next 2 FPdtr, 1FPdtr around each of next 2 FPdtr, skip 2 sts, 2sc, *1FPdtr around each of 2 skipped FPdtr, skip next 2 FPdtr, 1FPdtr around each of next 2 FPdtr, skip 4sts, 2sc* twice, 1FPdtr around each of 2 skipped FPdtr, skip 2 sts, 3sc, 2FPdtr around next FPdtr, 1FPdtr around next FPdtr, skip 3 sts, 3sc; turn.
Row 25. As row 3.
Row 26. Ch1, 5sc, 1FPdtr around each of 2 FPdtr below, 1FPdtr2tog around next 2 FPdtr, 1FPdtr around next FPdtr, skip 4 sts, 18sc, 1FPdtr around 5th (from the end of row) FPdtr below, 1FPdtr2tog around next 2 FPdtr, 1FPdtr around each of next 2 FPdtr, skip 4 sts, 5sc; turn.

Row 27. As row 3.
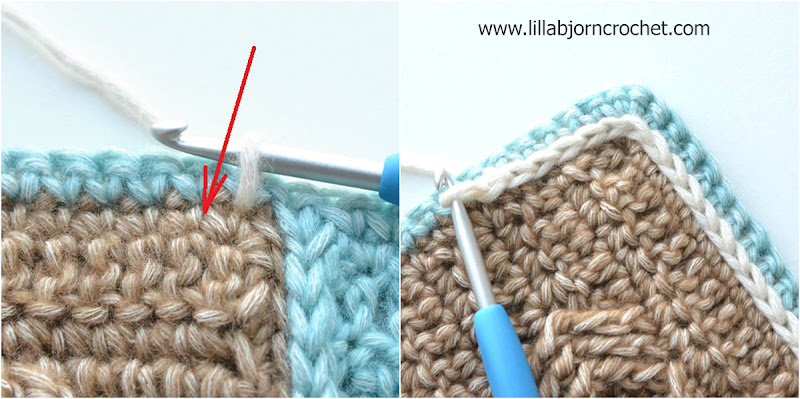
(RS) Ch1, 3sc in 1st st, 34sc, 3sc in last st, turn a quarter, 34 sc along the side evenly, turn a quarter, 3sc in 1st ch of foundation ch, 1sc in each of next 34ch, 3sc in last ch, turn a quarter, 34 sc along the side evenly. Join with ss in 1st sc after ch1. Fasten off, weave in tail. Block square to measurements.
Join squares together using the ‘flat zip method’ into a grid of 5 x 4 squares:
Place 2 squares to be joined next to one another, RS facing up. Insert your hook through the back loop of central st in the corner of the square on the right from front to back. Insert the hook through back loop of the central st in the corner of the other square from front to back, yo and draw through all 3 loops on the hook. Continue joining the back loops of each st with a ss in this way. The back loops of the stitches on each square will be the ones that are nearest the centre when you lay the squares side-by-side.

After last join don’t fasten off, turn, make ch1 and 1sc in the joining seam. Then continue to crochet around the entire blanket with sc on the WS always making 1sc in each joining seam and 3sc in the central sc in each corner. In the end of this rnd join with ss in the 1st sc and fasten off.

On RS make surface ss around the edge of the blanket inserting the hook in the sts of last round of small squares. Please, check THIS tutorial about how to make surface ss:
Congratulations! Your Celtic Tiles blanket is now completed!!
If you feel following written instructions is too difficult, please, watch Esther's video (It's All In a Nutshell):
About Celtic Tiles Blanket in brief:
Subscribe to a newsletter not to miss a single post. You can also follow me on Facebook, Pinterest and Instagram.


What you’ll need
- Yarn in one color. I used yarn “Stone Washed XL" by Scheepjes (50g/1.76 oz.,130 m/142 yds.) in shade Crystal Quartz (854) 87g for one square; 38 skeins for entire blanket
- Amour Crochet hook 5 mm (H)* or size needed to get an acceptable gauge.
- Stitch markers, scissors, tapestry needle to weave in yarn tails.
Stone Washed XL yarn is available for purchase in local Scheepjes stores and via online retailers:
Caro's Atelier* (NL and Europe)
Knotty House* (CA)
* DISCLOSURE: This blog contains affiliate links (marked with *). If you purchase a product via a link on my blog, I may get a small percentage contribution from the store which enables me to keep providing you with free patterns. It costs you nothing extra to visit the store via my link, but ensure I get the credit for the sale. Thank you for your support!
Gauge
15 sts x 10 rows = 10cm x 10cm (4in x 4in) with one row of dc, one row of sc patternFinished size
Each square is approx. 30cm/12” large when blocked. The entire blanket is approx. 122cm x 152cm (48in x 60in)Abbreviations and Stitch Guide (US terms)
US standard abbreviations are used in this pattern. But if you are used to other terms, please check this Crochet Translation Project which might be helpful in translation to your native language.
st(s) stitch(es)
ch chain
yo yarn over
lp(s) loop(s)
BL back loop(s)
WS wrong side
RS right side
sk skip st(s)
*…* *crochet following directions* as many times as indicated
ss (slip stitch) – insert hook in indicated st, yo, draw yarn up and pull 2nd lp through the 1st lp on hook.
sc (single crochet) – insert hook in indicated stitch, yo, draw up a lp, yo and pull through both lps on hook.
dc (double crochet) – yo, insert hook in indicated st, yo, draw up a lp, *yo, pull through 2 lps* twice.
FPtr (front post treble crochet) - yo twice, insert hook from front to back to front around the post of indicated stitch, yo, draw up a lp, *yo, pull through 2 lps* 3 times.
FPtr2tog (front post treble 2 together) - * yo twice, insert hook from front to back to front around the post of indicated stitch, yo, draw up a lp, [yo, pull through 2 lps] twice* twice, yo, pull through all 3 lps on hook.
FPdtr (front post double treble crochet) – yo 3 times, insert hook from front to back to front around the post of indicated stitch, yo, draw up a lp, *yo, pull through 2 lps* 4 times.
FPdtr2tog (front post double treble crochet 2 together) - *yo 3 times, insert hook from front to back around the post of indicated stitch, yo, draw up a lp,[yo, pull through 2 lps] 3 times*, twice, yo, pull through all 3 lps on hook.
Important notes
1. Reading the pattern. This pattern contains written instructions and a lot of pictures showing to which sts the overlaid stitches should be added (these sts are marked by arrows). I would strongly recommend using both kinds of instructions. It will be easier to read and understand the written instructions after looking at the pictures. This pattern is written for right-handed people.
2. Turning ch1/ch2. This square is worked in rows, back and forth. Ch1/ch2 in the beginning of each row doesn’t count as a st. So 1st st is always made in 1st st of previous row.
3. Gauge. Overlaid stitches are used to crochet this square, that’s why it is very important to have their gauge under control: they should be neither too loose nor too tight, because this will lead to a deformation of the shape. The right tensioned overlay stitches should be made to the height of the working round. And width of your square should stay the same after each row.

4. Skipping sts. Overlaid stitches “hide” the stitches of background and this is the reason, why sc of the working round should be skipped. Please note that the number of overlaid stitches is always the same as the number of skipped sts. And stitch count after each row is the same.
It might be tricky to keep track on skipped sts. Stitch markers can help you. After completing sc before each group of next FPsts, insert stitch marker in next sts. Then make indicated FPsts. And now 1st marked sts behind them will be counted at 1st skipped st.

Because you always skip sts behind FPsts, you will have gaps behind them. They are adding drape to the square and prevent it from being stiff. If you would like to get rid of these gaps, you can “close” them working on wrong side. To do so, insert the hook in back loops of skipped stitches and under both loops of corresponding FPsts of previous row (see pics below).

5. Inserting hook. If you make a front post stitch, the hook is always inserted from front to back and then again to front around the post (vertical part) of the indicated st. In other words, the hook will be inserted behind the post.

******************************************************
Instructions – Square (make 20)
Add this pattern to your Ravelry Queue*Purchase an ad-free and ready-to-print PDF of this pattern (including all Important Notes, material list, stitch guide, complete instructions and photo tutorials) HERE on Ravelry. There is also a print friendly copy of the pattern available for download - with no pictures*
VIDEO. Esther of It's All In A Nutshell has made a very detailed and professional video for this pattern (HERE). She will guide you through every single stitch.
Copyright LillaBjornCrochet 2017. All rights reserved. This pattern is for unlimited personal use only. Do not reproduce or sell the pattern. The pattern may not be copied in any way (print or digitally), in part or in full. Items may be sold that are made from this pattern as long as the designer is credited. Shop owners, if you wish to make a kit with yarn using this pattern, please request permission and copyright details from me before offering any kits for sale. Please, read Copyright page for more information.
******************************************************
To complete one square you will need approx. 86-87g of Stone Washed XL. Please, make sure you use not more than this amount, because otherwise yarn in the kit will not be enough to complete the blanket.
Row 1. (WS) Ch38. 1dc in 3rd ch from hook, 1dc in each ch to the end. Turn. (36 sts)
Row 2. (RS) Ch1 (doesn’t count as st here and throughout), 1sc in each st to the end. Turn (36 sts)
Row 3. Ch2 (doesn’t count as st here and throughout), 1dc in each st to the end. Turn.
Row 4. Note: all front post stitches are made around sts from 2 rows below – here and throughout the pattern.
Ch1, 3sc, 1FPtr around 6th sc from 2 rows below, 1FPtr around each of next 2 sts, skip 3 sts behind FPtr’s just made, 3sc, 1FPtr around same sc from 2 rows below, 1FPtr around next sc, skip 2 sts behind FPtr’s just made, 14sc, 1FPtr around 9th sc (from the end of the row) from 2 rows below, 1FPtr around next sc, skip 2 sts behind FPtr’s just made, 3sc, 1FPtr around same sc, 1FPtr around each of next 2 sc, skip 3 sts behind FPtr just made, 3sc; turn.

Row 5. As row 3.
Row 6. Ch1, 5sc, 1FPtr around 1st FPtr below, 1FPtr2tog around next 2 FPtr, skip 2 sts, 3sc, 1FPtr around each of 2FPtr below, skip 2sc on row 4, 1FPtr around each of next 2 sc, skip 4 sts on row 5, 2sc, 1FPtr around same sc from 2 rows below, 1FPtr around next sc, skip 4 sc on row 4, 1FPtr around each of next 2 sc, skip 4 sts on row 5, 2sc, 1FPtr around same sc from 2 rows below, 1FPtr around next sc, 1FPtr around each of next 2 FPtr below, skip 4 sts on row 5, 3sc, 1FPtr2tog around next 2FPtr, 1FPtr around next FPtr, skip 2 sts on row 5, 5sc; turn.

Row 8. Note: on this and all next rows by “skipped sts” are meant sts of previous row, hidden behind front post stitches just made.
Ch1, 7sc, 1FPdtr around 1st FPtr below, 1FPdtr around next FPtr2tog, *skip next 2 FPtr, 1FPdtr around each of next 2 FPtr, skip 4 sts, 2sc, 1FPdtr around each of 2 skipped FPtr below* 3 times, 1FPdtr around next FPtr2tog, 1FPdtr around next FPtr, skip 4sts, 7sc; turn.

Row 9. As row 3.
Row 10. Ch1, 6sc, skip 2 FPdtr below, 1FPdtr around each of next 2 FPdtr, skip 2 sts, 2sc, *1FPdtr around each of 2 skipped FPdtr placing them under FPdtr just made (see pics below), skip next 2 FPdtr, 1FPdtr around each of next 2 FPdtr, skip 4 sts, 2sc* 3 times, 1FPdtr around each of 2 skipped FPdtr placing them under FPdtr just made, skip 2 sts, 6sc; turn.

Row 11. As row 3.
Row 12. Ch1, 4sc, 1FPdtr around each of 2 FPdtr below, skip 2 sts, 3sc, skip next 2 FPdtr, 1FPdtr around each of next 2 FPdtr, skip 2 sts, 2sc, *1FPdtr around each of 2 skipped FPdtr, skip next 2 FPdtr, 1FPdtr around each of next 2 FPdtr, skip 4 sts, 2sc* twice, 1FPdtr around each of 2 skipped FPdtr, skip 2 sts, 3sc, 1FPdtr around each of 2 FPdtr below, skip 2 sts, 4sc; turn.

Row 13. As row 3.
Row 14. Ch1, 4sc, 1FPtr around each of 2 FPdtr below, skip 2 sts, 4sc, 1FPtr around each of 2 FPdtr below, skip next 2 FPdtr, 1FPdtr around each of next 2 FPdtr, skip 4sts, 2sc,
1FPdtr around each of 2 skipped FPdtr placing them under FPdtr just made, skip next 2 FPdtr, 1FPdtr around each of next 2 FPdtr, skip 4 sts, 2sc,
1FPdtr around each of 2 skipped FPdtr placing them under FPdtr just made, 1FPtr around each of next 2 FPdtr below, skip 4 sts, 4sc, 1FPtr around each of 2 FPdtr below, skip 2 sts, 4sc; turn.

Row 15. As row 3.
Row 16. Ch1, 4sc, 1FPtr around each of 2 FPtr below, skip 2 sts, 3sc, skip next 2 FPdtr, 1FPdtr around each of next 2 FPdtr, skip 2 sts, 2sc, *1FPdtr around each of 2 skipped FPdtr, skip next 2 FPdtr, 1FPdtr around each of next 2 FPdtr, skip 4 sts, 2sc* twice, 1FPdtr around each of 2 skipped FPdtr, skip 2 sts, 3sc, 1FPtr around each of 2 FPtr below, skip 2 sts, 4sc; turn.

Row 17. As row 3.
Row 18. Ch1, 6sc, 1FPdtr around each of 2 FPtr below, skip 2 sts, 2sc, 1FPtr around each of 2 FPdtr below, skip next 2 FPdtr, 1FPdtr around each of next 2 FPdtr, skip 4sts, 2sc,
1FPdtr around each of 2 skipped FPdtr below placing them under FPdtr just made, skip next 2 FPdtr, 1FPdtr around each of next 2 FPdtr, skip 4 sts, 2sc,
1FPdtr around each of 2 skipped FPdtr below placing them under FPdtr just made, 1FPtr around each of next 2 FPdtr below, skip 4 sts, 2sc, 1FPdtr around each of 2 FPdtr below, skip 2 sts, 6sc; turn.

Row 19. As row 3.
Row 20. Ch1, 7sc, 1FPdtr around each of 2 FPdtr below, skip next 2 FPtr, 1FPdtr around each of next 2 FPdtr below, skip 4sts, 2sc, *1FPdtr around each of 2 skipped FPtr, skip next 2 FPdtr, 1FPdtr around each of next 2 FPdtr, skip 4 sts, 2sc* twice, 1FPdtr around each of 2 skipped FPdtr, 1FPdtr around each of next 2 FPtr, skip 4sts, 7sc; turn.

Row 21. As row 3.
Row 22. Ch1, 5sc, skip 2 FPdtr below, 1FPdtr around each of next 2 FPdtr, skip 2 sts, 3sc, *1FPdtr around each of 2 skipped FPdtr below placing them under FPdtr just made, skip next 2 FPdtr, 1FPdtr around each of next 2 FPdtr, skip 4 sts, 2sc* 3 times, 1sc, 1FPdtr around each of 2 skipped FPdtr below placing them under FPdtr just made, skip 2 sts, 5sc; turn.

Row 23. As row 3.
Row 24. Note: for a neater result instead of 2 FPdtr around same st, make 1FPdtr around indicated st and then 1tr inserting the hook in a hole at the bottom of FPdtr just made (see pic’s below).
Ch1, 3sc, 1FPdtr around 1st FPdtr below, 2FPdtr around next FPdtr below, skip 3sts, 3sc, skip next 2 FPdtr, 1FPdtr around each of next 2 FPdtr, skip 2 sts, 2sc, *1FPdtr around each of 2 skipped FPdtr, skip next 2 FPdtr, 1FPdtr around each of next 2 FPdtr, skip 4sts, 2sc* twice, 1FPdtr around each of 2 skipped FPdtr, skip 2 sts, 3sc, 2FPdtr around next FPdtr, 1FPdtr around next FPdtr, skip 3 sts, 3sc; turn.

Row 25. As row 3.
Row 26. Ch1, 5sc, 1FPdtr around each of 2 FPdtr below, 1FPdtr2tog around next 2 FPdtr, 1FPdtr around next FPdtr, skip 4 sts, 18sc, 1FPdtr around 5th (from the end of row) FPdtr below, 1FPdtr2tog around next 2 FPdtr, 1FPdtr around each of next 2 FPdtr, skip 4 sts, 5sc; turn.

Row 27. As row 3.
Edge
(RS) Ch1, 3sc in 1st st, 34sc, 3sc in last st, turn a quarter, 34 sc along the side evenly, turn a quarter, 3sc in 1st ch of foundation ch, 1sc in each of next 34ch, 3sc in last ch, turn a quarter, 34 sc along the side evenly. Join with ss in 1st sc after ch1. Fasten off, weave in tail. Block square to measurements.
Joining and Border
Join squares together using the ‘flat zip method’ into a grid of 5 x 4 squares:
Place 2 squares to be joined next to one another, RS facing up. Insert your hook through the back loop of central st in the corner of the square on the right from front to back. Insert the hook through back loop of the central st in the corner of the other square from front to back, yo and draw through all 3 loops on the hook. Continue joining the back loops of each st with a ss in this way. The back loops of the stitches on each square will be the ones that are nearest the centre when you lay the squares side-by-side.

After last join don’t fasten off, turn, make ch1 and 1sc in the joining seam. Then continue to crochet around the entire blanket with sc on the WS always making 1sc in each joining seam and 3sc in the central sc in each corner. In the end of this rnd join with ss in the 1st sc and fasten off.

On RS make surface ss around the edge of the blanket inserting the hook in the sts of last round of small squares. Please, check THIS tutorial about how to make surface ss:

Congratulations! Your Celtic Tiles blanket is now completed!!
If you feel following written instructions is too difficult, please, watch Esther's video (It's All In a Nutshell):
About Celtic Tiles Blanket in brief:
- Level: Intermediate (front post stitches)
- Materials: Aran yarn in one color (Stone Washed XL by Scheepjes - yarn packs (38 skeins) are available at Wool Warehouse HERE*, Deramores HERE* and in your local Scheepjes shops), 5mm(H) crochet hook, stitch markers, scissors, tapestry needle to weave in ends.
- Size: each square is approx. 30cm/12in large. Entire blanket is 122cm x 152cm (48in x 60in).
- Language: English
- Instructions: US crochet terms and abbreviations (including complete stitch guide), written instructions, step-by-step pictures.
- Ready-to-print ads free pattern in PDF format is available for purchase HERE on Ravelry.
Subscribe to a newsletter not to miss a single post. You can also follow me on Facebook, Pinterest and Instagram.
You may probably know I have been working on a new blanket design using Stone Washed XL* yarn by Scheepjes. I had a few more sleepless nights and I am very close to writing the pattern down. Next week I will be busy making a photo-tutorial and hopefully I will also show you finished blanket. Oh yes, the pattern will be free!

What is my blanket about? It is about cables again. Cables and squares. Last year my Celtic Cabled Mandala design was released and it had a huge success. And this showed me crochet cables are very trendy right now. Patterns with front post stitches are not lazy and require lots of attention. And they are fun to follow and to make. Very often they call for just one colour, and there is no need to weave in endless yarn tails. And that’s a big advantage, don’t you agree?

I chose Stone Washed XL yarn because it’s very tactile, very nice to touch and perfect for blanket designs. It’s Aran weight and blankets made with this yarn give a nice heavy feel. I can’t wait to join my squares together and to snuggle under this blanket.

As I noted last week, I am using Crystal Quartz for my own blanket. But Stone Washed XL by Scheepjes has a very nice range of colours, and you can choose what you like the most. I made several samples to show you – in Moon Stone, Boulder Opal and Smokey Quartz. There will be one more sample in Amazonite, I will finish it and show you next week. I think cables look equally good when made with both light and dark shades. It’s even possible to mix them.

In free pattern I will give you exact yardages for each square, and you will be able to compose your own blanket.
In a meanwhile you can have a look at colour charts at Wool Warehouse (HERE*) and Deramores (HERE*) – both retailers ship orders worldwide. Stone Wahsed XL yarn is also available at Paradise Fibers* (US) and in your local Scheepjes shops.
And now I am back to my crochet again… See you soon!
UPDATE: the pattern for Celtic Tiles Square is available HERE.
Subscribe to a newsletter not to miss a single post. You can also follow me on Facebook, Pinterest and Instagram.
* thank you for using my affiliate links. It costs you nothing and helps to support my blog.

What is my blanket about? It is about cables again. Cables and squares. Last year my Celtic Cabled Mandala design was released and it had a huge success. And this showed me crochet cables are very trendy right now. Patterns with front post stitches are not lazy and require lots of attention. And they are fun to follow and to make. Very often they call for just one colour, and there is no need to weave in endless yarn tails. And that’s a big advantage, don’t you agree?

I chose Stone Washed XL yarn because it’s very tactile, very nice to touch and perfect for blanket designs. It’s Aran weight and blankets made with this yarn give a nice heavy feel. I can’t wait to join my squares together and to snuggle under this blanket.

As I noted last week, I am using Crystal Quartz for my own blanket. But Stone Washed XL by Scheepjes has a very nice range of colours, and you can choose what you like the most. I made several samples to show you – in Moon Stone, Boulder Opal and Smokey Quartz. There will be one more sample in Amazonite, I will finish it and show you next week. I think cables look equally good when made with both light and dark shades. It’s even possible to mix them.

In free pattern I will give you exact yardages for each square, and you will be able to compose your own blanket.
In a meanwhile you can have a look at colour charts at Wool Warehouse (HERE*) and Deramores (HERE*) – both retailers ship orders worldwide. Stone Wahsed XL yarn is also available at Paradise Fibers* (US) and in your local Scheepjes shops.
And now I am back to my crochet again… See you soon!
UPDATE: the pattern for Celtic Tiles Square is available HERE.
Subscribe to a newsletter not to miss a single post. You can also follow me on Facebook, Pinterest and Instagram.
* thank you for using my affiliate links. It costs you nothing and helps to support my blog.
Subscribe to:
Posts (Atom)


