Showing posts with label Labyrinth Mandala. Show all posts
Showing posts with label Labyrinth Mandala. Show all posts
Designing is a magic process. Really! Sometimes when I get an idea I feel my hands and my head don’t belong to me anymore. They are guided by some powerful, inspiring energy – till the end, when new crochet design is finally finished. And I truly believe creative ideas live on their own, and choose people (designers, artists and crafters) with whom they “want to work”. And this becomes even more obvious when I see what other people create with my patterns. Last week there was one of those moments when you silently look at the picture and can hardly say anything. Last week I saw Labyrinth Celtic mandala blanket finished by Taemombo (that's a Ravelry name as the author asked not to use her real name in the post).

I have been following Taemombo's work in my Ravelry group. I remember when she first posted and told she would like to combine several mandala’s and make a blanket. That’s sounded very interesting, though I couldn’t really imagine how it would turn out in the end! And today I am so happy to host Taemombo on my blog. She has kindly agreed to answer my questions and share her creative journey with us (all pictures are credited to Taemombo and used with her permission).
- Your blanket looks amazing!! How did you come up with this idea?
- I was looking for a pattern without flowers and not too girly so I could make a blanket for my husband. Every blanket I had made before I gave away. He has always been so supportive with the compliments and money for yarn, I decided it was his turn to get one. I bought some yarn and he liked the colors so decided they would be for his blanket.

When I saw the Labyrinth Mandala come up on Ravelry I was so excited. It was perfect!! I made the first mandala and he loved it, so I just kept making them. I had already made one Celtic Mandala which I enjoyed the challenge and figured I could work it into the blanket as well. So I had all these mandalas growing but wasn’t sure how to turn them into a blanket.

First I thought I would square them but since I’m not a designer and just a crocheter I needed a pattern especially since it was big and I didn’t want to ruin it now. I needed more stitches per round to square and decided Joana’s Mandala suited the Celtic Mandala, so added the last 14 rounds. I put all the notes about mandala modifications on my Ravelry project page, and you can check them HERE.
Still not convinced how to turn ready mandalas into a blanket I went back to Ravelry scouting for ideas. I came across the Summer Mosaic pattern by Julie Yaeger and figured, hey, this would work. After the Labyrinth Mandala’s were finished I laid them out on the floor. Looking at that picture all of a sudden I remembered a Waldo’s Puzzle square I had seen, so added that into the equation. Next was the border and Labyrinth Border had come out in the mean time. It was so fitting, and I had to use it! I added the last border section to the blanket with a few minor alterations to keep it square (without increases).

- How many blankets have you made in your life? What do you do with finished items?
The first blanket and mandala I had ever made was Mandala Madness CAL by Helen Shrimpton, which my best friend convinced me I should do with her. I was one of those people who said they would never make a blanket, never say never. While I was doing the CAL it was just too much time between releases so I added another blanket to my project list for my son. My niece got engaged as well so another blanket added to my project page! I was hooked! Made 7 blankets so far. They make excellent hugs to give away.
Always admired Tatsiana’s mandalas and didn’t know if that might be way beyond my ability but as I kept going and loved learning new stitches and techniques I decided it was time to tackle one which turned into two. My best friend’s blanket deserved the best. I chose Mint Coffee Mandala, then enlarged it with bits of Spanish Mandala and added Dandelion Border using Sophie loves Lilla Bjorn winter blanket pattern.

- When did you learn to crochet?
- I started crocheting by accident really. My sister did lots and told my daughter she should get her to teach her. She just laughed at me and said I should learn and make her things. Since her birthday was just a few weeks away and she was going away for a week I decided to surprise her by learning how to crochet and make her something for her birthday. So got my sister to teach me the chain and single crochet, then I went home and found a video tutorial for a mouse, my first project. That was December 2014.

- Do you also knit?
- Knitting, no! Grandma tried when I was about 8-10 but I couldn’t cast on or off and tension was all over the map as well as the number of stitches. I failed, never tried since.
******************************************************************
Subscribe to a newsletter not to miss a single post. You can also follow me on Facebook, Pinterest and Instagram.


I have been following Taemombo's work in my Ravelry group. I remember when she first posted and told she would like to combine several mandala’s and make a blanket. That’s sounded very interesting, though I couldn’t really imagine how it would turn out in the end! And today I am so happy to host Taemombo on my blog. She has kindly agreed to answer my questions and share her creative journey with us (all pictures are credited to Taemombo and used with her permission).
- Your blanket looks amazing!! How did you come up with this idea?
- I was looking for a pattern without flowers and not too girly so I could make a blanket for my husband. Every blanket I had made before I gave away. He has always been so supportive with the compliments and money for yarn, I decided it was his turn to get one. I bought some yarn and he liked the colors so decided they would be for his blanket.

When I saw the Labyrinth Mandala come up on Ravelry I was so excited. It was perfect!! I made the first mandala and he loved it, so I just kept making them. I had already made one Celtic Mandala which I enjoyed the challenge and figured I could work it into the blanket as well. So I had all these mandalas growing but wasn’t sure how to turn them into a blanket.

First I thought I would square them but since I’m not a designer and just a crocheter I needed a pattern especially since it was big and I didn’t want to ruin it now. I needed more stitches per round to square and decided Joana’s Mandala suited the Celtic Mandala, so added the last 14 rounds. I put all the notes about mandala modifications on my Ravelry project page, and you can check them HERE.
Still not convinced how to turn ready mandalas into a blanket I went back to Ravelry scouting for ideas. I came across the Summer Mosaic pattern by Julie Yaeger and figured, hey, this would work. After the Labyrinth Mandala’s were finished I laid them out on the floor. Looking at that picture all of a sudden I remembered a Waldo’s Puzzle square I had seen, so added that into the equation. Next was the border and Labyrinth Border had come out in the mean time. It was so fitting, and I had to use it! I added the last border section to the blanket with a few minor alterations to keep it square (without increases).

- How many blankets have you made in your life? What do you do with finished items?
The first blanket and mandala I had ever made was Mandala Madness CAL by Helen Shrimpton, which my best friend convinced me I should do with her. I was one of those people who said they would never make a blanket, never say never. While I was doing the CAL it was just too much time between releases so I added another blanket to my project list for my son. My niece got engaged as well so another blanket added to my project page! I was hooked! Made 7 blankets so far. They make excellent hugs to give away.
Always admired Tatsiana’s mandalas and didn’t know if that might be way beyond my ability but as I kept going and loved learning new stitches and techniques I decided it was time to tackle one which turned into two. My best friend’s blanket deserved the best. I chose Mint Coffee Mandala, then enlarged it with bits of Spanish Mandala and added Dandelion Border using Sophie loves Lilla Bjorn winter blanket pattern.

- When did you learn to crochet?
- I started crocheting by accident really. My sister did lots and told my daughter she should get her to teach her. She just laughed at me and said I should learn and make her things. Since her birthday was just a few weeks away and she was going away for a week I decided to surprise her by learning how to crochet and make her something for her birthday. So got my sister to teach me the chain and single crochet, then I went home and found a video tutorial for a mouse, my first project. That was December 2014.

- Do you also knit?
- Knitting, no! Grandma tried when I was about 8-10 but I couldn’t cast on or off and tension was all over the map as well as the number of stitches. I failed, never tried since.
******************************************************************
Subscribe to a newsletter not to miss a single post. You can also follow me on Facebook, Pinterest and Instagram.
Last month Labyrinth Mandala pillow pattern was released (you can read about it HERE). It was inspired by monochromic vector illustrations. This design became a big success, I got lots of lovely messages and comments, and recently quite a few projects have been finished (yay!). For some this pattern looks like Aztec, others see Greek motifs… When I finished several pillows, I thought it would be nice to grow Labyrinth Mandala in something bigger. Into a rug maybe. And today I am happy to introduce Labyrinth Border to you.

Add this pattern to your Ravelry Queue
Labyrinth Border was designed especially for Labyrinth Mandala, but it can be used for any mandala (or any crocheted circle) with 208 stitches on the last round. It’s the same in style and in stitch pattern, and it also imitates Brioche knitting stitch.
Border is available for purchase as a separate pattern HERE on Ravelry. If you would like to purchase Border together with Labyrinth Mandala, please put them TOGETHER in cart and 2$ discount will be automatically offered at the check-out. Previous purchases will also count. Even if you bought Mandala pattern before - please, put it to cart together with the Border. Ravelry system will see it as already purchased and you will not pay twice.

The border consists of two parts: wide part with graphical petals and narrow geometrical edge. I recommend to use only 2 colors for each section as it helps the pattern to pop up well. But you can also go creative and mix ombre shades together. I bet it will look very pretty, too!

As Labyrinth Mandala, the border is also made in overlay crochet technique with lots of front post stitches. The pattern is not very tricky (though you may say the opposite looking at the pictures), and lots of progress pictures are included to help you with every round.
It’s true that this pattern requires lots of attention and concentration. If you are fond of counting – then it is right for you. And if you are not fond of counting – both Labyrinth patterns will teach you to be patient. And it’s just always nice to try and learn something new.

I have created two Labyrinth rugs – both using Bloom yarn by Scheepjes* (16 skeins in total for both Mandala and Border). One of them is with 2 shades only (804 and 813). And while making another one I wanted to experiment with colors a little bit. My idea was to start with dark green and to gradient change to light green-yellow-white by the edge. Well, to be honest, I didn’t like how it was turning out. So several sections were frogged and I continued to work with only 3 colors. I believe it looks nice, what do you think? And did you know that green is a new color for year 2017? Great! My rug is in trend!
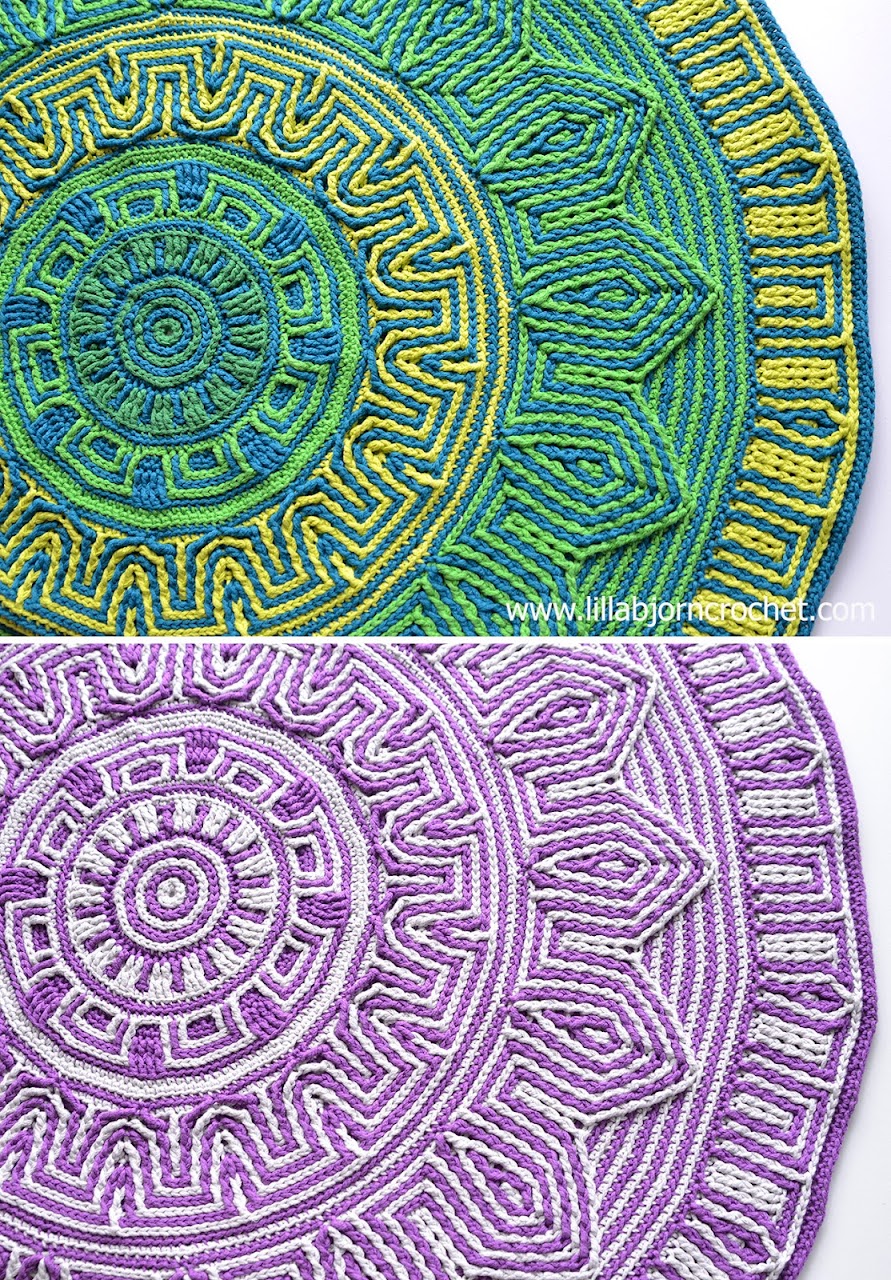
Bloom is Worsted yarn, and both rugs are approx. 82cm (32in) large across. I used 4.5mm (US7) Clover Amour crochet hook* and it gave me just the right tension. The fabric is sturdy and keeping its shape very well. Of course, if you use yarn in another weight, your rug will become either bigger or smaller.

If you intend to use this design as a rug, please, make sure you add anti-slip protection. Because this is not a lace design the anti-slip carpet pads can be a very good solution. Please, read HERE more about how to make your crocheted rugs non-slip.

About Labyrinth Border pattern in brief:
• Level: Intermediate (front post stitches, working in 3rd loop)
• Materials: Worsted yarn in 2 colours (Bloom by Scheepjes - available via Wool Warehouse HERE*, Deramores HERE*, Paradise Fibers (US)* and in your local Scheepjes shops), 4.5mm (US7) crochet hook*, stitch markers, scissors, tapestry needle to weave in ends.
• Size: The size of the finished border depends on the yarn and hook you use. My rug is approx. 82 cm (32 inches) in diameter (including central mandala).
• Language: English
• Instructions: US crochet terms and abbreviations (including complete stitch guide), written instructions, step-by-step pictures. Print friendly copy of the pattern is available (with no pictures)
Subscribe to a newsletter not to miss a single post. You can also follow me on Facebook, Pinterest and Instagram.
* thank you for using my affiliate links. It costs you nothing and helps to support my blog.

Add this pattern to your Ravelry Queue
Labyrinth Border was designed especially for Labyrinth Mandala, but it can be used for any mandala (or any crocheted circle) with 208 stitches on the last round. It’s the same in style and in stitch pattern, and it also imitates Brioche knitting stitch.
Border is available for purchase as a separate pattern HERE on Ravelry. If you would like to purchase Border together with Labyrinth Mandala, please put them TOGETHER in cart and 2$ discount will be automatically offered at the check-out. Previous purchases will also count. Even if you bought Mandala pattern before - please, put it to cart together with the Border. Ravelry system will see it as already purchased and you will not pay twice.

The border consists of two parts: wide part with graphical petals and narrow geometrical edge. I recommend to use only 2 colors for each section as it helps the pattern to pop up well. But you can also go creative and mix ombre shades together. I bet it will look very pretty, too!

As Labyrinth Mandala, the border is also made in overlay crochet technique with lots of front post stitches. The pattern is not very tricky (though you may say the opposite looking at the pictures), and lots of progress pictures are included to help you with every round.
It’s true that this pattern requires lots of attention and concentration. If you are fond of counting – then it is right for you. And if you are not fond of counting – both Labyrinth patterns will teach you to be patient. And it’s just always nice to try and learn something new.

I have created two Labyrinth rugs – both using Bloom yarn by Scheepjes* (16 skeins in total for both Mandala and Border). One of them is with 2 shades only (804 and 813). And while making another one I wanted to experiment with colors a little bit. My idea was to start with dark green and to gradient change to light green-yellow-white by the edge. Well, to be honest, I didn’t like how it was turning out. So several sections were frogged and I continued to work with only 3 colors. I believe it looks nice, what do you think? And did you know that green is a new color for year 2017? Great! My rug is in trend!

Bloom is Worsted yarn, and both rugs are approx. 82cm (32in) large across. I used 4.5mm (US7) Clover Amour crochet hook* and it gave me just the right tension. The fabric is sturdy and keeping its shape very well. Of course, if you use yarn in another weight, your rug will become either bigger or smaller.

If you intend to use this design as a rug, please, make sure you add anti-slip protection. Because this is not a lace design the anti-slip carpet pads can be a very good solution. Please, read HERE more about how to make your crocheted rugs non-slip.

About Labyrinth Border pattern in brief:
• Level: Intermediate (front post stitches, working in 3rd loop)
• Materials: Worsted yarn in 2 colours (Bloom by Scheepjes - available via Wool Warehouse HERE*, Deramores HERE*, Paradise Fibers (US)* and in your local Scheepjes shops), 4.5mm (US7) crochet hook*, stitch markers, scissors, tapestry needle to weave in ends.
• Size: The size of the finished border depends on the yarn and hook you use. My rug is approx. 82 cm (32 inches) in diameter (including central mandala).
• Language: English
• Instructions: US crochet terms and abbreviations (including complete stitch guide), written instructions, step-by-step pictures. Print friendly copy of the pattern is available (with no pictures)
Subscribe to a newsletter not to miss a single post. You can also follow me on Facebook, Pinterest and Instagram.
* thank you for using my affiliate links. It costs you nothing and helps to support my blog.
First mandala design of the year 2017 is here! Or technically it is second design as last week my UFO pillow was published… But that was just an experiment with Camel crochet stitch and through it’s round and reminds of a mandala a bit, I would say that my true mandala was born today. Let me introduce: Labyrinth Mandala pillow.
 Add this pattern to your Ravelry Queue
I feel magic when designs are being born fast. When true inspiration comes and you just need to grab yarns and hook at once and start crocheting immediately. I felt something similar when Spanish mandala was created. The same strong stream of creative energy and a few sleepless nights.
The story behind Labyrinth mandala is very simple. I was browsing black and white vector graphics on Pinterest the other day. Late at night of course. And I was amazed by how many graphical mandalas are out there. Suddenly those illustrations reminded me of a knitting brioche stitch. And ta-dah! Idea was already standing behind me. It was probably a very powerful idea because instead of going to bed, I went to bedroom to pick yarns. Not that I chose the yarns. I just grabbed first two skeins that came to my hands in the darkness (everyone in the house was sleeping already…). And started to crochet. After 2 hours it was clear my idea can work (and I could finally fall asleep, haha).
When next day my husband saw the wip he said: Labyrinth.

So here is my Labyrinth Mandala. I’ve made quite a few already trying different color combinations. And the possibilities of this design are really huge. You can make it with many shades, or only 2 shades. My dream is to try crocheting it once again with just black and white. As I take lots of progress pictures for all my patterns, black yarn would not work well as the stitches would not be seen. But one day when I have more time I will definitely recreate Labyrinth Mandala to make it look exactly like a black and white vector illustration.

I really-really wanted to imitate brioche knitting stitch, and to obtain a knit-look effect. And I think it worked well thanks to front post stitches and working in 3rd loops on some rounds. I used the same technique for UFO pillow, you can check a detailed tutorial HERE.

I made 2 pillow covers using Labyrinth Mandala. Both are reversible, with different color combination (or colourway) on each side. So that it’s easy to wash my pillowcases I inserted a zip closure. But if you don’t feel like sewing you can just join two mandalas by crocheting around, with single crochet stitches, for example.

For my pillow I used Soft Touch Clover hook (4mm/G)* and Soft Fun cotton yarn by Scheepjes. This yarn is available in a wide range of shades, so you can create bright or pastel versions. Or you can even mix unexpected colors together. Whatever palette you choose, it’s better to use only two shades for each of three sections. Exact yardages for each section are given in the pattern. You can find Soft Fun at Wool Warehouse (HERE*), Deramores (HERE*) and your local Scheepjes shops.

And here is another version with Bloom yarn* by Scheepjes:
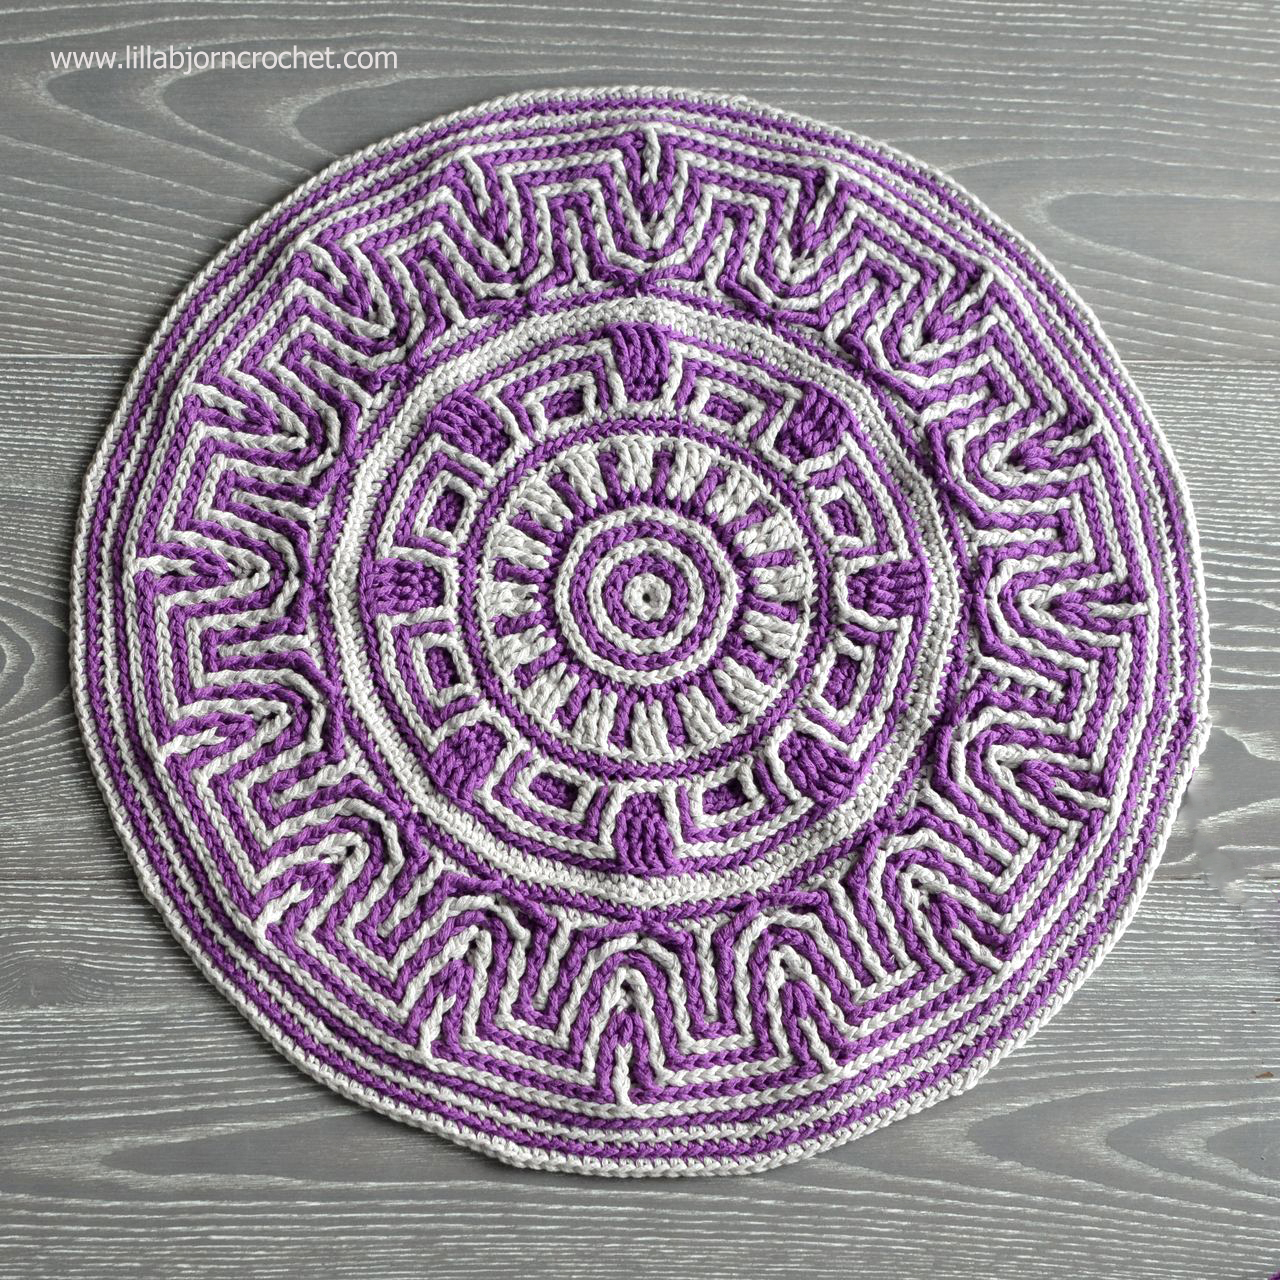
If you don’t need another pillow, there are many more ways to use Labyrinth Mandala pattern. You can make stool covers, trivets, wall hanging… and even a purse maybe? I am actually thinking about attaching two handles and adding fabric lining to one of my mandala’s. If you do so, please don’t forget to share pictures with me. I LOVE to see finished projects (please, use #labyrinthcrochetmandala to share them on social media).
The pattern is available for purchase in my Ravelry store HERE.

Here is brief information about the pattern:
* thank you for using my affiliate links. It costs you nothing and helps to support my blog.

I feel magic when designs are being born fast. When true inspiration comes and you just need to grab yarns and hook at once and start crocheting immediately. I felt something similar when Spanish mandala was created. The same strong stream of creative energy and a few sleepless nights.
The story behind Labyrinth mandala is very simple. I was browsing black and white vector graphics on Pinterest the other day. Late at night of course. And I was amazed by how many graphical mandalas are out there. Suddenly those illustrations reminded me of a knitting brioche stitch. And ta-dah! Idea was already standing behind me. It was probably a very powerful idea because instead of going to bed, I went to bedroom to pick yarns. Not that I chose the yarns. I just grabbed first two skeins that came to my hands in the darkness (everyone in the house was sleeping already…). And started to crochet. After 2 hours it was clear my idea can work (and I could finally fall asleep, haha).
When next day my husband saw the wip he said: Labyrinth.

So here is my Labyrinth Mandala. I’ve made quite a few already trying different color combinations. And the possibilities of this design are really huge. You can make it with many shades, or only 2 shades. My dream is to try crocheting it once again with just black and white. As I take lots of progress pictures for all my patterns, black yarn would not work well as the stitches would not be seen. But one day when I have more time I will definitely recreate Labyrinth Mandala to make it look exactly like a black and white vector illustration.

I really-really wanted to imitate brioche knitting stitch, and to obtain a knit-look effect. And I think it worked well thanks to front post stitches and working in 3rd loops on some rounds. I used the same technique for UFO pillow, you can check a detailed tutorial HERE.

I made 2 pillow covers using Labyrinth Mandala. Both are reversible, with different color combination (or colourway) on each side. So that it’s easy to wash my pillowcases I inserted a zip closure. But if you don’t feel like sewing you can just join two mandalas by crocheting around, with single crochet stitches, for example.

For my pillow I used Soft Touch Clover hook (4mm/G)* and Soft Fun cotton yarn by Scheepjes. This yarn is available in a wide range of shades, so you can create bright or pastel versions. Or you can even mix unexpected colors together. Whatever palette you choose, it’s better to use only two shades for each of three sections. Exact yardages for each section are given in the pattern. You can find Soft Fun at Wool Warehouse (HERE*), Deramores (HERE*) and your local Scheepjes shops.

And here is another version with Bloom yarn* by Scheepjes:

If you don’t need another pillow, there are many more ways to use Labyrinth Mandala pattern. You can make stool covers, trivets, wall hanging… and even a purse maybe? I am actually thinking about attaching two handles and adding fabric lining to one of my mandala’s. If you do so, please don’t forget to share pictures with me. I LOVE to see finished projects (please, use #labyrinthcrochetmandala to share them on social media).
The pattern is available for purchase in my Ravelry store HERE.

Here is brief information about the pattern:
- Level: Intermediate (front post stitches, working in 3rd loop)
- Materials: DK yarn in 2-6 colours (Soft Fun by Scheepjes*), 4mm (G) crochet hook, stitch markers, scissors, tapestry needle to weave in ends, zip (optional), ready pillow form. You can make one yourself using THIS tutorial.
- Size: The size of the finished mandala depends on the yarn and hook you use. My mandala is approx. 39 cm (15 ½ inches) in diameter.
- Language: English
- Instructions: US crochet terms and abbreviations (including complete stitch guide), written instructions, step-by-step pictures. Print friendly copy of the pattern is available (with no pictures)
* thank you for using my affiliate links. It costs you nothing and helps to support my blog.
Subscribe to:
Posts (Atom)


