Showing posts with label Cahlista. Show all posts
Showing posts with label Cahlista. Show all posts
A happy mail landed in my mailbox two days ago and what was inside? A brand new and fresh issue of YARN book-a-zine called FOLK! I can’t believe this is the sixth issue already (if you missed previous ones, please check them HERE). I was a proud contributor to each and every one! And FOLK is not an exception.

New FOLK issue contains more pages than previous ones, and it means even more crochet and knitting joy – 17 (!) patterns altogether. The projects vary in difficulty level and the category. You’ll find gorgeous blankets, home accessories, socks, shawls and garments!!
As every other issue FOLK features work and insights into a creative process of fiber artists. This time you’ll get acquainted with the work of Tuija Heikkinen (textile designer) and Jimmy Nelson (photographer), and read article about punch needle embroidery technique.
I love every YARN issue, but this time, in my humble opinion, Scheepjes have overdone themselves. From the first page you are invited into a luxury crochet and knitting world with gorgeous and tastefully styled pictures. But at the same time all projects you see are affordable and actually doable.
You can buy your own copy in local Scheepjes stores and via online retailers:
Woolwarehouse*, Deramores*, Black Sheep Wools* (all in UK with international shipping)
Caro’s Atelier* (NL and Europe), Habbedash* (NL with international shipping)
Knotty House* (Canada)
There is a blog hop running at the moment, and every contributing designer was asked to say something about her own design and the story behind it. Usually I do have a story behind my designs, but this time I am embarrassed to say I didn’t know what to suggest as a pattern publication. And when creative director of Scheepjes addressed me with an idea of colorful and festive garland, I happily jumped onto it. Because I have wanted to make something similar for long, but simply couldn’t find time.
 Add this pattern yo your Ravelry Queue
S
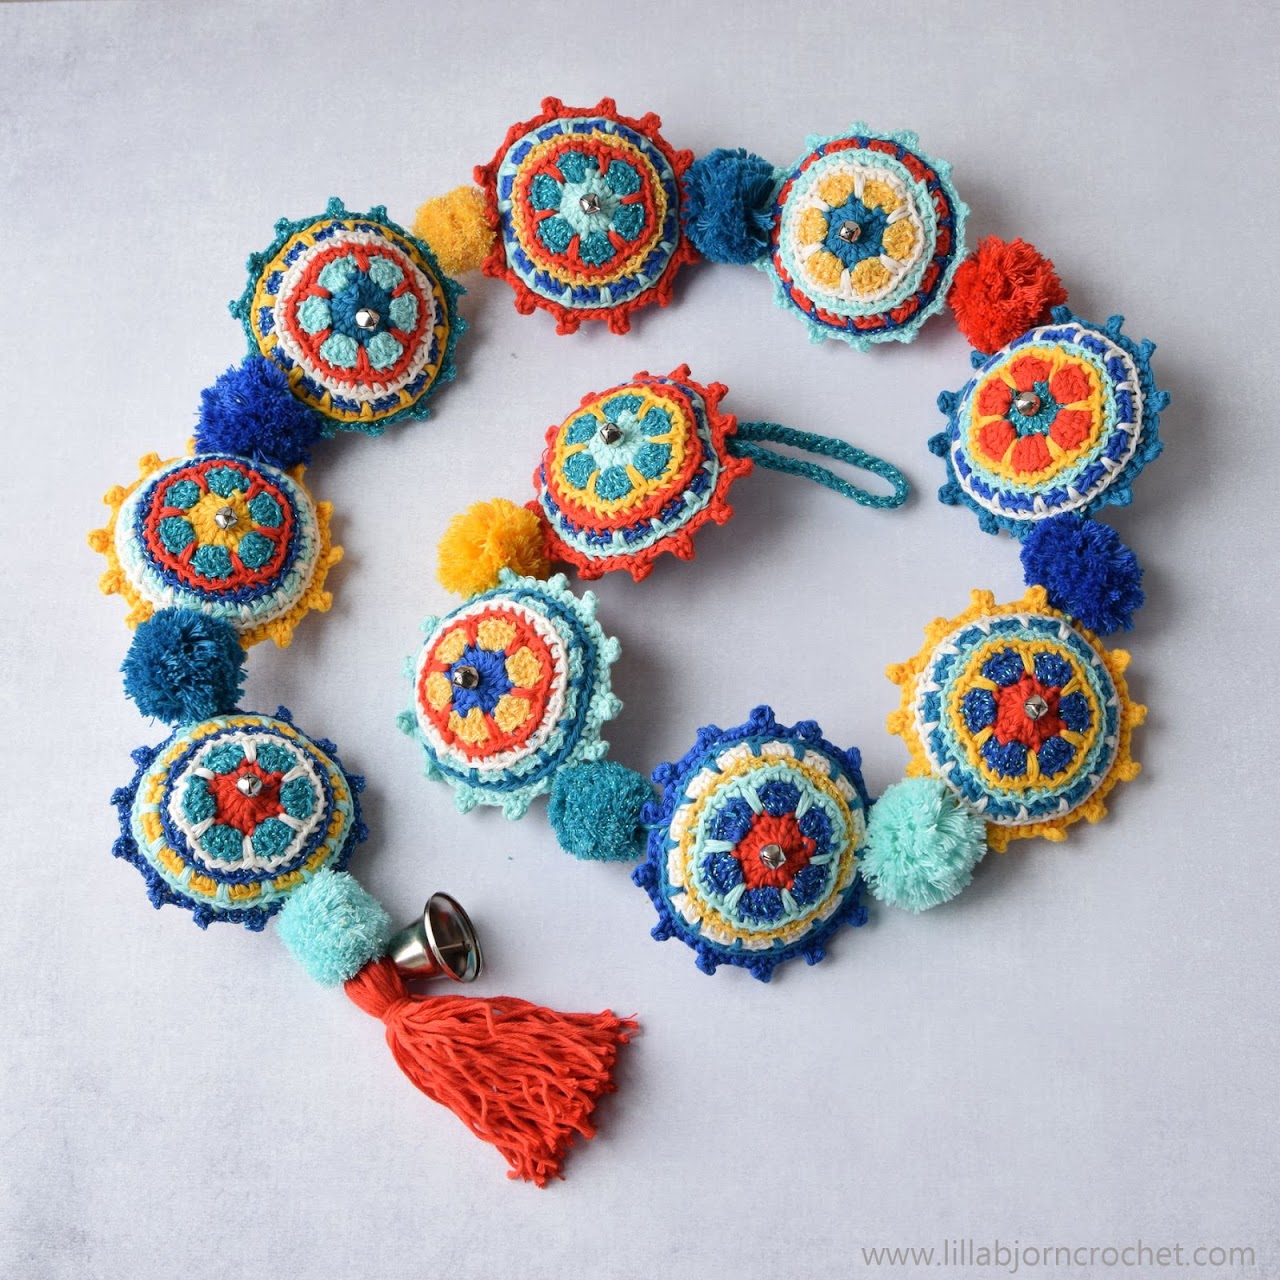
So here it is – my Jingle Garland. It’s super simple and relatively fast to make. You’ll not be bored with these small and cute circular motifs, as yarns and colors are changed on every round (and you don’t have to weave in tails, as each motif consists of two halves joined together and stuffed. And all ends will be hidden with stuffing). Small silver bells and pompons add cuteness. By the way my 7-years-old son helped me making pompons – great activity for the whole family!
I used Scheepjes Cahlista and Twinkle yarns (the second one is full of nice sparkles). Both yarns are available via your local Scheepjes shops or online retailers listed above.

And now let me say a few words about my own favourites from FOLK issue of YARN book-a-zine. I am in love with all of them but Frida Shawl by Miss Neriss has stolen my heart. I am excited about everything in this design: simple knit and sophisticated embroidery. And the moment I saw it I knew I must make one for myself.
I haven’t picked up my needles in a very long time (a life of a crochet designer, hehe) and I have never used 10mm needles before. So I was a bit worried of how it goes. But the pattern is beginner friendly, and my knitting part was done in nearly 4 hours. Why haven’t I heard about Peru yarn before? It’s so soft, draping and warm!

Now the embroidery is waiting for me. I am lucky to have a full box of Cahlista cutie pies*, so picking the colors should not be a problem. I think I will go for a mute fall palette… I am still not sure how to use a stabilizer for embroidery, but hopefully it will work out well! I’ve done lots of cross stitch embroidery in the past, but never did anything like this on a knitted fabric.
Scheepjes is running a YARN 6 giveaway alongside our blog hop! And you have a chance to win a copy of YARN 6, and materials to make your favourite YARN 6 project! All you have to do is read carefully. Each of participating designer has written her own blog post and hided a ‘secret symbol’ in the text. It might be a letter, a number or a symbol. It’s not invisible, so no worries – you’ll not miss it! If you put all these symbols in the same order as blog posts were published, you’ll get a secret sentence which is your entry to the giveaway!
Check previous blog post by Maria of Fifty Shades of 4 ply HERE. And tomorrow be sure to check the blog by Alia of The Little Bee (something - wow! - exciting is waiting for you there!)

To join in, comment on the Scheepjes Facebook giveaway post telling them what your favourite YARN 6 project is. Once the blog hop is finished, respond to your own comment with the full secret sentence and… let’s hope you will be the winner! The giveaway will run until November 11th, 2018 and the winner will be drawn November 12th on the Scheepjes Facebook page. It’s open to participants worldwide. Good luck!
Subscribe to a newsletter not to miss a single post. You can also follow me on Facebook, Pinterest and Instagram.


New FOLK issue contains more pages than previous ones, and it means even more crochet and knitting joy – 17 (!) patterns altogether. The projects vary in difficulty level and the category. You’ll find gorgeous blankets, home accessories, socks, shawls and garments!!
As every other issue FOLK features work and insights into a creative process of fiber artists. This time you’ll get acquainted with the work of Tuija Heikkinen (textile designer) and Jimmy Nelson (photographer), and read article about punch needle embroidery technique.
I love every YARN issue, but this time, in my humble opinion, Scheepjes have overdone themselves. From the first page you are invited into a luxury crochet and knitting world with gorgeous and tastefully styled pictures. But at the same time all projects you see are affordable and actually doable.
 |
| Farah Scarf by Jellina Verhoeff |
You can buy your own copy in local Scheepjes stores and via online retailers:
Woolwarehouse*, Deramores*, Black Sheep Wools* (all in UK with international shipping)
Caro’s Atelier* (NL and Europe), Habbedash* (NL with international shipping)
Knotty House* (Canada)
 |
| Fairy Homes by Maria McPherson |
Jingle Garland
There is a blog hop running at the moment, and every contributing designer was asked to say something about her own design and the story behind it. Usually I do have a story behind my designs, but this time I am embarrassed to say I didn’t know what to suggest as a pattern publication. And when creative director of Scheepjes addressed me with an idea of colorful and festive garland, I happily jumped onto it. Because I have wanted to make something similar for long, but simply couldn’t find time.

S
So here it is – my Jingle Garland. It’s super simple and relatively fast to make. You’ll not be bored with these small and cute circular motifs, as yarns and colors are changed on every round (and you don’t have to weave in tails, as each motif consists of two halves joined together and stuffed. And all ends will be hidden with stuffing). Small silver bells and pompons add cuteness. By the way my 7-years-old son helped me making pompons – great activity for the whole family!
I used Scheepjes Cahlista and Twinkle yarns (the second one is full of nice sparkles). Both yarns are available via your local Scheepjes shops or online retailers listed above.

Frida Shawl
And now let me say a few words about my own favourites from FOLK issue of YARN book-a-zine. I am in love with all of them but Frida Shawl by Miss Neriss has stolen my heart. I am excited about everything in this design: simple knit and sophisticated embroidery. And the moment I saw it I knew I must make one for myself.
I haven’t picked up my needles in a very long time (a life of a crochet designer, hehe) and I have never used 10mm needles before. So I was a bit worried of how it goes. But the pattern is beginner friendly, and my knitting part was done in nearly 4 hours. Why haven’t I heard about Peru yarn before? It’s so soft, draping and warm!

Now the embroidery is waiting for me. I am lucky to have a full box of Cahlista cutie pies*, so picking the colors should not be a problem. I think I will go for a mute fall palette… I am still not sure how to use a stabilizer for embroidery, but hopefully it will work out well! I’ve done lots of cross stitch embroidery in the past, but never did anything like this on a knitted fabric.
Giveaway!
Scheepjes is running a YARN 6 giveaway alongside our blog hop! And you have a chance to win a copy of YARN 6, and materials to make your favourite YARN 6 project! All you have to do is read carefully. Each of participating designer has written her own blog post and hided a ‘secret symbol’ in the text. It might be a letter, a number or a symbol. It’s not invisible, so no worries – you’ll not miss it! If you put all these symbols in the same order as blog posts were published, you’ll get a secret sentence which is your entry to the giveaway!
Check previous blog post by Maria of Fifty Shades of 4 ply HERE. And tomorrow be sure to check the blog by Alia of The Little Bee (something - wow! - exciting is waiting for you there!)

To join in, comment on the Scheepjes Facebook giveaway post telling them what your favourite YARN 6 project is. Once the blog hop is finished, respond to your own comment with the full secret sentence and… let’s hope you will be the winner! The giveaway will run until November 11th, 2018 and the winner will be drawn November 12th on the Scheepjes Facebook page. It’s open to participants worldwide. Good luck!
Subscribe to a newsletter not to miss a single post. You can also follow me on Facebook, Pinterest and Instagram.
Peacock Tail Mandala pattern is an adaptation of Peacock Tail Bag into full circle. You can use this mandala as wall hanging, pillow (shown in the pattern), table decoration and even area rug (if made with worsted/bulky yarn and larger hook).

Add this pattern to your Ravelry Queue
*Purchase an ad-free and ready-to-print PDF of this pattern in ENGLISH (including all Important Notes, material list, stitch guide, complete instructions and photo tutorials) HERE on Ravelry and HERE on Etsy.
You will need:
DISCLOSURE: This blog contains affiliate links (marked with *). If you purchase a (any) product via a link on my blog, I get a small percentage contribution from the store which enables me to keep providing you with free patterns. It costs you nothing extra to visit the store via my link, but ensure I get the credit for the sale. Thank you for your support!
~ Amour Clover crochet hook 4.5mm* or the size which will give you correct gauge
~ Tapestry needle to weave in yarn tails
~ Aran yarn in five colors. I used Cahlista yarn by Scheepjes in the following shades (amounts are given for entire pillow): 401 (3 skeins), 395 (3 skeins), 282 (3 skeins), 527 (3 skeins), 249 (1 skein)
Cahlista yarn is available in Scheepjes local stores as well as at Wool Warehouse* and Black Sheep Wools* (both in UK with international shipping), Caro’s Atelier* (NL) and Knotty House* (Canada).
Measurements: The size of the finished mandala depends on the yarn and hook you use. My pillow is approx. 62cm (24 ½”) large across.
Gauge: after 4 rounds circle with dc measures 10cm (4”) across.
Check Important Notes for this pattern HERE.

Abbreviations (US terms)
rnd round
st(s) stitch(es)
ch chain
sp(s) space(s)
yo yarn over
lp(s) loop(s)
NJ needle join
*…* *crochet following directions* as many times as indicated
ss (slip stitch) – insert hook in indicated st, yo, draw yarn up and pull second lp through the first lp on hook.
sc (single crochet) – insert hook in indicated stitch, yo, draw up a lp, yo and pull through both lps on hook.
hdc (half double crochet) – yo, insert hook in indicated st, yo, draw up a lp, yo, pull through 3 lps.
dc (double crochet) – yo, insert hook in indicated st, yo, draw up a lp, yo, *pull through 2 lps* twice.
FPtr (front post treble) – yo twice, insert hook from front to back to front around the post of indicated stitch, yo, draw up a lp, *yo, pull through 2 lps* three times.
FPtr2tog (front post treble 2 together) - *yo twice, insert hook from front to back to front around the post of indicated stitch, yo, draw up a lp, [yo, pull through 2 lps] twice* twice, yo, pull through all 3 lps on hook.
FPtr5tog (front posttreble 5 together) - *yo twice, insert hook from front to back to front around the post of indicated stitch, yo, draw up a lp, [yo, pull through 2 lps] twice*5 times, yo, pull through all 6 lps on hook.
FPdtr2tog (front post double treble 2 together) - *yo 3 times, insert hook from front to back to front around the post of indicated stitch, yo, draw up a lp, [yo, pull through 2 lps] 3 times* twice, yo, pull through all 3 lps on hook.
FPdtr (front post double treble)– yo 3 times, insert hook from front to back to front around the post of indicated stitch, yo, draw up a lp, *yo, pull through 2 lps* 4 times.
“modified” tr4tog - yo twice, insert hook from front to back to front around indicated stitch, yo, draw up a lp, [yo, pull through 2 lps] twice, *yo twice, insert the hook to the hole at the bottom of stitch just made, yo, draw up a loop, [yo, pull through 2 lps] twice*3 times, yo, pull through all 5 lps on hook. Check tutorial HERE.

INSTRUCTIONS
Copyright LillaBjornCrochet 2018. All rights reserved. This pattern is for unlimited personal use only. Do not reproduce or sell the pattern. The pattern may not be copied in any way (print or digitally), in part or in full. Items may be sold that are made from this pattern as long as the designer is credited. Shop owners, if you wish to make a kit with yarn using this pattern, please request permission and copyright details from me before offering any kits for sale. Please, read Copyright page for more information.
Color Key: C1 – emerald (401), C2 – green (395), C3 – purple (282), C4 – dark blue (527), C5 – yellow (249)
Important!! If you are familiar with overlay crochet, you may probably know that stitches of the background are usually made in back loops only. But for this pattern please work all rounds and rows on back AND front – through both loops!!!
Rnd 1. Start with yarn C1. Make magic ring, ch2 (counts as first dc) and 11dc in magic ring; NJ in first dc of the rnd after ch2. (12)

Rnd 2. Change to yarn C2. Attach yarn in any st of rnd 1. First dc increase will be ch2+dc in same st where yarn was attached.
*2dc in next st* 12 times, NJ in the first dc of the rnd after ch2. (24)

Rnd 3. Change to yarn C3. Attach yarn in first st of any dc increase of rnd 2.
*dc in next (first dc of the rnd will be ch2 – here and throughout), 2dc in next st* 12 times, NJ in the first dc of the rnd after ch2. (36)

Rnd 4. Change to yarn C1. Attach yarn in first dc of any dc increase of rnd 3.
*2dc, 2dc in next st* 12 times; NJ in the first dc of the rnd after ch2. (48)

Rnd 5. Change to yarn C2. Attach yarn in second dc after any dc increase of rnd 4.
*3dc, 2dc in next st* 12 times; NJ in the first dc of the rnd after ch2. (60)

Rnd 6. Change to yarn C3. Attach yarn in second dc of any dc increase of rnd 5.
Note: please, feel free to replace FPtr’s with FPdtr’s if they pull too much.
*hdc in next 5 sts (first hdc will be ch2 – here and throughout), FPtr around second dc of inc of rnd 4 below, skip no sts on rnd 5* 12 times; NJ in first hdc after ch2. (72)


Rnd 7. Change to yarn C1. Attach yarn in second hdc before any FPtr of rnd 6.
*5hdc, 2hdc in next st* 12 times, NJ in the first hdc of the rnd after ch2. (84)

Row 8. Change to yarn C2. Attach yarn in first st after any increase of Rnd 7.
On this and all next rounds tr4tog's are made in a "modified" way (See Abbreviations and Stitch Guide).
*3hdc, 1tr4tog in FPtr below, skip 1 st, 3hdc, 1FPtr around central st of Rnd 6 between two FPtr below, skip no sts* 12 times, NJ in first hdc after ch2. (96)


Rnd 9. Change to yarn C3. Attach yarn in any FPtr. Don’t work tight.
96hdc, NJ in first hdc after ch2, mark the loop of NJ. (96 sts)
Rnd 10. Change to yarn C1. Attach yarn in second st after marked st.
*3hdc, 2hdc in next st, 3hdc, 1tr4tog in FPtr below, skip 1 st* 12 times, NJ in first hdc after ch2. (108)

Rnd 11. Change to yarn C2. Attach yarn in any tr4tog. Don’t work tight.
108 hdc, NJ in first hdc after ch2, mark the loop of NJ. (108)

Rnd 12. Change to yarn C1. Attach yarn in first st after marked one.
Note: all increases are made directly above tr4tog’s of row 10. First increase will be ch2+dc in same st where yarn was attached.
*2hdc in next st, 4hdc, 1FPtr around second hdc of increase below, skip 1 st, 3hdc* 12 times, NJ in first hdc after ch2. (120 sts)

Rnd 13. Change to yarn C4. Attach yarn in second st of Rnd 12 before any FPtr.
Note: you will get 12 “U” on this row.
*5hdc, ch4, FPsc around 3 sts on row 11 (find tr4tog on row 10 below. Make FPsc into the st of row 11 that goes into this tr4tog, then make 1FPsc around each of next 2 next sts of rnd 11), ch4, skip 5 sts on Rnd 12* 12 times, NJ in first hdc after ch2.


Rnd 14. Change to yarn C3. Attach yarn in first hdc of any group of 5hdc of Rnd 13.
*3hdc, 1tr4tog in FPtr of Rnd 12 below, skip no sts, 2hdc, 1FPtr around same st of Rnd 11 where first FPsc was made, 3FPtr around next st of Rnd 11, 1FPtr around next st of Rnd 11, skip ch4-sp* 12 times; NJ in first hdc after ch2. (132)


Rnd 15. Change to yarn C1. Attach yarn in first st of Rnd 14 before any tr4tog.
*5hdc, 1FPtr around ch4-sp below, skip no sts, 5hdc, 1FPtr around ch4-sp below, skip 1 st,* 12 times, NJ in first hdc after ch2. (144 sts)

Rnd 16. Change to yarn C3. Attach yarn in FPtr of Rnd 15 before any tr4tog of same color below.
*3hdc, 2hdc in next st, 3hdc, 1FPtr around each of 5 FPtr below, skip 5 sts* 12 times; NJ in first hdc after ch2. (156)

Rnd 17. Change to yarn C4. Attach yarn in first st after any group of 5 FPtr of Rnd 16.
*8hdc, 1FPtr around FPtr of row 15 below, skip 1 st, 4hdc, 1FPtr around next FPtr of Rnd 15 below, skip no sts* 12 times; NJ in first hdc after ch2. (168)

Row 18. Change to yarn C3. Attach yarn in third hdc of Rnd 17 of any group of 4 hdc.
*14hdc, FPtr5tog (make each leg around each of 5 FPtr of same color below), skip no sts* 12 times, NJ in first hdc after ch2. (180)

Rnd 19. Change to yarn C1. Attach yarn in second st after any FPtr5tog of Rnd 18.
Note: when making FPtr2tog - work every leg around each of two FPtr of Rnd 17 lying to the right and to the left from FPtr5tog of previous rnd. Feel free to replace FPtr2tog with FPdtr2tog if it’s too tight.
*15hdc, 1FPtr2tog, skip no sts* 12 times, NJ in first hdc after ch2. (192)

Rnd 20. Change to yarn C2. Attach yarn in first st of Rnd 19 before any FPtr2tog.
*5hdc, 1FPtr around st of Rnd 18 which was made after FPtr of row 17 below, skip no sts, 10hdc, 1FPtr (as previous), sk 1 sts* 12 times, NJ in first hdc after ch2. (204)

Rnd 21. Change to yarn C4. Attach yarn in fourth hdc of Rnd 20 of any group of 5 hdc.
*16hdc, 2hdc in next st* 12 times, NJ in first hdc after ch2. (216)

Rnd 22. Change to yarn C5. Attach yarn in first hdc of Rnd 21 before any increase.
*6hdc, 1tr4tog in FPtr below, skip 1 st, 5hdc, 2hdc in next st, 4hdc, 1tr4tog in FPtr below, skip 1 st* 12 times, NJ in first hdc after ch2. (228)

Rnd 23. Change to yarn C2. Attach yarn in second hdc of any increase of Rnd 22.
*9hdc, 1FPtr around second hdc of increase of Rnd 21 below, skip 1 st, 9hdc* 12 times, NJ in first hdc after ch2. (228)

Rnd 24. Change to yarn C4. Attach yarn in first st of Rnd 23 before any FPtr.
*4hdc, FPtr around tr4tog below, skip 1 st, 6hdc, 2hdc in next st, 6hdc, 1FPtr around tr4tog below, skip 1 st* 12 times, NJ in first hdc after ch2. (240)

Rnd 25. Change to yarn C1. Attach yarn in fourth hdc of Rnd 24 of any group of 4 hdc.
Note: Feel free to replace FPtr’s with FPdtr’s if needed.
*10hdc, 1FPtr around st of Rnd 23 made in first st of increase of Rnd 22, skip no sts, 9hdc, 1tr4tog in FPtr below, skip 1 st* 12 times; NJ in first hdc after ch2. (252)

Rnd 26. Change to yarn C4. Attach yarn in second st of rnd 25 after any tr4tog. Make legs of FPtr2tog around FPtr of same color below lying to the right and to the left of current stitch.
*20hdc, 1FPtr2tog, skip 1 st* 12 times, NJ in first hdc after ch2. (252)

Rnd 27. Change to yarn C5. Attach yarn in fifth st of Rnd 26 before any FPtr2tog.
*5hdc, 2hdc in next FPtr2tog, 6hdc, 1tr4tog in fourth hdc of row 25 before next FPtr, skip 1 st, 3hdc, 1tr4tog in FPtr below, skip 1 st, 3hdc, 1tr4tog in fourth hdc of row 25 after FPtr, skip 1 st* 12 times, NJ in first hdc after ch2. (264)

Rnd 28. Change to yarn C3. Attach yarn in fourth st of Rnd 27 before any increase.
Note: legs of FPtr2togs are made around hdc of row 26 lying to the right and to the left of tr4tog of row 27 below.
*13sc (first sc will be ch1 – here and to the end), [1FPtr2tog, skip 1 st, 3sc] twice, 1FPtr2tog, skip 1 st* 12 times, NJ in first sc after ch1. (264)

Rnd 29. Change to yarn C2. Attach yarn in first sc of Rnd 28 after first FPtr2tog of any group of 3 FPtr2tog’s.
Ch2 (doesn’t count as hdc), *1tr4tog in hdc of row 27 visible at the bottom of “V”, skip 1 st, 2hdc, 1tr4tog (as previous), skip 1 st, 11hdc, 2hdc in next st, 6hdc* 12 times – make last hdc in same st where yarn was attached; NJ in first tr4tog. (276)

Rnd 30. Change to yarn C3. Attach yarn in second hdc of Rnd 29 of any group of 19 hdc.
Note: legs of FPtr2tog’s are made around FPtr2tog’s of Rnd 28 lying to the right and to the left of tr4tog of row 29 below.
*18sc, 1FPtr2tog, skip 1 st, 3sc, 1FPtr2tog, skip 1 st* 12 times, NJ in first sc after ch1. (276)

Rnd 31. Change to yarn C1. Attach yarn in FPtr2tog of Rnd 30 after any group of 3 sc.
*9hdc, 2hdc in next st, 12hdc, 1tr4tog in st of Rnd 29 at the bottom of “V” below, skip 1 st* 12 times, NJ in first hdc after ch2. (288)

Row 32. Change to yarn C3. Attach yarn in second hdc of Rnd 31 after any tr4tog.
Note: legs of FPtr2tog’s are made around FPtr2tog’s of Rnd 30 lying to the right and to the left of tr4tog of row 31 below.
*23sc, 1FPtr2tog, skip 1 st* 12 times, NJ in first sc after ch1. (288 sts)

Row 33. Change to yarn C1. Attach yarn in any st of Rnd 32.
Dc in every st around, NJ in first dc after ch2.

Back part
- Back part of Peacock pillow is worked in rounds on RS through both loops.
- Change colors on every round as per pattern (or in whatever order). Attach yarn in any sts between increases of previous round (or two round below if previous round doesn’t contain increases).
- First hdc/dc of each rnd will be ch2.
- Finish rounds with Needle Join (same as for front mandala)
Rnds 1-5. As for front mandala.
Rnd 6. With C3. *4hdc, 2hdc in next st* repeat around, NJ in first hdc. (72)
Rnd 7. With C1. *5hdc, 2hdc in next st* repeat around, NJ in first hdc. (84)
Rnd 8. With C2. *6hdc, 2hdc in next st* repeat around, NJ in first hdc. (96)
Rnd 9. With C3. Hdc in each st around, NJ in first hdc. (96)
Rnd 10. With C1. *7hdc, 2hdc in next st* repeat around, NJ in first hdc. (108)
Rnd 11. With C2. Hdc in each st around, NJ in first hdc. (108)
Rnd 12. With C4. *8hdc, 2hdc in next st* repeat around, NJ in first hdc. (120)
Rnd 13.With C1. Hdc in each st around, NJ in first hdc. (120)
Rnd 14. With C3. *9hdc, 2hdc in next st* repeat around, NJ in first hdc. (132)
Rnd 15. With C2. *10hdc, 2hdc in next st* repeat around, NJ in first hdc. (144)
Rnd 16. With C4. *11hdc, 2hdc in next st* repeat around, NJ in first hdc. (156)
Rnd 17. With C1. *12hdc, 2hdc in next st* repeat around, NJ in first hdc. (168)
Rnd 18. With C3. *13hdc, 2hdc in next st* repeat around, NJ in first hdc. (180)
Rnd 19. With C2. *14hdc, 2hdc in next st* repeat around, NJ in first hdc. (192)
Rnd 20. With C4. *15hdc, 2hdc in next st* repeat around, NJ in first hdc. (204)
Rnd 21. With C1. *16hdc, 2hdc in next st* repeat around, NJ in first hdc. (216)
Rnd 22. With C3. *17hdc, 2hdc in next st* repeat around, NJ in first hdc. (228)
Rnd 23. With C2. Hdc in each st around, NJ in first hdc. (228)
Rnd 24. With C4. *18hdc, 2hdc in next st* repeat around, NJ in first hdc. (240)
Rnd 25. With C1. *19hdc, 2hdc in next st* repeat around, NJ in first hdc. (252)
Rnd 26. With C3. Hdc in each st around, NJ in first hdc. (252)
Rnd 27. With C2. *20dc, 2dc in next st* repeat around, NJ in first dc. (264)
Rnd 28. With C4. *21dc, 2dc in next st* repeat around, NJ in first dc. (276)
Rnd 29. With C1. *22hdc, 2hdc in next st* repeat around, join with ss in first hdc, don’t fasten off. (288)
Finishing
Place front and back parts with WS facing each other. Sc around inserting the hook through both layers. Stuff the pillow (insert pillow foam) before you finish joining. Then continue sc till beginning of the rnd, join with ss in first sc, fasten off. Weave in tail.You can also insert zip into the seam if you wish. Hilde Tindlund of RoadRash did it for her pillowcase. Hilde helped me testing the pattern. She chose pastel colors which remind her of sunny summer days at sea with her family :)

 |
| Photo credit: Hilde Tindlund of RoadRash |
Congratulations!! Your Peacock Tail Mandala pillow is now finished!
*You can purchase an ad-free and ready-to-print PDF of this pattern in ENGLISH (including all Important Notes, material list, stitch guide, complete instructions and photo tutorials) HERE on Ravelry and HERE on Etsy.
Subscribe to a newsletter not to miss a single post. You can also follow me on Facebook, Pinterest and Instagram.

Subscribe to:
Posts (Atom)


