
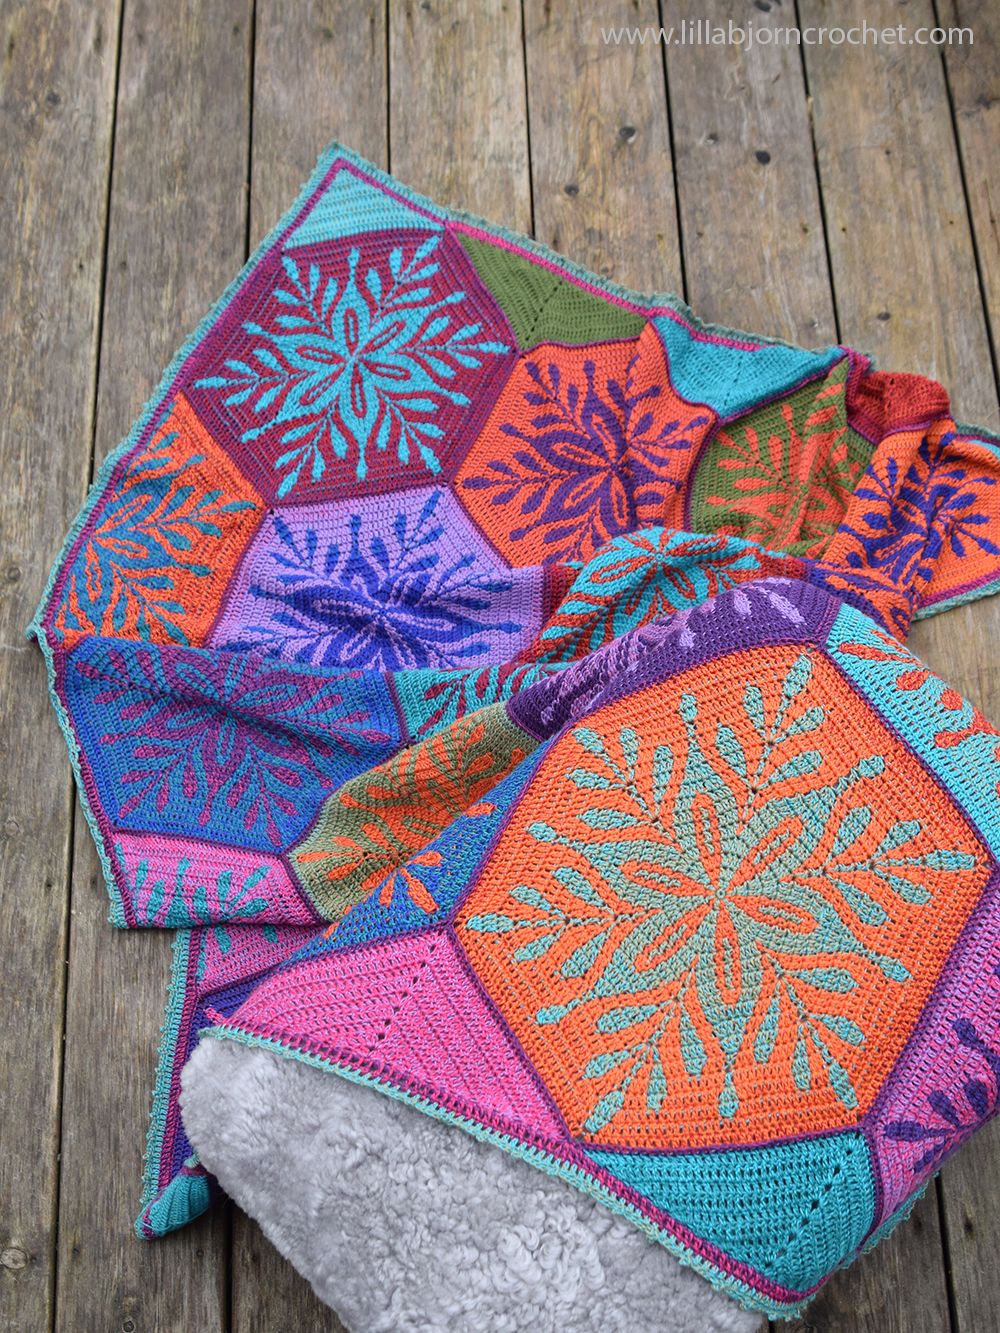
The first design of the year 2023 is here! And it is a blanket. We are in the middle of the winter here, in the Czech Republic. The days are short, and even in the daylight it feels greyish outside. Luckily, we, crafters, have lots of other means to brighten our days. With yarn in different colors, for example! “If the snow does not want to come to us this year, I will paint it myself” – I told myself.
Paint the Snow Blanket crochet pattern is available on Ravelry HERE and Etsy HERE.
This winter has been weird in many ways. Much warmer than average, with so little snow even in the mountains. And even if we are lucky to see some snowfall, it melts out during the night or the same morning. And it’s frightening.

A few days ago, I shared my thoughts about climate change on my FB page, and I was surprised to hear people in different corners of the world are experiencing the same thing. The weather forecasts surprise with the news that temperatures go down in the warmer regions, while the countries, which are normally used to the cold, have mild winter this year.
On the one hand, today with the rising pieces of energy, it should be a relief not to heat the houses at the most. And we all know that this year higher temperatures and no freeze is a blessing to some countries. But when I am thinking about this issue on a global scale, knowing it might get even worse with each new year, it makes me sad.
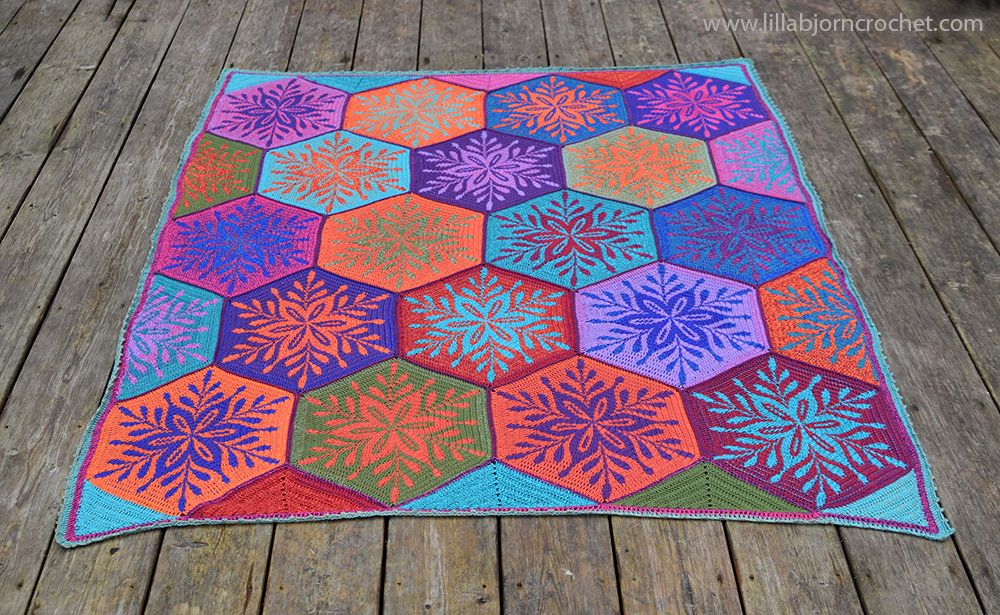
It’s not really about lack of snow or no possibilities to go skiing. It’s about understanding that mother nature needs our help. Paint the Snow Blanket has become a remind to myself that I should not take everything for granted, and that everyone is able to make small steps to the better climate sustainability.
Small facts about the Paint the Snow Blanket
I chose bright shades of Scheepjes Whirl yarn for my sample (2 cakes in the same color – so, 4 cakes in total). Whirls are always the best choice when you want a project with many colors, but do not want to bother picking them yourself. One Whirl cake carries several gorgeous shades with soft transitions. And you can also opt for an ombre look.

You can find Whirls in your local Scheepjes shop, or purchase them via online
retailers (affiliate links):
Wool Warehouse
(UK, international shipping),
Caro's atelier
(NL, Europe),
Taemombo
(US, Canada).
However, consisting of hexagon motifs, the blanket allows using us leftovers in different colors from your stash. Freeing your creativity at the same time.
My finished blanket measures approx. 125 x 150cm/ 49¼ x 59in after blocking, but of course you can easily adjust it in size adding or reducing the number of the motifs.

Paint the Snow Blanket uses tapestry crochet technique, and a cute snowflake pattern can bring your memories back to Rozeta CAL. Which also brings up the thought that Scheepjes Our Tribe could also be a great choice for this project for those who prefer warmer woolly blankets.

Paint the Snow Blanket crochet pattern is available on Ravelry HERE and Etsy HERE.
Hope you enjoy!

Hello and welcome to Week 2 of Not a Christmas Mystery crochet-a-long! Last week we were making small baubles in brioche crochet, and my social media feeds were flooded with the pictures of your gorgeous creations. It started to feel like holidays are here already! And today’s challenge is Blanket Coaster in tapestry crochet.
![]()
Blanket coaster is a new term to me. I found it out just at the time of
designing patterns for this cal. My initial idea was to use different
crochet techniques, but tapestry was not around them. And then Laura
(aka @taemombo) sent me a random picture of such a coaster.
![]()
And I fell in love with a tiny thing and its fringe. Doesn’t it make a perfect table decoration? For hygge winter evenings with hot chocolate or grog. These are the first every blanket coasters I have ever made in my life, so please don’t judge :)
The fringe can be trimmed to any length, and a bit longer one might look neater. But I went for a short fringe, and my blanket coasted also look like small hedgehogs…
Wondering where to find the pattern? It’s a part of my Not a Christmas CAL hosted on Ravelry right now. Purchase CAL listing HERE on Ravelry with the first two parts, and the next two patterns will be automatically added to your Ravelry library as they will be released (always on Friday).
I’ve received a few messages about the patterns not added to the library. That’ happens because you are not logged into your Ravelry account at the time of purchase. If you have already placed order, please go to your confirmation email and there you should see an option of adding the pattern to your library. If it’s not possible, please contact me and I will add the pattern manually.
For each blanket coaster you will need one 10g ball of Catona for background, and then you can use all different kinds of leftovers. The rows are short, and basically a new color can be used for each row. I tried to arrange mine for an ombre effect (combining similar shades). But I am pretty sure any order of colors will be fine.
![]()
The pattern uses tapestry crochet. You will see all explanations in the pattern. If it’s not enough please also check THIS how to tutorial.
For your coaster all rows will be worked on the right side in back loops only. You will start with a standing single crochet and cut/fasten off both colors at the end of each row.
 |
| Photo credit: Laura Jackson |
I made my coasters with 3.5 mm hook. Some testers felt like it was too loose, so they switched to a smaller hook instead. So, play with it and see what is more comfortable for you.
And see you next week! I can’t wait to share next pattern with you :)
UPDATE: The Tapestry Blanket Coaster pattern is now available HERE on Etsy.

 |
| Photo credit: Scheepjes |
As women, we can wear many different “hats” throughout our lives: daughter, sister, mother, wife, friend. These are roles that unite us, and can sometimes define us. But more importantly, throughout the many roles we play in our lives, we grow and develop. We become stronger, more confident and wiser.
In this 5th issue of YARN book-a-zine, we explore and celebrate the similarities and differences that unite us together as women. We join hand in hand with women of different ages, cultures, shapes and sizes, to bring you design that tells our stories.
If this is the first time you come across YARN, it’s a biannual book-a-zine published by Scheepjes yarn company. It combines the features of both a magazine and a book. And each issue is themed, so you can create your own collection. This is the fifth book-a-zine called WOMAN, and you can check previous issues HERE.

No need to say I love each and everyone, and not because I am one of the contributing designers. I like the whole concept of this edition, I like the styling and thick quality paper. And I know that YARN is a true labor of love. It’s created by creative and friendly people who are passionate about yarn and crafts.

I am not sure I can describe with words what YARN 5 is about. So probably the pictures can speak better. This issue includes 14 crochet and knitting patterns (garments, shawls, wraps, blankets, tablecloth, pillows and accessories). In this issue you will also find a “Must-Haves” guide about stylish and handy crafty tools and accessories, and get acquainted with Anne Ten Donkelaar, a designer and artist.

And the central chapter is devoted to Scheepjes Bloggers group (or, Tribe, as we call it). You’ll meet all bloggers – super creative, lovely and friendly ladies and one man, and you’ll learn more about individuals colorways of brand new yarn Our Tribe by Scheepjes (reviewed HERE). And because we are talking about Our Tribe yarn now, be sure to check an article by Tammy of Canadutch who swatched each and every colorway for you to see the colorchanges.
 |
| Photo credit: Canadutch |
I will not show you all designs included in YARN 5 (you can see previews on Ravelry HERE), but I just have to tell you about my own designs. Which I am very proud of.
One of them is Amethyst Dress – my latest challenge in garment design and sizing. The dress uses Whirl* and Whirlette* yarns in matching and gorgeous lavender shades. The construction is very simple: square yoke is growing down to an A-shaped skirt. And the dress comes in 5 sizes (S-XXL).
 |
| Photo credit: Scheepjes |
And another design I contributed to YARN 5 is Techno Clutch made in tapestry crochet with 10g mini skeins of Catona* yarn (or ‘cuties pies’).
 |
| Photo credit: Scheepjes |

I was a bit in a hurry wanting to show you newest issue of YARN book-a-zine, and I didn’t really have time to sit down and carefully read it through. So please, excuse me, I am off to read.
And you can grab your own copy (in English or in Dutch) in your local Scheepjes shops or via online retailers : Caro’s Atelier* (IN STOCK!!! - NL and Europe), Wool Warehouse* and Black Sheep Wools* - will be in stock any day now (UK with international shipping), and Knotty House* (Canada). Enjoy!
Subscribe to a newsletter not to miss a single post. You can also follow me on Facebook, Pinterest and Instagram.


Dove with an olive branch is known as a symbol for peace. And for me this also means peace of mind and peace of soul. How often we find ourselves in situations when we can’t do much. And then internal peace and hope help us to be strong. To cope… and even survive.
DOVE square pattern is available on Ravelry HERE and Etsy HERE and is offered with 20% discount through Monday, April 2nd, 2018. The discount is already applied in the price you see, and no coupon codes needed.
Add this pattern to your Ravelry Queue

Far not every crochet task sounds doable from the very beginning, but I truly believe that every creative idea can be finally brought to life. Sooner or later. In this or that way. I can’t really tell you how many hours it took me to figure out the whole concept for a dove square. My brain was working not stop for weeks trying to put the pieces of puzzle together. I was thinking about filet crochet, about colorful and solid squares. I even wanted to “draw” the dove with cables, when suddenly it clicked in my mind that I can actually combine several crochet techniques in one design. And woo-hoo here it is!

From the very beginning I wanted to design an afghan square. I had no idea how large it will be in the end. And I also wanted to present both symbols (dove and olive branch) together. And it became possible by using structured stitches for the square’s center, and then tapestry panel on the outer edge. To make square look balanced I again added a textured “olive branch border” around it. And I’m pretty happy with how all components look together.

As already mentioned, the pattern uses both tapestry and overlay crochet technique. The stitches are not tricky, but if you haven’t tried these techniques before you might need to practice a bit, before you get control over your tension (check step-by-step tutorial on how to do tapestry crochet HERE). But once you feel comfortable, everything will go smooth. And I also think that DOVE square pattern gives a nice opportunity to learn something new.

DOVE square can be made with just 2 colors, or more shades (4 for example). I used Stone Washed yarn by Scheepjes (reviewed HERE) for both versions shown in this blog post, together with 4mm Amour Clover hook*. Stone Washed yarn is available in your local Scheepjes stores as well as via larger online retailers, such as Wool Warehouse* and Black Sheep Wools* (both in UK but with international shipping), Caro’s Atelier* (NL and Europe), Knotty House* (Canada) and Loveknitting* (US).

You can use Dove square as a separate decoration for a pillow, or as an afghan square (you can combine squares with and without dove panel for a balanced look). Also central “olive branch squares" can be used as a separate pattern, too.

I am often asked how it is possible to turn crochet square into a pillow. Well, there are several options and one of them it to crochet another square in the same size and then join both pieces together. But I personally prefer another option: I always sew crocheted decoration onto ready fabric pillowcases by hand. I’ve created a short video HERE for you to see how to do it neatly.
If you have other ideas about how to use larger crochet squares, please leave a comment below this post. I would love to hear your ideas.

**************************************************************************
Brief facts about DOVE square:
- Level: Intermediate: tapestry crochet, clusters and front post stitches
- Language: English (US terms)
- Pattern contains complete written instructions and heavy photo-tutorial illustrating every round (except of tapestry panel which should be followed with chart and written text). The resolution of pictures is good enough to be zoomed in.
- DOVE square pattern is available on Ravelry HERE and Etsy HERE and is offered with 20% discount through Monday, April 2nd, 2018. The discount is already applied in the price you see, and no coupon codes needed.
Subscribe to a newsletter not to miss a single post. You can also follow me on Facebook, Pinterest and Instagram.
DISCLOSURE: This blog contains affiliate links (marked with *). If you purchase a (any) product via a link on my blog, I get a small percentage contribution from the store which enables me to keep providing you with free patterns. It costs you nothing extra to visit the store via my link, but ensure I get the credit for the sale. Thank you for your support!
with step-by-step pictures)")
This blog contains affiliate links. If you purchase a product via a link on my blog, I get a small percentage contribution from the store which enables me to keep providing you with free patterns. It costs you nothing extra to visit the store via my link, but ensure I get the credit for the sale. Thank you for your support!
You will need:
- Yarn in 10 shades. I used Stone Washed by Scheepjes in shades 802, 820, 816, 815, 806, 817, 808, 813, 805 and 801. One skein of each shade (but you can create your own color combination if you wish).
- Crochet hook Clover Soft Touch* 3.25mm
- One zip – 30cm.
- Scissors and tapestry needle to weave yarn tails in.
Finished Measurements
The size of finished pillow cover will depend on yarn and hook you choose, and also on your personal gauge. My pillow is approx. 44cm x 44cm (17 ½” x 17 ½”).
Gauge
Gauge for front and back differs a bit, because of additional yarn going through front.
Front: 20 sts x 21 rows = 10cm x 10cm (4” x 4”)
Back: 19 sts x 21 rows = 10cm x 10cm (4” x 4”)
Level
Intermediate (though I believe advanced beginners can absolutely try tapestry crochet as well).
Stitch guide and Abbreviations
US standard abbreviations are used in this pattern. But if you are used to other terms, please check this Crochet Translation Project which might be helpful in translation to your native language.rnd(s) - round(s)
st(s) - stitch(es)
ch - chain
sl st (slip stitch) – insert hook in indicated st, yo, draw yarn up and pull 2nd lp through the 1st lp on hook.
sc (single crochet) – insert hook in indicated stitch, yo, draw up a lp, yo and pull through both lps on hook.
NJ – needle join
*…* *crochet following directions* as many times as indicated
Important Notes
- If you have never tried tapestry crochet before, please, study THIS photo-tutorial first and make sure you understand the technique and can read the chart.
- Ch1 in the beginning of every row doesn’t count as sc. So 1st sc of every row is made in 1st sc of previous row.
- Change colour on the last yarn-over of the last sc of the relevant row. In the same way as in Windy Morning Shawlette (HERE).
INSTRUCTIONS
Add this pattern to Ravelry Queue
Copyright LillaBjornCrochet 2016. All rights reserved. This pattern is for unlimited personal use only. Do not reproduce or sell the pattern. The pattern may not be copied in any way (print or digitally), in part or in full. Items may be sold that are made from this pattern as long as the designer is credited. Shop owners, if you wish to make a kit with yarn using this pattern, please request permission and copyright details from me before offering any kits for sale. Please, read Copyright page for more information.
with step-by-step pictures)")
FRONT
Front part of the pillow is made in tapestry crochet. Each repeat consists of 16 sts + 5sts to finish (for symmetry). I made 5 repeats, but you can make more (to make the pillow larger).
Each stripe with dots (18 rows) is made with yarn in 2 colors.
with step-by-step pictures)")
Row 1. Ch86 with 802 (C1). Starting in 2nd ch from hook sc in every ch to the end. (85sc) Turn.
Rows 2-3. Ch1 (doesn’t count as sc here and throughout), 85sc. Turn.
Row 4. You will start working with shades 802 (C1) and 820 (C2) at the same time.
Ch1, *8sc with C1 (change yarn on 8th sc), 5sc with C2 (change yarn on 5th sc), 3sc with C1* 5 times, 5sc with C1. Turn.
Row 5. Сh1, *7sc with C1, 5sc with C2, 2sc with C1* 5 times, 5sc with C1. Turn.
Row 6. Сh1, *6sc with C1, 9sc with C2, 1sc with C1* 5 times, 5sc with C1. Turn.
Row 7-12. Сh1, *5sc with C1, 11sc with C2* 5 times, 5sc with C1. Turn.
Row 13. As row 6.
Row 14. As row 5.
Row 15. As row 4. Cut C2 leaving 15cm (6”) tail.
Row 16-18. With C1 as row 2. Change to 816. Cut C1 leaving 15 cm (6”) tail.
Next stripe (rows 19-36) will be worked with shades 816 (C3) and 815 (C4).
Rows 19-21. With C3. As row 2.
Row 22. Ch1, *5sc with C4, 11sc with C3* 5 times, 5sc with C4. Turn.
Row 23. Ch1, *6sc with C4, 9sc with C3, 1sc with C4* 5 times, 5sc with C4. Turn.
Row 24. Ch1, *7sc with C4, 7sc with C3, 2sc with C4* 5 times, 5sc with C4. Turn.
Rows 25-30. Ch1, *8sc with C4, 5sc with C3, 3sc with C4* 5 times, 5sc with C4. Turn.
Row 31. As row 24.
Row 32. As row 23.
Row 33. As row 22. Cut C4 leaving 15cm (6”) tail.
Rows 34-36. With C3 as row2. Change to 806. Cut C1 leaving 15 cm (6”) tail.
Rows 37-54. Repeat rows 1-18 working with shades 806 (C1) and 801 (C2).
Rows 55-72. Repeat rows 19-36 working with shades 808 (C3) and 813 (C4).
Rows 73-90. Repeat rows 1-19 working with shades 805 (C1) and 817 (C2).
Note: after row 90 you should get a square shape.
After row 90 change to shade 808 and crochet around the whole square making 85sc on each side and 3sc in each corner (for even and neat work - make 17sc into every stripe on the sides). Finish with sl st in 1st sc of this rnd or with NJ in 2nd sc. Cut yarn and weave all tails in.
with step-by-step pictures)")
BACK
You have two options for the back. To make it easier, you can begin with the same stitch count as for front (ch86 and 85sc on each row) and make necessary amount of stripes to match the front in height. Since you will have the same stitch count on the bottom and top, it will be easy to join both parts together.
with step-by-step pictures)")
I wanted the back of my pillow to be composed of stripes which are later squared up with simple striped border. To imitate quilt. So I began with a smaller stitch count. Here is what I did:
Row 1. Ch75 with 802. Starting in 2nd ch from hook sc in every ch to the end. (75sc) Turn
Row 2-90. Ch1 (doesn’t count as sc here and throughout), 75sc. Turn.
Color way:
Rows 1-9. Shade 802
Rows 10-18. Shade 820
Rows 19-27. Shade 815
Rows 28-36. Shade 816
Rows 37-45. Shade 806
Rows 46-54. Shade 808
Rows 55-63. Shade 817
Rows 64-72. Shade 813
Rows 73-81. Shade 801
Rows 82-90. Shade 805
After row 90 the back is approx. 40cm x 39 cm (16” x 15 ½”). To bring stitch count of the back to the same amount as front, change yarn to 808 after row 90 and start working around the whole square.
Rnd 1. 75sc on the top, 3sc in the corner, turn quarter and work 75sc on next side (you will make 7sc and 8sc in every other stripe), 3sc in next corner, 75 sc on the bottom, 3sc in corner, 75sc on next side (same as previous), 3sc in corner. Join with sl st in 1st sc of the rnd. Mark central sc in every corner.
with step-by-step pictures)")
Rnd 2. Ch1 (not a st), sc in same st. Continue crocheting around the square and make 3sc in every marked st in the corner. Join either with sl st in1st sc after ch1, or with Needle (invisible) Join into 2nd st after ch1 (see tutorial HERE). Fasten off. (77sc on each side + 3sc in every corner)
with step-by-step pictures)")
Rnds 3-4. Join shade 815 in any st after central st in the corner (by simply pulling a loop and making ch1) and sc around making 3sc in central st in each corner. Join as on rnd 2. Fasten off. (After rnd 4 you’ll get 81 sc on each side + 3 sc in every corner)
Rnds 5-6. With shade 817 repeat rnds 3 and 4. (After rnd 6 you’ll get 85 sc on each side + 3 sc in every corner. And this is the same stitch count as on front!)
After rnd 6 back part should be the same size as front!
JOINING
Place front and back with wrong sides facing (I liked the wrong side look of the border on the back, so I decided that wrong side will be right. But you may join the pillow as you like). You will crochet joning row on the back! With shade 813 start joining both parts on the bottom approx 5cm (2”) before the corner – for an appropriate size of the zip opening.
Important! Find central sc in the corner on both front and back and make sure you begin joining in the right st on front and back (the amount of sts till the corner should be the same!)
Crochet with sc till the 1st corner (insert the hook under all 4 loops), continue crocheting along 3 next sides, and make the same amount on another edge of the bottom as in the beginning. Don’t fasten off and continue to crochet with sc on the back only. When you come to the beginning of joining row, cut yarn leaving approx 50cm (20”) tail and NJ in 1st sc of joining row.
Now crochet with sc along unworked part of the zip opening (on the wrong side of the Front part).
with step-by-step pictures)")
When you come to the beginning of joining row, again - cut yarn leaving approx 50cm (20”) tail and finish with NJ to the beginning of joining row.
with step-by-step pictures)")
INSERTING ZIP
Pin zip to the opening on the bottom of the cover with a few sewing pins and sew it along the opening using yarn tails with running stitch. Secure the tails and cut yarn.
with step-by-step pictures)")
Ta-dah!!! Your very own Tapestry Circles Pillow cover is now finished!
You can subscribe to monthly newsletter not to miss a single post. You can also follow me on Facebook, Pinterest and Instagram.

Disclosure: This blog post contains affiliate links marked with *. Thanks for your support!
Usually there are two types of instructions available for tapestry crochet patterns: written explanations and charts. I personally find it easier to work from the charts. They are the same as for cross stitch embroidery: you can clearly see where the change of the color happens and it’s easier to count.
The majority of tapestry projects are worked in round – so all the rounds are made on the right side. But you can also work in back and forth (as I did for my Tapestry Circles Pillow). Some very skillful crafters crochet all the rows on the right side, changing right and left hands. I am not so skillful, so I just crocheted my pillow cover in usual way. I got stripes on each side (as you usually do with single crochet), but I kinda like them!

What you should keep in mind:
- If you are new to tapestry crochet, choose thick yarn and larger hook to learn this technique. The yarn should not be fluffy, as you will not be able to see each and every stitch.
- Don’t crochet loose. I would say you should crochet tight. You will use several yarns at the same time, and crochet with one color over another one. And if you crochet too loose, another color will be seen through the stitches. And you want to avoid it.
- Your crochet hook should match yarn very well. If you feel like you don’t get the right tension, try to change hook to a smaller (or larger) one until you are satisfied with the look of your tapestry fabric.
Tapestry process and Important Notes:
1. Put yarn C2 on the top of previous row. Now you will continue crocheting with yarn C1 in the usual way - but at the same time over C2. Hold C2 with your left hand (if you are right-handed) together with crocheted piece, so that it’s easier for you to insert the hook.

2. The color is always changed when you still have 2 loops on the hook. So you will do it on the last yarn over (to finish last stitch in previous color). Now, after color is changed, place yarn C1 on the top of crocheted piece and continue to crochet with C2 over it.

3. If you do everything correctly, the yarn of different color will not be seen either on right or wrong side.

4. If you see the yarn through the stitches, try to pull the (inside) yarn a bit before every color change. But don’t pull too much, as your work may wrap! The width of your project should stay the same after every row.

5. You should crochet over yarn of different color while making EVERY stitch. Don’t miss any. Otherwise you will get floats of yarn on the right (or wrong side).

6. When you work in rows it is important that you decide on which side is right and which is wrong. It has nothing to do with the pattern, as it will be reversible. But it is important to know how you should begin each row. When starting row on the wrong side, you should hold second yarn in front of your work. And starting row on the right side - hold 2nd yarn behind the work. It will give small colorful waves on the wrong side, while right side will look nice and neat.


Instructions (Triangle Tapestry Sample)
For this tutorial I used Stoned Washed* yarn by Scheepjes in shades 815 (C1) and 820 (C2). And 3.25mm Clover Soft Touch* crochet hook. The definition of the stitches with this yarn is very neat. And I would say it is great for tapestry crochet. The only disadvantage is that it is a bit difficult to frog. So you may want to use other yarn (scraps) to practice. But I would definitely recommend Stone Washed for your finished projects in tapestry crochet. I used it for my newest Tapestry Circles Pillow design. You can see the pictures HERE. And HERE is my review about Stoned Washed yarn.

I will show you the basics of tapestry crochet on the example of simple triangle. Here is the chart:

This small sample uses 2 colors of yarn. As you see first 4 rows are made in one color (C1 - aqua), and then the triangle pattern with C2 (pink) begins. Ch1 in the beginning of each row doesn’t count as sc, so make 1st sc of each row in 1st st of previous row.
So, let’s try? :)
Row 1. Ch22 with yarn C1 (aqua). Beginning in 2nd ch from hook, sc in every ch till the end. (21sc) Turn.
Row 2-4. Ch1 (doesn’t count as sc here and throughout), 21sc. Turn.
Row 5. On this row and next rows till 11th you will use C2 (pink) together with C1. Place C1 along the top of your crocheted piece and start crocheting over it, as shown above.
Ch1, 5sc with C1 (change color on 5th sc), 11sc with C2 (change color on 11th sc), 5sc with C1. Turn.
Row 6. Ch1, 6sc with C1, 9sc with C2, 6sc with C1. Turn.
Row 7. Ch1, 7sc with C1, 7sc with C2, 7sc with C1. Turn.
Row 8. Ch1, 8sc with C1, 5sc with C2, 8sc with C1. Turn.
Row 9. Ch1, 9sc with C1, 3sc with C2, 9sc with C1. Turn.
Row 10. Ch1, 10sc with C1, 1sc with C2, 10sc with C1. Turn.
Now you can either cut C2 and work next rows with C1 only, or you can continue crocheting over all the stitches with C1 (over C2). In this way your crocheted fabric will have the same thickness.
In my sample I cut C2, because Stone Washed yarn seems thick enough to me, and the difference in thickness between the parts is not critical at all.
Row 11-14. Ch1, 21sc with C1. Turn.
Congratulations!!! Your first sample in tapestry crochet is finished! Did it work well for you? Please, share your opinions with me!
If you would like to learn more about Tapestry Crochet and try some free and paid patterns – be sure to check art work of Carol Ventura and her web-site HERE. And FREE pattern of my Tapestry Circles pillow will be very soon available here on my blog. UPDATE: the pattern is HERE.
You can subscribe to weekly newsletter not to miss a single post. You can also follow me on Facebook, Pinterest and Instagram.


