Showing posts with label border. Show all posts
Showing posts with label border. Show all posts
YAY! Spirits of Life CAL is almost finished! This week is the last one. You will be making a simple border and then your wrap will be finished! I have mixed feelings about this week. It is a little bit sad that our crochet adventure is almost over. But on the other hand I am somewhat happy as well… This CAL was taking every single day of my life during last 2 months. I could hardly think of something else, and several new designs were put on hold. But now I will have more time to work on them and bring them to you soon.

If you missed previous parts of Spirits of Life CAL, please check General Information, Important Notes, Part 1, Part 2, Part 3, Part 4, Part 5, Part 6, Part 7 and Part 8.
Last week was very relaxed I hope. And today’s border is very simple, too. It consists of only rounds with single and double crochet stitches (US terms) and almost no counting is involved. So after you finish first round you can grab a cup of tea and continue with the pattern watching your favourite TV shows.
Why do I mention first round? Because on that round you will work evenly around entire wrap (it should be blocked already). I know many people I scared by “work evenly” instructions. To make it easier for you, I have given exact stitch count for every part of the wrap. So first round is broken into smaller sections, and hopefully it will be easy to be on track.
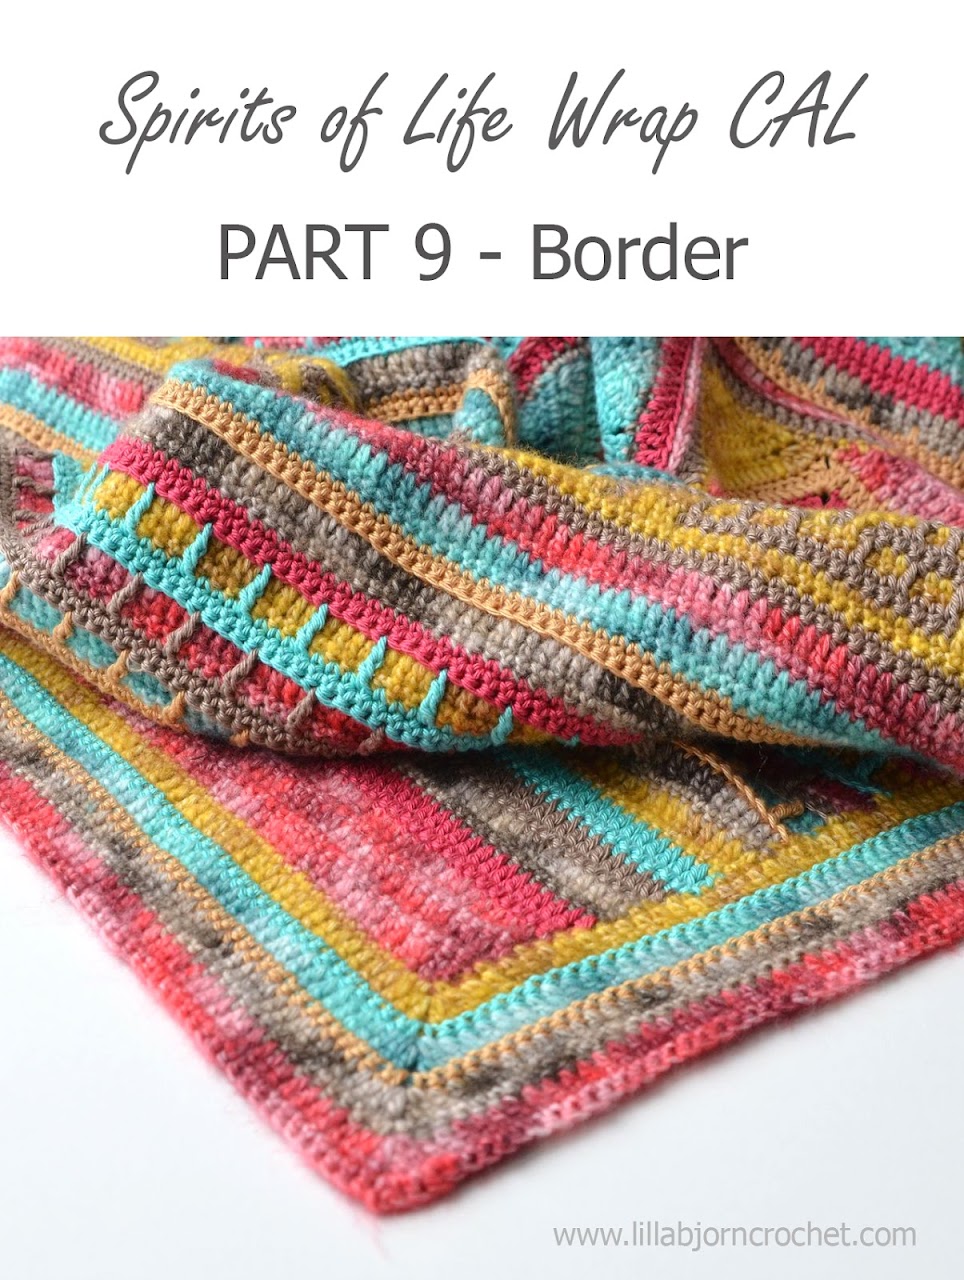
Please, note that my stitch count is perfect for the size and gauge given in the pattern. If your gauge was different, you might need to improvise a bit. The main rule is that your border must not ruffle. And it should not be pulling, too.
In case you don’t have enough yarn to finish the border as per pattern – don’t worry. You can absolutely join a new color in the middle of the round and continue to work with it. I would say different colors of yarn in the same round will make your wrap look very authentic.
IMPORTANT: Please, be aware that all my patterns (free or paid) are protected by copyright. You are not allowed to copy, reproduce, redistribute (online or off-line), sell and edit them in part or as a whole. You are welcome to sell your finished items made by my patterns, but you cannot use my pictures to promote them. Please, always credit me as the designer of these patterns. You are not allowed to share pdf-files created from my posts with anyone. If you would like more people to join my CAL – please, share a link to my blog with them. You can check Copyright page for more information.
**Errata** in some translations it was written to join Yarn F in the final stitch. It was an error. Please, make first round of the border with Yarn H :)
Part 9 - Afrikaans
Part 9 - Czech
Part 9 - Danish
Part 9 - Dutch
Part 9 - English (UK)
Part 9 - English (US)
Part 9 - Finnish
Part 9 - French
Part 9 - German
Part 9 - Hebrew
Part 9 - Norwegian
Part 9 - Polish
Part 9 - Portuguese
Part 9 - Spanish
Part 9 - Swedish
Part 9 - Russian
And if you have plenty of yarn left, here is my placement of colors for each of three colorways.

Here is a short video showing how the rounds begin and finish with a “needle join” (a nice opportunity to practice invisible join, isn’t?)
If you purchased an official Scheepjes kit you might be curious what is the metal ring for. And now I can tell you! It’s for a bonus pattern – a mandala wall hanging – which will be made with leftovers. The mandala design is created already and will be put to test this week. But since many of you are behind with the CAL and Christmas is almost here, I thought I would release bonus pattern early in January. When everyone will be back from holidays, fresh and ready for the new challenges!
Are you making this wrap for yourself or as a gift? :) I would love to hear from you in comments!!

Subscribe to a newsletter not to miss a single post. You can also follow me on Facebook, Pinterest and Instagram.


If you missed previous parts of Spirits of Life CAL, please check General Information, Important Notes, Part 1, Part 2, Part 3, Part 4, Part 5, Part 6, Part 7 and Part 8.
Last week was very relaxed I hope. And today’s border is very simple, too. It consists of only rounds with single and double crochet stitches (US terms) and almost no counting is involved. So after you finish first round you can grab a cup of tea and continue with the pattern watching your favourite TV shows.
Why do I mention first round? Because on that round you will work evenly around entire wrap (it should be blocked already). I know many people I scared by “work evenly” instructions. To make it easier for you, I have given exact stitch count for every part of the wrap. So first round is broken into smaller sections, and hopefully it will be easy to be on track.

Please, note that my stitch count is perfect for the size and gauge given in the pattern. If your gauge was different, you might need to improvise a bit. The main rule is that your border must not ruffle. And it should not be pulling, too.
In case you don’t have enough yarn to finish the border as per pattern – don’t worry. You can absolutely join a new color in the middle of the round and continue to work with it. I would say different colors of yarn in the same round will make your wrap look very authentic.
COPYRIGHT
IMPORTANT: Please, be aware that all my patterns (free or paid) are protected by copyright. You are not allowed to copy, reproduce, redistribute (online or off-line), sell and edit them in part or as a whole. You are welcome to sell your finished items made by my patterns, but you cannot use my pictures to promote them. Please, always credit me as the designer of these patterns. You are not allowed to share pdf-files created from my posts with anyone. If you would like more people to join my CAL – please, share a link to my blog with them. You can check Copyright page for more information.
**Errata** in some translations it was written to join Yarn F in the final stitch. It was an error. Please, make first round of the border with Yarn H :)
Part 9 - Afrikaans
Part 9 - Czech
Part 9 - Danish
Part 9 - Dutch
Part 9 - English (UK)
Part 9 - English (US)
Part 9 - Finnish
Part 9 - French
Part 9 - German
Part 9 - Hebrew
Part 9 - Norwegian
Part 9 - Polish
Part 9 - Portuguese
Part 9 - Spanish
Part 9 - Swedish
Part 9 - Russian
And if you have plenty of yarn left, here is my placement of colors for each of three colorways.

Here is a short video showing how the rounds begin and finish with a “needle join” (a nice opportunity to practice invisible join, isn’t?)
If you purchased an official Scheepjes kit you might be curious what is the metal ring for. And now I can tell you! It’s for a bonus pattern – a mandala wall hanging – which will be made with leftovers. The mandala design is created already and will be put to test this week. But since many of you are behind with the CAL and Christmas is almost here, I thought I would release bonus pattern early in January. When everyone will be back from holidays, fresh and ready for the new challenges!
Are you making this wrap for yourself or as a gift? :) I would love to hear from you in comments!!

- Spirits of Life CAL was sponsored by Scheepjes. There are still kits available for purchase (at the time of posting) at Wool Warehouse HERE (UK, international shipping) and Loveknitting HERE (US).
- You can join Official CCC Social group on Facebook which is an official host of Spirits of Life CAL. You will get all needed support and help there. You can also join my Ravelry group HERE and ask questions in CAL threads.
Subscribe to a newsletter not to miss a single post. You can also follow me on Facebook, Pinterest and Instagram.
If you are reading this blog post, you are most likely following Nuts About
Squares CAL. And if not – be sure to check it out! This CAL is about incredibly
beautiful blanket made of squares by different designers and put together by
Esther Dijkstra of
It’s All In A Nutshell. Esther chose
each square carefully, so that altogether they “play” in harmony. This CAL is
about structure, texture and different techniques. A true crochet adventure!
Read my
interview with Esther HERE
to learn more about her idea.
When Esther asked me to design a border for her blanket, I couldn’t resist. Of course! Such a honor! Esther asked for something textured but simple at the same time to frame the entire blanket and to support square patterns. And I gave it a try in overlay crochet.
This border was designed especially for Nuts About Squares CAL (squares with 44 stitches on each side) but you can use it for any blanket! The only important thing you should keep in mind is that stitch count on the first round, which should be multiple 4 plus one stitch.
You will need yarn in 4 shades for this border. Please, check Esther’s blog HERE to get complete information about colors and yardages for each of three color ways (and just to remind you, kits for NAS blanket are available at Wool Warehouse* and Deramores* (both are located in UK and ship orders internationally).
Video tutorial for the border is available HERE.
And you can also download Dutch translation of the pattern (Nederlands patroon) HERE.
US standard abbreviations are used in this pattern. Please check this Crochet Translation Project which might be helpful in translation to your native language.
BL(O) – back loop (only)
ch – chain
dc – double crochet
FL – front loop
FPtr – Front post treble crochet
FPdtr – front post double treble crochet
FPtr2tog – front post treble 2 together
FPst2tog – front post “stitches” 2 together (each leg is a different stitch)
NJ – “needle join”
rnd – round
sc – single crochet
sp(s) – space(s)
st(s) – stitch(es)
SPsc – spike stitch
1. New yarn is attached by simply pulling a loop into indicated st.
2. Ch1 in the beginning of each round counts as first sc.
3. Work all rounds in BLO unless otherwise stated on the pattern.
4. Finish every rnd with “needle join” (or “invisible join”).
Copyright LillaBjornCrochet 2017. All rights reserved. This pattern is for unlimited personal use only. Do not reproduce or sell the pattern. The pattern may not be translated other than for persoanl use, copied in any way (print or digitally), in part or in full. Items may be sold that are made from this pattern as long as the designer is credited. Shop owners, if you wish to make a kit with yarn using this pattern, please request permission and copyright details from me before offering any kits for sale. Please, read Copyright page for more information.
Add this pattern to your Ravelry Queue
Rnd 1. With C1 work through both lps. Attach yarn in first st after ch2-sp in any corner of large rectangle.
Ch1 (counts as first sc), [44sc, 1sc in ch2-sp, 1sc in seam, 1sc in next ch2-sp, 44sc, *1sc in ch2-sp, 2sc in seam, 1sc in next ch2-sp, 44sc* repeat till next corner, (1sc, ch2, 1sc) in next ch2-sp in the corner] 4 times; NJ in first sc after ch1 in beg of the rnd. (1140 sc: 333 sc on long side, 237 sc on each short side and 4 ch2-sps)
Rnd 2. Change to C2. Attach yarn in BL of any st. Work this and ALL next rnds in BL!!!
Ch1 (counts as sc), sc around making (1sc, ch2, 1sc) in each ch2-sp in the corner, NJ in first sc after ch1. (1148 sts: 335 sts on each long side, 239 sts on each short side and 4 ch2-sps)
Rnd 3. Note: skipped st in the end of last repeat on each edge counts as worked.
Change to C3. Attach yarn in first sc (BL) after ch2-sp.
*3sc (first sc is ch1), dc (FL) in 3rd st after ch2-sp of rnd 1, skip 1 st,
[3sc, skip 3 sts on rnd 1, dc (FL) in next st on rnd 1, skip 1 st on rnd 2] till you come to next corner leaving 3 unworked sts before ch2-sp, 1sc in next 3 sts, (1sc, ch2, 1sc) in next ch2-sp* 4 times, NJ in first sc after ch1. (1156 sts and 4 ch2-sps)
Rnd 4. Change to C4. Attach yarn in first sc (BL) after ch2-sp.
*1sc (first sc is ch1), 1tr (FL) in 2nd sc after ch2-sp of rnd 1, skip 1 st on rnd 3, 1sc,
[3sc, 1SPsc] till you come to the next corner leaving 6 unworked sts before ch2-sp, 4sc, 1tr (FL) in 2nd st of rnd 1 before ch2-sp, skip 1 st on rnd 3, 1sc, (1sc, ch2, 1sc) in next ch2-sp* 4 times, NJ in first sc after ch1. (1164 sts and 4 ch2-sps: 2tr in each corner)
Rnd 5. Change to C2. Attach yarn in first sc (BL) after ch2-sp.
*1sc (first sc is ch1), 1tr (FL) in first sc of rnd 2 after ch2-sp, skip 1 st on rnd 4,
[3sc, SPsc] till you come to the next corner leaving 5 unworked sts before ch2-sp, 3sc, 1tr (FL) on rnd 2 in first st before ch2-sp, skip 1 st on rnd 4, 1sc, (1sc, ch2, 1sc) in next ch2-sp* 4 times, NJ in first sc after ch1. (1172 sts and 4 ch2-sps: 2tr in each corner)
Rnd 6. Change to C3. Attach yarn in first sc (BL) after ch2-sp.
Note: legs of each FPtr2tog will be made around dc of rnd 3 lying to the right and to the left. After this rnd EVERY dc of rnd 3 will be covered with 2 FPsts.
Skipped st in the end of last repeat on each edge counts as worked.
*2sc (first sc is ch1), 1FPst2tog (make first leg (FPtr) around first sc of rnd 3 after ch2-sp, and make 2nd leg (FPdtr) around next dc of rnd 3), skip 1 st on rnd 5, 2sc,
[3sc, FPtr2tog, skip 1 st on rnd 5] till you come to the next corner leaving 8 unworked sts before ch2-sp, 5sc, 1FPst2tog (make first leg (FPdtr) around last dc of rnd 3 on this side, and make 2nd leg (FPtr) around first sc of rnd 3 just before next ch2-sp, skip 1 st on rnd 5, 2sc, (1sc, ch2, 1sc) in next ch2-sp* 4 times, NJ in first sc after ch1. (1180 sts and 4 ch2-sps)
Rnd 7. Change to C1. Attach yarn in BL of any st.
Ch1 (counts as sc), sc around making (1sc, ch2, 1sc) in each ch2-sp in the corner, NJ in first sc after ch1. (1188 sts and 4 ch2-sps)
Rnd 8. Change to C4. Attach yarn in first sc (BL) after ch2-sp.
*4sc (first sc is ch1), 1SPsc, [3sc, 1SPsc] till you come to the next corner leaving 4 unworked sts before ch2-sp, 4sc, (1sc, ch2, 1sc) in next ch2-sp* 4 times, NJ in first sc after ch1. (1196 sts and 4 ch2-sps)
Rnd 9. Change to C2. Attach yarn in first sc (BL) after ch2-sp.
*[3sc, 1SPsc] till you come to the next corner leaving 3 unworked sts before ch2-sp, 3sc, (1sc, ch2, 1sc) in next ch2-sp* 4 times, NJ in first sc after ch1. (1204 sts and 4 ch2-sps)
Rnd 10. Change to C1. Attach yarn in BL of any st.
Ch1 (counts as sc), sc around making 1sc in each ch2-sp in the corner, NJ in first sc after ch1. (1208 sts)
And here is video made by Esther to help you:
Ta-dah!!! You can’t even imagine how excited I am to say this: your Nuts About Squares Blanket is now finished!!!
Subscribe to a newsletter not to miss a single post. You can also follow me on Facebook, Pinterest and Instagram.
* DISCLOSURE: This blog contains affiliate links (marked with *). I may be compensated with a tiny amount from each purchase made via these links, and it will not cost you a penny. By using affiliate links you support my blog. Thank you!

|
| Nuts About Squares CAL. Photo credit: Scheepjes |
When Esther asked me to design a border for her blanket, I couldn’t resist. Of course! Such a honor! Esther asked for something textured but simple at the same time to frame the entire blanket and to support square patterns. And I gave it a try in overlay crochet.
This border was designed especially for Nuts About Squares CAL (squares with 44 stitches on each side) but you can use it for any blanket! The only important thing you should keep in mind is that stitch count on the first round, which should be multiple 4 plus one stitch.

|
| Nuts About Squares CAL. Photo credit: Scheepjes |
You will need yarn in 4 shades for this border. Please, check Esther’s blog HERE to get complete information about colors and yardages for each of three color ways (and just to remind you, kits for NAS blanket are available at Wool Warehouse* and Deramores* (both are located in UK and ship orders internationally).
Video tutorial for the border is available HERE.
And you can also download Dutch translation of the pattern (Nederlands patroon) HERE.
Abbreviations (US terms)
US standard abbreviations are used in this pattern. Please check this Crochet Translation Project which might be helpful in translation to your native language.
BL(O) – back loop (only)
ch – chain
dc – double crochet
FL – front loop
FPtr – Front post treble crochet
FPdtr – front post double treble crochet
FPtr2tog – front post treble 2 together
FPst2tog – front post “stitches” 2 together (each leg is a different stitch)
NJ – “needle join”
rnd – round
sc – single crochet
sp(s) – space(s)
st(s) – stitch(es)
SPsc – spike stitch
[...] - [crochet following directions] as many times as indicated
*...* - *crochet following directions* as many times as indicated
Pattern Notes:
1. New yarn is attached by simply pulling a loop into indicated st.
2. Ch1 in the beginning of each round counts as first sc.
3. Work all rounds in BLO unless otherwise stated on the pattern.
4. Finish every rnd with “needle join” (or “invisible join”).

|
| Nuts About Squares CAL. Photo credit: Scheepjes |
INSTRUCTIONS
Copyright LillaBjornCrochet 2017. All rights reserved. This pattern is for unlimited personal use only. Do not reproduce or sell the pattern. The pattern may not be translated other than for persoanl use, copied in any way (print or digitally), in part or in full. Items may be sold that are made from this pattern as long as the designer is credited. Shop owners, if you wish to make a kit with yarn using this pattern, please request permission and copyright details from me before offering any kits for sale. Please, read Copyright page for more information.
Add this pattern to your Ravelry Queue
Rnd 1. With C1 work through both lps. Attach yarn in first st after ch2-sp in any corner of large rectangle.
Ch1 (counts as first sc), [44sc, 1sc in ch2-sp, 1sc in seam, 1sc in next ch2-sp, 44sc, *1sc in ch2-sp, 2sc in seam, 1sc in next ch2-sp, 44sc* repeat till next corner, (1sc, ch2, 1sc) in next ch2-sp in the corner] 4 times; NJ in first sc after ch1 in beg of the rnd. (1140 sc: 333 sc on long side, 237 sc on each short side and 4 ch2-sps)
Rnd 2. Change to C2. Attach yarn in BL of any st. Work this and ALL next rnds in BL!!!
Ch1 (counts as sc), sc around making (1sc, ch2, 1sc) in each ch2-sp in the corner, NJ in first sc after ch1. (1148 sts: 335 sts on each long side, 239 sts on each short side and 4 ch2-sps)
Rnd 3. Note: skipped st in the end of last repeat on each edge counts as worked.
Change to C3. Attach yarn in first sc (BL) after ch2-sp.
*3sc (first sc is ch1), dc (FL) in 3rd st after ch2-sp of rnd 1, skip 1 st,
[3sc, skip 3 sts on rnd 1, dc (FL) in next st on rnd 1, skip 1 st on rnd 2] till you come to next corner leaving 3 unworked sts before ch2-sp, 1sc in next 3 sts, (1sc, ch2, 1sc) in next ch2-sp* 4 times, NJ in first sc after ch1. (1156 sts and 4 ch2-sps)
Rnd 4. Change to C4. Attach yarn in first sc (BL) after ch2-sp.
*1sc (first sc is ch1), 1tr (FL) in 2nd sc after ch2-sp of rnd 1, skip 1 st on rnd 3, 1sc,
[3sc, 1SPsc] till you come to the next corner leaving 6 unworked sts before ch2-sp, 4sc, 1tr (FL) in 2nd st of rnd 1 before ch2-sp, skip 1 st on rnd 3, 1sc, (1sc, ch2, 1sc) in next ch2-sp* 4 times, NJ in first sc after ch1. (1164 sts and 4 ch2-sps: 2tr in each corner)
Rnd 5. Change to C2. Attach yarn in first sc (BL) after ch2-sp.
*1sc (first sc is ch1), 1tr (FL) in first sc of rnd 2 after ch2-sp, skip 1 st on rnd 4,
[3sc, SPsc] till you come to the next corner leaving 5 unworked sts before ch2-sp, 3sc, 1tr (FL) on rnd 2 in first st before ch2-sp, skip 1 st on rnd 4, 1sc, (1sc, ch2, 1sc) in next ch2-sp* 4 times, NJ in first sc after ch1. (1172 sts and 4 ch2-sps: 2tr in each corner)
Rnd 6. Change to C3. Attach yarn in first sc (BL) after ch2-sp.
Note: legs of each FPtr2tog will be made around dc of rnd 3 lying to the right and to the left. After this rnd EVERY dc of rnd 3 will be covered with 2 FPsts.
Skipped st in the end of last repeat on each edge counts as worked.
*2sc (first sc is ch1), 1FPst2tog (make first leg (FPtr) around first sc of rnd 3 after ch2-sp, and make 2nd leg (FPdtr) around next dc of rnd 3), skip 1 st on rnd 5, 2sc,
[3sc, FPtr2tog, skip 1 st on rnd 5] till you come to the next corner leaving 8 unworked sts before ch2-sp, 5sc, 1FPst2tog (make first leg (FPdtr) around last dc of rnd 3 on this side, and make 2nd leg (FPtr) around first sc of rnd 3 just before next ch2-sp, skip 1 st on rnd 5, 2sc, (1sc, ch2, 1sc) in next ch2-sp* 4 times, NJ in first sc after ch1. (1180 sts and 4 ch2-sps)
Rnd 7. Change to C1. Attach yarn in BL of any st.
Ch1 (counts as sc), sc around making (1sc, ch2, 1sc) in each ch2-sp in the corner, NJ in first sc after ch1. (1188 sts and 4 ch2-sps)
Rnd 8. Change to C4. Attach yarn in first sc (BL) after ch2-sp.
*4sc (first sc is ch1), 1SPsc, [3sc, 1SPsc] till you come to the next corner leaving 4 unworked sts before ch2-sp, 4sc, (1sc, ch2, 1sc) in next ch2-sp* 4 times, NJ in first sc after ch1. (1196 sts and 4 ch2-sps)
Rnd 9. Change to C2. Attach yarn in first sc (BL) after ch2-sp.
*[3sc, 1SPsc] till you come to the next corner leaving 3 unworked sts before ch2-sp, 3sc, (1sc, ch2, 1sc) in next ch2-sp* 4 times, NJ in first sc after ch1. (1204 sts and 4 ch2-sps)
Rnd 10. Change to C1. Attach yarn in BL of any st.
Ch1 (counts as sc), sc around making 1sc in each ch2-sp in the corner, NJ in first sc after ch1. (1208 sts)
And here is video made by Esther to help you:
Ta-dah!!! You can’t even imagine how excited I am to say this: your Nuts About Squares Blanket is now finished!!!
Subscribe to a newsletter not to miss a single post. You can also follow me on Facebook, Pinterest and Instagram.
* DISCLOSURE: This blog contains affiliate links (marked with *). I may be compensated with a tiny amount from each purchase made via these links, and it will not cost you a penny. By using affiliate links you support my blog. Thank you!
Ta-dah! Here are free patterns for three different borders made around embroidery hoops. I chose natural shades for this project and wanted these frames to look classical and elegant. I am not really sure I was a success with a classical look, but for me they are quite elegant. :) They can be used in a variety of ways: as separate wall hanging decorations, for example. But I will use them as photo-frames. I had been working very hard last week taking progress pictures and writing the pattern down. And I wanted to share the patterns with you as soon as possible. So unfortunately I haven’t managed to finish a tutorial about attaching pictures to this frames yet. But I will do it in next posts!
 You can see more pictures of this project HERE. And HERE is a tutorial on how to attach pictures to these hoops.
All three borders are made in overlay crochet, and if you are not familiar with this technique, please, read important notes first. Once you understand the idea of crocheting in back loops and attaching overlaid stitches in front loops of previous rounds – everything will be very smooth and easy!
rnd - round
st(s) - stitch(es)
ch - chain
sp(s) - space(s)
yo - yarn over
lp(s) - loop(s)
BL - back loop(s)
NJ - needle join
*…* *crochet following directions* as many times as indicated
sl st (slip stitch) – insert hook in indicated st, yo, draw yarn up and pull 2nd lp through the 1st lp on hook.
sc (single crochet) – insert hook in indicated stitch, yo, draw up a lp, yo and pull through both lps on hook.
hdc (half double crochet) - yo, insert hook in indicated st, yo, draw up a lp, yo, pull through all three lps.
dc (double crochet) – yo, insert hook in indicated st, yo, draw up a lp, *yo, pull through 2 lps* twice.
tr (treble crochet) - yo twice, insert hook in indicated st, yo, draw up a lp, *yo, pull through 2 lps* three times.
dc4tog (double crochet 4 together) – *yo, insert hook in indicated st, yo, draw up a lp, yo, pull through 2 lps* 4 times in same st, yo, pull through all 5 lps on hook.
Copyright LillaBjornCrochet 2015. All rights reserved. This pattern is for unlimited personal use only. Do not reproduce or sell the pattern. The pattern may not be copied in any way (print or digitally), in part or in full. Items may be sold that are made from this pattern as long as the designer is credited. Shop owners, if you wish to make a kit with yarn using this pattern, please request permission and copyright details from me before offering any kits for sale. Please, read Copyright page for more information.
You will continue crocheting with the yarn of same color on rnd 2. To start make ch1 (counts as 1st sc of this rnd) and make next sc in a st after the one where you made sl st. Join second rnd with needle join.

BORDER 1
I used the embroidery hoop 9 cm. 8 sts in one repeat.
Rnd 1 (base – shade 613) Make 96 sc around the hoop, finish with sl st in the 1st sc, don’t fasten off. (96 sc)
Rnd 2 (continue with shade 613). Make this rnd through both lps.
Ch1 (counts as 1st sc), 95 sc; NJ in the 1st sc of this rnd after ch1. (96 sc)
Make 2 rounds with surface sl sts (please, check THIS tutorial).
Use shade 618 for the 1st one – insert the hook in sts of the 1st rnd (under sc of rnd2).

Use shade 620 for the 2nd round of slip stitches. Insert the hook under both loops of each sc of rnd 2.
Rnd 3. Change to shade 616. Attach yarn in any st of rnd 2. Work this rnd in BL.
*1sl st (1st st of the rnd will be ch1), 1sc, 1hdc, 2dc in next st, 1tr, 2dc in next st, 1hdc, 1sc* 12 times, NJ in 1st sc of the rnd after ch1. (=120 sts)

Rnd 4. Change to shade 619. Attach yarn in 1st dc on the top of any petal just after any tr (in BL!!).
Note: you will work this rnd in BL. But you will attach dc4tog’s in FL of rnd 2. These front loops are visible just above the second round of surface sl sts. Please, check THIS post to see how you should attach overlay stitches in FL of previous round.
*3sc (1st sc of the rnd will be ch1), 1dc4tog (FL) in the same st of rnd 2 where next sl st of rnd 2 was made, skip 3 sts on rnd 3, 3sc, (sl st, ch3, sl st) in next tr* 12 times, NJ in 1st sc of the rnd after ch1. (12 dc4togs + 72sc + 12 ch3-picots)

Congratulations! Your 1st border is now finished!

BORDER 2
I used hoop 12.5 cm. 6 sts in one repeat
Rnd 1 (base – shade 620) Make 114 sc around the hoop, finish with sl st in the 1st sc, don’t fasten off. (114 sc)
Rnd 2 (continue with shade 620). Make this rnd in BL!!!
Ch1 (counts as 1st sc), 113 sc; NJ in the 1st sc of this rnd after ch1. (114 sc)

Rnd 3. Change to shade 616. Attach yarn in any st of rnd 2. I made this rnd in BL, but I think it is better to work it through both lps. It’s up to you :)
Note: after this rnd there will be 5 sts skipped between each 2 dc.
*5sc (1st sc of the rnd will be ch1), 1dc (FL) in a st of rnd 1 lying directly under next sc of rnd 2, skip 1 st on rnd 2* 19 times, NJ in the 1st sc of the rnd after ch1. (= 114 sts)

Rnd 4. Change to shade 618. Attach yarn in any dc of rnd 3 (through both lps).
Note: Make sc in dc’s of rnd 3 – through both lps! As 1st sc of each rnd is always ch1, you will start this rnd with ch4.
*1sc in dc through both lps (1st sc of the rnd is ch1), ch3, 1sc (FL) in 3rd of 5 skipped sts of rnd 1 between two dc, ch3* 19 times, join this rnd with sl st in the same dc where you attached the yarn, fasten off. (= 38 sc + 38 ch3-sps)
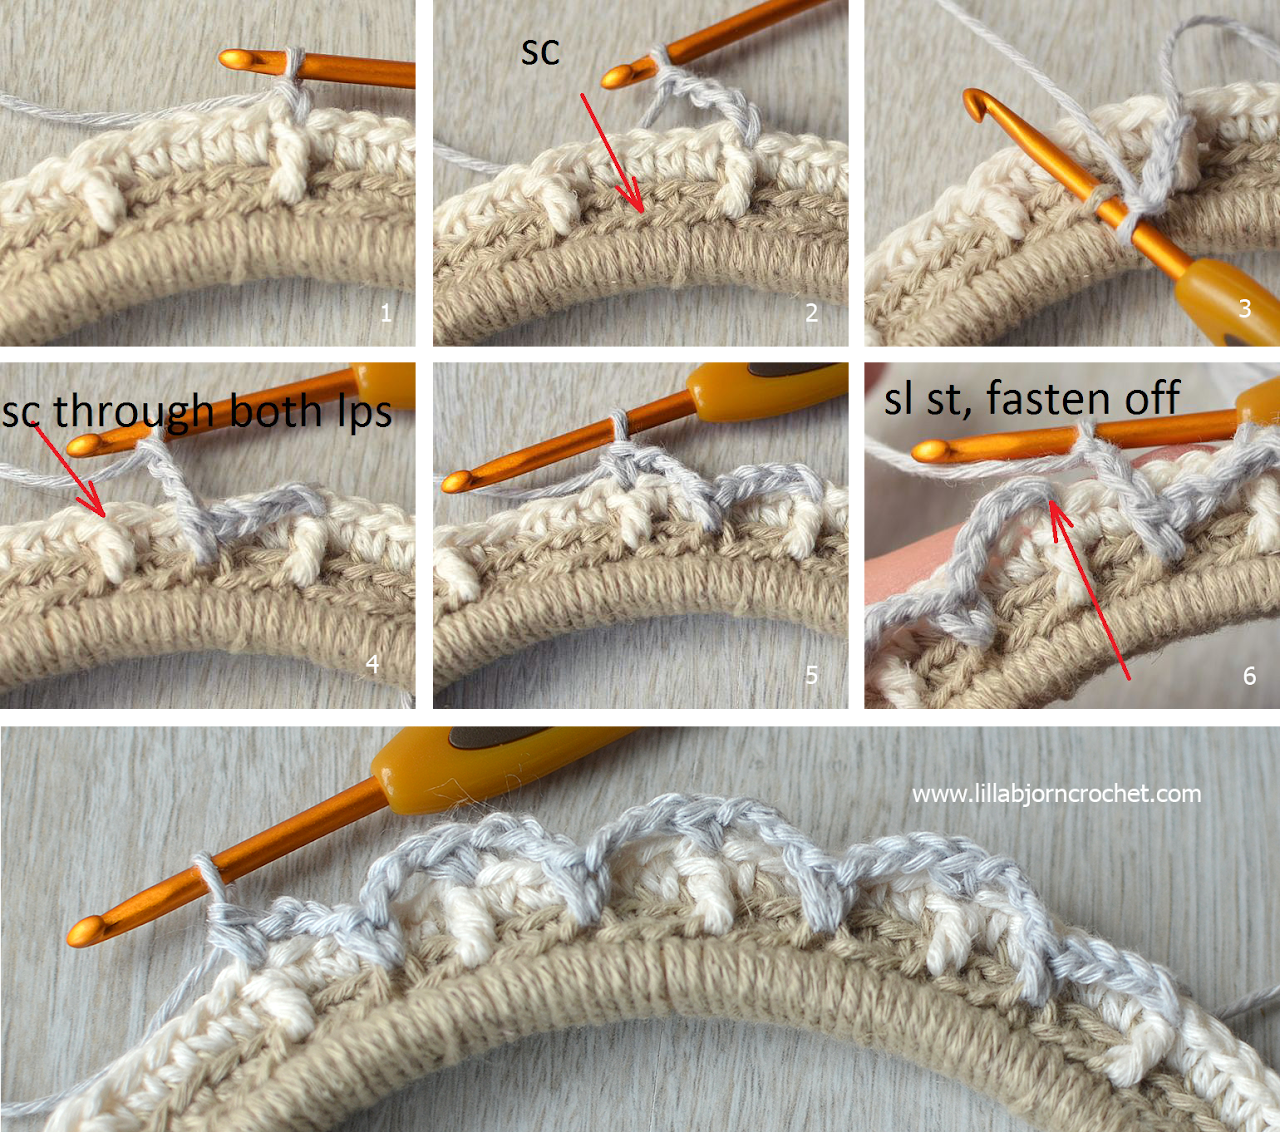
Congratulations! Your 2nd border is now finished! It will probably need some blocking ;-)
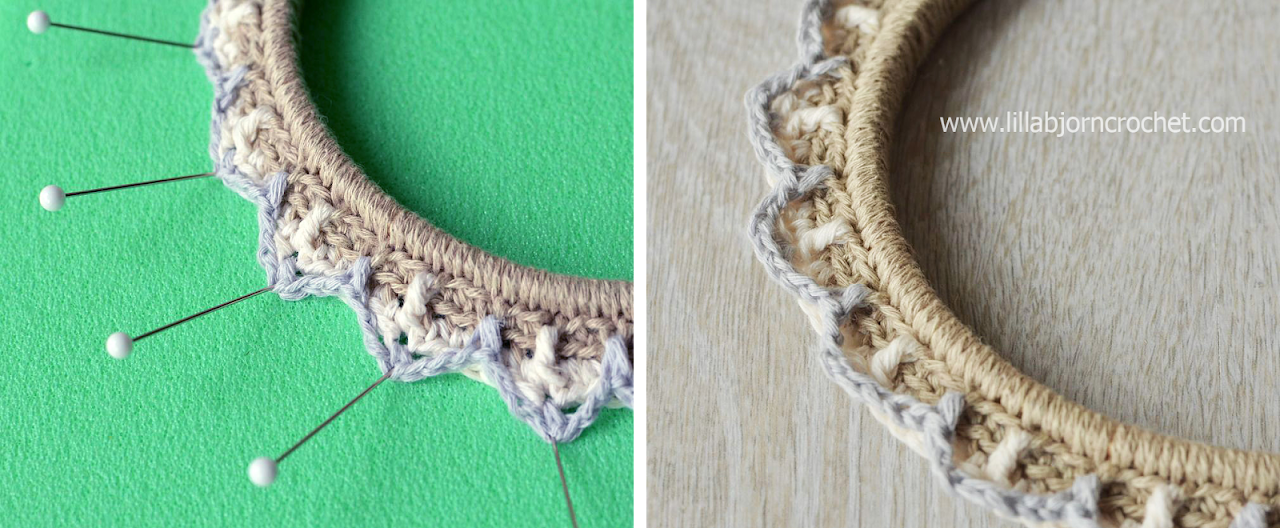
BORDER 3
Hoop 14.5 cm. 8 sts in one repeat
Rnd 1 (base – shade 616) Make 136 sc around the hoop, finish with sl st in the 1st sc, don’t fasten off. (136 sc)
Rnd 2 (continue with shade 616). Make this rnd through both lps!
Ch1 (counts as 1st sc), 135 sc; NJ in the 1st sc of this rnd after ch1. (136 sc)
Make one rnd of surface slip stitches with shade 620 (in the same way you made 2nd rnd of sl sts for Border 1).
Rnd 3. Change to shade 619. Attach yarn in any st of rnd 2. Work this rnd through both lps!
Note: 1st dc4tog of this rnd will be ch2+dc3tog.
*1dc4tog, ch4, skip 3 sts on rnd 2, (1sl st, ch3, 1 sl st) in next st, ch3, skip 3 sts on rnd 2* 17 times, join with sl st in the 1st dc4tog of this rnd, fasten off. (= 17 dc4togs + 34 ch4-sps + 17 ch3-picots)

Rnd 4. Change to shade 613. Attach yarn in any dc4tog (through both lps)!
Note: As 1st stitch of this rnd is ch1, you will start this rnd with ch4.
*(sl st, ch3, sl st) in dc4tog, ch3, 1 sc in next ch3-sp, ch3* 17 times, join this rnd with sl st in the same dc4tog where you attached the yarn, fasten off. (= 17 sc + 17 ch3-picots + 34 ch3-sps)

Congratulations! Your 3rd border is now finished!

I hope you had fun making all three borders. And next week I will show you how to attach pictures to your newly made frames! Stay tuned :)
You can subscribe to weekly newsletter not to miss a single post. You can also follow me on Facebook, Pinterest and Instagram.

All three borders are made in overlay crochet, and if you are not familiar with this technique, please, read important notes first. Once you understand the idea of crocheting in back loops and attaching overlaid stitches in front loops of previous rounds – everything will be very smooth and easy!
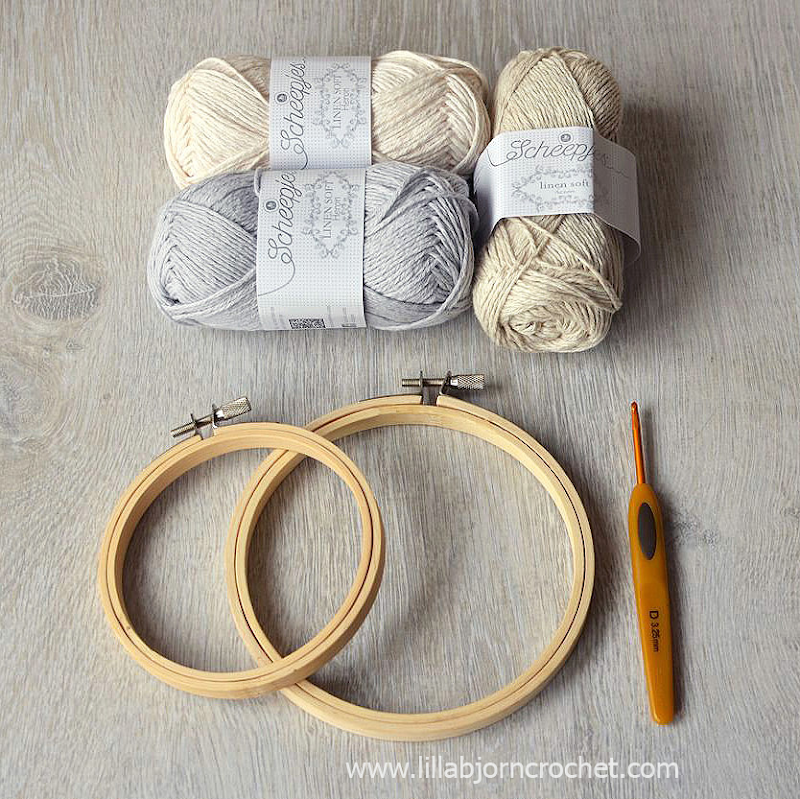
You will need:
- Wooden embroidery hoop. I used three in different sizes: 9cm, 12.5 cm an 14.5 cm
- Yarn in 4-5 shades. I used Linen Soft by Scheepjes in shades 613, 616, 618, 619 and 620. You can choose and purchase your shades via Scheepjes.com (NL), Deramores* or Wool Warehouse* (international shipping), and Paradise Fibers* (US).
- Crochet hook 3.25mm (D)
- Scissors and tapestry needle to weave yarn tails in

Stitch guide and Abbreviations
US standard abbreviations are used in this pattern. But if you are used to other terms, please check this Crochet Translation Project which might be helpful in translation to your native language.
rnd - round
st(s) - stitch(es)
ch - chain
sp(s) - space(s)
yo - yarn over
lp(s) - loop(s)
BL - back loop(s)
NJ - needle join
*…* *crochet following directions* as many times as indicated
sl st (slip stitch) – insert hook in indicated st, yo, draw yarn up and pull 2nd lp through the 1st lp on hook.
sc (single crochet) – insert hook in indicated stitch, yo, draw up a lp, yo and pull through both lps on hook.
hdc (half double crochet) - yo, insert hook in indicated st, yo, draw up a lp, yo, pull through all three lps.
dc (double crochet) – yo, insert hook in indicated st, yo, draw up a lp, *yo, pull through 2 lps* twice.
tr (treble crochet) - yo twice, insert hook in indicated st, yo, draw up a lp, *yo, pull through 2 lps* three times.
dc4tog (double crochet 4 together) – *yo, insert hook in indicated st, yo, draw up a lp, yo, pull through 2 lps* 4 times in same st, yo, pull through all 5 lps on hook.
Important notes
These photo-frames are made in overlay crochet. If this is your first experience with this amazing technique, please, be sure to check THIS SECTION with all necessary information about it.
- You can use embroidery hoops of any size. To adjust the amount of stitches for your particular hoop simply increase or decrease the amount of repeats. The number of stitches used in one repeat is stated in the pattern.
- You should use ring without a fastener to crochet the border around. The ring with the fastener will be used later to attach pictures (or embroidery). See a tutorial HERE.
- Attaching new yarn. New yarn is attached by simply pulling a loop of new color in the indicated st and making a ch, which will count as the first sc of the round (unless otherwise stated in the pattern). Read more HERE.
- Working in back or front loops. The stitches of the background are always crocheted in back loops only (unless otherwise stated in the pattern) while the overlaid long stitches are added (“anchored”) in the front loops of sts of previous rounds. If you crochet the background sts through the FL you won’t be able to place long stitches. Read more HERE.
- Skipping stitches. Overlaid stitches “hide” the stitches of background and this is the reason, why sc of the working round should be skipped. Read more HERE.
- Needle join. The rounds are finished with a needle join (NJ) in the first st of the round (unless otherwise stated in the pattern). I use a hook instead of a needle to join, it saves a lot of time. (I also use a hook to weave in all yarn tails). Read more HERE.
Copyright LillaBjornCrochet 2015. All rights reserved. This pattern is for unlimited personal use only. Do not reproduce or sell the pattern. The pattern may not be copied in any way (print or digitally), in part or in full. Items may be sold that are made from this pattern as long as the designer is credited. Shop owners, if you wish to make a kit with yarn using this pattern, please request permission and copyright details from me before offering any kits for sale. Please, read Copyright page for more information.
INSTRUCTIONS
Add this Pattern to your Ravelry QueueBase round
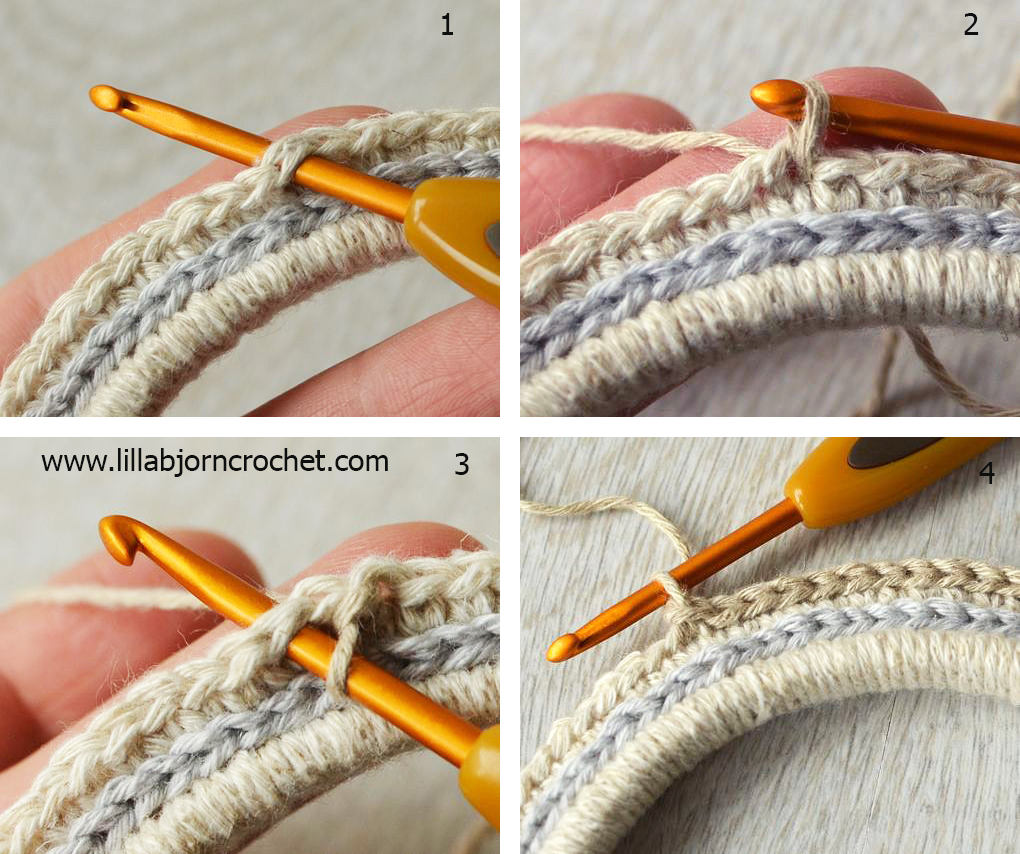
The base round around the embroidery hoop will count as 1st round for every design. Please, check THIS tutorial on how to crochet the base about the hoop. On pic. 1 below you can see the 1st st of base round. Make as many sts as needed and finish this round with a sl st in the 1st st of the rnd.You will continue crocheting with the yarn of same color on rnd 2. To start make ch1 (counts as 1st sc of this rnd) and make next sc in a st after the one where you made sl st. Join second rnd with needle join.

BORDER 1
I used the embroidery hoop 9 cm. 8 sts in one repeat.
Rnd 1 (base – shade 613) Make 96 sc around the hoop, finish with sl st in the 1st sc, don’t fasten off. (96 sc)
Rnd 2 (continue with shade 613). Make this rnd through both lps.
Ch1 (counts as 1st sc), 95 sc; NJ in the 1st sc of this rnd after ch1. (96 sc)
Make 2 rounds with surface sl sts (please, check THIS tutorial).
Use shade 618 for the 1st one – insert the hook in sts of the 1st rnd (under sc of rnd2).

Use shade 620 for the 2nd round of slip stitches. Insert the hook under both loops of each sc of rnd 2.

Rnd 3. Change to shade 616. Attach yarn in any st of rnd 2. Work this rnd in BL.
*1sl st (1st st of the rnd will be ch1), 1sc, 1hdc, 2dc in next st, 1tr, 2dc in next st, 1hdc, 1sc* 12 times, NJ in 1st sc of the rnd after ch1. (=120 sts)

Rnd 4. Change to shade 619. Attach yarn in 1st dc on the top of any petal just after any tr (in BL!!).
Note: you will work this rnd in BL. But you will attach dc4tog’s in FL of rnd 2. These front loops are visible just above the second round of surface sl sts. Please, check THIS post to see how you should attach overlay stitches in FL of previous round.
*3sc (1st sc of the rnd will be ch1), 1dc4tog (FL) in the same st of rnd 2 where next sl st of rnd 2 was made, skip 3 sts on rnd 3, 3sc, (sl st, ch3, sl st) in next tr* 12 times, NJ in 1st sc of the rnd after ch1. (12 dc4togs + 72sc + 12 ch3-picots)

Congratulations! Your 1st border is now finished!

BORDER 2
I used hoop 12.5 cm. 6 sts in one repeat
Rnd 1 (base – shade 620) Make 114 sc around the hoop, finish with sl st in the 1st sc, don’t fasten off. (114 sc)
Rnd 2 (continue with shade 620). Make this rnd in BL!!!
Ch1 (counts as 1st sc), 113 sc; NJ in the 1st sc of this rnd after ch1. (114 sc)

Rnd 3. Change to shade 616. Attach yarn in any st of rnd 2. I made this rnd in BL, but I think it is better to work it through both lps. It’s up to you :)
Note: after this rnd there will be 5 sts skipped between each 2 dc.
*5sc (1st sc of the rnd will be ch1), 1dc (FL) in a st of rnd 1 lying directly under next sc of rnd 2, skip 1 st on rnd 2* 19 times, NJ in the 1st sc of the rnd after ch1. (= 114 sts)

Rnd 4. Change to shade 618. Attach yarn in any dc of rnd 3 (through both lps).
Note: Make sc in dc’s of rnd 3 – through both lps! As 1st sc of each rnd is always ch1, you will start this rnd with ch4.
*1sc in dc through both lps (1st sc of the rnd is ch1), ch3, 1sc (FL) in 3rd of 5 skipped sts of rnd 1 between two dc, ch3* 19 times, join this rnd with sl st in the same dc where you attached the yarn, fasten off. (= 38 sc + 38 ch3-sps)

Congratulations! Your 2nd border is now finished! It will probably need some blocking ;-)

BORDER 3
Hoop 14.5 cm. 8 sts in one repeat
Rnd 1 (base – shade 616) Make 136 sc around the hoop, finish with sl st in the 1st sc, don’t fasten off. (136 sc)
Rnd 2 (continue with shade 616). Make this rnd through both lps!
Ch1 (counts as 1st sc), 135 sc; NJ in the 1st sc of this rnd after ch1. (136 sc)
Make one rnd of surface slip stitches with shade 620 (in the same way you made 2nd rnd of sl sts for Border 1).
Rnd 3. Change to shade 619. Attach yarn in any st of rnd 2. Work this rnd through both lps!
Note: 1st dc4tog of this rnd will be ch2+dc3tog.
*1dc4tog, ch4, skip 3 sts on rnd 2, (1sl st, ch3, 1 sl st) in next st, ch3, skip 3 sts on rnd 2* 17 times, join with sl st in the 1st dc4tog of this rnd, fasten off. (= 17 dc4togs + 34 ch4-sps + 17 ch3-picots)

Rnd 4. Change to shade 613. Attach yarn in any dc4tog (through both lps)!
Note: As 1st stitch of this rnd is ch1, you will start this rnd with ch4.
*(sl st, ch3, sl st) in dc4tog, ch3, 1 sc in next ch3-sp, ch3* 17 times, join this rnd with sl st in the same dc4tog where you attached the yarn, fasten off. (= 17 sc + 17 ch3-picots + 34 ch3-sps)

Congratulations! Your 3rd border is now finished!

I hope you had fun making all three borders. And next week I will show you how to attach pictures to your newly made frames! Stay tuned :)
You can subscribe to weekly newsletter not to miss a single post. You can also follow me on Facebook, Pinterest and Instagram.
Subscribe to:
Posts (Atom)


