Showing posts with label Part 3. Show all posts
Showing posts with label Part 3. Show all posts
Hello and thank you for joining Grinda MAL. We are slowly approaching third part and I hope you are doing great! Today the pattern will slightly change and we will be building “polka dots”, or large islands. One of them is Vaxholm, often referred to be a capital of Stockholm Archipelago.

Vaxholm is just in hour’s ferry ride from Stockholm, and it’s truly a very popular tourist destination. The island is lovely with beautiful houses, calm beaches and lots of cafes and restaurants. We spent long hours here: my husband with a book and me with crochet.

Buy a ready-to-print pdf with ALL parts (complete shawl pattern) HERE on Ravelry and HERE on Etsy.
If you are using paid pdf please note there were several updates made this week. The chart for Part 4 was re-uploaded, and stitch count in extension after Part 4 (so called “next row”) should be: 148dc and 147 ch1-sps. You can find errata on Ravelry pattern page.
Dimensions (after Part 3, blocked): approx. 131cm/51.5” wide, 60cm/23.6” high
Approx. 104-106g of yarn used (Part 1 + Part 2 + Part 3)
Row 36. As Row 18. {72 dc and 71 ch1-sps on each side, ch2-sp in the corner}
Row 37. As Row 19. {28 dc, 23 sc, 4 ch1-sps and 46 ch3-sps, ch2-sp in the corner}
Row 38. Ch4, 1dc in same st, [ch1, 1dc in next st] x3, [ch1, 1dc in next sp, ch1, 1dc in next sp, ch1, 1dc in next st] till 1 dc left before the corner, ch1, 1dc in next st, ch1, V-st in corner, [ch1, 1dc in next st] x2, [ch1, 1dc in next sp, ch1, 1dc in next sp, ch1, 1dc in next st] till 3dc left, [ch1, 1dc in next st] x2, ch1, (1dc, ch1, 1dc) in last st, turn. {76 dc and 75 ch1-sps on each side, ch2-sp in the corner}
Row 39. Ch4, 1dc in same st, 1 lace st,
[1 lace st, ch1, 1dc in next st, *1dc in next sp, 1dc in next st* x 3, ch1, skip sp, 1dc in next st] till corner, ch1, V-st in corner, ch1, 1dc in next st,
[ch1, skip sp, 1dc in next st, *1dc in next sp, 1dc in next st* x3, ch1, 1dc in next st, 1 lace st] till 3 dc left, 1 lace st, ch1, one more dc in last st, turn. {9 groups of 7dc, 22 dc, 10 sc, 20 ch1-sps and 20 ch3-sps on each side, ch2-sp in the corner}
Row 40. Ch4, 1dc in same st, ch1, 1dc in next st, [ch1, 1dc in next sp] x2, ch1, 1dc in next st,
[*ch1, 1dc in next sp* x2, ch1, 1dc in next st, 1dc in next sp, 7dc, 1dc in next sp, 1dc in next st] till 1 dc before the corner,
ch1, 1dc in next st, ch1, V-st in corner, ch1, 1dc in next st,
[ch1, 1dc in next st, 1dc in next sp, 7dc, 1dc in next sp, 1dc in next st, *ch1, 1dc in next sp* x2] x9,
ch1, 1dc in next st, [ch1, 1dc in next sp] x2, [ch1, 1dc in next st] x2, ch1, one more dc in last st, turn. {9 groups of 11 dc, 26 dc and 34 ch1-sps on each side, ch2-sp in the corner}
Row 41. Ch4, 1dc in same st, [ch1, 1dc in next st] x2, 1 lace st,
[1 lace st, 10dc] till 2dc left before the corner, [ch1, 1dc in next st] x2, ch1, V-st in corner, [ch1, 1dc in next st] x2, ch1, 1dc in next st,
[10dc, 1 lace st] till 5 dc left,
1 lace st, [ch1, 1dc in next st] x2, ch1, one more dc in last st, turn. {9 groups of 11 dc, 8 dc, 10 sc, 6 ch1-sps and 20 ch3-sps on each side, ch2-sp in the corner}
Row 42. Beg: Ch4, 1dc in same st, [ch1, 1dc in next st] x3, ch1, 1dc in next sp, ch1, 1dc in next sp, ch1, 1dc in next st,
Repeat: [ch1, 1dc in next sp, ch1, 1dc in next sp, ch1, 1dc in each of next 11 dc] x9,
Corner: [ch1, 1dc in next st] x3, ch1, V-st in corner, [ch1, 1dc in next st] x3,
Repeat: [ch1, 1dc in each of next 11dc, ch1, 1dc in next sp, ch1, 1dc in next sp] x9,
End: ch1, 1dc in next st, [ch1, 1dc in next sp] x2, [ch1, 1dc in next st] x4, ch1, one more dc in last st, turn. {9 groups of 11dc, 30 dc, 38 ch1-sps on each side, ch2-sp in the corner}
Row 43. Beg: Ch4, 1dc in same st, ch1, 1dc in next st, 3 lace sts,
Repeat: [ch1, skip 1 st, 7dc, ch1, skip 1 st, 1dc in next st, lace st] x9,
Corner: ch1, 1dc in next st, ch1, V-st in corner, [ch1, 1dc in next st] x2, lace st,
Repeat: x9,
End: 2 lace st, ch1, 1dc in last st, ch1, one more dc in last st, turn. {9 groups of 7dc, 26 dc, 22 ch1-sps, 24 ch3-sps and 12 sc on each side, ch2-sp in the corner}
Row 44. Beg: Ch4, 1dc in same st, [ch1, 1dc in next st] x2, [ch1, 1dc in next sp, ch1, 1dc in next sp, ch1, 1dc in next st] x3,
Repeat: *[ch1, skip 1 sp/st, 1dc in next st] x5, ch1, 1dc in next sp, ch1, 1dc in next sp, ch1, 1dc in next st* x9,
Corner: [ch1, 1dc in next st] x2, ch1, V-st in corner, [ch1, 1dc in next st] x3, [ch1, 1dc in next sp] x2, ch1, 1dc in next st,
Repeat: x9,
End: [ch1, 1dc in next sp, ch1, 1dc in next sp, ch1, 1dc in st] x2, [ch1, 1dc in st] x2, ch1, one more dc in last st, turn. {88 dc and 87 ch1-sps on each side, ch2-sp in the corner}
Row 45. As Row 6
Row 46. As Row 7
Row 47. As Row 33
Row 48. As row 16. {191 dc on each side, ch2-sp in the corner}
Row 49. As Row 17. {195 sts on each side, ch2-sp in the corner}
 Buy a ready-to-print pdf with ALL parts (complete shawl pattern) HERE on Ravelry and HERE on Etsy.
Subscribe to a newsletter not to miss a single post. You can also follow me on Facebook, Pinterest and Instagram.


Vaxholm is just in hour’s ferry ride from Stockholm, and it’s truly a very popular tourist destination. The island is lovely with beautiful houses, calm beaches and lots of cafes and restaurants. We spent long hours here: my husband with a book and me with crochet.

Buy a ready-to-print pdf with ALL parts (complete shawl pattern) HERE on Ravelry and HERE on Etsy.
If you are using paid pdf please note there were several updates made this week. The chart for Part 4 was re-uploaded, and stitch count in extension after Part 4 (so called “next row”) should be: 148dc and 147 ch1-sps. You can find errata on Ravelry pattern page.
Translations:
An original Lilla Björn Crochet Design (Tatsiana Kupryianchyk). Copyright 2014-2018. All rights reserved. This pattern is for personal use only. It cannot be sold, shared, republished (online and off-line), redistributed, translated without permission or edited in any way – in part or in a whole. Please, always credit me as a designer. Thank you!PART 3
Dimensions (after Part 3, blocked): approx. 131cm/51.5” wide, 60cm/23.6” high
Approx. 104-106g of yarn used (Part 1 + Part 2 + Part 3)
Row 36. As Row 18. {72 dc and 71 ch1-sps on each side, ch2-sp in the corner}
Row 37. As Row 19. {28 dc, 23 sc, 4 ch1-sps and 46 ch3-sps, ch2-sp in the corner}
Row 38. Ch4, 1dc in same st, [ch1, 1dc in next st] x3, [ch1, 1dc in next sp, ch1, 1dc in next sp, ch1, 1dc in next st] till 1 dc left before the corner, ch1, 1dc in next st, ch1, V-st in corner, [ch1, 1dc in next st] x2, [ch1, 1dc in next sp, ch1, 1dc in next sp, ch1, 1dc in next st] till 3dc left, [ch1, 1dc in next st] x2, ch1, (1dc, ch1, 1dc) in last st, turn. {76 dc and 75 ch1-sps on each side, ch2-sp in the corner}
Row 39. Ch4, 1dc in same st, 1 lace st,
[1 lace st, ch1, 1dc in next st, *1dc in next sp, 1dc in next st* x 3, ch1, skip sp, 1dc in next st] till corner, ch1, V-st in corner, ch1, 1dc in next st,
[ch1, skip sp, 1dc in next st, *1dc in next sp, 1dc in next st* x3, ch1, 1dc in next st, 1 lace st] till 3 dc left, 1 lace st, ch1, one more dc in last st, turn. {9 groups of 7dc, 22 dc, 10 sc, 20 ch1-sps and 20 ch3-sps on each side, ch2-sp in the corner}
Row 40. Ch4, 1dc in same st, ch1, 1dc in next st, [ch1, 1dc in next sp] x2, ch1, 1dc in next st,
[*ch1, 1dc in next sp* x2, ch1, 1dc in next st, 1dc in next sp, 7dc, 1dc in next sp, 1dc in next st] till 1 dc before the corner,
ch1, 1dc in next st, ch1, V-st in corner, ch1, 1dc in next st,
[ch1, 1dc in next st, 1dc in next sp, 7dc, 1dc in next sp, 1dc in next st, *ch1, 1dc in next sp* x2] x9,
ch1, 1dc in next st, [ch1, 1dc in next sp] x2, [ch1, 1dc in next st] x2, ch1, one more dc in last st, turn. {9 groups of 11 dc, 26 dc and 34 ch1-sps on each side, ch2-sp in the corner}
Row 41. Ch4, 1dc in same st, [ch1, 1dc in next st] x2, 1 lace st,
[1 lace st, 10dc] till 2dc left before the corner, [ch1, 1dc in next st] x2, ch1, V-st in corner, [ch1, 1dc in next st] x2, ch1, 1dc in next st,
[10dc, 1 lace st] till 5 dc left,
1 lace st, [ch1, 1dc in next st] x2, ch1, one more dc in last st, turn. {9 groups of 11 dc, 8 dc, 10 sc, 6 ch1-sps and 20 ch3-sps on each side, ch2-sp in the corner}
Row 42. Beg: Ch4, 1dc in same st, [ch1, 1dc in next st] x3, ch1, 1dc in next sp, ch1, 1dc in next sp, ch1, 1dc in next st,
Repeat: [ch1, 1dc in next sp, ch1, 1dc in next sp, ch1, 1dc in each of next 11 dc] x9,
Corner: [ch1, 1dc in next st] x3, ch1, V-st in corner, [ch1, 1dc in next st] x3,
Repeat: [ch1, 1dc in each of next 11dc, ch1, 1dc in next sp, ch1, 1dc in next sp] x9,
End: ch1, 1dc in next st, [ch1, 1dc in next sp] x2, [ch1, 1dc in next st] x4, ch1, one more dc in last st, turn. {9 groups of 11dc, 30 dc, 38 ch1-sps on each side, ch2-sp in the corner}
Row 43. Beg: Ch4, 1dc in same st, ch1, 1dc in next st, 3 lace sts,
Repeat: [ch1, skip 1 st, 7dc, ch1, skip 1 st, 1dc in next st, lace st] x9,
Corner: ch1, 1dc in next st, ch1, V-st in corner, [ch1, 1dc in next st] x2, lace st,
Repeat: x9,
End: 2 lace st, ch1, 1dc in last st, ch1, one more dc in last st, turn. {9 groups of 7dc, 26 dc, 22 ch1-sps, 24 ch3-sps and 12 sc on each side, ch2-sp in the corner}
Row 44. Beg: Ch4, 1dc in same st, [ch1, 1dc in next st] x2, [ch1, 1dc in next sp, ch1, 1dc in next sp, ch1, 1dc in next st] x3,
Repeat: *[ch1, skip 1 sp/st, 1dc in next st] x5, ch1, 1dc in next sp, ch1, 1dc in next sp, ch1, 1dc in next st* x9,
Corner: [ch1, 1dc in next st] x2, ch1, V-st in corner, [ch1, 1dc in next st] x3, [ch1, 1dc in next sp] x2, ch1, 1dc in next st,
Repeat: x9,
End: [ch1, 1dc in next sp, ch1, 1dc in next sp, ch1, 1dc in st] x2, [ch1, 1dc in st] x2, ch1, one more dc in last st, turn. {88 dc and 87 ch1-sps on each side, ch2-sp in the corner}
Row 45. As Row 6
Row 46. As Row 7
Row 47. As Row 33
Row 48. As row 16. {191 dc on each side, ch2-sp in the corner}
Row 49. As Row 17. {195 sts on each side, ch2-sp in the corner}

Subscribe to a newsletter not to miss a single post. You can also follow me on Facebook, Pinterest and Instagram.

Welcome to Part 3 of Spirits of Life Wrap CAL. My feeds on all social media are flooded with beautiful pictures of your wraps. And wow! So many new and amazing color combinations! I am very happy you had fun with Mosaic crochet last week. And today you will improve your skills in overlay crochet technique.

If it’s your first time to see this CAL, please check General Information HERE, Part 1 and Part 2.
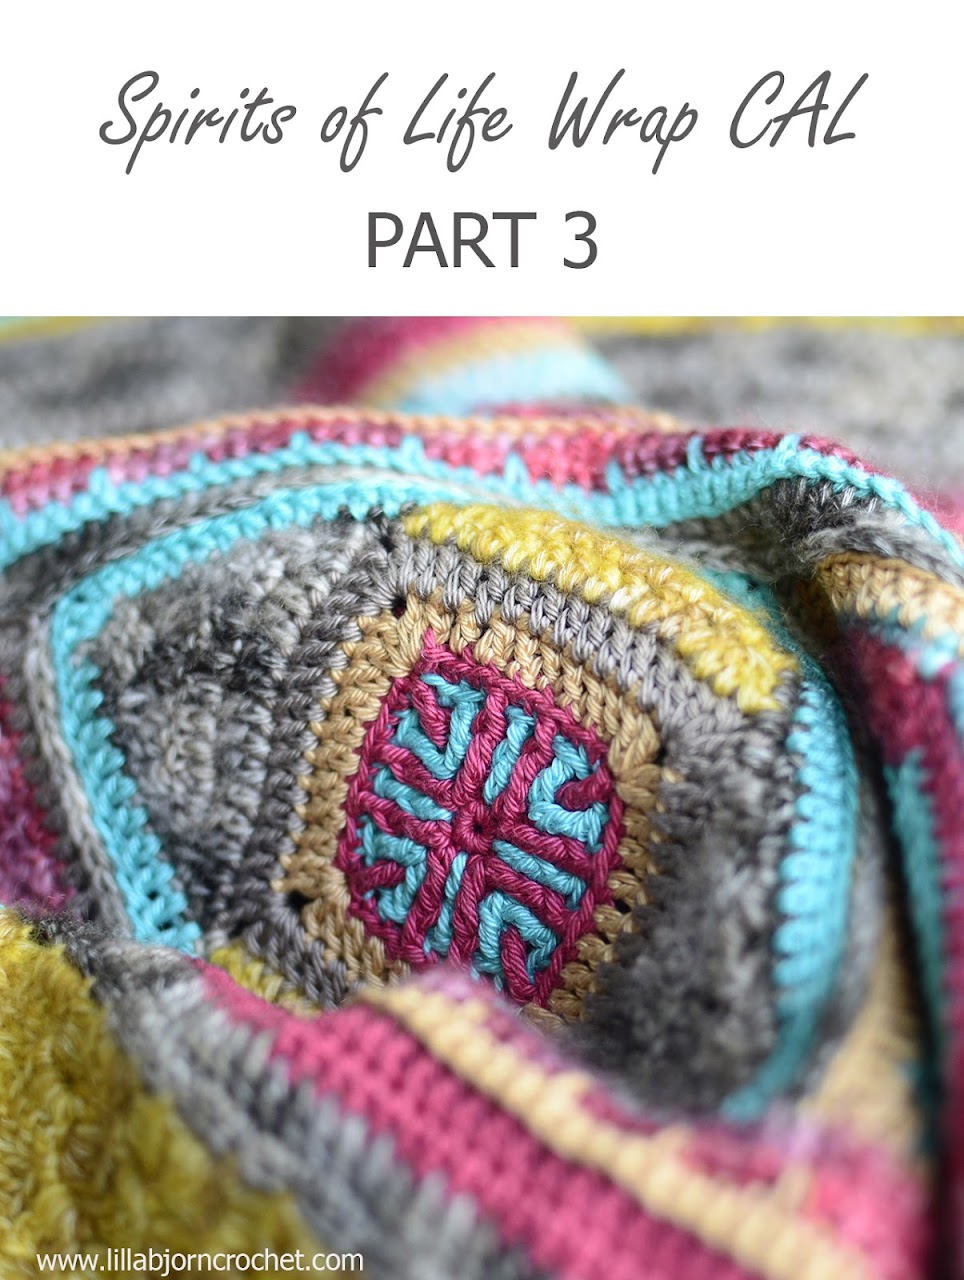
This week is about overlay crochet squares. You will complete 4 of them – each with a new placement of colors. So all your squares will be different, and you will definitely not be bored.
The square consists of central medallion (made with Catona) and then 4 corners (with Spirit yarn) are added. And to frame everything you will add a final edge with Catona again.
IMPORTANT: Please, be aware that all my patterns (free or paid) are protected by copyright. You are not allowed to copy, reproduce, redistribute (online or off-line), sell and edit them in part or as a whole. You are welcome to sell your finished items made by my patterns, but you cannot use my pictures to promote them. Please, always credit me as the designer of these patterns. You are not allowed to share pdf-files created from my posts with anyone. If you would like more people to join my CAL – please, share a link to my blog with them. You can check Copyright page for more information.
Part 3 - Afrikaans
Part 3 - Czech
Part 3 - Danish
Part 3 - Dutch
Part 3 - English (US)
Part 3 - English (UK)
Part 3 - Finnish
Part 3 - French
Part 3 - German
Part 3 - Hebrew
Part 3 - Norwegian
Part 3 - Polish
Part 3 - Portuguese
Part 3 - Spanish
Part 3 - Swedish
Part 3 - Russian
The pattern says every square should be 14cm large – after blocking. Of course this is valid only in case you have correct gauge and your previous parts were the same size as given in the pattern. If your gauge is a bit off – don’t worry. We will find the way how to fix this.
Please, measure the width of your blocked piece and divide it by 4. This is what your square size (blocked) should be. For example, if width of your wrap is 60cm, your square should be 60:4=15cm. And if your width is, say, 52cm – the square should be 52:4=13cm.

You can achieve correct size either by blocking (stretching your square to bigger dimensions), or making small tweaks with the pattern. You can try and play with hdc/dc/tr (US terms) stitches on rounds 7 and 8, and on the final round of the edge. If you feel your square is not getting desired size, try to replace stitches on these rounds with either shorter or longer ones. I hope this small trick will help you!
As on previous parts, please, weigh your yarns carefully and check yardages for each color in a table for Part 1.
And here are my squares joined for each color way. Please, feel free to join them in another order if you wish!

And here is the video! If you would like to see break-down in time for every round, please, visit my YouTube channel HERE.
Subscribe to a newsletter not to miss a single post. You can also follow me on Facebook, Pinterest and Instagram.


If it’s your first time to see this CAL, please check General Information HERE, Part 1 and Part 2.
This week is about overlay crochet squares. You will complete 4 of them – each with a new placement of colors. So all your squares will be different, and you will definitely not be bored.
The square consists of central medallion (made with Catona) and then 4 corners (with Spirit yarn) are added. And to frame everything you will add a final edge with Catona again.

COPYRIGHT
IMPORTANT: Please, be aware that all my patterns (free or paid) are protected by copyright. You are not allowed to copy, reproduce, redistribute (online or off-line), sell and edit them in part or as a whole. You are welcome to sell your finished items made by my patterns, but you cannot use my pictures to promote them. Please, always credit me as the designer of these patterns. You are not allowed to share pdf-files created from my posts with anyone. If you would like more people to join my CAL – please, share a link to my blog with them. You can check Copyright page for more information.
Part 3 - Afrikaans
Part 3 - Czech
Part 3 - Danish
Part 3 - Dutch
Part 3 - English (US)
Part 3 - English (UK)
Part 3 - Finnish
Part 3 - French
Part 3 - German
Part 3 - Hebrew
Part 3 - Norwegian
Part 3 - Polish
Part 3 - Portuguese
Part 3 - Spanish
Part 3 - Swedish
Part 3 - Russian
The pattern says every square should be 14cm large – after blocking. Of course this is valid only in case you have correct gauge and your previous parts were the same size as given in the pattern. If your gauge is a bit off – don’t worry. We will find the way how to fix this.
Please, measure the width of your blocked piece and divide it by 4. This is what your square size (blocked) should be. For example, if width of your wrap is 60cm, your square should be 60:4=15cm. And if your width is, say, 52cm – the square should be 52:4=13cm.

You can achieve correct size either by blocking (stretching your square to bigger dimensions), or making small tweaks with the pattern. You can try and play with hdc/dc/tr (US terms) stitches on rounds 7 and 8, and on the final round of the edge. If you feel your square is not getting desired size, try to replace stitches on these rounds with either shorter or longer ones. I hope this small trick will help you!
As on previous parts, please, weigh your yarns carefully and check yardages for each color in a table for Part 1.
And here are my squares joined for each color way. Please, feel free to join them in another order if you wish!

And here is the video! If you would like to see break-down in time for every round, please, visit my YouTube channel HERE.
- Spirits of Life CAL was sponsored by Scheepjes. There are still kits available for purchase (at the time of posting) if you want to buy one. Check information HERE.
- You can join Official CCC Social group on Facebook which is an official host of Spirits of Life CAL. You will get all needed support and help there. You can also join my Ravelry group HERE and ask questions in CAL threads.
Subscribe to a newsletter not to miss a single post. You can also follow me on Facebook, Pinterest and Instagram.
Time is definitely flying for me. It seems like Part 2 for a Peacock Tail Bag CAL was published a few days ago, but it’s Wednesday again!! And time for Part 3 already :) I noticed that last week some of you had difficulties with stitch count and color placement. So please, first read Important Notes below before jumping to a tutorial. Just a remind that you can check General Information about this CAL HERE. And Part 1 is available HERE.

DISCLOSURE: This blog contains affiliate links. If you purchase a (any) product via a link on my blog, I get a small percentage contribution from the store which enables me to keep providing you with free patterns. It costs you nothing extra to visit the store via my link, but ensure I get the credit for the sale. Thank you for your support!
Add this pattern to your Ravelry queue!
Part 4 can be found HERE.
I’ve just come home from Greece where I spent the whole week with my family with lots of sea bath and sunshine. I am dying to share lots of pictures with you. But I also understand it’s probably not the right moment as you probably would like to get crocheting at once. But anyway I would love to send you a bit of Greek warmness with this “postcard”.

1. Last week some of you had problems with figuring correct stitch count. I agree that instructions in the beginning of each row might be a bit confusing and I am sorry for that. But please keep in mind that directions in the very beginning always give an idea where the very first stitch is placed. They are ONLY for placement!! And Instructions (even though they contain the word “next”) already contain the 1st stitch. So when in the beginning you read: hdc in next 5 sts, it means you should make 5 sts in total in the beginning (and not just 1st stitch, and then 5 next). Hope that helps!!
2. Each row of this part begins with standing hdc, as in previous part. And all tr4togs are “modified”. If you missed this information on previous part – please check tutorials HERE (standing hdc) and HERE (modified tr4tog).
3. Some of you were concerned about the symmetry of “wings” on the front and back parts. It’s true they are not totally symmetrical (I did my best to adjust them), but this should work itself out after the band is added.
4. Please, don’t worry if the colors for front and back (and also for Deep and Pastel versions) don’t correspond. That’s ok! They should not necessarily be the same.
5. And last but VERY important note about the colors. As you know the gauge is very important in this project, especially if you are using the kit. I know that some of you were not able to obtain correct gauge and your bag is becoming larger. There is a danger you will run out of particular shades in the end. But you can handle it by changing colorway on the back, as it is not important at all.
I decided to give you the colorway for the rest of the pattern (after Part 3) so that you can see how many rows are made with each shade. And so that you can predict if you run out of yarn or not, and “play” with colorway for back.
Here is an example of what you can do: As you can see, in Deep version C5 is only used for 2(!!) rows on the front, and never on the back. So if your bag is obviously bigger, please, feel free to use C5 on some rows of the back instead of C1, C2 or C3.
It's a bit more complicated with Pastel version.. If you are not sure about the yardages, please complete the front first (all 5 parts) and then finish the back with yarn left :)
Row 20 – C2 (C1), C7 (C9)
Row 21 – C4 (C4), C6 (C10)
Row 22 – C5 (C3), C9 (C8)
Row 23 – C2 (C2), C7 (C7)
Row 24 – C4 (C4), C6 (C10)
Row 25 – C1 (C2), C10 (C7)
Row 26 – C4 (C1), C6 (C9)
Row 27 – C5 (C3), C9 (C8)
Row 28 – C3 (C4), C8 (C9)
Row 29 – C2 (C2), C7 (C7)
Row 30 – C3 (C1), C8 (C9)
Row 31 – C1 (C3), C6 (C8)
Row 32 – C3 (C2), C8 (C9)
And maybe another postcard for you not to be bored with too much text? :)

If you have any questions, please, check in Official CCC Social group on Facebook or in my Ravelry group.
IMPORTANT: Please, be aware that all my patterns (free or paid) are protected by copyright. You are not allowed to copy, reproduce, redistribute, sell and edit them in part or as a whole. You are welcome to sell your finished items made by my patterns, but you cannot use my pictures to promote them. Please, always credit me as the designer of these patterns. You are not allowed to share pdf-files created from my posts with anyone. If you would like more people to join my CAL – please, share a link to my blog with them. If you own a yarn store and would like to sell kits for this CAL - please, contact me for details. You can check Copyright page for more information.
English - US terms
English - UK terms
Afrikaans
Danish
Dutch
Finnish
French
German
Greek
Hebrew
Korean
Persian
Spanish
Swedish
VIDEO for this part was kindly recordered by wonderful Esther from It's All In A Nutshell. Please, see it in end of this post.
Abbreviations (US terms)
US standard abbreviations are used in this pattern. But if you are used to other terms, please check this Crochet Translation Project which might be helpful in translation to your language.
rnd round
st(s) stitch(es)
sl st slip stitch
ch chain
sp(s) space(s)
sc single crochet
hdc half double crochet
dc double crochet
tr4tog (modified) treble crochet 4 together cluster
FPtr front post treble crochet
FPtr2tog front post treble 2 together
FPtr3tog front post treble 3 together
yo yarn over
lp(s) loop(s)
NJ needle join
sk skip st(s)
*…* *crochet following directions* as many times as indicated
************************************************************
Change to yarn C3 (C10). Start in 2nd hdc!
Hdc in next 2 sts, *hdc in next 3 sts, tr4tog in FPtr of row 12 below, sk no sts, hdc in next 2 sts, FPtr around same st of row 11 where 1st FPsc was made, 3Fptr around next st of row 11, FPtr around next st of row 11, sk ch4-sp* 8 times, hdc in next 3 sts, tr4tog in FPtr of row 12 below, sk no sts, hdc in 5 next sts; fasten off. (99)

Row 15. Change to yarn C1 (C8). Start in 2nd hdc!
Hdc in next 7 sts, *FPtr around ch4-sp below, sk 1 st, hdc in next 5 sts, FPtr around ch4-sp below, sk 1 st, hdc in next 4 sts* 8 times, hdc in next 2 sts, 2hdc in next st; fasten off. (99)
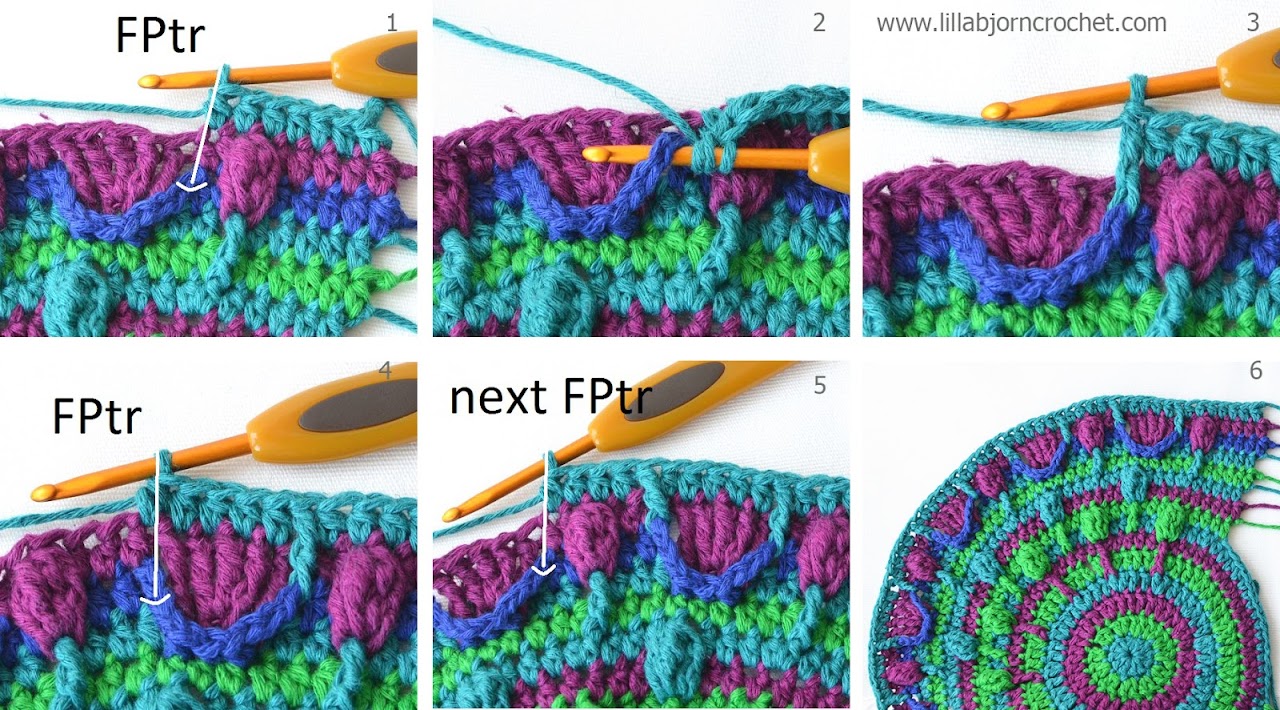

Row 16. Change to yarn C3 (C10). Start in 1st hdc.
Hdc in next 2 sts, *hdc in next 2 sts, 2hdc in next st, hdc in next 3 sts, FPtr around each of 5 FPtr below, sk 5 sts* 8 times, hdc in 3 next sts, 2hdc in next st, hdc in 5 next sts. (108)
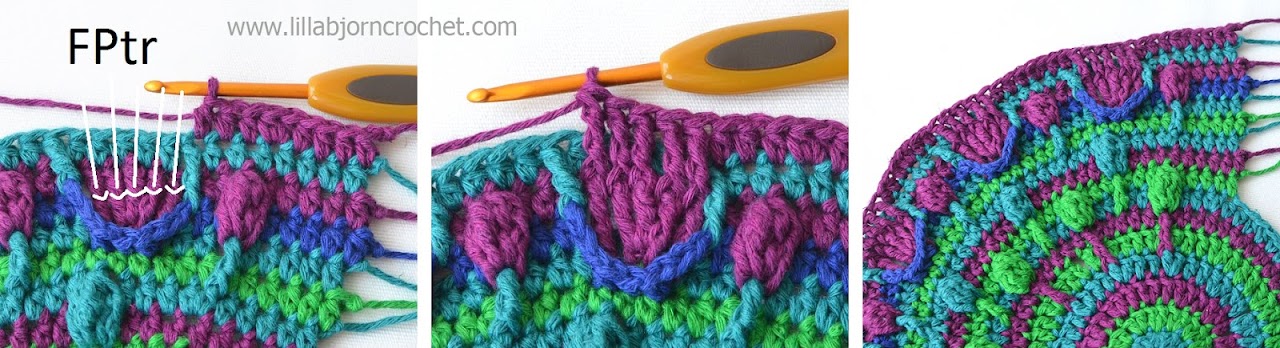
Row 17. Change to yarn C4 (C9). Start in 1st hdc.
Hdc in next 9 sts, *FPtr around FPtr of row 15 below, sk 1 st, hdc in 3 next sts, FPtr around FPtr of row 15 below, sk 1 st, hdc in next 7 sts* 8 times, hdc in next 3 sts; fasten off. (108)

Row 18. Change to yarn C3 (C10). Start in 2nd hdc!
Hdc in next 11 sts, *FPtr3tog (around 2nd, 3rd and 4th FPtr of row 16 below), sk no sts, hdc in next 12 sts* 8 times; fasten off. (115)

Row 19. Change to yarn C1 (C8). Start in 1st hdc.
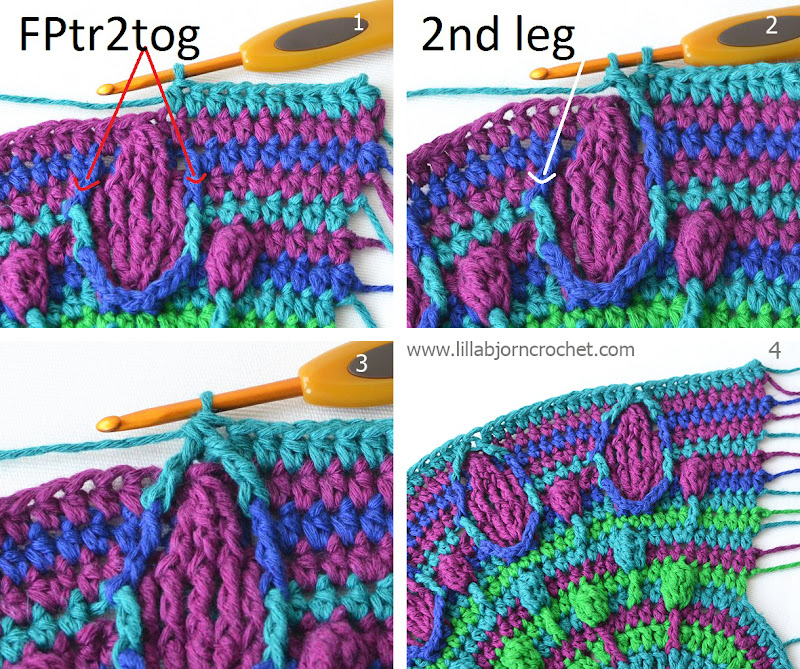
Note: when making FPtr2tog - work every leg around each of two FPtr of row 17 lying to the right and to the left from FPtr3tog of previous row. Feel free to replace FPtr2tog with FPdtr2tog if it’s too tight.
Hdc in next 11 sts, *FPtr2tog, sk 1 st, hdc in next 12 sts* 8 times, fasten off. (115)
*************************************************************
Please, try to keep the same gauge as for front. Check measurements after row 19.
Row 14. Change to yarn C3 (C8). Start in 2nd hdc!
Hdc in next 5 sts, 2hdc in next st, hdc in next 2 sts, *hdc in next 7 sts, 2hdc in next st, hdc in next 2 sts* 8 times, hdc in next 2 sts, fasten off. (99)
Row 15. Change to yarn C2 (C7). Start in 2nd hdc!
Hdc in 97 sts, 2hdc in last st, fasten off. (99)
Row 16. Change to yarn C1 (C9). Start in 2nd hdc!
2hdc in 2nd st, hdc in next 3 sts, 2hdc in next st, hdc in next 3 sts, *hdc in next 8 sts, 2hdc in next st, hdc in next 2 sts* 8 times, hdc in next 2 sts, fasten off. (108)
Row 17. Change to yarn C4 (C10). Start in 2nd hdc!
Hdc in 106 sts, 2hdc in last st, fasten off. (108)
Row 18. Change to yarn C3 (C8). Start in 2nd hdc!
Hdc in next 10 sts, *2hdc in next st, hdc in next 11 sts*, 8 times, hdc in last st, fasten off. (115)
Row 19. Change to yarn C2 (C7). Start in 2nd hdc!
Hdc in 113 sts, 2hdc in last st, fasten off. (115)
And here are video's made by Esther from It's All In A Nutshell.
Front:
And back:
You can subscribe to a newsletter not to miss a single post. You can also follow me on Facebook, Pinterest and Instagram.

DISCLOSURE: This blog contains affiliate links. If you purchase a (any) product via a link on my blog, I get a small percentage contribution from the store which enables me to keep providing you with free patterns. It costs you nothing extra to visit the store via my link, but ensure I get the credit for the sale. Thank you for your support!
Add this pattern to your Ravelry queue!
Part 4 can be found HERE.
I’ve just come home from Greece where I spent the whole week with my family with lots of sea bath and sunshine. I am dying to share lots of pictures with you. But I also understand it’s probably not the right moment as you probably would like to get crocheting at once. But anyway I would love to send you a bit of Greek warmness with this “postcard”.

Important Notes:
1. Last week some of you had problems with figuring correct stitch count. I agree that instructions in the beginning of each row might be a bit confusing and I am sorry for that. But please keep in mind that directions in the very beginning always give an idea where the very first stitch is placed. They are ONLY for placement!! And Instructions (even though they contain the word “next”) already contain the 1st stitch. So when in the beginning you read: hdc in next 5 sts, it means you should make 5 sts in total in the beginning (and not just 1st stitch, and then 5 next). Hope that helps!!
2. Each row of this part begins with standing hdc, as in previous part. And all tr4togs are “modified”. If you missed this information on previous part – please check tutorials HERE (standing hdc) and HERE (modified tr4tog).
3. Some of you were concerned about the symmetry of “wings” on the front and back parts. It’s true they are not totally symmetrical (I did my best to adjust them), but this should work itself out after the band is added.
4. Please, don’t worry if the colors for front and back (and also for Deep and Pastel versions) don’t correspond. That’s ok! They should not necessarily be the same.
5. And last but VERY important note about the colors. As you know the gauge is very important in this project, especially if you are using the kit. I know that some of you were not able to obtain correct gauge and your bag is becoming larger. There is a danger you will run out of particular shades in the end. But you can handle it by changing colorway on the back, as it is not important at all.
I decided to give you the colorway for the rest of the pattern (after Part 3) so that you can see how many rows are made with each shade. And so that you can predict if you run out of yarn or not, and “play” with colorway for back.
Here is an example of what you can do: As you can see, in Deep version C5 is only used for 2(!!) rows on the front, and never on the back. So if your bag is obviously bigger, please, feel free to use C5 on some rows of the back instead of C1, C2 or C3.
It's a bit more complicated with Pastel version.. If you are not sure about the yardages, please complete the front first (all 5 parts) and then finish the back with yarn left :)
Colour way (shades for back are in brackets):
Deep PastelRow 20 – C2 (C1), C7 (C9)
Row 21 – C4 (C4), C6 (C10)
Row 22 – C5 (C3), C9 (C8)
Row 23 – C2 (C2), C7 (C7)
Row 24 – C4 (C4), C6 (C10)
Row 25 – C1 (C2), C10 (C7)
Row 26 – C4 (C1), C6 (C9)
Row 27 – C5 (C3), C9 (C8)
Row 28 – C3 (C4), C8 (C9)
Row 29 – C2 (C2), C7 (C7)
Row 30 – C3 (C1), C8 (C9)
Row 31 – C1 (C3), C6 (C8)
Row 32 – C3 (C2), C8 (C9)
And maybe another postcard for you not to be bored with too much text? :)

If you have any questions, please, check in Official CCC Social group on Facebook or in my Ravelry group.
COPYRIGHT
IMPORTANT: Please, be aware that all my patterns (free or paid) are protected by copyright. You are not allowed to copy, reproduce, redistribute, sell and edit them in part or as a whole. You are welcome to sell your finished items made by my patterns, but you cannot use my pictures to promote them. Please, always credit me as the designer of these patterns. You are not allowed to share pdf-files created from my posts with anyone. If you would like more people to join my CAL – please, share a link to my blog with them. If you own a yarn store and would like to sell kits for this CAL - please, contact me for details. You can check Copyright page for more information.
INSTRUCTIONS: PART 3
English - US terms
English - UK terms
Afrikaans
Danish
Dutch
Finnish
French
German
Greek
Hebrew
Korean
Persian
Spanish
Swedish
VIDEO for this part was kindly recordered by wonderful Esther from It's All In A Nutshell. Please, see it in end of this post.
Abbreviations (US terms)
US standard abbreviations are used in this pattern. But if you are used to other terms, please check this Crochet Translation Project which might be helpful in translation to your language.
rnd round
st(s) stitch(es)
sl st slip stitch
ch chain
sp(s) space(s)
sc single crochet
hdc half double crochet
dc double crochet
tr4tog (modified) treble crochet 4 together cluster
FPtr front post treble crochet
FPtr2tog front post treble 2 together
FPtr3tog front post treble 3 together
yo yarn over
lp(s) loop(s)
NJ needle join
sk skip st(s)
*…* *crochet following directions* as many times as indicated
************************************************************
FRONT PART
After this part your piece (both front and back) should measure 25cm (10”) in widest place.
Row 14. Note: as on previous rows, make “modified” tr4tog’s in this part.
For a neater result, you can also make groups of 3 FPtr in a modified way: 1st FPtr is made in a usual way around the post of the indicated stitch, and next 2 tr’s are made in a space at the bottom of this FPtr. But these modifications are not really necessary!
Change to yarn C3 (C10). Start in 2nd hdc!
Hdc in next 2 sts, *hdc in next 3 sts, tr4tog in FPtr of row 12 below, sk no sts, hdc in next 2 sts, FPtr around same st of row 11 where 1st FPsc was made, 3Fptr around next st of row 11, FPtr around next st of row 11, sk ch4-sp* 8 times, hdc in next 3 sts, tr4tog in FPtr of row 12 below, sk no sts, hdc in 5 next sts; fasten off. (99)

Row 15. Change to yarn C1 (C8). Start in 2nd hdc!
Hdc in next 7 sts, *FPtr around ch4-sp below, sk 1 st, hdc in next 5 sts, FPtr around ch4-sp below, sk 1 st, hdc in next 4 sts* 8 times, hdc in next 2 sts, 2hdc in next st; fasten off. (99)


Row 16. Change to yarn C3 (C10). Start in 1st hdc.
Hdc in next 2 sts, *hdc in next 2 sts, 2hdc in next st, hdc in next 3 sts, FPtr around each of 5 FPtr below, sk 5 sts* 8 times, hdc in 3 next sts, 2hdc in next st, hdc in 5 next sts. (108)

Row 17. Change to yarn C4 (C9). Start in 1st hdc.
Hdc in next 9 sts, *FPtr around FPtr of row 15 below, sk 1 st, hdc in 3 next sts, FPtr around FPtr of row 15 below, sk 1 st, hdc in next 7 sts* 8 times, hdc in next 3 sts; fasten off. (108)

Row 18. Change to yarn C3 (C10). Start in 2nd hdc!
Hdc in next 11 sts, *FPtr3tog (around 2nd, 3rd and 4th FPtr of row 16 below), sk no sts, hdc in next 12 sts* 8 times; fasten off. (115)

Row 19. Change to yarn C1 (C8). Start in 1st hdc.
Note: when making FPtr2tog - work every leg around each of two FPtr of row 17 lying to the right and to the left from FPtr3tog of previous row. Feel free to replace FPtr2tog with FPdtr2tog if it’s too tight.
Hdc in next 11 sts, *FPtr2tog, sk 1 st, hdc in next 12 sts* 8 times, fasten off. (115)

*************************************************************
Back Part
Please, try to keep the same gauge as for front. Check measurements after row 19.
Row 14. Change to yarn C3 (C8). Start in 2nd hdc!
Hdc in next 5 sts, 2hdc in next st, hdc in next 2 sts, *hdc in next 7 sts, 2hdc in next st, hdc in next 2 sts* 8 times, hdc in next 2 sts, fasten off. (99)
Row 15. Change to yarn C2 (C7). Start in 2nd hdc!
Hdc in 97 sts, 2hdc in last st, fasten off. (99)
Row 16. Change to yarn C1 (C9). Start in 2nd hdc!
2hdc in 2nd st, hdc in next 3 sts, 2hdc in next st, hdc in next 3 sts, *hdc in next 8 sts, 2hdc in next st, hdc in next 2 sts* 8 times, hdc in next 2 sts, fasten off. (108)
Row 17. Change to yarn C4 (C10). Start in 2nd hdc!
Hdc in 106 sts, 2hdc in last st, fasten off. (108)
Row 18. Change to yarn C3 (C8). Start in 2nd hdc!
Hdc in next 10 sts, *2hdc in next st, hdc in next 11 sts*, 8 times, hdc in last st, fasten off. (115)
Row 19. Change to yarn C2 (C7). Start in 2nd hdc!
Hdc in 113 sts, 2hdc in last st, fasten off. (115)
And here are video's made by Esther from It's All In A Nutshell.
Front:
And back:
You can subscribe to a newsletter not to miss a single post. You can also follow me on Facebook, Pinterest and Instagram.
Subscribe to:
Posts (Atom)


