Showing posts with label Part 5. Show all posts
Showing posts with label Part 5. Show all posts
Welcome to final part of Grinda MAL. Thank you very much for joining me in this journey. So many Grinda shawls have poped up in my social media feeds and groups. I am happy you are having fun. And hope to see even more “Grindas” in the future. Today we are saying good bye to a charming small island and take the boat back to mainland. It’s time to go home…

Buy a ready-to-print pdf with ALL parts (complete shawl pattern) HERE on Ravelry and HERE on Etsy.
Dimensions: the height of the border is approx. 5cm/2”
Approx. 290-295g of yarn used (extended pattern + border)
Row 66. Ch4, 1pc in same st, ch3, skip 2 sts, 1sc in next st, [ch3, skip 2 sts, 1pc in next st, ch3, skip 2 sts, 1sc in next st] till 3 sts left before the corner, ch3, skip 3 sts, 1pc in corner, ch3, skip 3 sts, 1sc in next st, [ch3, skip 2 sts, 1pc in next st, ch3, skip 2 sts, 1sc in next st] till 3 dc left, ch3, skip 2 sts, (1pc, ch1, 1dc) in last st, turn. {43 pc, 43 sc, 1dc, 1ch1-sp and 86 ch3-sps on each side, 1pc in the corner}
Stitch count after extension: 51 pc, 51 sc, 1dc, 1ch1-sp and 102 ch3-sps on each side, 1pc in the corner.

Row 67. Ch4, 1dc in same st, [ch3, 1sc in next pc, ch3, 1dc in next sc] till last sp before corner, ch3, V-st in pc in the corner, [ch3, 1dc in next sc, ch3, 1sc in next pc] till end, ch3, (1dc, ch1, 1dc) in last st, turn. {46 dc, 43 sc, 1ch1-sp and 88 ch3-sps on each side, ch2-sp in the corner}
Row 68. Ch4, 1dc in same st, ch1, 1dc in next st, ch2, 1dc in next sc, ch3, 1sc in next dc, [ch3, 1dc in next sc, ch3, 1sc in next dc] till last ch3-sp before corner, ch3, (1dc, ch1, 1dc, ch1, 1dc) in corner, skip next dc, [ch3, 1sc in next dc, ch3, 1dc in next sc] till last 2 dc, ch2, 1dc in next st, ch1, (1dc, ch1, 1dc) in last st, turn. {46 dc, 42 sc, 2 ch1-sps and 87 ch3-sps, (1dc, ch1, 1dc, ch1, 1dc) in the corner}
Row 69. Ch4, 1picot, 1dc in same st, ch3, skip next sp+dc+sp, 1sc in next dc, [ch3, (1dc, picot, 1dc) in next dc, ch3, 1sc in next sc] till last ch3-sp before corner, ch3, 1dc in next dc, picot, ch1, (1dc, picot, 1dc) in next st, ch1, picot, 1dc in next st, [ch3, 1sc in next sc, ch3, (1dc, picot, 1dc) in next st] till 3 dc left, ch3, 1sc in next dc, ch3, (1dc, picot, 1dc) in last st. Fasten off. Block shawl to measurements.


Buy a ready-to-print pdf with ALL parts (complete shawl pattern) HERE on Ravelry and HERE on Etsy.
Subscribe to a newsletter not to miss a single post. You can also follow me on Facebook, Pinterest and Instagram.


Buy a ready-to-print pdf with ALL parts (complete shawl pattern) HERE on Ravelry and HERE on Etsy.
Translations:
An original Lilla Björn Crochet Design (Tatsiana Kupryianchyk). Copyright 2014-2018. All rights reserved. This pattern is for personal use only. It cannot be sold, shared, republished (online and off-line), redistributed, translated without permission or edited in any way – in part or in a whole. Please, always credit me as a designer. Thank you!
PART 5 – Border
Dimensions: the height of the border is approx. 5cm/2”
Approx. 290-295g of yarn used (extended pattern + border)
Row 66. Ch4, 1pc in same st, ch3, skip 2 sts, 1sc in next st, [ch3, skip 2 sts, 1pc in next st, ch3, skip 2 sts, 1sc in next st] till 3 sts left before the corner, ch3, skip 3 sts, 1pc in corner, ch3, skip 3 sts, 1sc in next st, [ch3, skip 2 sts, 1pc in next st, ch3, skip 2 sts, 1sc in next st] till 3 dc left, ch3, skip 2 sts, (1pc, ch1, 1dc) in last st, turn. {43 pc, 43 sc, 1dc, 1ch1-sp and 86 ch3-sps on each side, 1pc in the corner}
Stitch count after extension: 51 pc, 51 sc, 1dc, 1ch1-sp and 102 ch3-sps on each side, 1pc in the corner.

Row 67. Ch4, 1dc in same st, [ch3, 1sc in next pc, ch3, 1dc in next sc] till last sp before corner, ch3, V-st in pc in the corner, [ch3, 1dc in next sc, ch3, 1sc in next pc] till end, ch3, (1dc, ch1, 1dc) in last st, turn. {46 dc, 43 sc, 1ch1-sp and 88 ch3-sps on each side, ch2-sp in the corner}
Row 68. Ch4, 1dc in same st, ch1, 1dc in next st, ch2, 1dc in next sc, ch3, 1sc in next dc, [ch3, 1dc in next sc, ch3, 1sc in next dc] till last ch3-sp before corner, ch3, (1dc, ch1, 1dc, ch1, 1dc) in corner, skip next dc, [ch3, 1sc in next dc, ch3, 1dc in next sc] till last 2 dc, ch2, 1dc in next st, ch1, (1dc, ch1, 1dc) in last st, turn. {46 dc, 42 sc, 2 ch1-sps and 87 ch3-sps, (1dc, ch1, 1dc, ch1, 1dc) in the corner}
Row 69. Ch4, 1picot, 1dc in same st, ch3, skip next sp+dc+sp, 1sc in next dc, [ch3, (1dc, picot, 1dc) in next dc, ch3, 1sc in next sc] till last ch3-sp before corner, ch3, 1dc in next dc, picot, ch1, (1dc, picot, 1dc) in next st, ch1, picot, 1dc in next st, [ch3, 1sc in next sc, ch3, (1dc, picot, 1dc) in next st] till 3 dc left, ch3, 1sc in next dc, ch3, (1dc, picot, 1dc) in last st. Fasten off. Block shawl to measurements.


Buy a ready-to-print pdf with ALL parts (complete shawl pattern) HERE on Ravelry and HERE on Etsy.
Subscribe to a newsletter not to miss a single post. You can also follow me on Facebook, Pinterest and Instagram.

Welcome to Part 5 of Spirits of Life CAL! Since last Wednesday I have read lots of lovely comments about previous part. It was made in C2C (corner-to-corner) crochet and I know for many of you it was the first time to try this amazing and effective technique. Today we will continue to create colorful waves. The pattern is almost the same, but made in a mirror reflection.

If you missed previous parts of Spirits of Life CAL, please check General Information, Important Notes, Part 1, Part 2, Part 3 and Part 4.
I have a happy news for you. We are half through the CAL and since today all three crochet techniques will be repeated. But with different patterns, as I didn’t want you to be bored. Let’s take the second half of the CAL as examination in C2C, Mosaic and Overlay crochet. And I am sure, after your wrap is finished you will feel confident with your newly acquired crochet skills.

IMPORTANT: Please, be aware that all my patterns (free or paid) are protected by copyright. You are not allowed to copy, reproduce, redistribute (online or off-line), sell and edit them in part or as a whole. You are welcome to sell your finished items made by my patterns, but you cannot use my pictures to promote them. Please, always credit me as the designer of these patterns. You are not allowed to share pdf-files created from my posts with anyone. If you would like more people to join my CAL – please, share a link to my blog with them. You can check Copyright page for more information.
Please, note, that some translations are being revised at the moment and will be added later. Thank you for understanding!
IMPORTANT: there was an error in yardages. For ORCHID: Yarn B=8-9g, Yarn G=15-16g
Part 5 - Afrikaans
Part 5 - Czech
Part 5 - Danish
Part 5 - Dutch
Part 5 - English (US)
Part 5 - English (UK)
Part 5 - Finnish
Part 5 - French
Part 5 - German
Part 5 - Hebrew
Part 5 - Norwegian
Part 5 - Polish
Part 5 - Portuguese
Part 5 - Spanish
Part 5 - Swedish
Part 5 - Russian
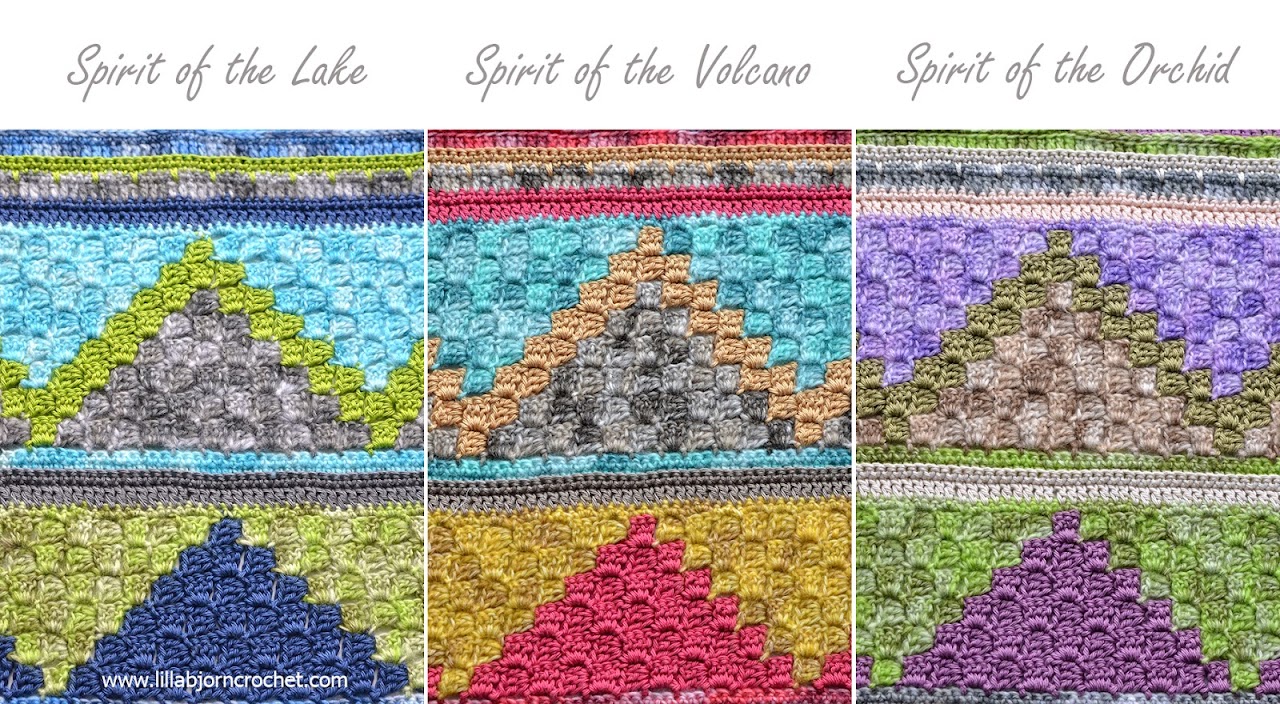
Part 5 (again) consists of two colorful C2C panels with dividers. I don’t want this blog post to be a long read, so please refer to Important Notes in Part 4, as they are the same for today’s part as well.
And here is a complete picture of how Part 5 should look in all three colorways.
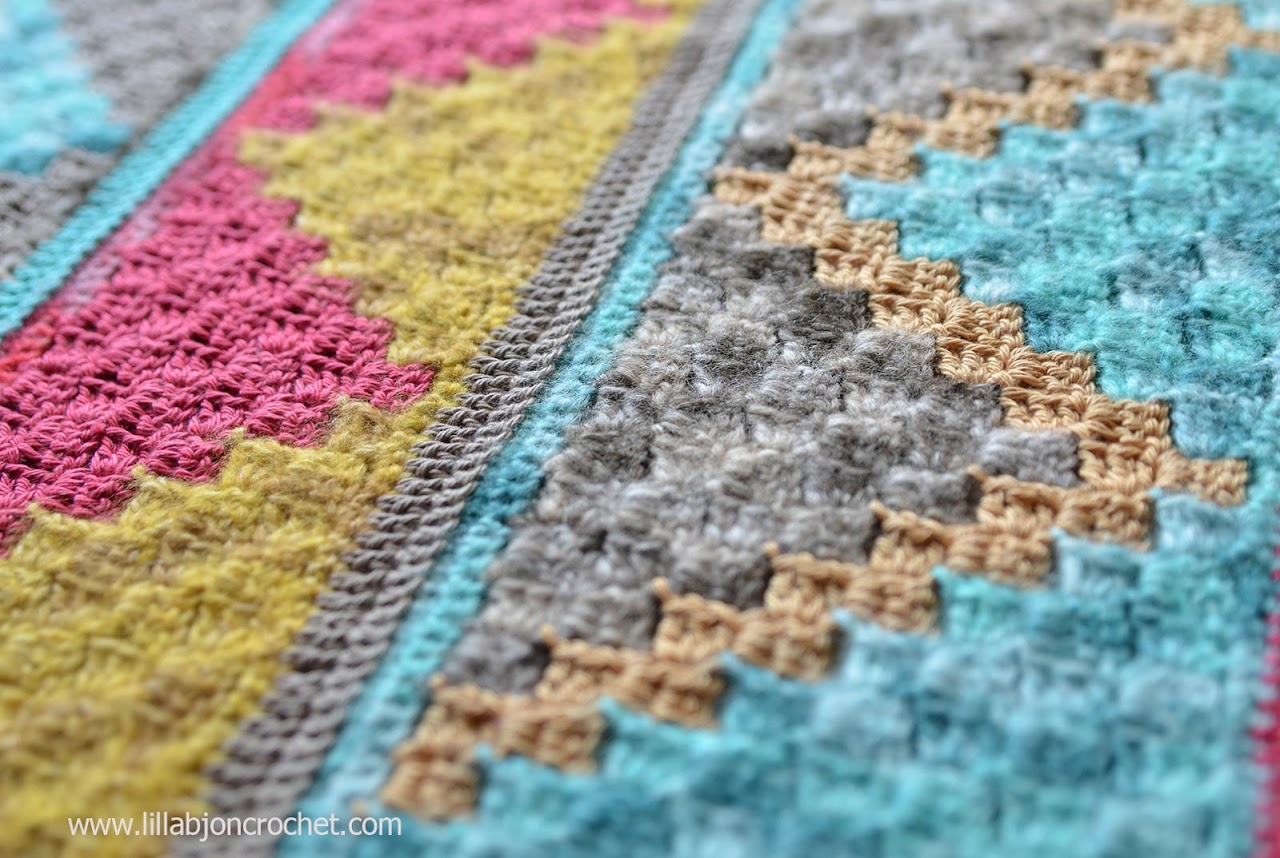
I am often asked what is the length of crocheted fabric after each new part is added. It is very easy to calculate: put together figures for each part (you will find them in written patterns). After Part 5 you wrap’s measurements should be approx.: 56cm/22in (width) and 116cm/45.7in (length).
Video for Part 5 comes in two bits again:
Subscribe to a newsletter not to miss a single post. You can also follow me on Facebook, Pinterest and Instagram.


If you missed previous parts of Spirits of Life CAL, please check General Information, Important Notes, Part 1, Part 2, Part 3 and Part 4.
I have a happy news for you. We are half through the CAL and since today all three crochet techniques will be repeated. But with different patterns, as I didn’t want you to be bored. Let’s take the second half of the CAL as examination in C2C, Mosaic and Overlay crochet. And I am sure, after your wrap is finished you will feel confident with your newly acquired crochet skills.

COPYRIGHT
IMPORTANT: Please, be aware that all my patterns (free or paid) are protected by copyright. You are not allowed to copy, reproduce, redistribute (online or off-line), sell and edit them in part or as a whole. You are welcome to sell your finished items made by my patterns, but you cannot use my pictures to promote them. Please, always credit me as the designer of these patterns. You are not allowed to share pdf-files created from my posts with anyone. If you would like more people to join my CAL – please, share a link to my blog with them. You can check Copyright page for more information.
Please, note, that some translations are being revised at the moment and will be added later. Thank you for understanding!
IMPORTANT: there was an error in yardages. For ORCHID: Yarn B=8-9g, Yarn G=15-16g
Part 5 - Afrikaans
Part 5 - Czech
Part 5 - Danish
Part 5 - Dutch
Part 5 - English (US)
Part 5 - English (UK)
Part 5 - Finnish
Part 5 - French
Part 5 - German
Part 5 - Hebrew
Part 5 - Norwegian
Part 5 - Polish
Part 5 - Portuguese
Part 5 - Spanish
Part 5 - Swedish
Part 5 - Russian
Part 5 (again) consists of two colorful C2C panels with dividers. I don’t want this blog post to be a long read, so please refer to Important Notes in Part 4, as they are the same for today’s part as well.
And here is a complete picture of how Part 5 should look in all three colorways.

I am often asked what is the length of crocheted fabric after each new part is added. It is very easy to calculate: put together figures for each part (you will find them in written patterns). After Part 5 you wrap’s measurements should be approx.: 56cm/22in (width) and 116cm/45.7in (length).

Video for Part 5 comes in two bits again:
- Spirits of Life CAL was sponsored by Scheepjes. There are still kits available for purchase (at the time of posting) at Wool Warehouse HERE (UK, international shipping) and Loveknitting HERE (US).
- You can join Official CCC Social group on Facebook which is an official host of Spirits of Life CAL. You will get all needed support and help there. You can also join my Ravelry group HERE and ask questions in CAL threads.
Subscribe to a newsletter not to miss a single post. You can also follow me on Facebook, Pinterest and Instagram.
You know what? I almost forgot it’s Wednesday today and I should publish Part 5 of the Peacock Tail Bag CAL for you. I checked my e-mail box in the morning and saw files with translations, and I almost had a heart attack! But luckily there were still 2 hours to prepare everything, so here it is!! If it’s first time you hear about this CAL – please, check general information HERE and also Part 1, Part 2, Part 3 and Part 4.

DISCLOSURE: This blog contains affiliate links. If you purchase a (any) product via a link on my blog, I get a small percentage contribution from the store which enables me to keep providing you with free patterns. It costs you nothing extra to visit the store via my link, but ensure I get the credit for the sale. Thank you for your support!
I have a good excuse for having bad memory though. Yesterday I returned from Sweden, where I spent almost 5 days – all of them sitting by the sea for long-long hours. Totally switched off. I thank you very much for support and lovely comments you gave me last week. They helped me a lot. Shortly after Part 4 was published, I packed my suitcase, left my husband with a kid and a dog and went to Malmö. You might know I have a very special relation with this place, and it already became a tradition to come there every year in late August-early September. I will for sure tell you more about my trip. But now it’s probably better to come back to the CAL.
Add this pattern to your Ravelry queue!
1. Yardages and Colors. Today’s part is final before the bag will be joined and put together. So after you finish Part 5 you will know exactly the size of your bag. If your gauge was off and you put back part aside for a while to see how much yarn in each shade will be left, now you can finish both front and back. You should have plenty of C4 and C6 left – and you will use it for the band next week.
2. Special techniques. You will work with short rows on this part – please, be careful when you count the stitches to place 1st stitch of every row correctly. You will attach new yarn by simply pulling a loop in indicated stitch and making ch1 (doesn’t count as a stitch). And each row will be finished with a slip stitch.Please, use “modified clusters” again. Tutorial is HERE.
3. Shape and “cupping”. On this part both your back and front will start “cupping” at the bottom. Don’t worry – this is on purpose: to shape the bag’s bottom nicely.
4. Wings and symmetry. You may have already noticed, that wings of you bag are not 100% symmetrical. I tried very hard to bring them to exactly the same shape. But because all the rows are worked on the right side, a turning effect appears, and it was very difficult to get rid of it, and to keep pattern symmetrical at the same time. After you finish part 5, please, try to block both parts to almost the same shape (so that they match nicely when put together with wrong sides). It will NOT work at 100%. But don’t worry. After the band is added, the shape should work itself out.
5. Social Media. Don't forget to share your creations on Instagram and Pinterest. Please use the tag #PeacockTailBagCAL.
Just a small remind. I am using Linen Soft yarn by Scheepjes and 2.75mm (С) Clover Soft Touch hook*. Linen Soft is available for purchase via Wool Warehouse HERE* (international shipping), Paradise Fibers (US) HERE* or in your local Scheepjes shop. Separate bag handles, magnetic clasps and D-rings are available via Wool Warehouse HERE*.
If you have any questions, please, check in Official CCC Social group on Facebook or in my Ravelry group.
IMPORTANT: Please, be aware that all my patterns (free or paid) are protected by copyright. You are not allowed to copy, reproduce, redistribute, sell and edit them in part or as a whole. You are welcome to sell your finished items made by my patterns, but you cannot use my pictures to promote them. Please, always credit me as the designer of these patterns. You are not allowed to share pdf-files created from my posts with anyone. If you would like more people to join my CAL – please, share a link to my blog with them. If you own a yarn store and would like to sell kits for this CAL - please, contact me for details. You can check Copyright page for more information.
English - US terms
English - UK terms
Afrikaans
Danish
Dutch
Finnish
French
German
Greek
Hebrew
Korean
Persian
Spanish
Swedish
VIDEO for this part was kindly recordered by wonderful Esther from It's All In A Nutshell. Please, see it in end of this post.
Abbreviations (US terms)
US standard abbreviations are used in this pattern. But if you are used to other terms, please check this Crochet Translation Project which might be helpful in translation to your language.
rnd round
st(s) stitch(es)
sl st slip stitch
ch chain
sp(s) space(s)
sc single crochet
hdc half double crochet
dc double crochet
tr4tog (modified) treble crochet 4 together cluster
FPtr front post treble crochet
FPtr2tog front post treble 2 together
yo yarn over
lp(s) loop(s)
sk skip st(s)
*…* *crochet following directions* as many times as indicated
************************************************************
Ch1 (doesn’t count as st here and to the end), sc in next 5 sts, hdc in next 4 sts, *FPtr2tog (work 1FPtr around each of 2 FPtr’s below), sk no sts, hdc in next 16 sts* 5 times, FPtr2tog (as previous), sk no sts, hdc in next 3 sts, sc in next 5 sts, sl st in next st; fasten off. (103 sts + ch1 + sl st)

Row 27. Change to yarn C5 (C9). Attach yarn in 5th st after ch1.
Note: as in previous parts, make “modified” tr4tog’s here and throughout.
Ch1, sc in next 4 sts, hdc in next st, *hdc in next 4 sts, tr4tog in 4th hdc of row 25 before next FPdtr, sk 1 st, hdc in next 3 sts, tr4tog in same FPdtr below, sk 1 st, hdc in next 3 sts, tr4tog in 4th hdc of row 25 after same FPdtr, sk 1 st, hdc in next 4 sts* 5 times, sc in next 5 sts, sl st in next st; fasten off. (95 sts + ch1 + sl st)
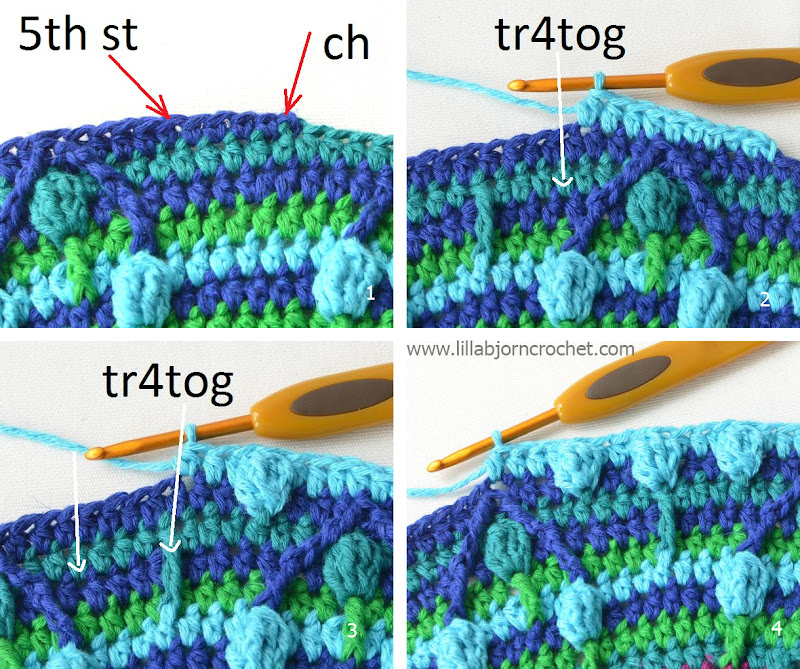
Row 28. Change to yarn C3 (C8). Attach yarn in 5th st after ch1.
Note: Each tr4tog of row 27 “hides” two hdc’s of previous row. Legs of FPtr2tog’s are made around hdc of row 26 lying to the right and to the left of tr4tog of row 27 below (but not around the hidden ones).
Ch1, sc in next 2 sts, hdc in next 3 sts, *[FPtr2tog, sk 1 st, hdc in next 3 sts] 3 times, 2hdc in next st, hdc in next 4 sts* 4 times, [FPtr2tog, sk 1 st, hdc in next 3 sts] 3 times, sc in next 2 sts, sl st in next st; fasten off. (91 sts + ch1+sl st)

Row 29. Change to yarn C2 (C7). Attach yarn in 4th st after ch1.
Ch1, sc in next 7 sts, hdc in next st, *hdc in next 14 sts, tr4tog in hdc of row 27 visible at the bottom of “V”, sk 1 st, hdc in next 2 sts, tr4tog (as previous), sk 1 st* 3 times, hdc in next 15 sts, sc in next 7 sts, sl st in next st; fasten off. (84sts+ch1+sl st)

Rnd 30. Change to yarn C3 (C8). Attach yarn in 14th st after ch1.
Note: legs of FPtr2tog’s are made around FPtr2tog’s of row 28 lying to the right and to the left of tr4tog of row 29 below.
Ch1, sc in next 4 sts, hdc in next 4 sts, FPtr2tog, sk 1 st, hdc in next 3 sts, FPtr2tog, sk 1 st, *hdc in next 13 sts, FPtr2tog, sk 1 st, hdc in next 3 sts, FPtr2tog, sk 1 st* twice, hdc in next 4 sts, sc in next 6 sts, sl st in next st. (59 sts+ch1+sl st)

Row 31. Change to yarn C1 (C6). Attach yarn in 5th st after ch1.
Ch1, sc in next 3 sts, hdc in next 2 sts, tr4tog in 1st of 2 sts of row 29 visible at the bottom of underlying “V”, sk 1 st, *hdc in next 17 sts, tr4tog (as previous), sk 1 st* twice, hdc in next 2 sts, sc in next 5 sts, sl st in next st; fasten off. (49 sts+ch1+sl st)

Row 32. Change to yarn C3 (C8). Attach yarn in 4th st after ch1.
Note: legs of FPtr2tog’s are made around FPtr2tog’s of row 30 lying to the right and to the left of tr4tog of row 31 below.
Ch1, sc in next 2 sts, FPtr2tog, sk 1 st, *sc in next 17 sts, FPtr2tog, sk 1 st* twice, sc in next 2 sts, sl st in next st; fasten off. (41sts+ch1+sl st)

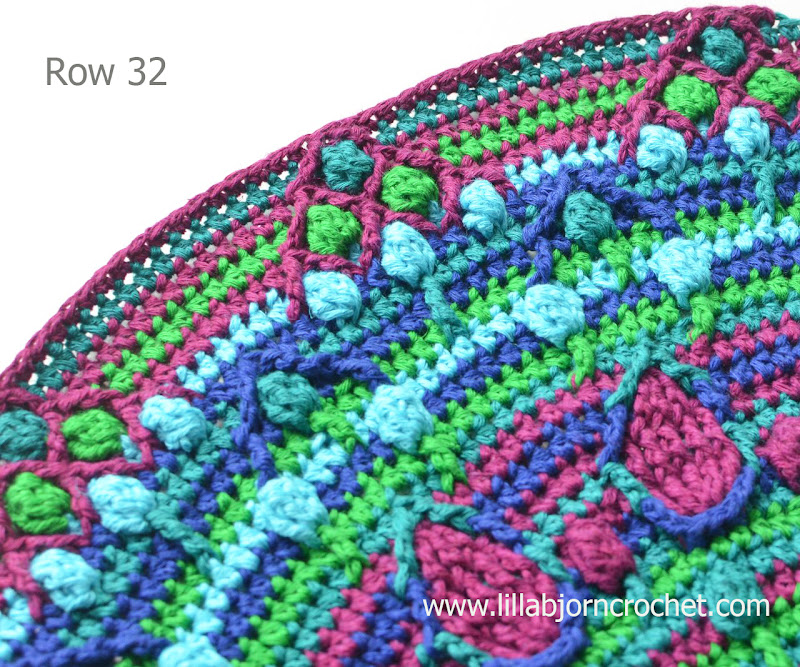
Row 33. Change to yarn C4 (C6). Begin with standing hdc in 1st hdc of row 25.
Note: always make hdc in the same st where yarn was attached, and next hdc in next sc – on one side. Make hdc in last sc of each row and then in the same st of previous row where sl st was made (placing hdc after sl st) – on the other side.
Hdc in 145 sts, fasten off. (145)
After this row your piece should measure 29cm (11 ½”) from top to bottom.
It may happen that your amount of stitches will differ a bit. This is not critical at all. You will only need to take it into consideration while joining front and back parts together. And if the number of stitches differs on both parts – you will need to make several decreases evenly.

Please, try to keep the same gauge as for front. Check measurements after row 33.
On this and all next rows new yarn is attached by simply pulling a loop into indicated st.
Row 26. Change to yarn C1 (C9). Start in 19th st!
Ch1, sc in next 5 sts, *hdc in next 2 sts, 2hdc in next st, hdc in next 13 sts*, 5 times, hdc in next 2 sts, 2hdc in next st, hdc in next 4 sts, sc in next 5 sts, sl st in next st, fasten off. (103 sts + ch1 + sl st )
Row 27. Change to yarn C3 (C8). Start in 3rd st after ch1!
Ch1, sc in next 5 sts, hdc in next 86 sts, sc in next 4 sts, sl st in next st, fasten off. (95 sts + ch1 + sl st)
Row 28. Change to yarn C4 (C9). Start in 3rd st after ch1!
Ch1, sc in next 3 sts, hdc in next 14 sts, *hdc in next st, 2hdc in next st, hdc in next 15 sts* 4 times, sc in next 2 sts, sl st in next st, fasten off. (91 sts + ch1 + sl st)
Row 29. Change to yarn C2 (C7). Start in 3rd st after ch1!
Ch1, sc in next 7 sts, hdc in next 70 sts, sc in next 7 sts, sl st in next st, fasten off. (84 sts + ch1 + sl st)
Row 30. Change to yarn C1 (C9). Start in 11th st after ch1!
Ch1, sc in next 6 sts, hdc in next 49 sts, sc in next 4 sts, sl st in next st, fasten off. (59 sts + ch1 + sl st)
Row 31. Change to yarn C3 (C8). Start in 5th st after ch1!
Ch1, sc in next 5 sts, hdc in next 41 sts, sc in next 3 sts, sl st in next st, fasten off. (49 sts + ch1 + sl st)
Row 32. Change to yarn C2 (C9). Start in 4th st after ch1!
Ch1, sc in next 41 sts, sl st in next st, fasten off. (41 sts + ch1 + sl st )
Rnd 33. Same as front! Don’t fasten off!
Block front and back parts to the same size (and possibly shape). Wings are not completely symmetrical, but the band will ease things into place. Part 6 is available HERE.
And here are video's made by Esther from It's All In A Nutshell.
Front:
and Back:
You can subscribe to a newsletter not to miss a single post. You can also follow me on Facebook, Pinterest and Instagram.

DISCLOSURE: This blog contains affiliate links. If you purchase a (any) product via a link on my blog, I get a small percentage contribution from the store which enables me to keep providing you with free patterns. It costs you nothing extra to visit the store via my link, but ensure I get the credit for the sale. Thank you for your support!
I have a good excuse for having bad memory though. Yesterday I returned from Sweden, where I spent almost 5 days – all of them sitting by the sea for long-long hours. Totally switched off. I thank you very much for support and lovely comments you gave me last week. They helped me a lot. Shortly after Part 4 was published, I packed my suitcase, left my husband with a kid and a dog and went to Malmö. You might know I have a very special relation with this place, and it already became a tradition to come there every year in late August-early September. I will for sure tell you more about my trip. But now it’s probably better to come back to the CAL.
Add this pattern to your Ravelry queue!
Important Notes
1. Yardages and Colors. Today’s part is final before the bag will be joined and put together. So after you finish Part 5 you will know exactly the size of your bag. If your gauge was off and you put back part aside for a while to see how much yarn in each shade will be left, now you can finish both front and back. You should have plenty of C4 and C6 left – and you will use it for the band next week.
2. Special techniques. You will work with short rows on this part – please, be careful when you count the stitches to place 1st stitch of every row correctly. You will attach new yarn by simply pulling a loop in indicated stitch and making ch1 (doesn’t count as a stitch). And each row will be finished with a slip stitch.Please, use “modified clusters” again. Tutorial is HERE.
3. Shape and “cupping”. On this part both your back and front will start “cupping” at the bottom. Don’t worry – this is on purpose: to shape the bag’s bottom nicely.
4. Wings and symmetry. You may have already noticed, that wings of you bag are not 100% symmetrical. I tried very hard to bring them to exactly the same shape. But because all the rows are worked on the right side, a turning effect appears, and it was very difficult to get rid of it, and to keep pattern symmetrical at the same time. After you finish part 5, please, try to block both parts to almost the same shape (so that they match nicely when put together with wrong sides). It will NOT work at 100%. But don’t worry. After the band is added, the shape should work itself out.
5. Social Media. Don't forget to share your creations on Instagram and Pinterest. Please use the tag #PeacockTailBagCAL.
Just a small remind. I am using Linen Soft yarn by Scheepjes and 2.75mm (С) Clover Soft Touch hook*. Linen Soft is available for purchase via Wool Warehouse HERE* (international shipping), Paradise Fibers (US) HERE* or in your local Scheepjes shop. Separate bag handles, magnetic clasps and D-rings are available via Wool Warehouse HERE*.
If you have any questions, please, check in Official CCC Social group on Facebook or in my Ravelry group.
COPYRIGHT
IMPORTANT: Please, be aware that all my patterns (free or paid) are protected by copyright. You are not allowed to copy, reproduce, redistribute, sell and edit them in part or as a whole. You are welcome to sell your finished items made by my patterns, but you cannot use my pictures to promote them. Please, always credit me as the designer of these patterns. You are not allowed to share pdf-files created from my posts with anyone. If you would like more people to join my CAL – please, share a link to my blog with them. If you own a yarn store and would like to sell kits for this CAL - please, contact me for details. You can check Copyright page for more information.
INSTRUCTIONS: PART5
Edit: some translations are not ready at the moment. they will be added in next days or even hours. Sorry for delay. the files are in proof-read at the moment.
English - US terms
English - UK terms
Afrikaans
Danish
Dutch
Finnish
French
German
Greek
Hebrew
Korean
Persian
Spanish
Swedish
VIDEO for this part was kindly recordered by wonderful Esther from It's All In A Nutshell. Please, see it in end of this post.
Abbreviations (US terms)
US standard abbreviations are used in this pattern. But if you are used to other terms, please check this Crochet Translation Project which might be helpful in translation to your language.
rnd round
st(s) stitch(es)
sl st slip stitch
ch chain
sp(s) space(s)
sc single crochet
hdc half double crochet
dc double crochet
tr4tog (modified) treble crochet 4 together cluster
FPtr front post treble crochet
FPtr2tog front post treble 2 together
yo yarn over
lp(s) loop(s)
sk skip st(s)
*…* *crochet following directions* as many times as indicated
************************************************************
FRONT PART
Row 26. Change to yarn C4 (C6). Attach yarn in 18th st.
Ch1 (doesn’t count as st here and to the end), sc in next 5 sts, hdc in next 4 sts, *FPtr2tog (work 1FPtr around each of 2 FPtr’s below), sk no sts, hdc in next 16 sts* 5 times, FPtr2tog (as previous), sk no sts, hdc in next 3 sts, sc in next 5 sts, sl st in next st; fasten off. (103 sts + ch1 + sl st)

Row 27. Change to yarn C5 (C9). Attach yarn in 5th st after ch1.
Note: as in previous parts, make “modified” tr4tog’s here and throughout.
Ch1, sc in next 4 sts, hdc in next st, *hdc in next 4 sts, tr4tog in 4th hdc of row 25 before next FPdtr, sk 1 st, hdc in next 3 sts, tr4tog in same FPdtr below, sk 1 st, hdc in next 3 sts, tr4tog in 4th hdc of row 25 after same FPdtr, sk 1 st, hdc in next 4 sts* 5 times, sc in next 5 sts, sl st in next st; fasten off. (95 sts + ch1 + sl st)

Row 28. Change to yarn C3 (C8). Attach yarn in 5th st after ch1.
Note: Each tr4tog of row 27 “hides” two hdc’s of previous row. Legs of FPtr2tog’s are made around hdc of row 26 lying to the right and to the left of tr4tog of row 27 below (but not around the hidden ones).
Ch1, sc in next 2 sts, hdc in next 3 sts, *[FPtr2tog, sk 1 st, hdc in next 3 sts] 3 times, 2hdc in next st, hdc in next 4 sts* 4 times, [FPtr2tog, sk 1 st, hdc in next 3 sts] 3 times, sc in next 2 sts, sl st in next st; fasten off. (91 sts + ch1+sl st)

Row 29. Change to yarn C2 (C7). Attach yarn in 4th st after ch1.
Ch1, sc in next 7 sts, hdc in next st, *hdc in next 14 sts, tr4tog in hdc of row 27 visible at the bottom of “V”, sk 1 st, hdc in next 2 sts, tr4tog (as previous), sk 1 st* 3 times, hdc in next 15 sts, sc in next 7 sts, sl st in next st; fasten off. (84sts+ch1+sl st)

Rnd 30. Change to yarn C3 (C8). Attach yarn in 14th st after ch1.
Note: legs of FPtr2tog’s are made around FPtr2tog’s of row 28 lying to the right and to the left of tr4tog of row 29 below.
Ch1, sc in next 4 sts, hdc in next 4 sts, FPtr2tog, sk 1 st, hdc in next 3 sts, FPtr2tog, sk 1 st, *hdc in next 13 sts, FPtr2tog, sk 1 st, hdc in next 3 sts, FPtr2tog, sk 1 st* twice, hdc in next 4 sts, sc in next 6 sts, sl st in next st. (59 sts+ch1+sl st)

Row 31. Change to yarn C1 (C6). Attach yarn in 5th st after ch1.
Ch1, sc in next 3 sts, hdc in next 2 sts, tr4tog in 1st of 2 sts of row 29 visible at the bottom of underlying “V”, sk 1 st, *hdc in next 17 sts, tr4tog (as previous), sk 1 st* twice, hdc in next 2 sts, sc in next 5 sts, sl st in next st; fasten off. (49 sts+ch1+sl st)

Row 32. Change to yarn C3 (C8). Attach yarn in 4th st after ch1.
Note: legs of FPtr2tog’s are made around FPtr2tog’s of row 30 lying to the right and to the left of tr4tog of row 31 below.
Ch1, sc in next 2 sts, FPtr2tog, sk 1 st, *sc in next 17 sts, FPtr2tog, sk 1 st* twice, sc in next 2 sts, sl st in next st; fasten off. (41sts+ch1+sl st)


Row 33. Change to yarn C4 (C6). Begin with standing hdc in 1st hdc of row 25.
Note: always make hdc in the same st where yarn was attached, and next hdc in next sc – on one side. Make hdc in last sc of each row and then in the same st of previous row where sl st was made (placing hdc after sl st) – on the other side.
Hdc in 145 sts, fasten off. (145)
After this row your piece should measure 29cm (11 ½”) from top to bottom.
It may happen that your amount of stitches will differ a bit. This is not critical at all. You will only need to take it into consideration while joining front and back parts together. And if the number of stitches differs on both parts – you will need to make several decreases evenly.

Back Part
Please, try to keep the same gauge as for front. Check measurements after row 33.
On this and all next rows new yarn is attached by simply pulling a loop into indicated st.
Row 26. Change to yarn C1 (C9). Start in 19th st!
Ch1, sc in next 5 sts, *hdc in next 2 sts, 2hdc in next st, hdc in next 13 sts*, 5 times, hdc in next 2 sts, 2hdc in next st, hdc in next 4 sts, sc in next 5 sts, sl st in next st, fasten off. (103 sts + ch1 + sl st )
Row 27. Change to yarn C3 (C8). Start in 3rd st after ch1!
Ch1, sc in next 5 sts, hdc in next 86 sts, sc in next 4 sts, sl st in next st, fasten off. (95 sts + ch1 + sl st)
Row 28. Change to yarn C4 (C9). Start in 3rd st after ch1!
Ch1, sc in next 3 sts, hdc in next 14 sts, *hdc in next st, 2hdc in next st, hdc in next 15 sts* 4 times, sc in next 2 sts, sl st in next st, fasten off. (91 sts + ch1 + sl st)
Row 29. Change to yarn C2 (C7). Start in 3rd st after ch1!
Ch1, sc in next 7 sts, hdc in next 70 sts, sc in next 7 sts, sl st in next st, fasten off. (84 sts + ch1 + sl st)
Row 30. Change to yarn C1 (C9). Start in 11th st after ch1!
Ch1, sc in next 6 sts, hdc in next 49 sts, sc in next 4 sts, sl st in next st, fasten off. (59 sts + ch1 + sl st)
Row 31. Change to yarn C3 (C8). Start in 5th st after ch1!
Ch1, sc in next 5 sts, hdc in next 41 sts, sc in next 3 sts, sl st in next st, fasten off. (49 sts + ch1 + sl st)
Row 32. Change to yarn C2 (C9). Start in 4th st after ch1!
Ch1, sc in next 41 sts, sl st in next st, fasten off. (41 sts + ch1 + sl st )
Rnd 33. Same as front! Don’t fasten off!
Block front and back parts to the same size (and possibly shape). Wings are not completely symmetrical, but the band will ease things into place. Part 6 is available HERE.
And here are video's made by Esther from It's All In A Nutshell.
Front:
and Back:
You can subscribe to a newsletter not to miss a single post. You can also follow me on Facebook, Pinterest and Instagram.
Subscribe to:
Posts (Atom)


